Monthly Archives: June 2016

Assert Mockito mock method arguments if no equals() method implemented

Last Updated on by

Post summary: How to assert mock method is called with the specific object as an argument in case no equals() method is implemented on argument object.

Mock JUnit tests with Mockito example post introduces Mockito as Java mocking framework. The code shown in examples below is available in GitHub java-samples/junit repository. Mockito makes it possible to verify whether a mock method has been called and with what specific object:

verify(locatorServiceMock, times(1)).geoLocate(new Point(1, 1));

The code above verifies that mock’s geoLocate() method was called with argument object with coordinates (1, 1).

Missing equals() method

Internally Mockito uses Point class’s equals() method to compare object that has been passed to the method as an argument with object configured as expected in verify() method. If equals() is not overridden then java.lang.Object’s equals() is used which compares only the references, i.e. if both variables point to one and the same object in heap. In the current example, Point class has no equals() method implemented. When providing expected a new object is created, references are not one and the same, so Mockito will fail the verification.

Override equals()

In order to make verification works simplest solution is to implement equals() method in Point class. Personally, I’m not a big fan of changing production code for sake of testing. Maybe there is a valid reason for a developer to have designed current class in such manner. A more realistic scenario is that Point class comes from some external library which there is no control over, so overriding equals() method is not possible at all.

Use Mockito argThat matcher

Mockito provides a method called argThat() in org.mockito.Matchers class. It accepts an object from the class that implements org.hamcrest.Matcher<T> interface. Actual equals implementation is done in its matches() method:

private class PointMatcher extends ArgumentMatcher<Point> {
	private final Point expected;

	public PointMatcher(Point expected) {
		this.expected = expected;
	}

	@Override
	public boolean matches(Object obj) {
		if (!(obj instanceof Point)) {
			return false;
		}
		Point actual = (Point) obj;

		return actual.getX() == expected.getX()
			&& actual.getY() == expected.getY();
	}
}

Once implemented this class can be used in tests:

verify(locatorServiceMock, times(1))
	.geoLocate(argThat(new PointMatcher(new Point(1, 1))));

Conclusion

In examples above is shown how to implement or change equals() method behavior for a specific class in unit tests so that Mockito can verify object from this class is provided as an argument for mock’s method call.

Related Posts

Read more...

Mock JUnit tests with Mockito example

Last Updated on by

Post summary: Why mocking is needed in unit testing and how to do it with Mockito.

Unit testing

By definition, unit testing is a process in which the smallest testable parts of an application, called units, are individually and independently tested for proper operation. Smallest testable unit in Java is a method. Public methods are the only one exposed to outside world, so only they are subject to unit testing.

Mocking

Unit tests focus on a particular piece of code that needs to be exercised. In most of the cases, this code relies on external dependencies. Those dependencies have to be controlled, so only code under test is exercised. Removing dependencies is done with a test double. Test doubles are objects that look and behave like their release-intended counterparts but are actually simplified versions of them which reduce the complexity and facilitate testing. Test doubles are fakes, stubs, and mocks.

Mockito

Mockito is the most famous mocking framework for Java. It provides all mocking features needed for proper unit testing, except mocking of static methods. Static methods can be mocked with PowerMock. It is a Mockito’s wrapper that provides same API plus static method mocking and other features. In PowerMock examples and why better not to use them post, I have shown how to use PowerMock and its features.

Example class for unit test

Code shown in examples below is available in GitHub java-samples/junit repository. We are going to unit test a class called Locator that internally uses another class LocatorService:

public class Locator {

	private final LocatorService locatorService;

	public Locator(LocatorService locatorService) {
		this.locatorService = locatorService;
	}

	public Point locate(int x, int y) {
		if (x < 0 || y < 0) {
			return new Point(Math.abs(x), Math.abs(y));
		} else {
			return locatorService.geoLocate(new Point(x, y));
		}
	}
}

The example above is pretty simple. If we pass point with some negative coordinates method locate() returns point with positive coordinates. If coordinates are positive then search via LocatorService is done. This class represents some external API that our code is calling. Since there is no control over this API and internal structure is not know it should be mocked in the unit tests. As stated above unit tests are focused on a specific piece of code, a unit.

Initialising a mock

As described in Mockito’s documentation a way to mock some object is: List mockedList = mock(List.class); Another way, that is used in current examples is to annotate the filed that is going to be mocked with @Mock and annotate JUnit test class with @RunWith(MockitoJUnitRunner.class). In this way Mockito runner does the initialization behind the scenes:

@RunWith(MockitoJUnitRunner.class)
public class LocatorTest {

	@Mock
	private LocatorService locatorServiceMock;
}

Control mock’s behavior

The whole idea of having a mock is to be able to control its behavior. If mock is called it should respond in a predictable manner. This is done with when() method:

when(locatorServiceMock.geoLocate(any(Point.class)))
	.thenReturn(new Point(11, 11)); 

When mock’s geoLocate() method is being called with any given point object it always returns new Point with coordinates X=11 and Y=11. If this is not enough, more elaborate scenarios can be used:

when(locatorServiceMock.geoLocate(new Point(5, 5))).thenReturn(new Point(50, 50));
when(locatorServiceMock.geoLocate(new Point(1, 1))).thenReturn(new Point(11, 11));

If locator class is called with a point with coordinates (5, 5) then new point with coordinates (50, 50) is returned. If mock is called with a point with coordinates (1, 1) then point with (11, 11) is returned. In any other cases, null is returned by default.

Nota bene: in order to work properly object used to call the mocked method (Point is the current example) should have properly implemented equals() method otherwise java.lang.Object‘s equals() method is used, which just compared the references. Examples above will not work, as Point doesn’t have equals() method properly overridden.

Depending on tests that have to be conducted more precise control over mock’s response could be needed. This is done with thenAnswer() mock’s method:

when(locatorServiceMock.geoLocate(any(Point.class)))
	.thenAnswer(new Answer<Point>() {
		@Override
		public Point answer(InvocationOnMock invocationOnMock) throws Throwable {
			Object[] args = invocationOnMock.getArguments();
			Point caller = (Point) args[0];
			
			if (caller.getX() == 5 && caller.getY() == 5) {
				return new Point(50, 50);
			} else if (caller.getX() == 1 && caller.getY() == 1) {
				return new Point(11, 11);
			} else {
				return null;
			}
		}
	});

Call to invocationOnMock.getArguments() returns array with arguments that mock’s geoLocate() method was called with. In the current example, it is only one argument from type Point, so it is cast and saved to new Point object inside caller variable. If coordinates are (5, 5) then new point with coordinates (50, 50) are returned. If coordinates on input are (1, 1) then new point (11, 11) is returned. In all other cases, null is returned.

Verify mock was interacted with

In order to verify execution path is correct, Mockito provides a way to check if a certain method on the mock has been called and how many times. This is done with verify() method. To confirm no more methods are called on this specific mock instance then verifyNoMoreInteractions() is used:

verify(locatorServiceMock, times(1)).geoLocate(new Point(1, 1));

verifyNoMoreInteractions(locatorServiceMock);

The example above verifies that mock’s geoLocate() method was called with a specific point with coordinates (1, 1). If it is not important which object is passed to the method then any(Point.class) can be used.

Nota bene: the example above will not work as there is no equals() method implemented on point class, so Mockito is using java.lang.Object’s equals() method by default that compares only the references. Point class is intentionally left without equals method to demonstrate how such situations can be solved. How to solve this obstacle is shown in Assert Mockito mock method arguments if no equals() method implemented post.

Putting it all together

All snippets above are put together is one simple unit test that covers all the possible paths for Locator’s locate() method, but obviously not all the test conditions:

import org.junit.Before;
import org.junit.Test;
import org.junit.runner.RunWith;
import org.mockito.Mock;
import org.mockito.runners.MockitoJUnitRunner;

import static org.junit.Assert.assertEquals;
import static org.junit.Assert.assertTrue;
import static org.mockito.Matchers.any;
import static org.mockito.Mockito.when;

@RunWith(MockitoJUnitRunner.class)
public class LocatorTest {

	private static final Point TEST_POINT = new Point(11, 11);

	@Mock
	private LocatorService locatorServiceMock;

	private Locator locatorUnderTest;

	@Before
	public void setUp() {
		when(locatorServiceMock.geoLocate(any(Point.class)))
			.thenReturn(TEST_POINT);

		locatorUnderTest = new Locator(locatorServiceMock);
	}

	@Test
	public void testLocateWithServiceResult() {
		assertEquals(TEST_POINT, locatorUnderTest.locate(1, 1));
	}

	@Test
	public void testLocateLocalResult() {
		Point expected = new Point(1, 1);
		assertTrue(arePointsEqual(expected, locatorUnderTest.locate(-1, -1)));
	}

	private boolean arePointsEqual(Point p1, Point p2) {
		return p1.getX() == p2.getX()
			&& p1.getY() == p2.getY();
	}
}

When locatorServiceMock is called with any then TEST_POINT is returned. No matter that Point has no equals() method defined, assertEquals() in testLocateWithServiceResult() passes because code refers one and the same object. Helper method arePointsEqual() is needed in testLocateLocalResult() though. Code coverage report in IntelliJ IDEA is:
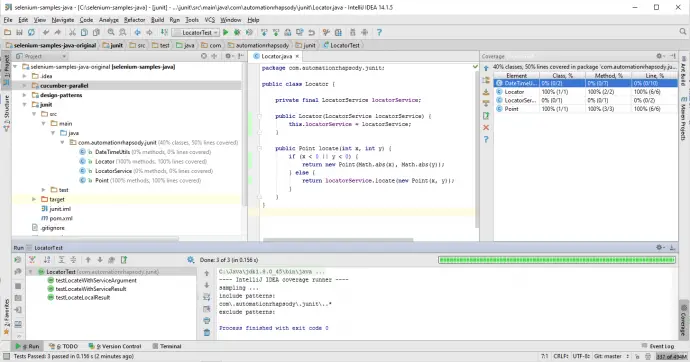
Mockito-JUnit-results

Optimise

Next step is to improve test coverage by adding more unit tests. Copy/paste is not an option, so in post Data driven testing with JUnit parameterized tests I have described how to make data-driven tests in JUnit.

Conclusion

Mocking is mandatory when developing unit tests. Mockito is a convenient mocking library for Java. It is possible to control what mock returns if called with whatever value or if called with a specific value. Mockito allows verification on which of mock’s methods has been called and how many times.

Related Posts

Read more...

Avoid multithreading problems in Java using ThreadLocal

Last Updated on by

Post summary: What are common approaches to deal with multithreading problems in Java. What is ThreadLocal and how to use it.

Multithreading problems

By definition, multithreading is the ability of CPU to execute multiple processes and threads. Almost every application nowadays is multithreaded. This allows programs to be faster and handler more users, programs have a more complex design. Multithreading causes race conditions (performing many operations at the same time on one resource) and deadlocks (competitive actions wait for each other to finish).

Multithreading problem

See code snippet below. This is a simple utility class that converts Date to String. When functional or unit tests are executed on it there are no issues, since in most cases those are single threaded. When a performance test is run program will burst into flames. Problem is that SimpleDateFormat is not thread-safe. Java 8 date objects are thread safe as they are immutable, but Java 7 below are not:

import java.text.SimpleDateFormat;
import java.util.Date;
import java.util.Locale;

public final class DateTimeUtils {

	private static final SimpleDateFormat DATE_FORMAT
			= new SimpleDateFormat("yyyy-MM-dd", Locale.ENGLISH);

	private DateTimeUtils() {
		// Util class
	}

	public static String toDateString(Date date) {
		return DATE_FORMAT.format(date);
	}
}

Avoid multithreading problems

Debugging multithreading problems is really hard. During debug, there are no race conditions and program works correctly. The program can even work correctly with a small number of users. One clue for multithreading problems is NullPointerException in places in a code where it is impossible to have such. Prevention is better than debugging. Prevention suggests proper design. Below is a list of approaches how to prevent and avoid multithreading issues:

  • Immutable objects
  • Defensive copies
  • Synchronized
  • Volatile
  • Atomic operations
  • ThreadLocal

Immutable objects

Immutable means something that cannot change. Values in such objects are initialized once and never changed, just read. Date objects in Java 8 are immutable which makes them safe to use. Object below is an example of immutable one:

public class Immutable {

	private String name;

	public Immutable(String name) {
		this.name = name;
	}

	public String getName() {
		return name;
	}
}

Going back to the initial problem with DateTimeUtils one solution could be to always create new SimpleDateFormat object:

public static String toDateString(Date date) {
	return new SimpleDateFormat("yyyy-MM-dd", Locale.ENGLISH).format(date);
}

Defensive copies

Immutable objects are really simple and their fields should be primitive data types, which is not always possible. If some field is an object (List) then the getter will return a copy of the reference to this object, but the actual object can be still manipulated in heap. In such cases defensive copies are returned:

import java.util.ArrayList;
import java.util.Collections;
import java.util.List;

public class Immutable {

	private String name;
	private List<String> hobbies;

	public Immutable(String name, String... hobbies) {
		this.name = name;
		this.hobbies = new ArrayList<>();
		Collections.addAll(this.hobbies, hobbies);
	}

	public String getName() {
		return name;
	}

	public List<String> getHobbies() {
		return new ArrayList<>(hobbies);
	}
}

The example here works as ArrayList is from String. If it was from some Object only references would be copied from one list to other, again real object would be available in heap, so deep copy of the Object data is also needed. Copy should drill down to the primitive types.

Synchronized

Synchronized methods cannot be accessed from two thread at the same time. One thread can access the synchronized object method, others are blocked and wait. Another solution to DateTimeUtils problem could be using synchronized:

private static final SimpleDateFormat DATE_FORMAT
            = new SimpleDateFormat("yyyy-MM-dd", Locale.ENGLISH);

public static synchronized String toDateString(Date date) {
	return DATE_FORMAT.format(date);
}

Theoretically, this should work and when testing locally it does, but I’ve seen this solution not working in real life application, so I would not go for synchronized in given problem context.

Volatile

Volatile means that variable is stored in main memory. I would not go into details about this solution. It is pretty complex and has unexpected problems.

Atomic operations

The Java language specification guarantees that reading or writing a variable is an atomic operation (unless the variable is of type long or double because of some CPU architecture specifics). For example, i++ is not an atomic operation, it consists of two operations – read the value and add 1 to it. In order to be sure you use atomic operations on variables, Java provides a whole package with atomic objects java.util.concurrent.atomic. Objects have methods like getAndSet(), getAndIncrement() and getAndDecrement() which ensure thread safety.

ThreadLocal

This was the topic initially blog post was about, but with the research, it got little extended. This class provides thread-local variables or in other words variables that are actually different for each and every thread. It is little strange because declaration suggests this is one variable but Java makes copies behind the scenes. There is also InheritableThreadLocal which means the variable is different for other threads, but one and the same for the current thread and its sub-threads. This could also lead to multithreading problems if you mess the thread-local object from the sub-threads. The third solution to DateTimeUtils problem could be:

private static final ThreadLocal<SimpleDateFormat> DATE_FORMAT
		= new ThreadLocal<SimpleDateFormat>() {
	@Override
	protected SimpleDateFormat initialValue() {
		return new SimpleDateFormat("yyyy-MM-dd", Locale.ENGLISH);
	}
};

public static String toDateString(Date date) {
	return DATE_FORMAT.get().format(date);
}

Or using new Java 8 lambda expressions code will look as below. More on Java 8 features can be found in Java 8 features – Lambda expressions, Interface changes, Stream API, DateTime API post.

private static final ThreadLocal<SimpleDateFormat> DATE_FORMAT_SAFE = ThreadLocal
	.withInitial(() -> new SimpleDateFormat("yyyy-MM-dd", Locale.ENGLISH));

public static String toDateString(Date date) {
	return DATE_FORMAT.get().format(date);
}

Comparison of solutions to multithreading problem

I have given three solutions to DateTimeUtils multithreading problem. Code shown above is available in GitHub java-samples/junit repository. There is unit test DateTimeUtilsTest which is run in multithreading mode with Maven Surefire Plugin and tests the solutions. 10 tests are run in 10 separate threads. Each test makes 1000 invocations of toDateString() method with unique date. Java 8 LocalDate is used in tests to confirm thread safety. Here are thoughts and time for different solutions:

  • synchronized (toDateStringSynchronized) – time to execute tests is 0.091 – 0.101s. I would not go for this solution as I stated above I’ve seen it not working in real life application. Also just theoretically since threads have to wait on each other performance will suffer.
  • new object on each method call (toDateStringNewObject) – time to execute tests is 0.114 – 0.124s. Object creation could be expensive operation. In this case there are 10000 objects created, compared to 1 in synchronized version and 10 in ThreadLocal version.
  • ThreadLocal (toDateStringThreadLocal) – time to execute tests is 0.75 – 0.82s. This is my favourite. There is no wait on threads and very low amount of objects are created.

Observations above are valid for given multithreading problem, not a general rule. Everything is up to the problem that needs to be solved.

Conclusion

Multithreading is a very advanced topic. In this post, I have just given some overview and examples that could be easily applied in automation code. I would encourage you to use ThreadLocal to prevent multithreading problems. In production code, things could be much more complex. Very good tutorial on multithreading can be found in Java Concurrency / Multithreading Tutorial.

Related Posts

Read more...

JUnit methods execution sequence

Last Updated on by

Post summary: Details with code samples on JUnit methods execution sequence.

In order to be effective in your unit tests, you need to know in details how JUnit works. In this post, I’ll show what is the execution sequence in one JUnit test. The code shown in the current post is available on GitHub java-samples/junit repository.

JUnit execution sequence

Methods that are used in a JUnit test:

  • Methods annotated with @Before and @After – those are public void methods that do some specific setup/teardown before and after a test method. Generally, it is good to have just one @Before and @After method, but JUnit allows as much as you have. Execution sequence with the same annotation is in order of appearance in the file.
  • Methods annotated with @BeforeClass and @AfterClass – those public static void methods which do some setup/teardown just once before and after all tests have started/passed. An also good idea to have just one of each, but in case of more with the same annotation, they are executed in order of appearance.
  • Methods annotated with @Test – those are public void methods with actual tests logic and asserts. Generally, there should be many test methods in a class. Default JUnit execution order is by name ascending. Still, this is not always guaranteed. Although bad practice to have a sequence of unit tests this can be done by annotating your test class with @FixMethodOrder(MethodSorters.NAME_ASCENDING).
  • Test class constructor – each and every test method is run in its own object instance, so constructor is run on instantiation. It is not very good practice to do something in test class constructor. Setup should be done in a @Before method.

Order of differently annotated methods does not depend on where they are put in the file but depends on types of annotations. Order of methods with one and the same annotations is described above. Here is the output of ExecutionSequenceTest:

@BeforeClass

	TestClass constructor
	@Before
	test1 body
	@After

	TestClass constructor
	@Before
	test2 body
	@After

	TestClass constructor
	@Before
	test3 body
	@After

@AfterClass

JUnit execution sequence with rules

In Use JUnit rules to debug failed API tests post, I have described rules and how they work. TestWatcher gives access to tests results when the test starts and finishes. The example here is with @Rule and @ClassRule annotated objects from a custom PrintSequenceRule class extending TestWatcher class. Along with methods described in the previous section, there are several that come into play when rules are involved:

  • starting() and finished() – methods come from TestWatcher class and are run on start/finish of class/method.
  • succeeded(), failed() or skipped() – one of this is executed based on class method result.
  • Rule constructor – it is not recommended to use something in rule constructor.

Output of ExecutionSequenceRulesTest class is:

RuleClass constructor
starting() of TestClass
@BeforeClass

	RuleClass constructor
	TestClass constructor
	starting() of TestMethod test1()
	@Before
	test1 body
	@After
	succeeded() of TestMethod test1()
	finished() of TestMethod test1()

	RuleClass constructor
	TestClass constructor
	starting() of TestMethod test2()
	@Before
	test2 body
	@After
	succeeded() of TestMethod test2()
	finished() of TestMethod test2()

	RuleClass constructor
	TestClass constructor
	starting() of TestMethod test3()
	@Before
	test3 body
	@After
	succeeded() of TestMethod test3()
	finished() of TestMethod test3()

@AfterClass
succeeded() of TestClass
finished() of TestClass

Conclusion

In order to design your tests correctly, it is good to know what is JUnit methods execution order. @Before/@After methods are executed before/after each test method. @BeforeClass/@AfterClass are executed just once per test class on its start and end. Rules provide a capability of extending the standard functionality. It is possible to use @Rule for each test method or @ClassRule for the whole test class.

Read more...

Retry JUnit failed tests immediately

Last Updated on by

Post summary: How to retry failed JUnit tests immediately and if a retry is OK then report test as passed.

Approaches

There are mainly three approaches to make JUnit retry failed tests.

  • Maven Surefire or Failsafe plugins – follow plugin name links for more details how to use and configure plugins
  • JUnit rules – code listed in the current post can be used as a rule. See more for rules in Use JUnit rules to debug failed API tests post. Problem is @Rule annotation works for test methods only. In order to have retry logic in @BeforeClass then the @ClassRule object should be instantiated.
  • JUnit custom runner – this post is dedicated to creating own JUnit retry runner and run tests with it.

Custom JUnit retry runner

A custom runner can be created by extending org.junit.runners.BlockJUnit4ClassRunner class and override public void run(final RunNotifier notifier) and protected void runChild(final FrameworkMethod method, RunNotifier notifier) methods. run() is accessed when test class is instantiated, runChild() is accessed when test method is run. Below is the code for custom JUnit retry runner class:

package com.automationrhapsody.junit.runners;

import org.junit.Ignore;
import org.junit.internal.AssumptionViolatedException;
import org.junit.internal.runners.model.EachTestNotifier;
import org.junit.runner.Description;
import org.junit.runner.notification.RunNotifier;
import org.junit.runner.notification.StoppedByUserException;
import org.junit.runners.BlockJUnit4ClassRunner;
import org.junit.runners.model.FrameworkMethod;
import org.junit.runners.model.InitializationError;
import org.junit.runners.model.Statement;

public class RetryRunner extends BlockJUnit4ClassRunner {

	private static final int RETRY_COUNT = 2;

	public RetryRunner(Class<?> clazz) throws InitializationError {
		super(clazz);
	}

	@Override
	public void run(final RunNotifier notifier) {
		EachTestNotifier testNotifier = new EachTestNotifier(notifier, getDescription());
		Statement statement = classBlock(notifier);
		try {
			statement.evaluate();
		} catch (AssumptionViolatedException ave) {
			testNotifier.fireTestIgnored();
		} catch (StoppedByUserException sbue) {
			throw sbue;
		} catch (Throwable t) {
			System.out.println("Retry class: " + getDescription().getDisplayName());
			retry(testNotifier, statement, t, getDescription());
		}
	}

	@Override
	protected void runChild(final FrameworkMethod method, RunNotifier notifier) {
		Description description = describeChild(method);
		if (method.getAnnotation(Ignore.class) != null) {
			notifier.fireTestIgnored(description);
		} else {
			runTest(methodBlock(method), description, notifier);
		}
	}

	private void runTest(Statement statement, Description description, RunNotifier notifier) {
		EachTestNotifier eachNotifier = new EachTestNotifier(notifier, description);
		eachNotifier.fireTestStarted();
		try {
			statement.evaluate();
		} catch (AssumptionViolatedException e) {
			eachNotifier.addFailedAssumption(e);
		} catch (Throwable e) {
			System.out.println("Retry test: " + description.getDisplayName());
			retry(eachNotifier, statement, e, description);
		} finally {
			eachNotifier.fireTestFinished();
		}
	}

	private void retry(EachTestNotifier notifier, Statement statement, Throwable currentThrowable, Description info) {
		int failedAttempts = 0;
		Throwable caughtThrowable = currentThrowable;
		while (RETRY_COUNT > failedAttempts) {
			try {
				System.out.println("Retry attempt " + (failedAttempts + 1) + " for " + info.getDisplayName());
				statement.evaluate();
				return;
			} catch (Throwable t) {
				failedAttempts++;
				caughtThrowable = t;
			}
		}
		notifier.addFailure(caughtThrowable);
	}
}

The code shown above is available in GitHub java-samples/junit repository.

Using JUnit RetryRunner

In order to configure JUnit test to use the runner, class holding tests should be annotated with @RunWith:

@RunWith(RetryRunner.class)
public class RetryRunnerTests {
	@Test
	public void testRetrySuccessFirstTime() {
		assertTrue(true);
	}
}

Conclusion

Making JUnit to rerun is easy, the harder thing to do is to fix your tests so they pass from the first time. Generally, it is not good to have tests that are flaky.

Read more...

Use JUnit rules to debug failed API tests

Last Updated on by

Post summary: What are JUnit rules and how to use them to improve debugging of failed API tests.

What are JUnit rules

Rules are an easy way to separate tests from non-tests code. In many cases, some kind of setup is required before starting the tests. Rules provide a way to define this setup code externally and just access it from your tests.

How to use JUnit rules

Instantiate a public variable with rule class you want to use. Depending on the specific rule you can invoke methods on this public variable. The example below is the simplest that gives you the name of current test method being executed.

@Rule
public TestName name = new TestName();

@Test
public void testPrintMethodName() {
	assertEquals("testPrintMethodName", name.getMethodName());
}

Types of JUnit rules

Below are shown rules that JUnit provides:

  • TemporaryFolder – allows the creation of files and folders that gets deleted when test method finishes.
  • ExternalResource – sets up external resources (file, socket, database connection) and then releases them. Same can be accomplished in @Before and @After methods.
  • ErrorCollector – execution of test continues after the first error and successive errors are collected and reported after test finishes.
  • Verifier – additional asserting on test conditions.
  • TestWatcher – has access to tests output – when test starts, finishes, and the test result.
  • TestName – gives current executing test method name.
  • Timeout – sets a timeout for all the test methods in the class. If some test takes longer it is terminated and failed.
  • ExpectedException – very handy way to test whether method throws correct exception. It is possible to use @Test(expected = NullPointerException.class), but it does not allow you to check what is the exception message.

ClassRule

@Rule annotation creates a new instance of the rule class before each and every test method is run. In some cases, rule object is needed into test class initialization method (annotated with @BeforeClass). In order to have it into initialization method, a @ClassRule annotation has to be used instead. Then the rule object is instantiated only once before @BeforeClass method has run, so the rule is available in it. @ClassRule is good to be used in situations where there are expensive resources to be created – better to create them on test class initialization rather before each test method. More details about execution sequence can be found in JUnit methods execution sequence post.

Debug API tests

API tests generally are a sequence of requests. One request depends on previous as it takes some data out of it. If some of the requests in the chain fail you will need the whole chain to be able to debug and trace why exactly the whole scenario failed.

Store API calls in a Queue

It is a good idea to have one class that is sending API requests and returning responses. Below is a simple example of such class. In real life, makeRequest methods will accept some parameters or request object and result will be some response object, not String.

public class RequestUtils {

	private static final Queue<String> MESSAGES_QUEUE = new LinkedList<>();

	public static String makeSomeRequest(String request) {
		getMessages().add(request);
		String response = "makeSomeRequestResponse";
		getMessages().add(response);
		return response;
	}

	public static String makeAnotherRequest(String request) {
		getMessages().add(request);
		String response = "makeAnotherRequestResponse";
		getMessages().add(response);
		return response;
	}

	public static void printMessages() {
		for (String message : getMessages()) {
			System.out.println(message);
		}
		clearMessages();
	}

	public static void clearMessages() {
		getMessages().clear();
	}

	private static Queue<String> getMessages() {
		return MESSAGES_QUEUE;
	}
}

Class collects all requests and responses in a queue of Strings. It has printMessages() and clearMessages() methods. It also has a getMessages() method which just returns the queue. This method is not bringing real value to code but rather used to easily switch to different types of queues.

Extend TestWatcher to have access to test results

As stated above TestWatcher provides access to tests output without the ability to modify it. Extending TestWatcher gives you access to those methods:

public class MessagesQueueRule extends TestWatcher {

	protected void succeeded(Description description) {
		RequestUtils.clearMessages();
	}

	protected void failed(Throwable e, Description description) {
		RequestUtils.printMessages();
	}

	protected void skipped(AssumptionViolatedException e, 
			Description description) {
		RequestUtils.printMessages();
	}
}

On success, messages queue get cleared, on skipped or failed it gets printed to enable you to debug.

Tests are a sequence of requests and responses

Test below is just an example to show how an API test generally looks like. It is possible to do some method chaining, but this is out of the scope of the current post.

@Test
public void test1() {
	String result1 = RequestUtils.makeSomeRequest("test1request1");
	String result2 = RequestUtils.makeAnotherRequest(result1);
	String actualResult = RequestUtils.makeAnotherRequest(result2);
	assertEquals("makeAnotherRequestResponse", actualResult);
}

If assertEquals() fails all requests/response in the test method will get printed into the logs.

Multithreading

You might have noticed that current solution is not thread-safe as Queue is one and the same and can be accessed from many threads which will lead to ConcurrentModification exception. In Avoid multithreading problems in Java using ThreadLocal post, there is a solution using ThreadLocal.

Conclusion

Rules provide flexibility make whatever is needed for your tests. They are an easy way to extract code which is not a test logic to external classes. All the details about rules are available at JUnit Rules page. In the current post, I showed you an easy way to store and output requests in case of API testing. The code shown above is available in GitHub java-samples/junit repository.

Related Posts

Read more...

Code coverage of manual or automated tests with OpenCover for .NET applications

Last Updated on by

Post summary: Examples how to do code coverage of manual or automated functional test with OpenCover tool for .NET applications

Code coverage

This topic is how to do the code coverage on .NET applications with OpenCover. Theory on what is code coverage, why it is needed can be found in What about code coverage post.

OpenCover

OpenCover is open source tool for code coverage for .NET 2.0 and above applications for Windows only. With OpenCover instrumentation of the code is not needed. The application is started through OpenCover and it collects coverage results. What is mandatory though is PDB file along with executables and assemblies, so application under test should be built in Debug mode. If PDB file is not found then no coverage data will be gathered.

The latest version can be downloaded form Releases in GitHub. There are installer and zip archive. If the installer is used by default OpenCover is installed in C:\Users\{USER_ACCOUNT}\AppData\Local\Apps\OpenCover. If you want to change this, click Advanced button during installation and then select Install for all users on this machine.

How to use OpenCover

Usage guide can be found in OpenCover usage reference online. Also along with OpenCover installation, there is Usage.rft file which holds all the information about the tool. Most useful commands are listed below:

  • -target:<path to target> – the path to application executable file or name of service
  • -filter:<filters> – list of filters to apply to selectively include or exclude assemblies and classes from coverage results
  • -output:<output file> – the path to output XML file, if empty then results.xml will be created the in the current directory
  • -register[:user] – register and de-register the code coverage profiler
  • -targetargs:<target arguments> – arguments to be passed to the target process
  • -targetdir:<target directory> – path to the target directory or alternative path to PDB files

ReportGenerator

OpenCover produces results in raw format, which is not for humans. ReportGenerator is used to convert XML reports generated by OpenCover, PartCover, Visual Studio or NCover into human readable reports in various formats. Usage guide can be found on its home page, most useful commands are:

  • -reports:<report> – coverage reports that should be parsed, semicolon separated, wildcards are allowed
  • -targetdir:<target directory> – directory where the generated report should be saved
  • -sourcedirs:<directory>[;<directory>][;<directory>] – directories which contain the corresponding source code, optional, semicolon separated
  • -classfilters:<(+|-)filter>[;<(+|-)filter>][;<(+|-)filter>] – list of classes that should be included or excluded in the report, optional, wildcards are allowed.

Hands on examples on manual code coverage

In order to try you need to checkout code samples from GitHub SampleApp or SampleAppPlus repository to C:\Telerik Testing Framework needs to be installed as it copies lots of assemblies in GAC. OpenCover and ReportGenerator should also be installed to C:\.

With current setup command to start SimpleAppPlus.exe from OpenCover is:

C:\OpenCover\OpenCover.Console.exe `
	-target:"C:\SampleAppPlus\SampleAppPlus\bin\Debug\SampleAppPlus.exe" `
	-output:C:\SampleAppPlus\CoverageReports\SampelAppPlus.results.xml `
	-register:user

Now the application is started and manual functional tests can be executed. Once the application is stopped coverage results are saved in SampelAppPlus.results.xml file.

Hands on examples on automated code coverage

Since automation is the future of QA and we have already created automated tests for both SimpleApp and SimplaAppPlus, we want to measure how our tests perform on code coverage. Automated tests run the application, attach to it and manipulate it. So it seems close to mind just to use the command from manual example and start the application with it. It will not work though since the command is starting and returning OpenCover process, not underlying SimpleAppPlus one. Extra code is needed in SampleAppPlus.Tests.Framework\Tests\BaseTest.cs file. Instead of:

Application appWhite = Application.Launch(applicationPath);

following code has to be added:

Process sampleAppPlus = StartProcess();
Application appWhite = Application.Attach(sampleAppPlus);

where StartProcess() method is:

using System;
using System.Collections.Generic;
using System.Diagnostics;
using System.Linq;
using System.Threading;

private Process StartProcess()
{
	string appName = "SampleAppPlus";
	string openCover = @"C:\OpenCover\OpenCover.Console.exe";
	long timeStamp = (long)(DateTime.UtcNow 
						- new DateTime(1970, 1, 1)).TotalMilliseconds;

	List<string> arguments = new List<string>();
	arguments.Add(@"-target:C:\SampleAppPlus\SampleAppPlus\bin\Debug\"
					+ appName + ".exe");
	arguments.Add(@"-output:C:\SampleAppPlus\CoverageReports\SampelAppPlus."
					+ timeStamp + ".xml");
	arguments.Add("-register:user");

	Process process = new Process();
	process.StartInfo.FileName = openCover;
	process.StartInfo.Arguments = string.Join(" ", arguments);
	process.Start();

	Thread.Sleep(5000);
	return Process.GetProcesses().First(proc => appName == proc.ProcessName);
}

OpenCover arguments “-target”, “-output” and “-register” are used. Note that -output file is always different by adding current unix time in the file name, this is to prevent overwriting of the file. The idea is to run OpenCover which will start SimpleAppPlus. Wait 5 seconds to ensure the application is up, then get all Windows processes with Process.GetProcesses(), iterate them, find and return the needed SampleAppPlus process which TestStack.White and Telerik Testing Framework will attach to.

Create report

Once tests are run and OpenCover XML report files are generated it is time to generated human readable reports. This is done with ReportGenerator with the command:

C:\ReportGenerator\bin\ReportGenerator.exe `
	-reports:C:\SampleAppPlus\CoverageReports\SampelAppPlus.*.xml `
	-targetdir:C:\SampleAppPlus\CoverageReports\html `
	-sourcedirs:C:\SampleAppPlus\ `
	-classfilters:-SampleAppPlus.Properties.*

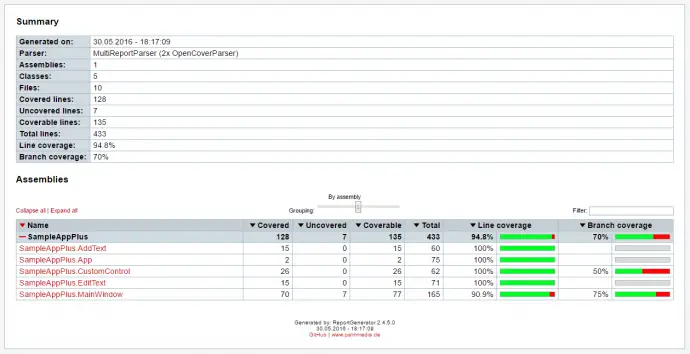
OpenCover-report

Inspect report

Coverage report file from examples above can be found in OpenCover code coverage report. Inspecting the report there is missed code in SampleAppPlus.MainWindow class – else branch of if ((bool)openFileDialog.ShowDialog()) condition is not covered. Documentation of this method states that it returns false if Cancel button is clicked of the dialog window. In order to increase the coverage test that clicks Cancel button and verifies no upload is done should be added to test suite.

Code coverage for IIS web application or Windows service

Examples above show how to run a normal windows application. It is valid for both UI and console applications as they are started with single EXE file. OpenCover can also work for IIS web applications, Silverlight applications and Windows service applications. More details can be found in documentation accompanying OpenCover installation.

Although it is possible to connect to a running service, I have done code coverage on Windows service in the manner suggested in the documentation – run the service as a console application. Since debugging a running Windows service is not that straightforward task, developers have most likely already implemented a switch to start service as a console application. If not you will easy their lives by asking them to do so.

Conclusion

OpenCover is the only open source tool for code coverage for .NET applications. It is really powerful and easy to use. No code instrumentation is needed, just build the code into Debug mode to have PDB files and run the application through OpenCover. It can also be used for measuring code coverage of unit tests.

Related Posts

Read more...