Testing with Cypress – Custom logging of errors and JUnit results

Last Updated on by

Post summary: Description of the custom error logger and also custom JUnit XML file creator.

This post is part of a Cypress series, you can see all post from the series in Testing with Cypress – lessons learned in a complete framework. Examples code is located in cypress-testing-framework GitHub repository.

The issue

Cypress is not good at error tracking and reporting. If a test fails it is hard to understand why. Errors sometimes are vague, stacktrace is not useful as it does not lead to the proper line of your code since it is being wrapped into Cypress’ code. Forget about the nice stack traces that Java/C# code is producing, where you just go, find, and eliminate the error without even debugging. Debugging errors in tests is much harder with Cypress.

The solution

Gleb Bahmutov, currently a VP of Engineering at Cypress.io has a nice NPM package, called cypress-failed-log. It gathers commands that Cypress was executing during a test run and in case of a failure saves them to a file. You can inspect the file and trace what parts of your test were executed.

Modified solution

I started with that solution but did not enjoy it much. What I did is to take the base code and modify it. Those modifications are still tracking the Cypress commands, but also they track requests and response being exchanged by application and the backend, so in case of error you can also inspect the backend response. One important thing is that each test should have a unique name, otherwise overlapping may occur. The logging code is located in cypress/support/core/cypress_logging.js file, it is registered to Cypress within cypress/support/index.js file with import ‘./core/cypress_logging’;. The code also copies the screenshot of the test failure for better understanding of the error.

Capturing of request/response between the backend and the frontend can be controlled with TEST_CAPTURE_RESPONSES environment variable, it is true by default. Sometimes you will need to avoid certain requests/responses from being captured as they are not important. This can be done with TEST_CAPTURE_RESPONSES_EXCLUDE_PATHS variable, use asterisks to match the URLs. For e.g. I am testing a Ruby on Rails application which has a profiler enabled, which massively pollutes the logs, so I exclude those with ‘*/mini-profiler-resources/*’ pattern.

All this data is saved as a file with the name of the test inside a folder with the name of the suite. For e.g. cypress/logs/logging/multiple_testsuites_mix_spec.js/Test suite mix #1 — test case #2 (failed).json. The name of the JSON file is same as the name of the automatically generated screenshot on failure.

JUnit results with Cypress

In order to make Cypress output the test results into JUnit XML file following steps has to be done. Add the following configuration into cypress.json. This configuration makes Cypress create JUnit XML file. The important bit here is [hash] in the file name, otherwise, Cypress will overwrite the files.

{
    "reporter": "junit",
    "reporterOptions": {
        "mochaFile": "results/my-test-output-[hash].xml"
    }
}

If you use some CI tool then you can pass the XML results to it and it will visualize them.

Additionally, you can manipulate the XML results, you can merge them into just one XML file by installing junit-merge as a global NPM package and run junit-merge -d results -o results/merged.xml.

You can generate an HTML from XMLs with xunit-viewer NPM package. In case you have merged the XMLs into one then the command is xunit-viewer –results=results/merged.xml –output=results/merged.html, in case you have not the command is xunit-viewer –results=results –output=results/merged.html.

Custom JUnit results

Well, the out of the box solution is good but not enough for me. It does not show the skipped tests, it adds one more testsuite with name Root Suite, which is empty and Jenkins for e.g. avoids it, but if you want to visualize the results into HTML then it is a problem. What I have done is to generate JUnit XML on my own. This happens automatically in cypress_logging.js file. Files are put into the cypress/logs folder and have the name of the suite. Processing of the custom results is additionally made in provided code, you can read mode in Testing with Cypress – Code with Istanbul post.

Compare of JUnit reports

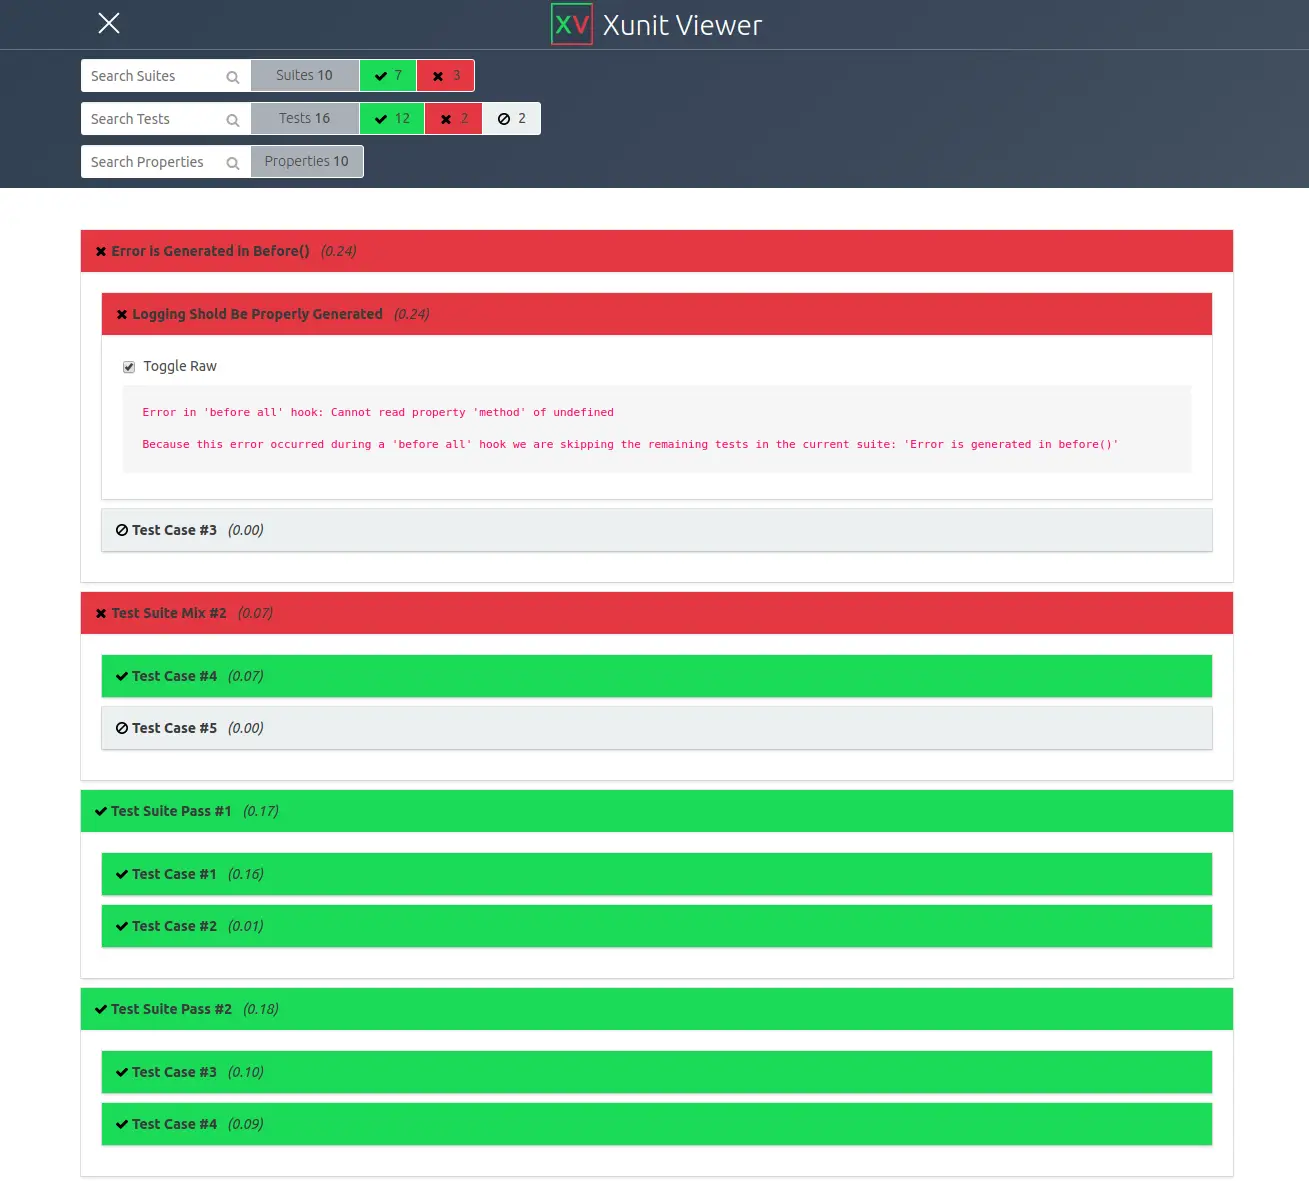
In this section, I will put some comparison of Cypress JUnit results and the one I have created. See the images below how HTML report looks like. HTML files can be opened from Cypress-report.html and Custom-report.html. XML results can be downloaded from xmls.zip.

Cypress standard HTML report

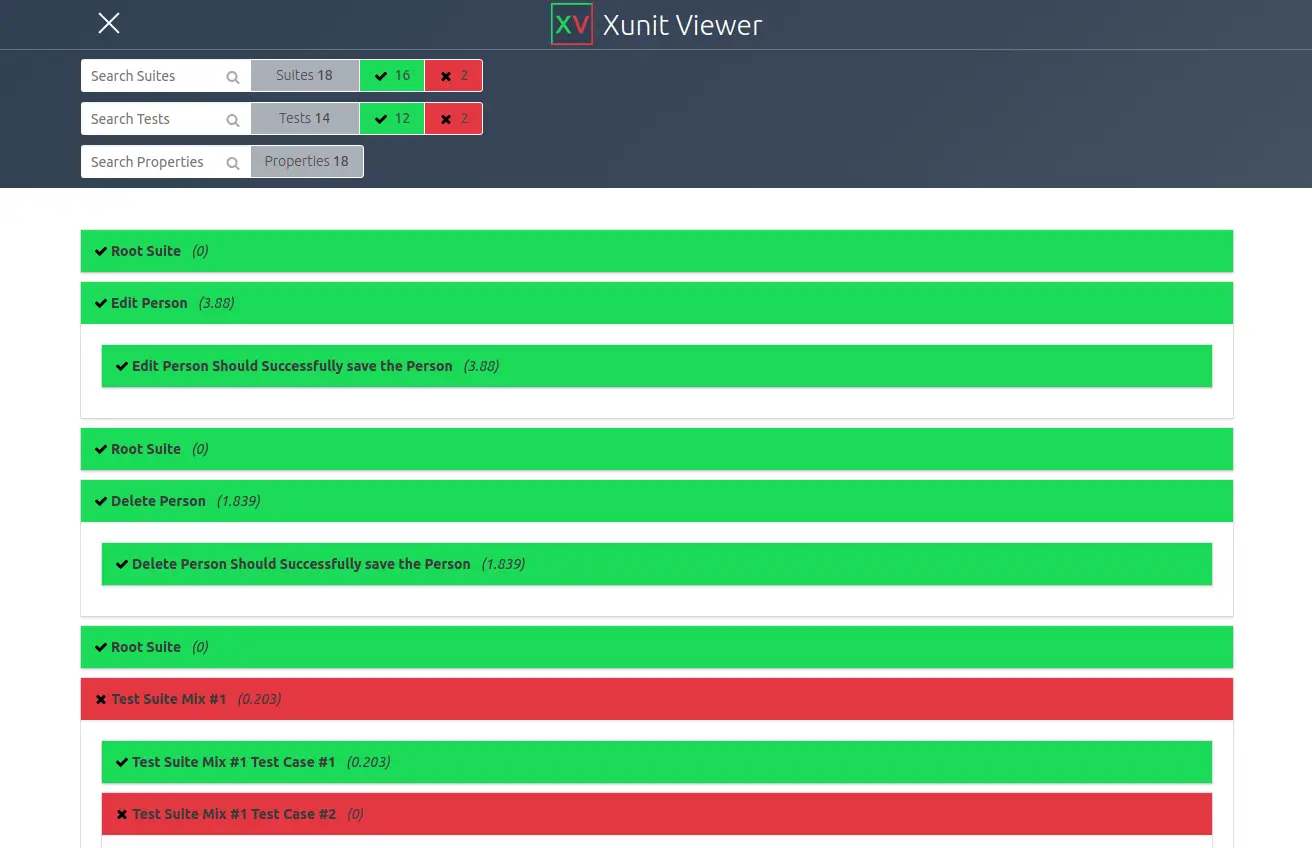
Cypress custom HTML report

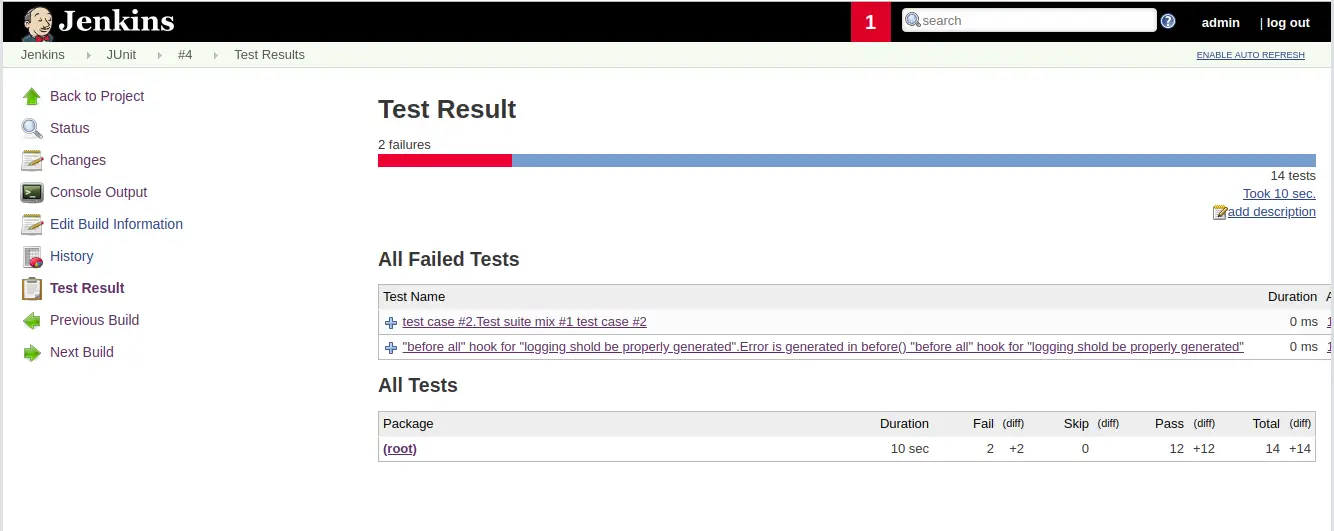
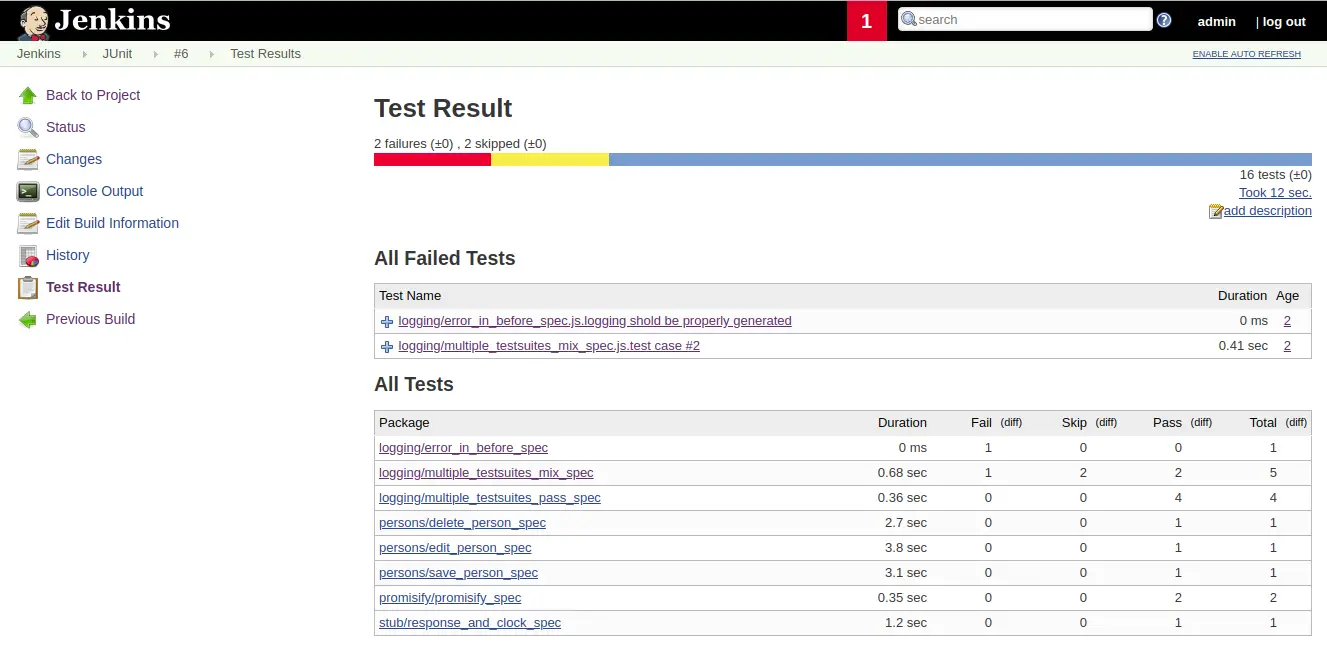
I also made a quick Jenkins installation from its Docker container and uploaded the results for comparison. Below are the images of the comparison. Both JUnit reports are not visualized very well. Mostly this is because of the fact that JUnit is a format for Java tests, where we have packages and Jenkins is visualizing the results based on this assumption.

Cypress Jenkins standard

Cypress Jenkins custom

HTML Reports

HTML report is generated with xunit-viewer NPM package as described above. It is done by invoking the yarn cypress:report command. Above you can also see how HTML report looks like.

Semaphore file

Apart from the HTML report, there is one more file that is generated. It is named failed.txt. We are using AWS CodeBuild for CI/CD and we just need an indicator if the build passed or not. If this file is present then the build failed. The file content shows which are the failed suites. The whole artifacts are zipped and uploaded to an S3 bucket where can be investigated later.

Conclusion

In the current post, I have described the custom functionality I have for improving the debugging of failed tests by logging more information. Also, I have made a custom JUnit reporting of the test results. An HTML report is generated for better visualization of the results.

Related Posts

Read more...

Mock new object creation with PowerMock

Last Updated on by

Post summary: How to control what objects are being instantiated when using PowerMock.

This post is part of PowerMock series examples. The code shown in examples below is available in GitHub java-samples/junit repository.

Mock new object creation

You might have a method which instantiates some object and works with it. This case could be very tricky to automate because you do not have any control over this newly created object. This is where PowerMock comes to help to allow you to control what object is being created by replacing it with an object you can control.

Code to test

Below is a simple method where a new object is being created inside a method that has to be unit tested.

public class PowerMockDemo {

	public Point publicMethod() {
		return new Point(11, 11);
	}
}

Unit test

What we want to achieve in the unit test is to control instantiation of new Point object so that it is replaced with an object we have control over. The first thing to do is to annotate unit test with @RunWith(PowerMockRunner.class) telling JUnit to use PowerMock runner and with @PrepareForTest(PowerMockDemo.class) telling PowerMock to get inside PowerMockDemo class and prepare it for mocking. Mocking is done with PowerMockito.whenNew(Point.class).withAnyArguments().thenReturn(mockPoint). It tells PowerMock when a new object from class Point is instantiated with whatever arguments to return mockPoint instead. It is possible to return different objects based on different arguments Point is created with withArguments() method. Full code is below:

import org.junit.Before;
import org.junit.Test;
import org.junit.runner.RunWith;
import org.powermock.api.mockito.PowerMockito;
import org.powermock.core.classloader.annotations.PrepareForTest;
import org.powermock.modules.junit4.PowerMockRunner;

import static org.hamcrest.CoreMatchers.is;
import static org.hamcrest.MatcherAssert.assertThat;
import static org.mockito.Mockito.mock;

@RunWith(PowerMockRunner.class)
@PrepareForTest(PowerMockDemo.class)
public class PowerMockDemoTest {

	private PowerMockDemo powerMockDemo;

	@Before
	public void setUp() {
		powerMockDemo = new PowerMockDemo();
	}

	@Test
	public void testMockNew() throws Exception {
		Point mockPoint = mock(Point.class);

		PowerMockito.whenNew(Point.class)
			.withAnyArguments().thenReturn(mockPoint);

		Point actualMockPoint = powerMockDemo.publicMethod();

		assertThat(actualMockPoint, is(mockPoint));
	}
}

Conclusion

PowerMock allows you to control want new objects are being created and replacing them with an object you have control over.

Related Posts

Read more...

Mock private method call with PowerMock

Last Updated on by

Post summary: How to mock private method with PowerMock by using spy object.

This post is part of PowerMock series examples. The code shown in examples below is available in GitHub java-samples/junit repository.

Mock private method

In some cases, you may need to alter the behavior of private method inside the class you are unit testing. You will need to mock this private method and make it return what needed for the particular case. Since this private method is inside your class under test then mocking it is little more specific. You have to use spy object.

Spy object

A spy is a real object which mocking framework has access to. Spied objects are partially mocked objects. Some their methods are real some mocked. I would say use spy object with great caution because you do not really know what is happening underneath and whether are you actually testing your class or mocked version of it.

Code to be tested

Below is a simple code that has a private method which created new Point object based on given as argument one. This private method is used to demonstrate how private methods can be called in Call private method with PowerMock post. In the current example, there is also a public method which calls this private method with a Point object.

public class PowerMockDemo {

	public Point callPrivateMethod() {
		return privateMethod(new Point(1, 1));
	}

	private Point privateMethod(Point point) {
		return new Point(point.getX() + 1, point.getY() + 1);
	}
}

Unit test

What we want to achieve in the unit test is to mock private method so that each call to it returns an object we have control over. The first thing to do is to annotate unit test with @RunWith(PowerMockRunner.class) telling JUnit to use PowerMock runner and with @PrepareForTest(PowerMockDemo.class) telling PowerMock to get inside PowerMockDemo class and prepare it for mocking. Then a spy object has to be created with PowerMockito.spy(new PowerMockDemo()). Actually, this is real PowerMockDemo object, but PowerMock is spying on it. The mocking of the private method is done with following code: PowerMockito.doReturn(mockPoint).when(powerMockDemoSpy, “privateMethod”, anyObject()). When “privateMethod” is called with whatever object then return mockPoint which is actually a mocked object. The full code example is shown below:

import org.junit.Before;
import org.junit.Test;
import org.junit.runner.RunWith;
import org.powermock.api.mockito.PowerMockito;
import org.powermock.core.classloader.annotations.PrepareForTest;
import org.powermock.modules.junit4.PowerMockRunner;

import static org.hamcrest.CoreMatchers.is;
import static org.hamcrest.MatcherAssert.assertThat;
import static org.mockito.Matchers.anyObject;
import static org.mockito.Mockito.mock;

@RunWith(PowerMockRunner.class)
@PrepareForTest(PowerMockDemo.class)
public class PowerMockDemoTest {

	private PowerMockDemo powerMockDemoSpy;

	@Before
	public void setUp() {
		powerMockDemoSpy = PowerMockito.spy(new PowerMockDemo());
	}

	@Test
	public void testMockPrivateMethod() throws Exception {
		Point mockPoint = mock(Point.class);

		PowerMockito.doReturn(mockPoint)
			.when(powerMockDemoSpy, "privateMethod", anyObject());

		Point actualMockPoint = powerMockDemoSpy.callPrivateMethod();

		assertThat(actualMockPoint, is(mockPoint));
	}
}

Conclusion

PowerMock provides a way to mock private methods by using spy objects. Mockito also has spy objects, but they are not so powerful as PowerMock’s. One example is that PowerMock can spy on final objects.

Related Posts

Read more...

Call private method with PowerMock

Last Updated on by

Post summary: How to invoke a private method with PowerMock.

This post is part of PowerMock series examples. The code shown in examples below is available in GitHub java-samples/junit repository.

Unit test private method

Mainly public methods are being tested, so it is a very rare case where you want to unit test a private method. PowerMock provides utilities that can invoke private methods via a reflection and get output which can be tested.

Code to be tested

Below is a sample code that shows a class with a private method in it. It does nothing else but increases the X and Y coordinates of given as argument Point.

public class PowerMockDemo {

	private Point privateMethod(Point point) {
		return new Point(point.getX() + 1, point.getY() + 1);
	}
}

Unit test

Assume that this private method has to be unit tested for some reason. In order to do so, you have to use PowerMock’s Whitebox.invokeMethod(). You give an instance of the object, method name as a String and arguments to call the method with. In the example below argument is new Point(11, 11).

import org.junit.Before;
import org.junit.Test;
import org.powermock.reflect.Whitebox;

import static org.hamcrest.CoreMatchers.is;
import static org.hamcrest.MatcherAssert.assertThat;

public class PowerMockDemoTest {

	private PowerMockDemo powerMockDemo;

	@Before
	public void setUp() {
		powerMockDemo = new PowerMockDemo();
	}

	@Test
	public void testCallPrivateMethod() throws Exception {
		Point actual = Whitebox.invokeMethod(powerMockDemo, 
			"privateMethod", new Point(11, 11));

		assertThat(actual.getX(), is(12));
		assertThat(actual.getY(), is(12));
	}
}

Conclusion

PowerMock provides utilities which uses reflection to do certain things, as shown in the example above to invoke a private method.

Related Posts

Read more...

Soft assertions that do not fail JUnit test

Last Updated on by

Post summary: Code examples how to use assertions that do not fail the unit test immediately.

The code shown in examples below is available in GitHub java-samples/jersey1 repository.

Unit vs Functional testing

Unit testing paradigm states that each test exercises particular code behavior. So in a perfect world, one unit test would have one assertion which defines unit test result – either passed or failed. This is why unit testing frameworks provide only asserts which stop further execution of current test method. In functional testing usually, one test verifies several conditions. Not debating if this is good or bad. Assume you are doing GUI testing, once you have opened particular page you’d better do as much verification as possible to reduce the risk of bugs. Having this page opened over and over for every single check is not the most efficient way of testing. This is why when you run functional tests you need some kind of assert that indicates whether passed or failed but to let the test continue in no critical issue is present. Those are generally called “soft” asserts.

Soft assertions and JUnit

TestNG provides org.testng.asserts.SoftAssert class for soft asserts as it is more oriented towards functional testing. JUnit is a unit testing framework, so it does not provide any soft assertions. In order to create such behavior, additional libraries are needed.

AssertJ

AssertJ is a library providing fluent assertions. It is very similar to Hamcrest which comes by default with JUnit. Along with all the asserts, AssertJ provides soft assertions with its SoftAssertions class inside org.assertj.core.api package.

Usage

Below is a functional test run against Dropwizard stub described in Build a RESTful stub server with Dropwizard post. Important is to instantiate a new SoftAssertions object before the test verifications and to call assertAll() method in the end to collect results. Best way to do this is to use JUnit’s @Before and @After annotated methods.

package com.automationrhapsody.jersey1;

import com.automationrhapsody.jersey1.model.Person;
import com.automationrhapsody.jersey1.rules.PersonServiceJerseyClient;

import java.util.List;

import org.assertj.core.api.SoftAssertions;
import org.junit.After;
import org.junit.Before;
import org.junit.ClassRule;
import org.junit.Test;

import static org.hamcrest.MatcherAssert.assertThat;
import static org.hamcrest.core.Is.is;

public class PersonServiceTest {

	@ClassRule
	public static final PersonServiceJerseyClient CLIENT 
		= new PersonServiceJerseyClient();

	private SoftAssertions softAssertions;

	private Person person;

	@Before
	public void setUp() {
		person = new Person();
		person.setId(123);
		person.setFirstName("First Name");
		person.setLastName("Last Name");
		person.setEmail("Email");

		softAssertions = new SoftAssertions();
	}

	@After
	public void tearDown() {
		softAssertions.assertAll();
	}

	@Test
	public void testAllOperations() {
		String saveResult = CLIENT.save(person);
		assertThat(saveResult, is("Added Person with id=123"));

		Person actual = CLIENT.get(person.getId());
		softAssertions
			.assertThat(actual.getId()).isEqualTo(person.getId());
		softAssertions
			.assertThat(actual.getFirstName()).isEqualTo(person.getFirstName());
		softAssertions
			.assertThat(actual.getLastName()).isEqualTo(person.getLastName());
		softAssertions
			.assertThat(actual.getEmail()).isEqualTo(person.getEmail());

		String result = CLIENT.remove();
		assertThat(result, is("Last person remove. Total count: 4"));
	}
}

Conclusion

Soft assertions are needed in case of functional tests being run with JUnit. Since such is not available out of the box because JUnit is targeted for unit tests soft assertions can be used from external libraries such as AssertJ.

Related Posts

Read more...

Verify static method was called with PowerMock

Last Updated on by

Post summary: How to verify that static method was called during a unit test with PowerMock.

This post is part of PowerMock series examples. The code shown in examples below is available in GitHub java-samples/junit repository.

In Mock static methods in JUnit with PowerMock example post, I have given information about PowerMock and how to mock a static method. In the current post, I will demonstrate how to verify given static method was called during execution of a unit test.

Example class for unit test

We are going to unit test a class called LocatorService that internally uses a static method from utility class Utils. Method randomDistance(int distance) in Utils is returning random variable, hence it has no predictable behavior and the only way to test it is by mocking it:

public class LocatorService {

	public Point generatePointWithinDistance(Point point, int distance) {
		return new Point(point.getX() + Utils.randomDistance(distance), 
			point.getY() + Utils.randomDistance(distance));
	}
}

And Utils class is:

import java.util.Random;

public final class Utils {

	private static final Random RAND = new Random();

	private Utils() {
		// Utilities class
	}

	public static int randomDistance(int distance) {
		return RAND.nextInt(distance + distance) - distance;
	}
}

Nota bene: it is good code design practice to make utility classes final and with a private constructor.

Verify static method call

This is the full code. Additional details are shown below it.

package com.automationrhapsody.junit;

import org.junit.Before;
import org.junit.Test;
import org.junit.runner.RunWith;
import org.mockito.internal.verification.VerificationModeFactory;
import org.powermock.api.mockito.PowerMockito;
import org.powermock.core.classloader.annotations.PrepareForTest;
import org.powermock.modules.junit4.PowerMockRunner;

@RunWith(PowerMockRunner.class)
@PrepareForTest(Utils.class)
public class LocatorServiceTest {

	private LocatorService locatorServiceUnderTest;

	@Before
	public void setUp() {
		PowerMockito.mockStatic(Utils.class);

		locatorServiceUnderTest = new LocatorService();
	}

	@Test
	public void testStaticMethodCall() {
		locatorServiceUnderTest
			.generatePointWithinDistance(new Point(11, 11), 1);
		locatorServiceUnderTest
			.generatePointWithinDistance(new Point(11, 11), 234);

		PowerMockito.verifyStatic(VerificationModeFactory.times(2));
		Utils.randomDistance(1);

		PowerMockito.verifyStatic(VerificationModeFactory.times(2));
		Utils.randomDistance(234);

		PowerMockito.verifyNoMoreInteractions(Utils.class);
	}
}

Explanation

Class containing static method should be prepared for mocking with PowerMockito.mockStatic(Utils.class) code. Then call to static method is done inside locatorServiceUnderTest .generatePointWithinDistance() method. In this test, it is intentionally called 2 times with different distance (1 and 234) in order to show the verification which consists of two parts. First part is PowerMockito.verifyStatic(VerificationModeFactory.times(2)) which tells PowerMock to verify static method was called 2 times. The second part is Utils.randomDistance(1) which tells exactly which static method should be verified. Instead of 1 in the brackets you can use anyInt() or anyObject(). 1 is used to make verification explicit. As you can see there is second verification that randomDistance() method was called with 234 as well: PowerMockito.verifyStatic(VerificationModeFactory.times(2)); Utils.randomDistance(234);.

Conclusion

PowerMock provides additional power to Mockito mocking library which is described in Mock JUnit tests with Mockito example post. In the current post, I have shown how to verify static method was called. It is very specific as verification actually consists of two steps.

Related Posts

Read more...

Data driven testing with JUnit and Gradle

Last Updated on by

Post summary: How to do data-driven testing with JUnit and Gradle.

In Data driven testing with JUnit parameterized tests post, I’ve shown how to create data-driven JUnit test. It should be annotated with @RunWith(Parameterized.class).

Older Gradle and Parameterized.class

Gradle cannot run JUnit tests annotated with @RunWith(Parameterized.class). There is official Gradle bug which states issue is resolved in Gradle 2.12, so if you are using older Gradle then the current post is suitable for you.

Data-Driven JUnit tests

There is a library called junit-dataprovider which is easy to use. What you have to do to use it is:

  1. Annotate the test class
  2. Define test data
  3. Create test and use test data

Annotate the test class

The class needs to be run with a specialized runner in order to be treated as data-driven one. Runner is: com.tngtech.java.junit.dataprovider.DataProviderRunner. The class looks like:

import com.tngtech.java.junit.dataprovider.DataProviderRunner;
import org.junit.runner.RunWith;

@RunWith(DataProviderRunner.class)
public class LocatorDataProviderTest {
}

Define test data

Test data is seeded from static method: public static Object[] dataProvider(). This method returns an array of Object arrays where each array is one row with input and expected output test data. This method is annotated with @DataProvider. Here is how test data is defined:

@DataProvider
public static Object[] dataProvider() {
	return new Object[][] {
		{-1, -1, new Point(1, 1)},
		{-1, 0, new Point(1, 0)},
		{-1, 1, new Point(1, 1)},

		{0, -1, new Point(0, 1)},
		{0, 0, MOCKED_POINT},
		{0, 1, MOCKED_POINT},

		{1, -1, new Point(1, 1)},
		{1, 0, MOCKED_POINT},
		{1, 1, MOCKED_POINT}
	};
}

Create test and use test data

In order to use the test data in some test method, it should be annotated with @UseDataProvider(“dataProvider”) where “dataProvider” is the name of the static method which generates the test data. Another mandatory is test method should have same number and type of arguments as each line of the test data array. Here is how test method looks like:

@Test
@UseDataProvider("dataProvider")
public void testLocateResults(int x, int y, Point expected) {
	assertTrue(PointUtils.arePointsEqual(expected, 
				locatorUnderTest.locate(x, y)));
}

Putting it all together

Combining all steps into one class leads to the code below:

import com.automationrhapsody.junit.utils.PointUtils;
import com.tngtech.java.junit.dataprovider.DataProvider;
import com.tngtech.java.junit.dataprovider.DataProviderRunner;
import com.tngtech.java.junit.dataprovider.UseDataProvider;

import org.junit.Before;
import org.junit.Test;
import org.junit.runner.RunWith;

import static org.junit.Assert.assertTrue;
import static org.mockito.Matchers.any;
import static org.mockito.Mockito.mock;
import static org.mockito.Mockito.when;

@RunWith(DataProviderRunner.class)
public class LocatorDataProviderTest {

	private static final Point MOCKED_POINT = new Point(11, 11);

	private LocatorService locatorServiceMock = mock(LocatorService.class);

	private Locator locatorUnderTest;

	@DataProvider
	public static Object[] dataProvider() {
		return new Object[][] {
			{-1, -1, new Point(1, 1)},
			{-1, 0, new Point(1, 0)},
			{-1, 1, new Point(1, 1)},

			{0, -1, new Point(0, 1)},
			{0, 0, MOCKED_POINT},
			{0, 1, MOCKED_POINT},

			{1, -1, new Point(1, 1)},
			{1, 0, MOCKED_POINT},
			{1, 1, MOCKED_POINT}
		};
	}

	@Before
	public void setUp() {
		when(locatorServiceMock.geoLocate(any(Point.class)))
				.thenReturn(MOCKED_POINT);

		locatorUnderTest = new Locator(locatorServiceMock);
	}

	@Test
	@UseDataProvider("dataProvider")
	public void testLocateResults(int x, int y, Point expected) {
		assertTrue(PointUtils.arePointsEqual(expected, 
				locatorUnderTest.locate(x, y)));
	}
}

Benefits

Using junit-dataprovider has one huge benefit over JUnit’s Parameterized runner. Test data provider is used only for the method annotated with its name. JUnit’s Parameterized runner runs each and every test method with given data provider. In one test class, you can define several data providers as different static methods and use them in different test methods. This is not possible with JUnit’s Parameterized runner.

Conclusion

JUnit-dataprovider is a very nice library which makes JUnit 4 data-driven testing very nice and easy. Even if you do not have issues with Gradle I still would recommend it to use it instead of a standard Parameterized runner because it gives you the flexibility to bind data provider method with the specific unit test method.

Related Posts

Read more...

Mutation testing for Java with PITest

Last Updated on by

Post summary: Introduction to mutation testing and examples with PITest tool for Java.

Mutation testing

Mutation testing is a form of white-box testing. It is used to design new unit tests and evaluate the quality of the existing ones. Mutation testing involves modifying a program code in small ways, based on well-defined mutation operators that either mimic typical programming errors (such as using the wrong operator or variable name) or force the creation of valuable tests (such as dividing each expression by zero). Each mutated version is called a mutant. Existing unit tests are run against this mutant. If some unit test fails then mutant is killed. If no unit test fails then mutant survived. Test suites are measured by the percentage of mutants that they kill. New tests can be designed to kill additional mutants. The purpose of mutation testing is to help the tester develop effective tests or locate weaknesses in the test data used in the existing tests.

It is not very often when I get surprised by discovering new testing technique I’ve never heard about, so I must give credits to Alexander Todorov since I learned this one from his presentation.

PITest

Mutation testing can be done manually by changing program code and running the tests, but this is not really effective and can lead to serious problems where you commit mutated code by mistake. Most effective and recommended way of doing mutation testing is by using tools. PITest is a tool for mutation testing in Java. It seems to be fast growing and has a big community.

Integrate PITest

Examples given in current post can be found in GitHub sample-dropwizard-rest-stub repository. It is very easy to use PITest. The first step is to add it to pom.xml file:

<plugin>
	<groupId>org.pitest</groupId>
	<artifactId>pitest-maven</artifactId>
	<version>1.1.10</version>
	<configuration>
		<targetClasses>
			<param>com.automationrhapsody.reststub.persistence*</param>
		</targetClasses>
		<targetTests>
			<param>com.automationrhapsody.reststub.persistence*</param>
		</targetTests>
	</configuration>
</plugin>

The example given above is the most simple one. PITest provides various configurations very well described into PITest Maven Quick Start page.

Run PITest

Once configured it can be run with: mvn org.pitest:pitest-maven:mutationCoverage or if you want to ensure clean build every time: mvn clean test org.pitest:pitest-maven:mutationCoverage

PITest results

PITest provides very understandable reports. Along with the line code coverage, it measures the mutation coverage. There are statistics on package level.

pitest-package

PersonDB is the only class that has been uni tested. It has 91% line coverage and 1 not killed mutation. Opening the PersonDB class gives more details what is not covered by tests and what the mutation is:

pitest-class

PITest has negated the condition on line 44, making the mutated code to be: PERSONS.get(person.getId()) == null. Unit tests had passed although this mutation. Full reports can be found in PITest report example.

Action PITest results

Current results indicate that unit tests are not good enough because of the survived mutation. They are also insufficient as one line of code is not tested at all. The first improvement is to kill the mutation by change line 37 of PersonDBTest.java from PersonDB.save(person); to assertEquals(“Added Person with id=11”, PersonDB.save(person)); and PITest is run again then results show all mutations are killed.

pitest-class-no-mutations

Still, there is one line of code not covered. This will require adding a new unit test to cover the update person functionality.

PITest performance

Doing a mutation testing requires significant resources to run a large amount of unit tests. Examples given above work very fast, but they are far away from the reality. I was curious how this works on a real project so I run it on one which is relatively small one. It has very good unit tests though with 95% line coverage – 2291 out of 2402 lines. Still, PITest found only 90% mutation coverage (849/940). 51 out of 940 mutations that survived and 40 with no unit test coverage which gives a room for improvement. The total run took 3 mins 11 secs. See results below:

PIT >> INFO : Found  464 tests
PIT >> INFO : Calculated coverage in 22 seconds.
PIT >> INFO : Created  132 mutation test units

- Timings
==================================================================
> scan classpath : < 1 second
> coverage and dependency analysis : 22 seconds
> build mutation tests : < 1 second
> run mutation analysis : 2 minutes and 48 seconds
--------------------------------------------------------------------------------
> Total : 3 minutes and 11 seconds
--------------------------------------------------------------------------------
==================================================================
- Statistics
==================================================================
>> Generated 940 mutations Killed 849 (90%)
>> Ran 2992 tests (3.18 tests per mutation)
==================================================================
- Mutators
==================================================================
> org.pitest.mutationtest.engine.gregor.mutators.ConditionalsBoundaryMutator
>> Generated 18 Killed 9 (50%)
> KILLED 7 SURVIVED 7 TIMED_OUT 2 NON_VIABLE 0
> MEMORY_ERROR 0 NOT_STARTED 0 STARTED 0 RUN_ERROR 0
> NO_COVERAGE 2
--------------------------------------------------------------------------------
> org.pitest.mutationtest.engine.gregor.mutators.VoidMethodCallMutator
>> Generated 115 Killed 96 (83%)
> KILLED 81 SURVIVED 12 TIMED_OUT 15 NON_VIABLE 0
> MEMORY_ERROR 0 NOT_STARTED 0 STARTED 0 RUN_ERROR 0
> NO_COVERAGE 7
--------------------------------------------------------------------------------
> org.pitest.mutationtest.engine.gregor.mutators.ReturnValsMutator
>> Generated 503 Killed 465 (92%)
> KILLED 432 SURVIVED 16 TIMED_OUT 33 NON_VIABLE 0
> MEMORY_ERROR 0 NOT_STARTED 0 STARTED 0 RUN_ERROR 0
> NO_COVERAGE 22
--------------------------------------------------------------------------------
> org.pitest.mutationtest.engine.gregor.mutators.MathMutator
>> Generated 10 Killed 9 (90%)
> KILLED 8 SURVIVED 0 TIMED_OUT 1 NON_VIABLE 0
> MEMORY_ERROR 0 NOT_STARTED 0 STARTED 0 RUN_ERROR 0
> NO_COVERAGE 1
--------------------------------------------------------------------------------
> org.pitest.mutationtest.engine.gregor.mutators.NegateConditionalsMutator
>> Generated 294 Killed 270 (92%)
> KILLED 254 SURVIVED 16 TIMED_OUT 15 NON_VIABLE 0
> MEMORY_ERROR 0 NOT_STARTED 0 STARTED 0 RUN_ERROR 1
> NO_COVERAGE 8
--------------------------------------------------------------------------------

Case study

I used PITest on production project written on Java 8 extensively using Stream APIs and Lambda expressions. The initial run of 606 existing test cases gave 90% mutation coverage (846/940) and 95% line coverage (2291/2402).

Note that PITest calculates in statistic given above that existing tests are 464. This is because some of them are data driven tests and JUnit calculates the total number of 606 because every data row is counted as a test. Understand how to make JUnit data-driven tests in Data driven testing with JUnit parameterized tests post.

After analysis and adding new tests total test cases number was increased to 654 which is almost 8% increase. PITest run shows 97% mutation coverage (911/939) and 97% line coverage (2332/2403). During the analysis, no bugs in code were found.

Conclusion

Mutation testing is a good additional technique to make your unit tests better. It should not be the primary technique though as tests will be written just to kill the mutations instead of actually testing the functionality. In projects with well-written unit tests mutation testing does not bring much of a value, but still, it is a very good addition to your testing arsenal. PITest is a very good tool to do mutation testing in Java I would say to give it a try.

Related Posts

Read more...

Mock/Stub REST API with WireMock for better unit testing

Last Updated on by

Post summary: Examples how to use WireMock to stub (mock also is possible as a term) REST API in order make better unit testing.

The code shown in examples below is available in GitHub java-samples/wiremock repository.

WireMock

WireMock is a simulator for HTTP-based APIs. Some might consider it a service virtualization tool or a mock server. It enables you to stay productive when an API you depend on doesn’t exist or isn’t complete. It supports testing of edge cases and failure modes that the real API won’t reliably produce. And because it’s fast it can reduce your build time from hours down to minutes.

When to use it

One case where WireMock is very helpful is when building a REST API client. Create simple REST API client using Jersey post describes a way to achieve this with Jersey. In most of the cases REST API might not be forced to fail with certain errors, so WireMock is an excellent addition to standard functional tests to verify that client is working correctly in corner cases. Also, it is mandatory for unit testing because it eliminates dependencies to external services. The mock server is extremely fast and under complete control. Another case where WireMock helps is if you need to create API tests, but API is not ready yet or not working. WireMock can be used to stub the service in order to make testing framework and structure. Once the real server is ready tests will just be elaborated and details cleared up.

How to use it

WireMock is used in JUnit as a rule. More info on JUnit rules can be found in Use JUnit rules to debug failed API tests post. There are WireMockClassRule and WireMockRule. The most appropriate is the class rule, there is no need to create a mock server for each and every test, also additional logic is needed for port collision avoidance. In case you use other unit testing framework there is WireMockServer which can be started before tests and stopped afterward. The code given below is used to REST API client from Create simple REST API client using Jersey post. First JUnit class rule is created.

public class JerseyPersonRestClientTest {

	private static final int WIREMOCK_PORT = 9999;

	@ClassRule
	public static final WireMockClassRule WIREMOCK_RULE
		= new WireMockClassRule(WIREMOCK_PORT);

	private JerseyPersonRestClient clientUnderTest;

	@Before
	public void setUp() throws Exception {
		clientUnderTest
			= new JerseyPersonRestClient("http://localhost:" + WIREMOCK_PORT);
	}
}

Port should be free, otherwise there is com.github.tomakehurst.wiremock.common.FatalStartupException: java.lang.RuntimeException: java.net.BindException: Address already in use: bind exception thrown.

Usage is very simple. There are several methods which are important. Method stubFor() is initializing the stub. Method get() notifies that stub is called with HTTP GET request. Method urlMatching() uses regular expression to match which API path is invoked, then willReturn() returns aResponse() withBody(). There are several with() methods which gives a variety of options for testing. Complete test is below:

@Test
public void testGet_WithBody_PersonJson() {
	String personString = "{\"firstName\":\"FN1\",\"lastName\":\"LN1\"}";
	stubFor(get(urlMatching(".*/person/get/.*"))
		.willReturn(aResponse().withBody(personString)));

	Person actual = clientUnderTest.get(1);

	assertEquals("FN1", actual.getFirstName());
	assertEquals("LN1", actual.getLastName());
}

This is the very straightforward case, where the client should work, but when you start to elaborate on with() scenarios you can sometimes catch an issue with the code being tested. See test below is working correctly in a case where API returns HTTP response code 500 – Internal Server Error. The client might need to add some verification on response codes as well:

@Test
public void testGet_WithStatus() {
	String personString = "{\"firstName\":\"FN1\",\"lastName\":\"LN1\"}";
	stubFor(get(GET_URL)
		.willReturn(aResponse()
		.withStatus(500)
		.withBody(personString)));

	Person actual = clientUnderTest.get(1);

	assertEquals("FN1", actual.getFirstName());
	assertEquals("LN1", actual.getLastName());
}

Wiremock stateful behavior

You can configure Wiremock to respond with series of different responses, hence keeping an internal state. This might happen when you want to perform tests with more steps or some end-to-end scenario. On the first request, Wiremock can respond with one response, on the second request it can respond with a totally different response. See more in Wiremock stateful behaviour.

Difference between stub and mock

In Mock JUnit tests with Mockito example post, I’ve shown how to use Mockito to mock given classes and control their behavior in order to control and eliminate dependencies. Mockito is not suitable for this particular case because if you mock JerseyPersonRestClient‘s get() method it will just return an object, there is no testing whatsoever. Stubbing with WireMock on other hand tests all code for invoking the service, getting a response (controlled by you) and deserializing this response from network stream to Java object. It is much more adequate and close to reality testing.

Conclusion

WireMock is a very powerful framework for API stubbing in order to make your test better and it is a must for unit testing some REST API client.

Related Posts

Read more...

Mock static methods in JUnit with PowerMock example

Last Updated on by

Post summary: Examples how to mock static methods in JUnit tests with PowerMock.

This post is part of PowerMock series examples. The code shown in examples below is available in GitHub java-samples/junit repository.

In Mock JUnit tests with Mockito example post, I have shown how and why to use Mockito java mocking framework to create good unit tests. There are several things that Mockito is not supporting, but one of them is mocking of static methods. It is not that common to encounter such situation is real life, but the moment you encounter it Mockito is not able to solve the task. This is where PowerMock comes to the rescue.

PowerMock

PowerMock is a framework that extends other mock libraries giving them more powerful capabilities. PowerMock uses a custom classloader and bytecode manipulation to enable mocking of static methods, constructors, final classes and methods, private methods, removal of static initializers and more.

Example class for unit test

We are going to unit test a class called LocatorService that internally uses a static method from utility class Utils. Method randomDistance(int distance) in Utils is returning random variable, hence it has no predictable behavior and the only way to test it is by mocking it:

public class LocatorService {

	public Point generatePointWithinDistance(Point point, int distance) {
		return new Point(point.getX() + Utils.randomDistance(distance), 
			point.getY() + Utils.randomDistance(distance));
	}
}

And Utils class is:

import java.util.Random;

public final class Utils {

	private static final Random RAND = new Random();

	private Utils() {
		// Utilities class
	}

	public static int randomDistance(int distance) {
		return RAND.nextInt(distance + distance) - distance;
	}
}

Nota bene: it is good code design practice to make utility classes final and with a private constructor.

Using PowerMock

In order to use PowerMock two things has to be done:

  1. Import PowerMock into the project
  2. Annotate unit test class
  3. Mock the static class

Import PowerMock into the project

In case of using Maven import statement is:

<dependency>
	<groupId>org.powermock</groupId>
	<artifactId>powermock-module-junit4</artifactId>
	<version>1.6.5</version>
	<scope>test</scope>
</dependency>
<dependency>
	<groupId>org.powermock</groupId>
	<artifactId>powermock-api-mockito</artifactId>
	<version>1.6.5</version>
	<scope>test</scope>
</dependency>

Nota bene: there is a possibility of version mismatch between PowerMock and Mockito. I’ve received: java.lang.NoSuchMethodError: org.mockito.mock.MockCreationSettings.isUsingConstructor()Z exception when using PowerMock 1.6.5 with Mockito 1.9.5, so I had to upgrade to Mockito 1.10.19.

Annotate JUnit test class

Two annotations are needed. One is to run unit test with PowerMockRunner: @RunWith(PowerMockRunner.class). Other is to prepare Utils class for testing: @PrepareForTest({Utils.class}). The final code is:

import org.junit.runner.RunWith;
import org.powermock.core.classloader.annotations.PrepareForTest;
import org.powermock.modules.junit4.PowerMockRunner;

@RunWith(PowerMockRunner.class)
@PrepareForTest({Utils.class})
public class LocatorServiceTest {
}

Mock static class

Explicit mocking to static class should be made in order to be able to use standard Mockito when().thenReturn() construction:

int distance = 111;
PowerMockito.mockStatic(Utils.class);
when(Utils.randomDistance(anyInt())).thenReturn(distance);

Putting it all together

Final JUnit test class is shown below. The code in tests verifies logic in LocatorService, if a point is given then new point is returned by adding random to its X and Y coordinates. By removing the random element with mocking code can be tested with specific values.

package com.automationrhapsody.junit;

import org.junit.Before;
import org.junit.Test;
import org.junit.runner.RunWith;
import org.powermock.api.mockito.PowerMockito;
import org.powermock.core.classloader.annotations.PrepareForTest;
import org.powermock.modules.junit4.PowerMockRunner;

import static org.junit.Assert.assertTrue;
import static org.mockito.Matchers.anyInt;
import static org.mockito.Mockito.when;

@RunWith(PowerMockRunner.class)
@PrepareForTest({Utils.class})
public class LocatorServiceTest {

	private LocatorService locatorServiceUnderTest;

	@Before
	public void setUp() {
		PowerMockito.mockStatic(Utils.class);

		locatorServiceUnderTest = new LocatorService();
	}

	@Test
	public void testGeneratePointWithinDistance() {
		int distance = 111;

		when(Utils.randomDistance(anyInt())).thenReturn(distance);

		Point input = new Point(11, 11);
		Point expected = new Point(input.getX() + distance, 
				input.getY() + distance);

		assertTrue(arePointsEqual(expected, 
			locatorServiceUnderTest.generatePointWithinDistance(input, 1)));
	}

	public static boolean arePointsEqual(Point p1, Point p2) {
		return p1.getX() == p2.getX()
			&& p1.getY() == p2.getY();
	}
}

Conclusion

PowerMock is a powerful addition to standard mocking libraries as Mockito. Using it has some specifics, but once you understand them it is easy and fun to use it. Keep in mind that if you encounter a need to use PowerMock that can mean that code under test is not well designed. In my experience, it is possible to have very good unit tests with more than 85% coverage without any PowerMock usage. Still, there are some exceptional cases where PowerMock can be put in operation.

Related Posts

Read more...

Data driven testing with JUnit parameterized tests

Last Updated on by

Post summary: How to do data-driven testing with JUnit parameterized tests.

In Mock JUnit tests with Mockito example post, I have introduced Mockito and showed how to use for proper unit testing. In current post I will show how to improve test coverage by adding more scenarios. One solution is to copy and then paste single unit test and change input and expected output values, but this is a failure-prone approach. A smarter approach is needed – data-driven testing.

Data Driven Testing

The term from Wikipedia is: Data-driven testing (DDT) is a term used in the testing of computer software to describe testing done using a table of conditions directly as test inputs and verifiable outputs as well as the process where test environment settings and control are not hard-coded.

This exactly what is needed to improve test coverage – test with different scenarios and different input data without hard-coding the scenario itself, but just feeding different input and expected output data to it.

Parameterized JUnit tests

JUnit supports running test or several tests with given data table. Several things have to be done in order to do this:

  1. Annotate the test class
  2. Define test data
  3. Define variables to store the test data and read it
  4. Use tests data in tests

Nota bene: Every JUnit test (class annotated with @Test) is be executed with each row of the test data set. If you have 3 tests and 12 data rows this will result in 36 tests.

Annotate the class

The class needs to be run with a specialized runner in order to be treated as data-driven one. Runner is: org.junit.runners.Parameterized. The class looks like:

import org.junit.runner.RunWith;
import org.junit.runners.Parameterized;

@RunWith(Parameterized.class)
public class LocatorParameterizedTest {
}

Define test data

Test data is seeded from static method: public static Iterable<Object[]> data(). This method returns a collection of Object arrays where each array is one row with input and expected output test data. This method is annotated with @Parameterized.Parameters. The annotation may accept name argument which can display data from each row by its index: name = “{index}: Test with X={0}, Y={1}, result is: {2}”, where {index} is current test sequence, {0} is the first element from Object array. Here is how test data is defined:

@Parameterized.Parameters(name = "{index}: Test with X={0}, Y={1}, result: {2}")
public static Iterable<Object[]> data() {
	return Arrays.asList(new Object[][] {
		{-1, -1, new Point(1, 1)},
		{-1, 0, new Point(1, 0)},
		{-1, 1, new Point(1, 1)},
	});
}

Define variables to store the test data and read it

Private fields are needed to store every index from Object array representing test data row. In the constructor of the class, those variables are stored. Not that constructor must have the same number of parameters. If there is difference running the test fails with: java.lang.IllegalArgumentException: wrong number of arguments exception. Code is:

private final int x;
private final int y;
private final Point expected;

public LocatorParameterizedTest(int x, int y, Point expected, int a) {
	this.x = x;
	this.y = y;
	this.expected = expected;
}

Use tests data in tests

Once read test data is accessed in tests by using the private fields that were read through the constructor:

@Test
public void testLocateLocalResult() {
	assertTrue(arePointsEqual(expected, locatorUnderTest.locate(x, y)));
}

private boolean arePointsEqual(Point p1, Point p2) {
	return p1.getX() == p2.getX()
		&& p1.getY() == p2.getY();
}

Putting it all together

Combining all steps into one class leads to unit test shown below. If you switch the tabs you can see original test class with just two tests as described Mock JUnit tests with Mockito example post:

Data-driven test with 12 cases

import java.util.Arrays;

import org.junit.Before;
import org.junit.Test;
import org.junit.runner.RunWith;
import org.junit.runners.Parameterized;

import static org.junit.Assert.assertTrue;
import static org.mockito.Matchers.any;
import static org.mockito.Mockito.mock;
import static org.mockito.Mockito.when;

@RunWith(Parameterized.class)
public class LocatorParameterizedTest {

	private static final Point MOCKED_POINT = new Point(11, 11);

	private LocatorService locatorServiceMock = mock(LocatorService.class);

	private Locator locatorUnderTest;

	@Parameterized.Parameters(name 
		= "{index}: Test with X={0}, Y={1}, result: {2}")
	public static Iterable<Object[]> data() {
		return Arrays.asList(new Object[][] {
			{-1, -1, new Point(1, 1)},
			{-1, 0, new Point(1, 0)},
			{-1, 1, new Point(1, 1)},

			{0, -1, new Point(0, 1)},
			{0, 0, MOCKED_POINT},
			{0, 1, MOCKED_POINT},

			{1, -1, new Point(1, 1)},
			{1, 0, MOCKED_POINT},
			{1, 1, MOCKED_POINT}
		});
	}

	private final int x;
	private final int y;
	private final Point expected;

	public LocatorParameterizedTest(int x, int y, Point expected) {
		this.x = x;
		this.y = y;
		this.expected = expected;
	}

	@Before
	public void setUp() {
		when(locatorServiceMock.geoLocate(any(Point.class)))
			.thenReturn(MOCKED_POINT);

		locatorUnderTest = new Locator(locatorServiceMock);
	}

	@Test
	public void testLocateResults() {
		assertTrue(arePointsEqual(expected, 
			locatorUnderTest.locate(x, y)));
	}

	private boolean arePointsEqual(Point p1, Point p2) {
		return p1.getX() == p2.getX()
			&& p1.getY() == p2.getY();
	}
}

Simple test with 2 cases

import org.junit.Before;
import org.junit.Test;
import org.junit.runner.RunWith;
import org.mockito.Mock;
import org.mockito.runners.MockitoJUnitRunner;

import static org.junit.Assert.assertEquals;
import static org.junit.Assert.assertTrue;
import static org.mockito.Matchers.any;
import static org.mockito.Mockito.when;

@RunWith(MockitoJUnitRunner.class)
public class LocatorTest {

	private static final Point TEST_POINT = new Point(11, 11);

	@Mock
	private LocatorService locatorServiceMock;

	private Locator locatorUnderTest;

	@Before
	public void setUp() {
		when(locatorServiceMock.geoLocate(any(Point.class)))
			.thenReturn(TEST_POINT);

		locatorUnderTest = new Locator(locatorServiceMock);
	}

	@Test
	public void testLocateWithServiceResult() {
		assertEquals(TEST_POINT, locatorUnderTest.locate(1, 1));
	}

	@Test
	public void testLocateLocalResult() {
		Point expected = new Point(1, 1);
		assertTrue(arePointsEqual(expected, 
			locatorUnderTest.locate(-1, -1)));
	}

	private boolean arePointsEqual(Point p1, Point p2) {
		return p1.getX() == p2.getX()
			&& p1.getY() == p2.getY();
	}
}

The full example can be found in LocatorParameterizedTest.java class.

data-driven-junit

Better alternatives

Standard JUnit data provider is not very flexible. Define the data set is used for the whole test class, thus every test method in this class will be run with each of dataset rows. If you have 4 rows and 3 test methods then this will result in 12 tests being run. TestNG provides much better data provider where a dataset is defined and can be applied to individual test method only. More details can be found in TestNG data provider page. This data provider is available for JUnit by external Java library called junit-dataprovider. More details how to use this data provider can be found in Data driven testing with JUnit and Gradle post.

Conclusion

Data-driven testing is very powerful instrument. With current post, I showed how easy it is to do it with JUnit as well as what alternatives are available.

Related Posts

Read more...

Assert Mockito mock method arguments if no equals() method implemented

Last Updated on by

Post summary: How to assert mock method is called with the specific object as an argument in case no equals() method is implemented on argument object.

Mock JUnit tests with Mockito example post introduces Mockito as Java mocking framework. The code shown in examples below is available in GitHub java-samples/junit repository. Mockito makes it possible to verify whether a mock method has been called and with what specific object:

verify(locatorServiceMock, times(1)).geoLocate(new Point(1, 1));

The code above verifies that mock’s geoLocate() method was called with argument object with coordinates (1, 1).

Missing equals() method

Internally Mockito uses Point class’s equals() method to compare object that has been passed to the method as an argument with object configured as expected in verify() method. If equals() is not overridden then java.lang.Object’s equals() is used which compares only the references, i.e. if both variables point to one and the same object in heap. In the current example, Point class has no equals() method implemented. When providing expected a new object is created, references are not one and the same, so Mockito will fail the verification.

Override equals()

In order to make verification works simplest solution is to implement equals() method in Point class. Personally, I’m not a big fan of changing production code for sake of testing. Maybe there is a valid reason for a developer to have designed current class in such manner. A more realistic scenario is that Point class comes from some external library which there is no control over, so overriding equals() method is not possible at all.

Use Mockito argThat matcher

Mockito provides a method called argThat() in org.mockito.Matchers class. It accepts an object from the class that implements org.hamcrest.Matcher<T> interface. Actual equals implementation is done in its matches() method:

private class PointMatcher extends ArgumentMatcher<Point> {
	private final Point expected;

	public PointMatcher(Point expected) {
		this.expected = expected;
	}

	@Override
	public boolean matches(Object obj) {
		if (!(obj instanceof Point)) {
			return false;
		}
		Point actual = (Point) obj;

		return actual.getX() == expected.getX()
			&& actual.getY() == expected.getY();
	}
}

Once implemented this class can be used in tests:

verify(locatorServiceMock, times(1))
	.geoLocate(argThat(new PointMatcher(new Point(1, 1))));

Conclusion

In examples above is shown how to implement or change equals() method behavior for a specific class in unit tests so that Mockito can verify object from this class is provided as an argument for mock’s method call.

Related Posts

Read more...

Mock JUnit tests with Mockito example

Last Updated on by

Post summary: Why mocking is needed in unit testing and how to do it with Mockito.

Unit testing

By definition, unit testing is a process in which the smallest testable parts of an application, called units, are individually and independently tested for proper operation. Smallest testable unit in Java is a method. Public methods are the only one exposed to outside world, so only they are subject to unit testing.

Mocking

Unit tests focus on a particular piece of code that needs to be exercised. In most of the cases, this code relies on external dependencies. Those dependencies have to be controlled, so only code under test is exercised. Removing dependencies is done with a test double. Test doubles are objects that look and behave like their release-intended counterparts but are actually simplified versions of them which reduce the complexity and facilitate testing. Test doubles are fakes, stubs, and mocks.

Mockito

Mockito is the most famous mocking framework for Java. It provides all mocking features needed for proper unit testing, except mocking of static methods. Static methods can be mocked with PowerMock. It is a Mockito’s wrapper that provides same API plus static method mocking and other features. In PowerMock examples and why better not to use them post, I have shown how to use PowerMock and its features.

Example class for unit test

Code shown in examples below is available in GitHub java-samples/junit repository. We are going to unit test a class called Locator that internally uses another class LocatorService:

public class Locator {

	private final LocatorService locatorService;

	public Locator(LocatorService locatorService) {
		this.locatorService = locatorService;
	}

	public Point locate(int x, int y) {
		if (x < 0 || y < 0) {
			return new Point(Math.abs(x), Math.abs(y));
		} else {
			return locatorService.geoLocate(new Point(x, y));
		}
	}
}

The example above is pretty simple. If we pass point with some negative coordinates method locate() returns point with positive coordinates. If coordinates are positive then search via LocatorService is done. This class represents some external API that our code is calling. Since there is no control over this API and internal structure is not know it should be mocked in the unit tests. As stated above unit tests are focused on a specific piece of code, a unit.

Initialising a mock

As described in Mockito’s documentation a way to mock some object is: List mockedList = mock(List.class); Another way, that is used in current examples is to annotate the filed that is going to be mocked with @Mock and annotate JUnit test class with @RunWith(MockitoJUnitRunner.class). In this way Mockito runner does the initialization behind the scenes:

@RunWith(MockitoJUnitRunner.class)
public class LocatorTest {

	@Mock
	private LocatorService locatorServiceMock;
}

Control mock’s behavior

The whole idea of having a mock is to be able to control its behavior. If mock is called it should respond in a predictable manner. This is done with when() method:

when(locatorServiceMock.geoLocate(any(Point.class)))
	.thenReturn(new Point(11, 11)); 

When mock’s geoLocate() method is being called with any given point object it always returns new Point with coordinates X=11 and Y=11. If this is not enough, more elaborate scenarios can be used:

when(locatorServiceMock.geoLocate(new Point(5, 5))).thenReturn(new Point(50, 50));
when(locatorServiceMock.geoLocate(new Point(1, 1))).thenReturn(new Point(11, 11));

If locator class is called with a point with coordinates (5, 5) then new point with coordinates (50, 50) is returned. If mock is called with a point with coordinates (1, 1) then point with (11, 11) is returned. In any other cases, null is returned by default.

Nota bene: in order to work properly object used to call the mocked method (Point is the current example) should have properly implemented equals() method otherwise java.lang.Object‘s equals() method is used, which just compared the references. Examples above will not work, as Point doesn’t have equals() method properly overridden.

Depending on tests that have to be conducted more precise control over mock’s response could be needed. This is done with thenAnswer() mock’s method:

when(locatorServiceMock.geoLocate(any(Point.class)))
	.thenAnswer(new Answer<Point>() {
		@Override
		public Point answer(InvocationOnMock invocationOnMock) throws Throwable {
			Object[] args = invocationOnMock.getArguments();
			Point caller = (Point) args[0];
			
			if (caller.getX() == 5 && caller.getY() == 5) {
				return new Point(50, 50);
			} else if (caller.getX() == 1 && caller.getY() == 1) {
				return new Point(11, 11);
			} else {
				return null;
			}
		}
	});

Call to invocationOnMock.getArguments() returns array with arguments that mock’s geoLocate() method was called with. In the current example, it is only one argument from type Point, so it is cast and saved to new Point object inside caller variable. If coordinates are (5, 5) then new point with coordinates (50, 50) are returned. If coordinates on input are (1, 1) then new point (11, 11) is returned. In all other cases, null is returned.

Verify mock was interacted with

In order to verify execution path is correct, Mockito provides a way to check if a certain method on the mock has been called and how many times. This is done with verify() method. To confirm no more methods are called on this specific mock instance then verifyNoMoreInteractions() is used:

verify(locatorServiceMock, times(1)).geoLocate(new Point(1, 1));

verifyNoMoreInteractions(locatorServiceMock);

The example above verifies that mock’s geoLocate() method was called with a specific point with coordinates (1, 1). If it is not important which object is passed to the method then any(Point.class) can be used.

Nota bene: the example above will not work as there is no equals() method implemented on point class, so Mockito is using java.lang.Object’s equals() method by default that compares only the references. Point class is intentionally left without equals method to demonstrate how such situations can be solved. How to solve this obstacle is shown in Assert Mockito mock method arguments if no equals() method implemented post.

Putting it all together

All snippets above are put together is one simple unit test that covers all the possible paths for Locator’s locate() method, but obviously not all the test conditions:

import org.junit.Before;
import org.junit.Test;
import org.junit.runner.RunWith;
import org.mockito.Mock;
import org.mockito.runners.MockitoJUnitRunner;

import static org.junit.Assert.assertEquals;
import static org.junit.Assert.assertTrue;
import static org.mockito.Matchers.any;
import static org.mockito.Mockito.when;

@RunWith(MockitoJUnitRunner.class)
public class LocatorTest {

	private static final Point TEST_POINT = new Point(11, 11);

	@Mock
	private LocatorService locatorServiceMock;

	private Locator locatorUnderTest;

	@Before
	public void setUp() {
		when(locatorServiceMock.geoLocate(any(Point.class)))
			.thenReturn(TEST_POINT);

		locatorUnderTest = new Locator(locatorServiceMock);
	}

	@Test
	public void testLocateWithServiceResult() {
		assertEquals(TEST_POINT, locatorUnderTest.locate(1, 1));
	}

	@Test
	public void testLocateLocalResult() {
		Point expected = new Point(1, 1);
		assertTrue(arePointsEqual(expected, locatorUnderTest.locate(-1, -1)));
	}

	private boolean arePointsEqual(Point p1, Point p2) {
		return p1.getX() == p2.getX()
			&& p1.getY() == p2.getY();
	}
}

When locatorServiceMock is called with any then TEST_POINT is returned. No matter that Point has no equals() method defined, assertEquals() in testLocateWithServiceResult() passes because code refers one and the same object. Helper method arePointsEqual() is needed in testLocateLocalResult() though. Code coverage report in IntelliJ IDEA is:

Mockito-JUnit-results

Optimise

Next step is to improve test coverage by adding more unit tests. Copy/paste is not an option, so in post Data driven testing with JUnit parameterized tests I have described how to make data-driven tests in JUnit.

Conclusion

Mocking is mandatory when developing unit tests. Mockito is a convenient mocking library for Java. It is possible to control what mock returns if called with whatever value or if called with a specific value. Mockito allows verification on which of mock’s methods has been called and how many times.

Related Posts

Read more...

JUnit methods execution sequence

Last Updated on by

Post summary: Details with code samples on JUnit methods execution sequence.

In order to be effective in your unit tests, you need to know in details how JUnit works. In this post, I’ll show what is the execution sequence in one JUnit test. The code shown in the current post is available on GitHub java-samples/junit repository.

JUnit execution sequence

Methods that are used in a JUnit test:

  • Methods annotated with @Before and @After – those are public void methods that do some specific setup/teardown before and after a test method. Generally, it is good to have just one @Before and @After method, but JUnit allows as much as you have. Execution sequence with the same annotation is in order of appearance in the file.
  • Methods annotated with @BeforeClass and @AfterClass – those public static void methods which do some setup/teardown just once before and after all tests have started/passed. An also good idea to have just one of each, but in case of more with the same annotation, they are executed in order of appearance.
  • Methods annotated with @Test – those are public void methods with actual tests logic and asserts. Generally, there should be many test methods in a class. Default JUnit execution order is by name ascending. Still, this is not always guaranteed. Although bad practice to have a sequence of unit tests this can be done by annotating your test class with @FixMethodOrder(MethodSorters.NAME_ASCENDING).
  • Test class constructor – each and every test method is run in its own object instance, so constructor is run on instantiation. It is not very good practice to do something in test class constructor. Setup should be done in a @Before method.

Order of differently annotated methods does not depend on where they are put in the file but depends on types of annotations. Order of methods with one and the same annotations is described above. Here is the output of ExecutionSequenceTest:

@BeforeClass

	TestClass constructor
	@Before
	test1 body
	@After

	TestClass constructor
	@Before
	test2 body
	@After

	TestClass constructor
	@Before
	test3 body
	@After

@AfterClass

JUnit execution sequence with rules

In Use JUnit rules to debug failed API tests post, I have described rules and how they work. TestWatcher gives access to tests results when the test starts and finishes. The example here is with @Rule and @ClassRule annotated objects from a custom PrintSequenceRule class extending TestWatcher class. Along with methods described in the previous section, there are several that come into play when rules are involved:

  • starting() and finished() – methods come from TestWatcher class and are run on start/finish of class/method.
  • succeeded(), failed() or skipped() – one of this is executed based on class method result.
  • Rule constructor – it is not recommended to use something in rule constructor.

Output of ExecutionSequenceRulesTest class is:

RuleClass constructor
starting() of TestClass
@BeforeClass

	RuleClass constructor
	TestClass constructor
	starting() of TestMethod test1()
	@Before
	test1 body
	@After
	succeeded() of TestMethod test1()
	finished() of TestMethod test1()

	RuleClass constructor
	TestClass constructor
	starting() of TestMethod test2()
	@Before
	test2 body
	@After
	succeeded() of TestMethod test2()
	finished() of TestMethod test2()

	RuleClass constructor
	TestClass constructor
	starting() of TestMethod test3()
	@Before
	test3 body
	@After
	succeeded() of TestMethod test3()
	finished() of TestMethod test3()

@AfterClass
succeeded() of TestClass
finished() of TestClass

Conclusion

In order to design your tests correctly, it is good to know what is JUnit methods execution order. @Before/@After methods are executed before/after each test method. @BeforeClass/@AfterClass are executed just once per test class on its start and end. Rules provide a capability of extending the standard functionality. It is possible to use @Rule for each test method or @ClassRule for the whole test class.

Read more...

Retry JUnit failed tests immediately

Last Updated on by

Post summary: How to retry failed JUnit tests immediately and if a retry is OK then report test as passed.

Approaches

There are mainly three approaches to make JUnit retry failed tests.

  • Maven Surefire or Failsafe plugins – follow plugin name links for more details how to use and configure plugins
  • JUnit rules – code listed in the current post can be used as a rule. See more for rules in Use JUnit rules to debug failed API tests post. Problem is @Rule annotation works for test methods only. In order to have retry logic in @BeforeClass then the @ClassRule object should be instantiated.
  • JUnit custom runner – this post is dedicated to creating own JUnit retry runner and run tests with it.

Custom JUnit retry runner

A custom runner can be created by extending org.junit.runners.BlockJUnit4ClassRunner class and override public void run(final RunNotifier notifier) and protected void runChild(final FrameworkMethod method, RunNotifier notifier) methods. run() is accessed when test class is instantiated, runChild() is accessed when test method is run. Below is the code for custom JUnit retry runner class:

package com.automationrhapsody.junit.runners;

import org.junit.Ignore;
import org.junit.internal.AssumptionViolatedException;
import org.junit.internal.runners.model.EachTestNotifier;
import org.junit.runner.Description;
import org.junit.runner.notification.RunNotifier;
import org.junit.runner.notification.StoppedByUserException;
import org.junit.runners.BlockJUnit4ClassRunner;
import org.junit.runners.model.FrameworkMethod;
import org.junit.runners.model.InitializationError;
import org.junit.runners.model.Statement;

public class RetryRunner extends BlockJUnit4ClassRunner {

	private static final int RETRY_COUNT = 2;

	public RetryRunner(Class<?> clazz) throws InitializationError {
		super(clazz);
	}

	@Override
	public void run(final RunNotifier notifier) {
		EachTestNotifier testNotifier = new EachTestNotifier(notifier, getDescription());
		Statement statement = classBlock(notifier);
		try {
			statement.evaluate();
		} catch (AssumptionViolatedException ave) {
			testNotifier.fireTestIgnored();
		} catch (StoppedByUserException sbue) {
			throw sbue;
		} catch (Throwable t) {
			System.out.println("Retry class: " + getDescription().getDisplayName());
			retry(testNotifier, statement, t, getDescription());
		}
	}

	@Override
	protected void runChild(final FrameworkMethod method, RunNotifier notifier) {
		Description description = describeChild(method);
		if (method.getAnnotation(Ignore.class) != null) {
			notifier.fireTestIgnored(description);
		} else {
			runTest(methodBlock(method), description, notifier);
		}
	}

	private void runTest(Statement statement, Description description, RunNotifier notifier) {
		EachTestNotifier eachNotifier = new EachTestNotifier(notifier, description);
		eachNotifier.fireTestStarted();
		try {
			statement.evaluate();
		} catch (AssumptionViolatedException e) {
			eachNotifier.addFailedAssumption(e);
		} catch (Throwable e) {
			System.out.println("Retry test: " + description.getDisplayName());
			retry(eachNotifier, statement, e, description);
		} finally {
			eachNotifier.fireTestFinished();
		}
	}

	private void retry(EachTestNotifier notifier, Statement statement, Throwable currentThrowable, Description info) {
		int failedAttempts = 0;
		Throwable caughtThrowable = currentThrowable;
		while (RETRY_COUNT > failedAttempts) {
			try {
				System.out.println("Retry attempt " + (failedAttempts + 1) + " for " + info.getDisplayName());
				statement.evaluate();
				return;
			} catch (Throwable t) {
				failedAttempts++;
				caughtThrowable = t;
			}
		}
		notifier.addFailure(caughtThrowable);
	}
}

The code shown above is available in GitHub java-samples/junit repository.

Using JUnit RetryRunner

In order to configure JUnit test to use the runner, class holding tests should be annotated with @RunWith:

@RunWith(RetryRunner.class)
public class RetryRunnerTests {
	@Test
	public void testRetrySuccessFirstTime() {
		assertTrue(true);
	}
}

Conclusion

Making JUnit to rerun is easy, the harder thing to do is to fix your tests so they pass from the first time. Generally, it is not good to have tests that are flaky.

Read more...

Use JUnit rules to debug failed API tests

Last Updated on by

Post summary: What are JUnit rules and how to use them to improve debugging of failed API tests.

What are JUnit rules

Rules are an easy way to separate tests from non-tests code. In many cases, some kind of setup is required before starting the tests. Rules provide a way to define this setup code externally and just access it from your tests.

How to use JUnit rules

Instantiate a public variable with rule class you want to use. Depending on the specific rule you can invoke methods on this public variable. The example below is the simplest that gives you the name of current test method being executed.

@Rule
public TestName name = new TestName();

@Test
public void testPrintMethodName() {
	assertEquals("testPrintMethodName", name.getMethodName());
}

Types of JUnit rules

Below are shown rules that JUnit provides:

  • TemporaryFolder – allows the creation of files and folders that gets deleted when test method finishes.
  • ExternalResource – sets up external resources (file, socket, database connection) and then releases them. Same can be accomplished in @Before and @After methods.
  • ErrorCollector – execution of test continues after the first error and successive errors are collected and reported after test finishes.
  • Verifier – additional asserting on test conditions.
  • TestWatcher – has access to tests output – when test starts, finishes, and the test result.
  • TestName – gives current executing test method name.
  • Timeout – sets a timeout for all the test methods in the class. If some test takes longer it is terminated and failed.
  • ExpectedException – very handy way to test whether method throws correct exception. It is possible to use @Test(expected = NullPointerException.class), but it does not allow you to check what is the exception message.

ClassRule

@Rule annotation creates a new instance of the rule class before each and every test method is run. In some cases, rule object is needed into test class initialization method (annotated with @BeforeClass). In order to have it into initialization method, a @ClassRule annotation has to be used instead. Then the rule object is instantiated only once before @BeforeClass method has run, so the rule is available in it. @ClassRule is good to be used in situations where there are expensive resources to be created – better to create them on test class initialization rather before each test method. More details about execution sequence can be found in JUnit methods execution sequence post.

Debug API tests

API tests generally are a sequence of requests. One request depends on previous as it takes some data out of it. If some of the requests in the chain fail you will need the whole chain to be able to debug and trace why exactly the whole scenario failed.

Store API calls in a Queue

It is a good idea to have one class that is sending API requests and returning responses. Below is a simple example of such class. In real life, makeRequest methods will accept some parameters or request object and result will be some response object, not String.

public class RequestUtils {

	private static final Queue<String> MESSAGES_QUEUE = new LinkedList<>();

	public static String makeSomeRequest(String request) {
		getMessages().add(request);
		String response = "makeSomeRequestResponse";
		getMessages().add(response);
		return response;
	}

	public static String makeAnotherRequest(String request) {
		getMessages().add(request);
		String response = "makeAnotherRequestResponse";
		getMessages().add(response);
		return response;
	}

	public static void printMessages() {
		for (String message : getMessages()) {
			System.out.println(message);
		}
		clearMessages();
	}

	public static void clearMessages() {
		getMessages().clear();
	}

	private static Queue<String> getMessages() {
		return MESSAGES_QUEUE;
	}
}

Class collects all requests and responses in a queue of Strings. It has printMessages() and clearMessages() methods. It also has a getMessages() method which just returns the queue. This method is not bringing real value to code but rather used to easily switch to different types of queues.

Extend TestWatcher to have access to test results

As stated above TestWatcher provides access to tests output without the ability to modify it. Extending TestWatcher gives you access to those methods:

public class MessagesQueueRule extends TestWatcher {

	protected void succeeded(Description description) {
		RequestUtils.clearMessages();
	}

	protected void failed(Throwable e, Description description) {
		RequestUtils.printMessages();
	}

	protected void skipped(AssumptionViolatedException e, 
			Description description) {
		RequestUtils.printMessages();
	}
}

On success, messages queue get cleared, on skipped or failed it gets printed to enable you to debug.

Tests are a sequence of requests and responses

Test below is just an example to show how an API test generally looks like. It is possible to do some method chaining, but this is out of the scope of the current post.

@Test
public void test1() {
	String result1 = RequestUtils.makeSomeRequest("test1request1");
	String result2 = RequestUtils.makeAnotherRequest(result1);
	String actualResult = RequestUtils.makeAnotherRequest(result2);
	assertEquals("makeAnotherRequestResponse", actualResult);
}

If assertEquals() fails all requests/response in the test method will get printed into the logs.

Multithreading

You might have noticed that current solution is not thread-safe as Queue is one and the same and can be accessed from many threads which will lead to ConcurrentModification exception. In Avoid multithreading problems in Java using ThreadLocal post, there is a solution using ThreadLocal.

Conclusion

Rules provide flexibility make whatever is needed for your tests. They are an easy way to extract code which is not a test logic to external classes. All the details about rules are available at JUnit Rules page. In the current post, I showed you an easy way to store and output requests in case of API testing. The code shown above is available in GitHub java-samples/junit repository.

Related Posts

Read more...