Build a REST API with Express on Node.js and run it on Docker
Code below can be found in GitHub sample-nodejs-rest-stub repository. This is my first JavaScript post, so bare with me if something is not as perfect as it should be.
Node.js
Node.js is a JavaScript runtime built on Chrome's V8 JavaScript engine. Node.js uses an event-driven, non-blocking I/O model that makes it lightweight and efficient. Node.js' package ecosystem, npm, is the largest ecosystem of open source libraries in the world.Create Node.js project
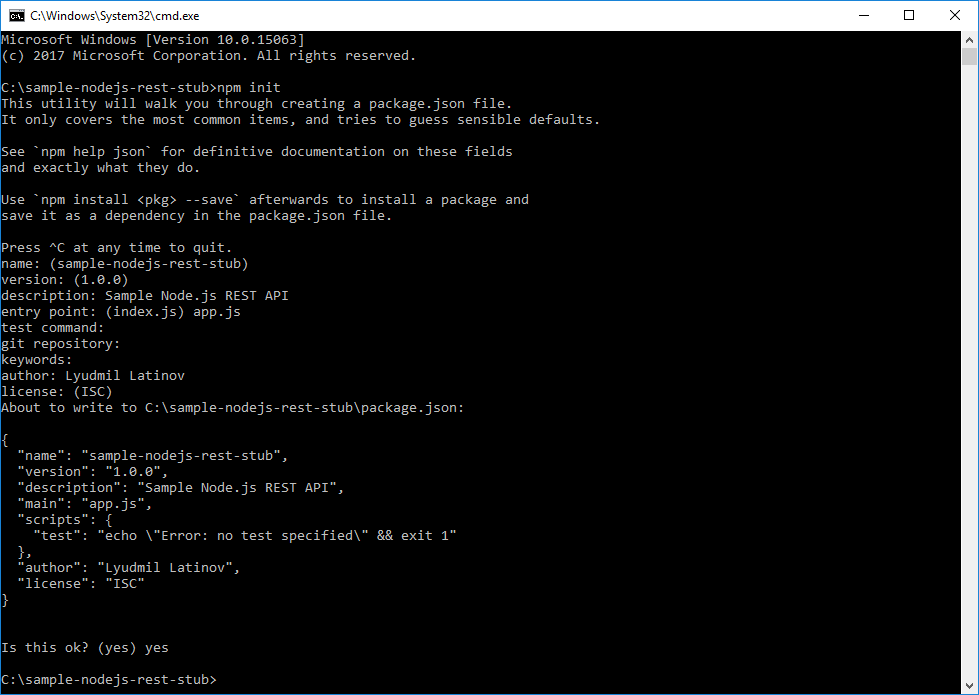
Node.js project is created with npm init, which guides you through a wizard with several questions.In the end package.json file is created. This is the file with all your project’s configuration.
{
  "name": "sample-nodejs-rest-stub",
  "version": "1.0.0",
  "description": "Sample Node.js REST API",
  "main": "app.js",
  "scripts": {
    "test": "echo \"Error: no test specified\" && exit 1"
  },
  "author": "Lyudmil Latinov",
  "license": "ISC"
}
Once created it is good to add some JavaScript code to test that project is working. I called the file app.js and it will be later extended. It does nothing, but writing Hello world! to the console.
'use strict';

console.log('Hello world!');
File with JavaScript code can be run with node app.js command. You can change package.json file by adding start script and then run the application with npm start:
"scripts": {
  "start": "node app.js",
  "test": "echo \"Error: no test specified\" && exit 1"
}
Express
Express is a web framework for Node.js. It is the most used one. In order to use express it has to be added as a dependency and saved to package.json file.npm install express --save
Change app.js in order to verify Express is working correctly. The ‘use strict’ literal is used for enabling ECMAScript 5 strict mode, which has several restrictions, like warnings are thrown as errors, usage of undeclared variables is prohibited, etc. I would prefer using constants declared with const whenever possible. Express module is assigned to express variable with require(‘express’) directive. Then new express object is created and assigned to app variable. HTTP GET endpoint that listens to ’/’ is configured with app.get(path, callback) function. Callback is a function that is called inside another function, in our case inside get() function. In the current example, callback has arguments req and res which gives you access to Express’ Request and Response objects. What is done below is that send([body]) function on the response is called, which returns the result. Socket that listens for incoming connections is started with app.listen(path, [callback]) function. More details can be found in Express API reference documentation.
'use strict';

const express = require('express');
const app = new express();

app.get('/', (req, res) => {
    res.send('Hello World!');
});

app.listen(3000, () => {
    console.log('Server up!');
});
If you run with npm start you should see Server is up! text. Firing GET request to http://localhost:3000 should return Hello World! response.
Add REST API
Functionality is a sample Person service that is used also in Build a RESTful stub server with Dropwizard and Build a REST API with .NET Core 2 and run it on Docker Linux container posts.The first step is to include body-parser, an Express middleware which parses request body and makes it available as an object in req.body property.
npm install body-parser --save
Express middleware is series of function calls that have access to req and res objects. Middleware is used in our application. I will explain as much as possible, if you are interested in more details you can read in Express using middleware documentation.
Person class
A standard model class or POJO is needed in order to transfer and process JSON data. It is standard ECMAScript 6 Person class with constructor which is then exported as a module with module.exports = Person.Person repository
Again there will be no real database layer, but a functionality that acts as such. In the constructor, a Map with several Person objects is created. There are getById, getAll, remove and save functions which simulate different CRUD operations on data. Inside them, various Map functions are used. I'm not going to explain those in details, you can read more about maps in JavaScript Map object documentation. In the end, PersonRepository is instantiated to a personRepository variable which is exported as a module. Later, when require is used, this instance will be accessible only, not the PersonRepository class itself.Person routes
In initial example routes and their handling was done with app.get(), here express.Router is used. It is complete middleware routing system. See more in Express routing documentation. Router class is imported const Router = require('express') and new instance is created const router = new Router(). Registering path handlers is same as in application. There are get(), post(), etc., functions resp. for GET and POST requests. Specific when using the router is that it should be registered as application middleware with app.use('/person', router). This makes router handle all defined in it paths which are now under /person base path. Current route configuration is defined as a function with name getPersonRoutes which takes app as an argument. This function is exported as a module.Application
Important bit here is require('./routes/personRoutes')(app) which uses getPersonRoutes function and registers person routes.'use strict';
class Person {
constructor(id, firstName, lastName, email) {
this.id = id;
this.firstName = firstName;
this.lastName = lastName;
this.email = email;
}
}
module.exports = Person;
'use strict';

const Person = require('../json/person');

class PersonRepository {
    constructor() {
        this.persons = new Map([
            [1, new Person(1, 'FN1', 'LN1', 'email1@email.na')],
            [2, new Person(2, 'FN2', 'LN2', 'email2@email.na')],
            [3, new Person(3, 'FN3', 'LN3', 'email3@email.na')],
            [4, new Person(4, 'FN4', 'LN4', 'email4@email.na')]
        ]);
    }

    getById(id) {
        return this.persons.get(id);
    }

    getAll() {
        return Array.from(this.persons.values());
    }

    remove() {
        const keys = Array.from(this.persons.keys());
        this.persons.delete(keys[keys.length - 1]);
    }

    save(person) {
        if (this.getById(person.id) !== undefined) {
            this.persons[person.id] = person;
            return "Updated Person with id=" + person.id;
        }
        else {
            this.persons.set(person.id, person);
            return "Added Person with id=" + person.id;
        }
    }
}

const personRepository = new PersonRepository();

module.exports = personRepository;
'use strict';

const Router = require('express');
const personRepo = require('../repo/personRepository');

const getPersonRoutes = (app) => {
    const router = new Router();

    router
        .get('/get/:id', (req, res) => {
            const id = parseInt(req.params.id);
            const result = personRepo.getById(id);
            res.send(result);
        })
        .get('/all', (req, res) => {
            const result = personRepo.getAll();
            res.send(result);
        })
        .get('/remove', (req, res) => {
            personRepo.remove();
            const result = 'Last person remove. Total count: '
                + personRepo.persons.size;
            res.send(result);
        })
        .post('/save', (req, res) => {
            const person = req.body;
            const result = personRepo.save(person);
            res.send(result);
        });

    app.use('/person', router);
};

module.exports = getPersonRoutes;
'use strict';

const express = require('express');
const app = new express();
const bodyParser = require('body-parser');

// register JSON parser middlewear
app.use(bodyParser.json());

require('./routes/personRoutes')(app);

app.listen(3000, () => {
    console.log("Server is up!");
});
Debug with Visual Studio Code
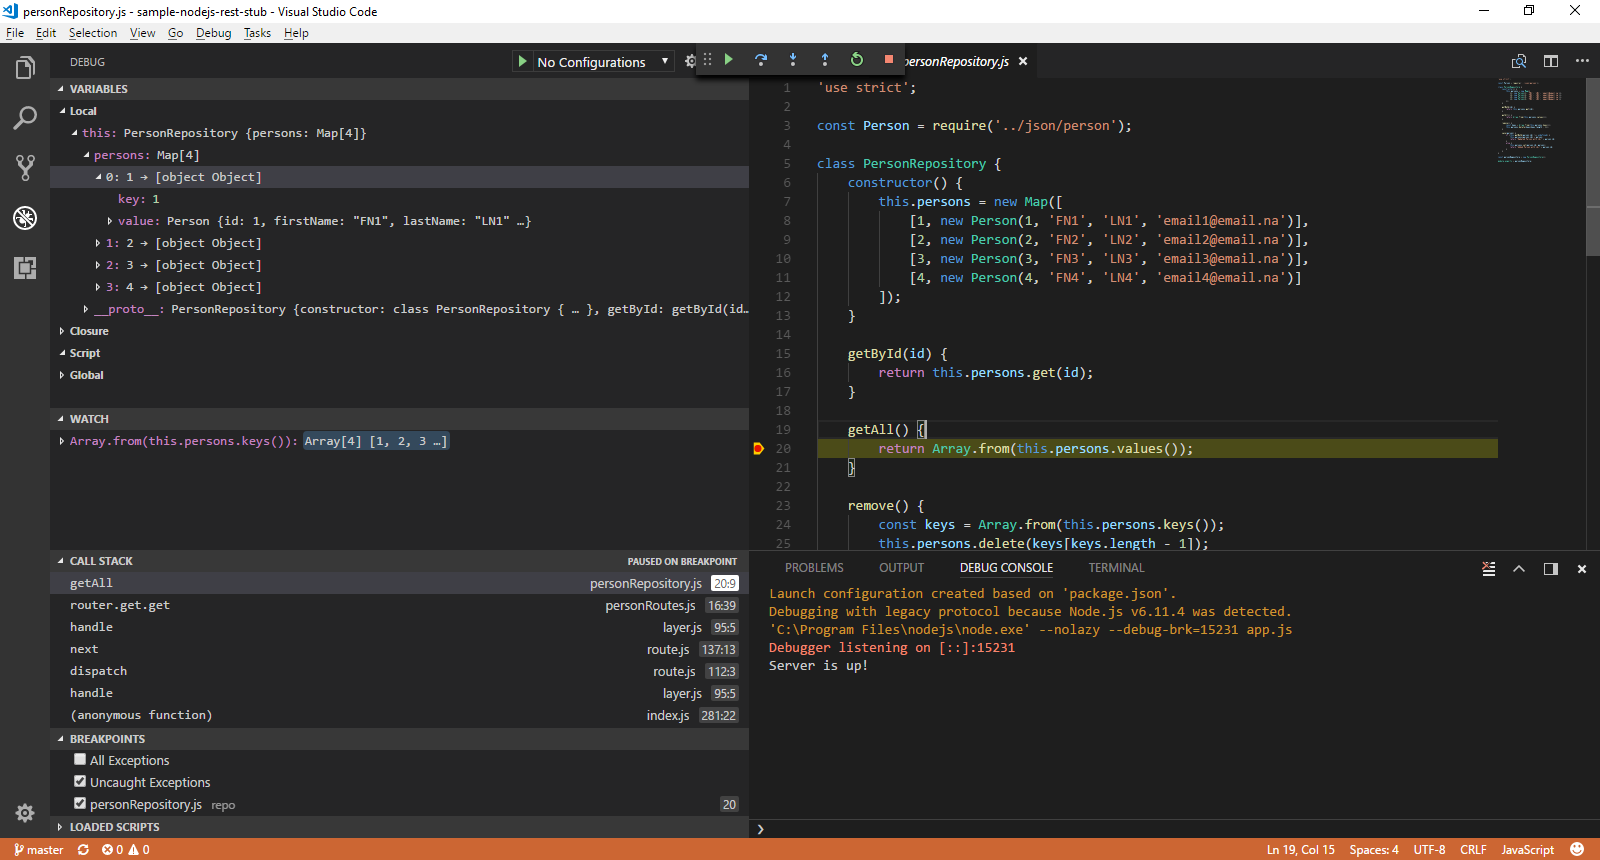
I started to like Visual Studio Code – an open source multi-platform editor maintained by Microsoft. Once project folder is imported, hitting F5 starts to debug on the project.External configuration
External configuration from a file is a must for every serious application, so this also has to be handled. A separate config.js file is keeping the configuration and exposing it as a module. There is versionRoutes.js file added which is reading configuration value and exposing it to the API. It follows the same pattern as personRoutes.js, but it has config as function argument as well. Also, app.js has to be changed, import config and pass it to getVersionRoutes function.'use strict';
const config = {
version: '1.0'
};
module.exports = config;
'use strict';

const getVersionRoutes = (app, config) => {
    app.get('/api/version', (req, res) => {
        res.send(config.version);
    });
};

module.exports = getVersionRoutes;
'use strict';

const express = require('express');
const bodyParser = require('body-parser');
const config = require('./config/config');
const app = new express();

// register JSON parser middlewear
app.use(bodyParser.json());

require('./routes/personRoutes')(app);
require('./routes/versionRoutes')(app, config);

app.listen(3000, () => {
    console.log("Server is up!");
});
Code style checker
It is very good practice to have consistency over projects code. The more important benefit of using it is that it can catch bugs that otherwise will be caught later in when the application is run. This is why using a code style checker is recommended. Most popular for JavaScript is ESLint. In order to have it has to be added as a dependency to the project:npm install eslint --save-dev
Notice the —save-dev option, this creates a new devDependencies node in package.json. This means that project needs this packages, but just for development. Those dependencies will not be available if someone is importing your project. Entry in scripts node in package.json file can be added: “lint”: “eslint .”. This will allow you to run ESLint with npm run lint. ESLint configuration is present in .eslintrc file. In .eslintignore are listed folders to be skipped during the check.
{
  "extends": "eslint:recommended",
  "parserOptions": {
    "ecmaVersion": 6
  },
  "env": {
    "es6": true,
    "node": true
  },
  "globals": {
  },
  "rules": {
    "quotes": [2, "single"]
  }
}
node_modules
"scripts": {
  "start": "node app.js",
  "test": "echo \"Error: no test specified\" && exit 1",
  "lint": "eslint ."
},
...
"devDependencies": {
  "eslint": "^4.15.0"
}
'use strict';

const express = require('express');
const bodyParser = require('body-parser');
const config = require('./config/config');
const app = new express();

// register JSON parser middlewear
app.use(bodyParser.json());

require('./routes/personRoutes')(app);
require('./routes/versionRoutes')(app, config);

app.listen(3000, () => {
    /* eslint-disable */
    console.log('Server is up!');
});
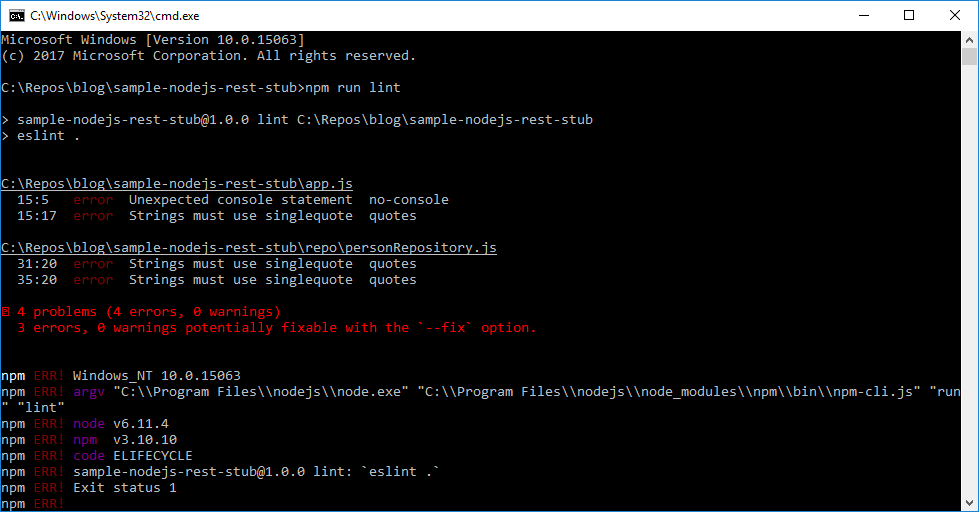
During the check, some issues were found. One of the issues is that console.log() is not allowed. This is a pretty good rule as all logging should be done to some specific logger, but in our case, we need app.js to have text showing that server is up. In order to ignore this error /* eslint-disable */ comment can be used, see app.js above.
Dockerfile
Dockerfile that packs application is shown below:FROM node:8.6-alpine
RUN mkdir -p /usr/src/app
WORKDIR /usr/src/app
COPY package.json ./
RUN npm install
COPY . .
EXPOSE 3000
CMD ["npm", "start"]
Docker container that is used is node:8.6-alpine. Folder /usr/src/app and is made current working directory. Then package.json file is copied into container and npm install is run, this will download all dependencies. All files from the current folder are copied on docker image with: COPY . .. Port 3000 is exposed so it is, later on, available from the container. With CMD is configured the command that is run when the container is started.
Build and run Docker container
Docker container is packaged with tag nodejs-rest with the following command:docker build . -t nodejs-rest
Docker container is run with exposing port 3000 from the container to port 9000 on the host with the following command:
docker run -e VERSION=1.1 -p 9000:3000 nodejs-rest
Notice the -e VERSION=1.1 which sets an environment variable to be used inside the container. The intention is to use this variable in the application. This can be enabled with modifying config.js file by changing to: version: process.env.VERSION || ‘1.0’. If environment variable VERSION is available then save it in version, if not use 1.0.
'use strict';

const config = {
    version: process.env.VERSION || '1.0'
};

module.exports = config;
If invoked now /api/version returns 1.1.


