Monthly Archives: October 2016

Mock static methods in JUnit with PowerMock example

Last Updated on by

Post summary: Examples how to mock static methods in JUnit tests with PowerMock.

This post is part of PowerMock series examples. The code shown in examples below is available in GitHub java-samples/junit repository.

In Mock JUnit tests with Mockito example post, I have shown how and why to use Mockito java mocking framework to create good unit tests. There are several things that Mockito is not supporting, but one of them is mocking of static methods. It is not that common to encounter such situation is real life, but the moment you encounter it Mockito is not able to solve the task. This is where PowerMock comes to the rescue.

PowerMock

PowerMock is a framework that extends other mock libraries giving them more powerful capabilities. PowerMock uses a custom classloader and bytecode manipulation to enable mocking of static methods, constructors, final classes and methods, private methods, removal of static initializers and more.

Example class for unit test

We are going to unit test a class called LocatorService that internally uses a static method from utility class Utils. Method randomDistance(int distance) in Utils is returning random variable, hence it has no predictable behavior and the only way to test it is by mocking it:

public class LocatorService {

	public Point generatePointWithinDistance(Point point, int distance) {
		return new Point(point.getX() + Utils.randomDistance(distance), 
			point.getY() + Utils.randomDistance(distance));
	}
}

And Utils class is:

import java.util.Random;

public final class Utils {

	private static final Random RAND = new Random();

	private Utils() {
		// Utilities class
	}

	public static int randomDistance(int distance) {
		return RAND.nextInt(distance + distance) - distance;
	}
}

Nota bene: it is good code design practice to make utility classes final and with a private constructor.

Using PowerMock

In order to use PowerMock two things has to be done:

  1. Import PowerMock into the project
  2. Annotate unit test class
  3. Mock the static class

Import PowerMock into the project

In case of using Maven import statement is:

<dependency>
	<groupId>org.powermock</groupId>
	<artifactId>powermock-module-junit4</artifactId>
	<version>1.6.5</version>
	<scope>test</scope>
</dependency>
<dependency>
	<groupId>org.powermock</groupId>
	<artifactId>powermock-api-mockito</artifactId>
	<version>1.6.5</version>
	<scope>test</scope>
</dependency>

Nota bene: there is a possibility of version mismatch between PowerMock and Mockito. I’ve received: java.lang.NoSuchMethodError: org.mockito.mock.MockCreationSettings.isUsingConstructor()Z exception when using PowerMock 1.6.5 with Mockito 1.9.5, so I had to upgrade to Mockito 1.10.19.

Annotate JUnit test class

Two annotations are needed. One is to run unit test with PowerMockRunner: @RunWith(PowerMockRunner.class). Other is to prepare Utils class for testing: @PrepareForTest({Utils.class}). The final code is:

import org.junit.runner.RunWith;
import org.powermock.core.classloader.annotations.PrepareForTest;
import org.powermock.modules.junit4.PowerMockRunner;

@RunWith(PowerMockRunner.class)
@PrepareForTest({Utils.class})
public class LocatorServiceTest {
}

Mock static class

Explicit mocking to static class should be made in order to be able to use standard Mockito when().thenReturn() construction:

int distance = 111;
PowerMockito.mockStatic(Utils.class);
when(Utils.randomDistance(anyInt())).thenReturn(distance);

Putting it all together

Final JUnit test class is shown below. The code in tests verifies logic in LocatorService, if a point is given then new point is returned by adding random to its X and Y coordinates. By removing the random element with mocking code can be tested with specific values.

package com.automationrhapsody.junit;

import org.junit.Before;
import org.junit.Test;
import org.junit.runner.RunWith;
import org.powermock.api.mockito.PowerMockito;
import org.powermock.core.classloader.annotations.PrepareForTest;
import org.powermock.modules.junit4.PowerMockRunner;

import static org.junit.Assert.assertTrue;
import static org.mockito.Matchers.anyInt;
import static org.mockito.Mockito.when;

@RunWith(PowerMockRunner.class)
@PrepareForTest({Utils.class})
public class LocatorServiceTest {

	private LocatorService locatorServiceUnderTest;

	@Before
	public void setUp() {
		PowerMockito.mockStatic(Utils.class);

		locatorServiceUnderTest = new LocatorService();
	}

	@Test
	public void testGeneratePointWithinDistance() {
		int distance = 111;

		when(Utils.randomDistance(anyInt())).thenReturn(distance);

		Point input = new Point(11, 11);
		Point expected = new Point(input.getX() + distance, 
				input.getY() + distance);

		assertTrue(arePointsEqual(expected, 
			locatorServiceUnderTest.generatePointWithinDistance(input, 1)));
	}

	public static boolean arePointsEqual(Point p1, Point p2) {
		return p1.getX() == p2.getX()
			&& p1.getY() == p2.getY();
	}
}

Conclusion

PowerMock is a powerful addition to standard mocking libraries as Mockito. Using it has some specifics, but once you understand them it is easy and fun to use it. Keep in mind that if you encounter a need to use PowerMock that can mean that code under test is not well designed. In my experience, it is possible to have very good unit tests with more than 85% coverage without any PowerMock usage. Still, there are some exceptional cases where PowerMock can be put in operation.
Related Posts

Read more...

Data driven testing with JUnit parameterized tests

Last Updated on by

Post summary: How to do data-driven testing with JUnit parameterized tests.

In Mock JUnit tests with Mockito example post, I have introduced Mockito and showed how to use for proper unit testing. In current post I will show how to improve test coverage by adding more scenarios. One solution is to copy and then paste single unit test and change input and expected output values, but this is a failure-prone approach. A smarter approach is needed – data-driven testing.

Data Driven Testing

The term from Wikipedia is: Data-driven testing (DDT) is a term used in the testing of computer software to describe testing done using a table of conditions directly as test inputs and verifiable outputs as well as the process where test environment settings and control are not hard-coded.

This exactly what is needed to improve test coverage – test with different scenarios and different input data without hard-coding the scenario itself, but just feeding different input and expected output data to it.

Parameterized JUnit tests

JUnit supports running test or several tests with given data table. Several things have to be done in order to do this:

  1. Annotate the test class
  2. Define test data
  3. Define variables to store the test data and read it
  4. Use tests data in tests

Nota bene: Every JUnit test (class annotated with @Test) is be executed with each row of the test data set. If you have 3 tests and 12 data rows this will result in 36 tests.

Annotate the class

The class needs to be run with a specialized runner in order to be treated as data-driven one. Runner is: org.junit.runners.Parameterized. The class looks like:

import org.junit.runner.RunWith;
import org.junit.runners.Parameterized;

@RunWith(Parameterized.class)
public class LocatorParameterizedTest {
}

Define test data

Test data is seeded from static method: public static Iterable<Object[]> data(). This method returns a collection of Object arrays where each array is one row with input and expected output test data. This method is annotated with @Parameterized.Parameters. The annotation may accept name argument which can display data from each row by its index: name = “{index}: Test with X={0}, Y={1}, result is: {2}”, where {index} is current test sequence, {0} is the first element from Object array. Here is how test data is defined:

@Parameterized.Parameters(name = "{index}: Test with X={0}, Y={1}, result: {2}")
public static Iterable<Object[]> data() {
	return Arrays.asList(new Object[][] {
		{-1, -1, new Point(1, 1)},
		{-1, 0, new Point(1, 0)},
		{-1, 1, new Point(1, 1)},
	});
}

Define variables to store the test data and read it

Private fields are needed to store every index from Object array representing test data row. In the constructor of the class, those variables are stored. Not that constructor must have the same number of parameters. If there is difference running the test fails with: java.lang.IllegalArgumentException: wrong number of arguments exception. Code is:

private final int x;
private final int y;
private final Point expected;

public LocatorParameterizedTest(int x, int y, Point expected, int a) {
	this.x = x;
	this.y = y;
	this.expected = expected;
}

Use tests data in tests

Once read test data is accessed in tests by using the private fields that were read through the constructor:

@Test
public void testLocateLocalResult() {
	assertTrue(arePointsEqual(expected, locatorUnderTest.locate(x, y)));
}

private boolean arePointsEqual(Point p1, Point p2) {
	return p1.getX() == p2.getX()
		&& p1.getY() == p2.getY();
}

Putting it all together

Combining all steps into one class leads to unit test shown below. If you switch the tabs you can see original test class with just two tests as described Mock JUnit tests with Mockito example post:

Data-driven test with 12 cases

import java.util.Arrays;

import org.junit.Before;
import org.junit.Test;
import org.junit.runner.RunWith;
import org.junit.runners.Parameterized;

import static org.junit.Assert.assertTrue;
import static org.mockito.Matchers.any;
import static org.mockito.Mockito.mock;
import static org.mockito.Mockito.when;

@RunWith(Parameterized.class)
public class LocatorParameterizedTest {

	private static final Point MOCKED_POINT = new Point(11, 11);

	private LocatorService locatorServiceMock = mock(LocatorService.class);

	private Locator locatorUnderTest;

	@Parameterized.Parameters(name 
		= "{index}: Test with X={0}, Y={1}, result: {2}")
	public static Iterable<Object[]> data() {
		return Arrays.asList(new Object[][] {
			{-1, -1, new Point(1, 1)},
			{-1, 0, new Point(1, 0)},
			{-1, 1, new Point(1, 1)},

			{0, -1, new Point(0, 1)},
			{0, 0, MOCKED_POINT},
			{0, 1, MOCKED_POINT},

			{1, -1, new Point(1, 1)},
			{1, 0, MOCKED_POINT},
			{1, 1, MOCKED_POINT}
		});
	}

	private final int x;
	private final int y;
	private final Point expected;

	public LocatorParameterizedTest(int x, int y, Point expected) {
		this.x = x;
		this.y = y;
		this.expected = expected;
	}

	@Before
	public void setUp() {
		when(locatorServiceMock.geoLocate(any(Point.class)))
			.thenReturn(MOCKED_POINT);

		locatorUnderTest = new Locator(locatorServiceMock);
	}

	@Test
	public void testLocateResults() {
		assertTrue(arePointsEqual(expected, 
			locatorUnderTest.locate(x, y)));
	}

	private boolean arePointsEqual(Point p1, Point p2) {
		return p1.getX() == p2.getX()
			&& p1.getY() == p2.getY();
	}
}

Simple test with 2 cases

import org.junit.Before;
import org.junit.Test;
import org.junit.runner.RunWith;
import org.mockito.Mock;
import org.mockito.runners.MockitoJUnitRunner;

import static org.junit.Assert.assertEquals;
import static org.junit.Assert.assertTrue;
import static org.mockito.Matchers.any;
import static org.mockito.Mockito.when;

@RunWith(MockitoJUnitRunner.class)
public class LocatorTest {

	private static final Point TEST_POINT = new Point(11, 11);

	@Mock
	private LocatorService locatorServiceMock;

	private Locator locatorUnderTest;

	@Before
	public void setUp() {
		when(locatorServiceMock.geoLocate(any(Point.class)))
			.thenReturn(TEST_POINT);

		locatorUnderTest = new Locator(locatorServiceMock);
	}

	@Test
	public void testLocateWithServiceResult() {
		assertEquals(TEST_POINT, locatorUnderTest.locate(1, 1));
	}

	@Test
	public void testLocateLocalResult() {
		Point expected = new Point(1, 1);
		assertTrue(arePointsEqual(expected, 
			locatorUnderTest.locate(-1, -1)));
	}

	private boolean arePointsEqual(Point p1, Point p2) {
		return p1.getX() == p2.getX()
			&& p1.getY() == p2.getY();
	}
}

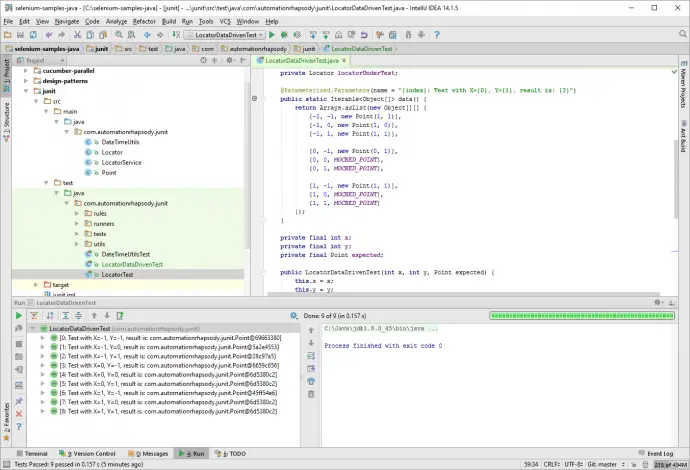
The full example can be found in LocatorParameterizedTest.java class.

data-driven-junit

Better alternatives

Standard JUnit data provider is not very flexible. Define the data set is used for the whole test class, thus every test method in this class will be run with each of dataset rows. If you have 4 rows and 3 test methods then this will result in 12 tests being run. TestNG provides much better data provider where a dataset is defined and can be applied to individual test method only. More details can be found in TestNG data provider page. This data provider is available for JUnit by external Java library called junit-dataprovider. More details how to use this data provider can be found in Data driven testing with JUnit and Gradle post.

Conclusion

Data-driven testing is very powerful instrument. With current post, I showed how easy it is to do it with JUnit as well as what alternatives are available.

Related Posts

Read more...

Introduction to Postman with examples

Last Updated on by

Post summary: This post is demonstrating different Postman features with examples.

All examples shown in this post are available at Postman Examples link and can be imported in Postman. Environments are also used in attached examples and are available in Admin environment and User environment. In order to run all the examples you need to download and run Dropwizard stub described in Build a RESTful stub server with Dropwizard post and available in sample-dropwizard-rest-stub GitHub repo, otherwise, you can just see the Postman code and screenshots.

Postman

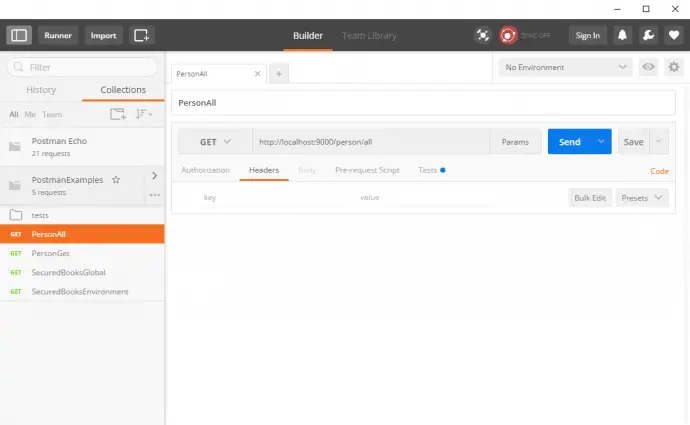
Postman is a Chrome add-on and Mac application which is used to fire requests to an API. It is very lightweight and fast. Requests can be organized in groups, also tests can be created with verifications for certain conditions on the response. With its features, it is very good and convenient API tool. It is possible to make different kinds of HTTP requests – GET, POST, PUT, PATCH and DELETE. It is possible to add headers to the requests. In current post I will write about more interesting features it has Variables, Pre-Request Script, Environments, and Tests.

postman-main

Variables

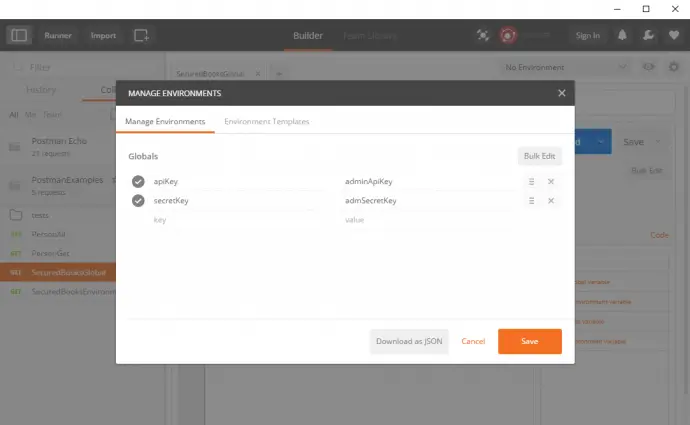
There are two types of variables – global and environment. Global variables are for all requests, environment variables are defined per specific environment which can be selected from a drop-down or no environment can be selected. Environments will be discussed in details later in current port. Global variables are editable by a small eye-shaped icon in the top right corner. Once defined variables can be used in a request with format surrounded by curly brackets: {{VARIABLE_NAME}}.

postman-globals

Pre-Request Script

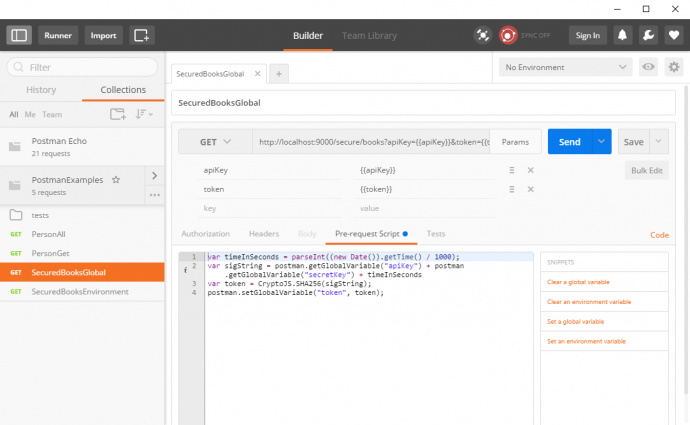
Postman allows users to do some JavaScript coding with which to manipulate the data being sent with the request. One such example is when testing and API with security as explained in How to implement secure REST API authentication over HTTP post – SHA256 hash (build from apiKey + secretKey + timestamp in seconds) is sent as a request parameter with the request. Calculating SHA256 hash is done with the following pre-request script and then stored as a global variable token.

var timeInSeconds = parseInt((new Date()).getTime() / 1000);
var sigString = postman.getGlobalVariable("apiKey") + 
	postman.getGlobalVariable("secretKey") + timeInSeconds
var token = CryptoJS.SHA256(sigString);
postman.setGlobalVariable("token", token);

Here CryptoJS library is used to create a SHA256 hash. All available libraries in Postman are described in Postman Sandbox page. Global variable {{token}} is then sent as token request parameter.

postman-pre-request-script

Environments

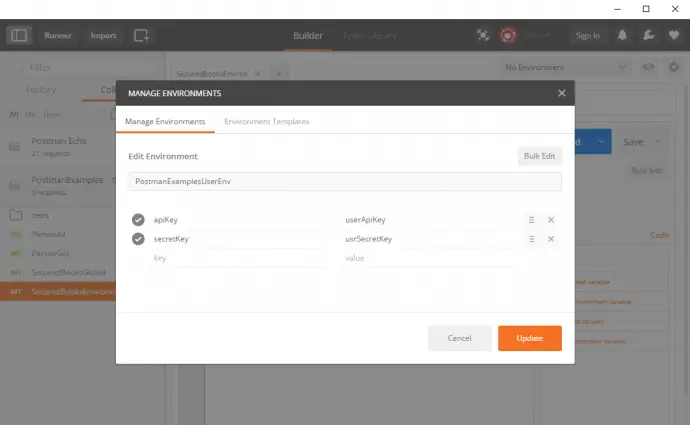
The code shown above is working fine with just one set of credentials because they are stored as global variables. If you need to switch between different credentials this is where environments come into play. By switching environment and with no change in the request you can send different parameters to API. Environments are managed from Settings icon in the top right corner which opens a menu with “Manage Environments” link.

postman-environments

Postman supports so-called shared environments, which means the whole team can use one and the same credentials managed centrally. It requires sign in and some plan though but might be a good investment in the long run.

In order to use environments, pre-request script has to be changed to:

var timeInSeconds = parseInt((new Date()).getTime() / 1000);
var sigString = environment.apiKey + environment.secretKey + timeInSeconds
var token = CryptoJS.SHA256(sigString);
postman.setEnvironmentVariable("token", token);

Both apiKey and secretKey are read from the environment. An environment can be changed from the top right corner.

Nota bene: There is specific behavior (I would not call it bug as it makes sense) in Postman. If select “No Environment” and fire request above Postman will automatically create an environment with the name “No Environment”. This is because it actually needs an environment to store a variable into. This might be very confusing the first time.

Post-Request Script

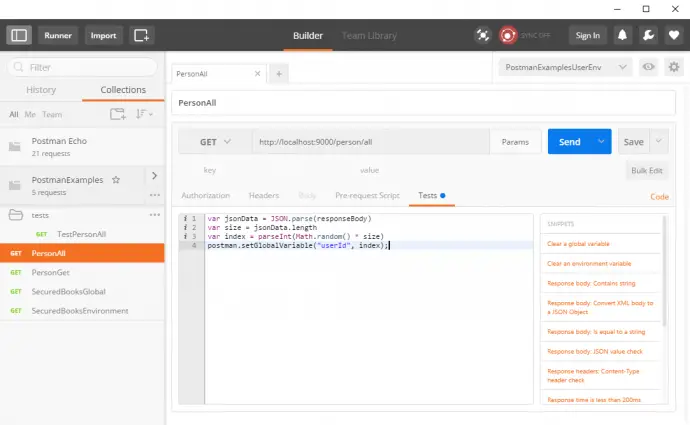
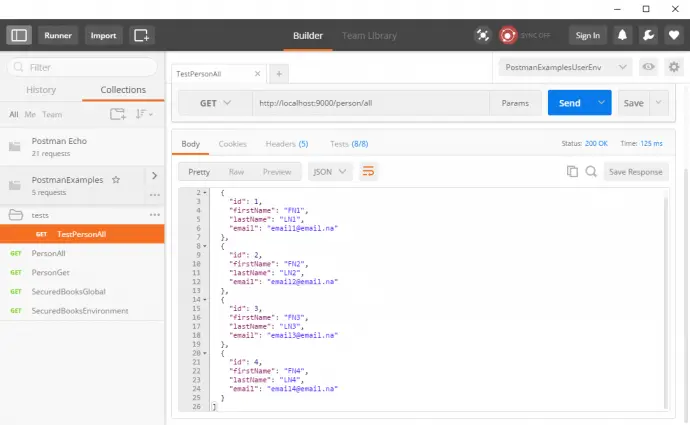
There is no such term defined in Postman. The idea is that in many cases you will need to do something with the response and extract a variable from it in order to use it at a later stage. This can be done in “Tests” tab. The example given below is to take all persons with API call and then to process the response and at random select one id which is stored as a global variable and then used in next request. You can put whatever JavaScript code you like in order to fulfill your logic.

var jsonData = JSON.parse(responseBody)
var size = jsonData.length
var index = parseInt(Math.random() * size)
postman.setGlobalVariable("userId", index);

postman-post-request

Then in the subsequent request you can use GET call to URL: http://localhost:9000/person/get/{{userId}}

Tests

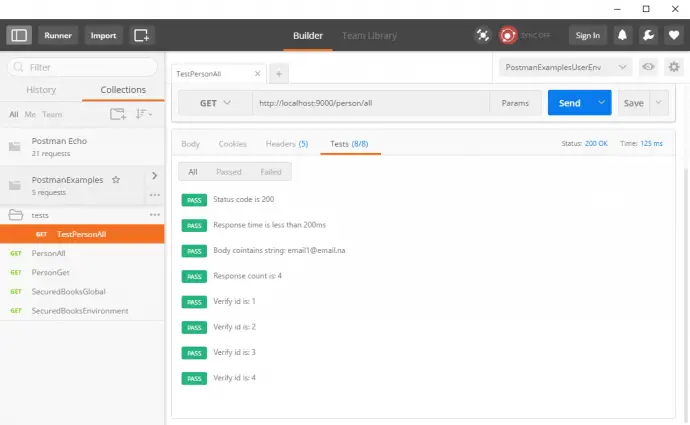
After a response is received Postman has a functionality to make verifications on it. This is done in “Tests” tab. Below is an example of different verifications. Most interesting part is in case of JSON response it can be parsed to an array and then elements accessed by index and value jsonData[0].id or even iterated as shown below. Format is: tests[“TEST_NAME”] = BOOLEAN_CONDITION.

tests["Status code is 200"] = responseCode.code === 200;

tests["Response time is less than 200ms"] = responseTime < 200;

var expected = "email1@email.na"
tests["Body cointains string: " + expected] = responseBody.has(expected);

var jsonData = JSON.parse(responseBody);
var expectedCount = 4
tests["Response count is: " + expectedCount] = jsonData.length === expectedCount;

for(var i=1; i<=expectedCount; i++) {
	tests["Verify id is: " + i] = jsonData[i-1].id === i;
}

postman-test-response

postman-test-results

Nota bene: if you use responseTime verification you have to know that it measures just the TTFB (time to the first bite) it does not measure the time needed to transfer the data. If you have API with big responses or network is slow you may fire the request, wait a lot and then Postman shows very small response time which might be confusing.

Run from command line

In order to run Postman tests in the command line as part of some CI process, there is a separate tool called Newman. It requires NodeJS to be installed and runs on NodeJS environment. It is very well described in How to write powerful automated API tests with Postman, Newman and Jenkins.

Code reuse between requests

It is very convenient some piece of code to be re-used between a request to prevent copy/paste it. Postman does not support yet code re-use between requests. Good thing is that there is a workaround for this. It is possible to do it by defining a helper function with verifications which are saved as a global variable in the first request from your test scenario:

postman.setGlobalVariable("loadHelpers", function loadHelpers() {
	let helpers = {};

	helpers.verifyCount = function verifyCount(expectedCount) {
		var jsonData = JSON.parse(responseBody);
		tests["Response count is: " + expectedCount] 
			= jsonData.length === expectedCount;
	}

	// ...additional helpers

	return helpers;
} + '; loadHelpers();');

Then from other requests helpers are taken from global variables and verification functions can be used:

var helpers = eval(globals.loadHelpers);
helpers.verifyCount(4);

See more in Reusing pre-request scripts across requests in a collection issue thread.

Conclusion

Postman is a very nice tool to use when developing your API or manual test it. I would definitely recommend Postman, I use it on daily basis for probing the API. For serious API functional tests automation, I would say Postman is not ready yet and you’d better go for another approach. Good thing is that there is a big community around it which is growing and new features are added.

Related Posts

Read more...

JSON format to register service with Eureka

Last Updated on by

Post summary: What JSON data is needed to register service node with Eureka server.

Eureka is a REST based service that is primarily used in the AWS cloud for locating services for the purpose of load balancing and failover of middle-tier servers.

Jersey 1 vs Jersey 2

As of now, Eureka client works only with Jersey 1. There is PR to create Jersey 2 client, but by the time this post is created, it is still not developed. Jersey 1 and Jersey 2 are mutually exclusive. If your product works with Jersey 2 then in order to register with Eureka you have to write your own client.

Registering with Eureka

Eureka documentation is giving example how to register a server or service node with Eureka server. Given example is an XML one and there is no JSON example. The XML example cannot be straight-forward converted for JSON because JSON does not support attributes as XML does.

Solution

Use following JSON in order to register with Eureka server with custom REST client:

{
	"instance": {
		"hostName": "WKS-SOF-L011",
		"app": "com.automationrhapsody.eureka.app",
		"vipAddress": "com.automationrhapsody.eureka.app",
		"secureVipAddress": "com.automationrhapsody.eureka.app"
		"ipAddr": "10.0.0.10",
		"status": "STARTING",
		"port": {"$": "8080", "@enabled": "true"},
		"securePort": {"$": "8443", "@enabled": "true"},
		"healthCheckUrl": "http://WKS-SOF-L011:8080/healthcheck",
		"statusPageUrl": "http://WKS-SOF-L011:8080/status",
		"homePageUrl": "http://WKS-SOF-L011:8080",
		"dataCenterInfo": {
			"@class": "com.netflix.appinfo.InstanceInfo$DefaultDataCenterInfo", 
			"name": "MyOwn"
		},
	}
}

Implementation details

Important part which is not clear enough in standard documentation is: “securePort”: {“$”: “8443”, “@enabled”: “true”}. Note that “securePort”: “8443” would also work, but this will just set the port number without enabling it. By default secure port is disabled unless register call enables it.

I would recommend using one and the same for “vipAddress” and “secureVipAddress”. When searching for HTTP endpoint Eureka server uses “vipAddress” and if you switch your client to search for HTTPS port Eureka server will now search for “secureVipAddress”. If both are different this may lead to confusion why no endpoint is returned although there is one with HTTPS enabled.

Implementation is needed for DataCenterInfo interface. One such implementation is:

private static final class DefaultDataCenterInfo implements DataCenterInfo {
	private final Name name;

	private DefaultDataCenterInfo(Name name) {
		this.name = name;
	}

	@Override
	public Name getName() {
		return name;
	}

	public static DataCenterInfo myOwn() {
		return new DefaultDataCenterInfo(Name.MyOwn);
	}
}

As seen in JSON example application status is STARTING. This is good practice to keep STARTING state until the application is fully started. This will prevent current not yet ready node to be returned for usage by Eureka server. Once the application is fully started then with subsequent call you can change the status to UP. This is done with REST PUT call to /eureka/v2/apps/appID/instanceID/status?value=UP. InstanceID is basically the hostname. AppID is the one registered with “app” in JSON. Also, good idea is to have “app” same as “vipAddress” to minimize confusion.

Conclusion

Eureka is a really nice tool. It has a default client which can be used out of the box. Problem is that this client uses Jersey 1. If you need Jersey 2 client by the time of this post you have to make it on your own. This post gives basic direction how to do this. Since official documentation is lacking details how to register a node with JSON this port gives more clarity. The most important part is: “securePort”: {“$”: “8443”, “@enabled”: “true”}.

Related Posts

Read more...

Unmarshal/Convert JSON data to JAXBElement object

Last Updated on by

Post summary: How to marshal and unmarshal JAXBElement to JSON with Jackson.

This post gives solution for following usecase

Usecase

XML document -> POJO containing JAXBElement -> JSON -> POJO containing JAXBElement.

For some reason, there is a POJO which has some JAXBElement. This usually happens when mixing SOAP and REST services with XML and JSON. This POJO is easily converted to JSON data. Then from this JSON data, a POJO containing JAXBElement has to be unmarshalled.

Problem

By default Jackson’s ObjectMapper is unable to unmarshal JSON data into a JAXBElement object. An exception is thrown:

No suitable constructor found for type [simple type, class javax.xml.bind.JAXBElement]: cannot instantiate from JSON object (missing default constructor or creator, or perhaps need to add/enable type information?)

Solution

Although somewhere it is recommended to use com.fasterxml.jackson.module.jaxb.JaxbAnnotationModule it might not work. The solution is to create custom MixIn and register it with ObjectMapper. MixIn class is:

import javax.xml.bind.JAXBElement;
import javax.xml.namespace.QName;

@JsonIgnoreProperties(value = {"globalScope", "typeSubstituted", "nil"})
public abstract class JAXBElementMixIn<T> {

	@JsonCreator
	public JAXBElementMixIn(@JsonProperty("name") QName name,
			@JsonProperty("declaredType") Class<T> declaredType,
			@JsonProperty("scope") Class scope,
			@JsonProperty("value") T value) {
	}
}

ObjectMapper is instantiated with following code:

import com.fasterxml.jackson.databind.ObjectMapper;

ObjectMapper objectMapper = new ObjectMapper();
objectMapper.addMixIn(JAXBElement.class, JAXBElementMixIn.class);

Conclusion

Jackson’s ObjectMapper does not support JSON to JAXBElement conversion by default. This is solved by creating a custom MixIn as described in the current post and register it with ObjectMapper.

Related Posts

Read more...