AWS examples in C# – run the solution

Last Updated on by

Post summary: Explanation of how to install and use the solution in AWS examples in C# blog post series.

This post is part of AWS examples in C# – working with SQS, DynamoDB, Lambda, ECS series. The code used for this series of blog posts is located in aws.examples.csharp GitHub repository. In the current post, I give information on how to install and run the project.

Disclaimer

The solution has commands to deploy to the cloud as well as to clean resources. Note not all resources are cleaned, read more in the Cleanup section. In order to be run in AWS valid account is needed. I am not going to describe how to create an account. If an account is present, then there is also knowledge and awareness of how to use it.

Important: current examples generate costs on AWS account. Use cautiously at your own risk!

Restrictions

The project was tested to be working on Linux and Windows. For Windows, it is working only with Git Bash. The project requires a valid AWS account.

Required installations

In order to fully run and enjoy the project following needs to be installed:

Configurations

AWS CLI has to be configured in order to run properly. It happens with aws configure. If there is no AWS account, this is not an issue, put some values for access and secret key and put a correct region, like us-east-1.

Import Postman collection, in order to be able to try the examples. Postman collection is in aws.examples.csharp.postman_collection.json file in the code. This is an optional step, below there are cURL examples also.

Run the project in AWS

Running on AWS requires the setting of environment variables:

export AwsAccessKey=KIA57FV4.....
export AwsSecretKey=mSgsxOWVh...
export AwsRegion=us-east-1

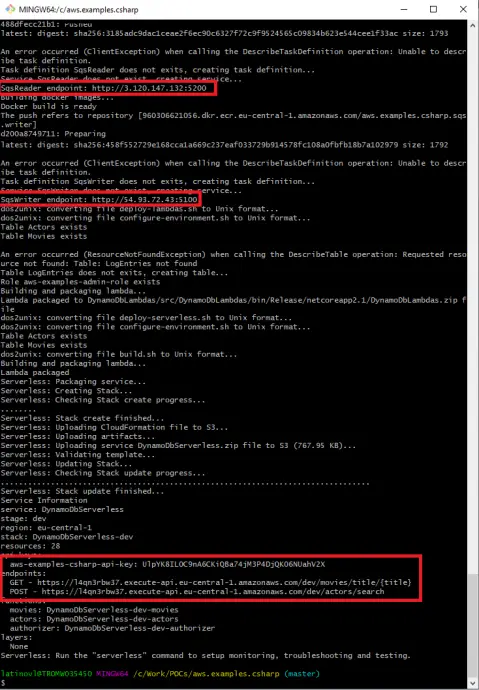
Then the solution is deployed to AWS with ./solution-deploy.sh script. Note that the output of the command gives the API Gateway URL and API key, as well as the SqsWriter and SqsReader endpoints. See image below:

Run the project partly in AWS

The most expensive part of the current setup is the running of the docker containers in EC2 (Elastic Compute Cloud). I have prepared a script called ./solution-deploy-hybrid.sh, which runs the containers locally and all other things are in AWS. Still, environment variables from the previous section are mandatory to be set. I believe this is the optimal variant if you want to test and run the code in a “production-like” environment.

Run the project in LocalStack

LocalStack provides an easy-to-use test/mocking framework for developing Cloud applications. It spins up a testing environment on local machines that provide the same functionality and APIs as the real AWS cloud environment. I have experimented with LocalStack, there is a localstack branch in GitHub. The solution can be run with solution-deploy-localstack.sh command. I cannot really estimate if this is a good alternative, because I am running the free tier in AWS and the most expensive part is ECS, which I skip by running the containers locally, instead of AWS. See the previous section on how to run a hybrid.

Usage

There is a Postman collection which allows easy firing of the requests. Another option is to use cURL, examples of all requests with their Postman names are available below.

SqsWriter

SqsWriter is a .NET Core 3.0 application, that is dockerized and run in AWS ECS (Elastic Container Service). It exposes an API that can be used to publish Actor or Movie objects. There is also a health check request. After AWS deployment proper endpoint is needed. The endpoint can be found as an output of deployment scripts. See the image above.

PublishActor

curl --location --request POST 'http://localhost:5100/api/publish/actor' \
--header 'Content-Type: application/json' \
--data-raw '{
	"FirstName": "Bruce",
	"LastName": "Willis"
}'

PublishMovie

curl --location --request POST 'http://localhost:5100/api/publish/movie' \
--header 'Content-Type: application/json' \
--data-raw '{
	"Title": "Die Hard",
	"Genre": "Action Movie"
}'

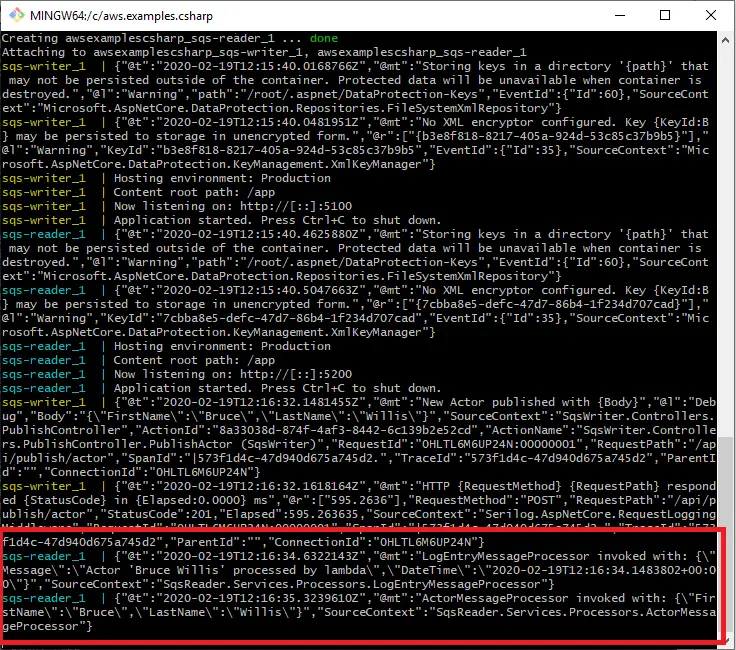
When Actor or Movie is published, it goes to the SQS queue, SqsReader picks it up from there and processes it. What is visible in the logs is that both LogEntryMessageProcessor and ActorMessageProcessor are invoked. See the screenshot:

SqsWriterHealthCheck

curl --location --request GET 'http://localhost:5100/health'

SqsReader

SqsReader is a .NET Core 3.0 application, that is dockerized and run in AWS ECS. It has a consumer that listens to the SQS queue and processes the messages by writing them into appropriate AQS DynamoDB tables. It also exposes API to stop or start processing, as long as reprocess the dead-letter queue or simply get the queue status. After AWS deployment proper endpoint is needed. The endpoint can be found as an output of deployment scripts. See the image above.

ConsumerStart

curl --location --request POST 'http://localhost:5200/api/consumer/start' \
--header 'Content-Type: application/json' \
--data-raw ''

ConsumerStop

curl --location --request POST 'http://localhost:5200/api/consumer/stop' \
--header 'Content-Type: application/json' \
--data-raw ''

ConsumerStatus

curl --location --request GET 'http://localhost:5200/api/consumer/status'

ConsumerReprocess
If this one is invoked with no messages in the dead-letter queue then it takes 20 seconds to finish, because it actually waits for long polling timeout.

curl --location --request POST 'http://localhost:5200/api/consumer/reprocess' \
--header 'Content-Type: application/json' \
--data-raw ''

SqsReaderHealthCheck

curl --location --request GET 'http://localhost:5200/health'

ActorsServerlessLambda

This lambda is managed by the Serverless framework. It is exposed as REST API via AWS API Gateway. It also has a custom authorizer as well as API Key attached. Those are described in a further post.

ServerlessActors

In the case of AWS, the API Key and URL are needed, those can be obtained from deployment command logs. See the screenshot above. Put correct values to CHANGE_ME and REGION placeholders. Request is:

curl --location --request POST 'https://CHANGE_ME.execute-api.REGION.amazonaws.com/dev/actors/search' \
--header 'Content-Type: application/json' \
--header 'x-api-key: CHANGE_ME' \
--header 'Authorization: Bearer validToken' \
--data-raw '{
    "FirstName": "Bruce",
    "LastName": "Willis"
}'

MoviesServerlessLambda

ServerlessMovies

Put correct values to CHANGE_ME and REGION placeholders. Request is:

curl --location --request GET 'https://CHANGE_ME.execute-api.REGION.amazonaws.com/dev/movies/title/Die Hard'

Cleanup

Nota bene: This is a very important step, as leaving the solution running in AWS will accumulate costs.

In order to stop and clean up all AWS resources run ./solution-delete.sh script.

Nota bene: There a resource that is not automatically deleted by the scripts. This is a Route53 resource created by AWS Cloud Map. It has to be deleted with the following commands. Note that the id in the delete command comes from the result of list-namespaces command.

aws servicediscovery list-namespaces
aws servicediscovery delete-namespace --id ns-kneie4niu6pwwela

Verify cleanup

In order to be sure there are no leftovers from the examples, following AWS services has to be checked:

  • SQS
  • DynamoDB
  • IAM -> Roles
  • EC2 -> Security Groups
  • ECS -> Clusters
  • ECS -> Task Definitions
  • ECR -> Repositories
  • Lambda -> Functions
  • Lambda -> Applications
  • CloudFormation -> Stacks
  • S3
  • CloudWatch -> Log Groups
  • Route 53
  • AWS Cloud Map

On top of it, Billing should be regularly monitored to ensure no costs are applied.

Conclusion

This post describes how to run and they the solution described in AWS examples in C# – working with SQS, DynamoDB, Lambda, ECS series

Related Posts

Read more...

Dockerize React application with a Docker multi-staged build

Last Updated on by

Post summary: How to build React application inside a Docker container, with a multi-staged build and then run it with NGINX or Caddy.

In the current post, I am not going to compare NGINX vs. Caddy. I will show how to build a React application and package it into a Docker container with both of them. Examples code is located in cypress-testing-framework GitHub repository.

NGINX

NGINX is open-source software for web serving, reverse proxying, caching, load balancing, media streaming, and more. It started out as a web server designed for maximum performance and stability. In addition to its HTTP server capabilities, NGINX can also function as a proxy server for email (IMAP, POP3, and SMTP) and a reverse proxy and load balancer for HTTP, TCP, and UDP servers.

Caddy

Caddy is an open-source, HTTP/2-enabled web server written in Go. It uses the Go standard library for its HTTP functionality. One of Caddy’s most notable features is enabling HTTPS by default.

Building

Docker multi-staged building is going to be used in the current post. I have slightly touched the topic in the Optimize the size of Docker images post. The main idea is to optimize the Docker images, so they become smaller. In the current post, I will show two flavors of builds. One is with the standard NPM package manager and is described in Build and run with NGINX section.

The other is with Yarn package manager and is described in Build and run with Caddy section. Current examples are configured to use Yarn. I personally prefer Yarn as for local development it has very effective caching and also it has a reliable dependency locking mechanism.

Build and run with NGINX

Following Dockerfile is describing the building of the React application with NPM package manager and packaging it into NGINX image.

# ========= BUILD =========
FROM node:8.16.0-alpine as builder

WORKDIR /app

COPY package.json .
COPY package-lock.json .
RUN npm install --production

COPY . .

RUN npm run build

# ========= RUN =========
FROM nginx:1.17

COPY conf/nginx.conf /etc/nginx/nginx.conf
COPY --from=builder /app/build /usr/share/nginx/html

The keyword as builder is used to put the name to the image. Both package.json and package-lock.json are copied to the already configured work directory /app. Installation of the packages is done with npm install –production, where the –production switch is used to skip the devDependencies. In the current example, Cypress takes a lot of time to install, and it is not needed for a production build. Afterward, all project files are copied to the image. The files configured in .dockerignore are skipped. All source code files are intentionally copied to the image only after the NPM packages installation. Packages installation takes time, and they need to be installed only if the package.json file has been changed. In case of code changes only, Docker cache is used for the packages layer, this speeds up the build. The build is initiated with npm run build and takes quite a time. Now there the build artifacts are ready. Next stage is to copy the artifacts to nginx:1.17 image into /usr/share/nginx/html folder from builder image’s /app/build folder. Also, NGINX configuration file is copied.

worker_processes auto;
worker_rlimit_nofile 8192;

events {
  worker_connections 1024;
}

http {
  include /etc/nginx/mime.types;
  sendfile on;
  tcp_nopush on;

  gzip on;
  gzip_static on;
  gzip_types
    text/plain
    text/css
    text/javascript
    application/json
    application/x-javascript
    application/xml+rss;
  gzip_proxied any;
  gzip_vary on;
  gzip_comp_level 6;
  gzip_buffers 16 8k;
  gzip_http_version 1.1;

  server {
    listen 3000;
    server_name localhost;
    root /usr/share/nginx/html;
    auth_basic off;

    location / {
      try_files $uri $uri/ /index.html;
    }

    # 404 if a file is requested (so the main app isn't served)
    location ~ ^.+\..+$ {
      try_files $uri =404;
    }
  }
}

I will not go into NGINX configuration details, the configuration can be checked in details in NGINX documentation. Important in the configuration above is that gzip compression is enabled and NGINX listens to port 3000. Then with try_files unknown routes are redirected to index.html, so React can bootstrap the routes.

Build and run with Caddy

Following Dockerfile is describing the building of the React application with Yarn package manager and packaging it into Caddy image.

# ========= BUILD =========
FROM node:8.16.0-alpine as builder

WORKDIR /app

RUN npm install yarn -g

COPY package.json .
COPY yarn.lock .
RUN yarn install --production=true

COPY . .

RUN yarn build

# ========= RUN =========
FROM abiosoft/caddy:1.0.3

COPY conf/Caddyfile /etc/Caddyfile
COPY --from=builder /app/build /usr/share/caddy/html

Absolutely the same logic applies here as above. Yarn is installed as an additional Linux package, then package.json and yarn.lock files are copied. It is very important to copy the yarn.lock, otherwise every run lates dependencies will be fetched, and there might be inconsistent behavior. Only production dependencies are installed with yarn install –production=true. After the application is built with yarn build it is being copied to abiosoft/caddy:1.0.3 image in /usr/share/caddy/html folder from builder image. Caddyfile is copied as well to configure Caddy.

0.0.0.0:3000 {
	gzip
	log / stdout "{method} {path} {status}"
	root /usr/share/caddy/html
	rewrite {
		regexp .*
		to {path} /
	}
}

Caddy is configured to listen to port 3000, gzip compression is enabled and there is rewrite rule which redirects unknown paths to the main path, so React can bootstrap the router.

Conclusion

In the current post, I have shown how to build React application inside a Docker image with both NPM and Yarn and then pack the build artifacts to NGINX or Caddy Docker image, which later can be run as a container. This process optimizes the Docker image size and also it does not put extra requirements to the build machine to have Node JS installed, as Node JS is inside the builder image.

Related Posts

Read more...

Optimize the size of Docker images

Last Updated on by

Post summary: How to optimize the size of the Docker images, by using intermediate build image and final runtime image.

The code used for this blog post is located in dotnet.core.templates GitHub repository. The code examples below are for .NET Core 3.0, but principles applied in this article are valid for any programming language, so it is worth reading.

Docker layers and images

Docker image is an executable version of a given application that runs on top of an operating system’s kernel. Docker image is the result of the execution of a Dockerfile. Usually, Dockerfile starts from some base image, for e.g. an operating system. Then commands are built on top of this base image and the result is a new image. This new image can be used as a base image somewhere else. Each and every command in Dockerfile results in a layer. This layering system is used for better reusability, as several images can reuse a given layer. The more layers are added to the image the bigger it gets in size.

All docker images can be listed with docker images command. Size is also present as an output of the command. Then for a given image, it is possible to list all the layers with docker history <IMAGE_NAME> command, which also shows the size of a given layer.

Images are kept in a Docker repository, either public or private. The bigger the image, the more time it takes to upload, to download and the more space it consumes in the repository. It is a good practice to optimize the images in terms of size.

Optimize the size

Usually when building software much more resources are needed, such as SDK, or compiler, or additional libraries, than if the software is run. One strategy for optimization is to build the software on a special build machine and then pack it to a Docker image. In this approach, the build machine should have the needed build software. This puts some demand on the build machine and also makes the image creating process dependant on certain software packages being installed. A more convenient option is to build the application as part of the Docker image creating and then packet into a separate container. See Dockerfile below.

FROM mcr.microsoft.com/dotnet/core/aspnet:3.0-buster-slim AS base
WORKDIR /app

FROM mcr.microsoft.com/dotnet/core/sdk:3.0-buster AS build
WORKDIR /src
COPY . .
RUN dotnet restore
RUN dotnet publish -c Release -o /pub

FROM base AS final
WORKDIR /app
COPY --from=build /pub .
ENTRYPOINT ["dotnet", "PROJECT_NAME.dll"]

In short, image sdk:3.0-buster is used to publish the application as it has .NET Core SDK on it, and then application code is copied into aspnet:3.0-buster-slim which has only the .NET Core runtime and is low in size.

No matter how the software is built, the most optimal image in terms of size and capabilities has to be selected to pack the code into. For e.g. Google provides “Distroless”, images that do not contain package managers, shells or any other programs you would expect to find in a standard Linux distribution. This makes images smaller and much more secure. I tried to build the application I am experimenting with into Distroless image and it gets 136MB in size, where if I pack it into .NET 3.0 runtime image it gets 209MB. Unfortunately, there is no Distroless image for .NET Core 3.0, so my experiment image fails to run, and I have to use aspnet:3.0-buster-slim in order to run my sample application.

.NET Core different images

.NET Core has different images, which are very well explained into .NET Core SDK images page. They are:

  • buster – Debian 10
  • alpine – Alpine
  • bionic – Ubuntu 18.04
  • disco – Ubuntu 19.04
  • stretch – Debian 9

.NET Core 3.0 error in stretch images

This section is not directly contributing to the main point of the topic, but it might be helpful to someone. When I experimented, I initially started with stretch base images. And I got the following errors:

  • System.MissingMethodException: Method not found: ‘Void Microsoft.AspNetCore.WebUtilities.FileBufferingReadStream..ctor(System.IO.Stream, Int32)’
  • System.TypeLoadException: Could not load type ‘Microsoft.AspNetCore.WebUtilities

These errors were not present when switching to buster base images.

Conclusion

In the current post, I describe how to construct Docker files so the build is done in Docker, eliminating the need of having specific software in order to pack the images. No matter how the software is built it is very important to pack it into the smallest possible image in order to save bandwidth and storage space during image usage. Google provides Distroless images that seem very lightweight and also secure as they do not contain package managers, shells or any other programs. Examples in this post are in .NET Core 3.0, but principles can be applied to different programming languages and technologies.

Related Posts

Read more...

Testing with Cypress – Build a React application with Node.js backend

Last Updated on by

Post summary: Short introduction to the application under test that is created for and used in all Cypress examples. It is React frontend created with Create React App package. Backend is a Node.js application running on Express.

This post is part of a Cypress series, you can see all post from the series in Testing with Cypress – lessons learned in a complete framework. Examples code is located in cypress-testing-framework GitHub repository.

Backend

The backend is a simple Node.js application build with Express web server. It supports several APIs that can save a person, get a person by id, get all persons or delete the last person in the collection. You can read the full description in Build a REST API with Express on Node.js and run it on Docker post.

Frontend

Current post is mainly devoted to the frontend. It described how the React application is built. In order to make this part easy, Create React App is used. The best thing about it is that you do not need to handle lots of configurations and you just focus on your application. In order to create an application, Create React App has to be installed as a global NPM package with npm install -g create-react-app. The application itself is created with create-react-app my-application-name. Once this is done you can start building your application. See more details on application creation in How to Create a React App with create-react-app. I have added Bootstrap for better styles and Toastr for nicer notifications. I also use Axios for API calls. I am not going into details about how to work with React as this is a pretty huge topic and I am not really expert at it. You can inspect the GitHub repository given above of how controllers are structured.

Instrumented for code coverage

After having the application ready I wanted to add support for code coverage. The tool used to measure code coverage is Istanbul. Because of Create React App, adding the configuration is not straight-forward as practically there is no webpack.config.js file, it is hidden.

One option is to eject the application. Maybe for a big project where you need full control over the configurations, this is OK, but for this small application, I would not want to deal with it.

Another option is to use a package that builds on top of Create React App. One such plugin is react-app-rewired. It is installed along with istanbul-instrumenter-loader, the actual code coverage plugin. Once those two are installed the actual configuration is pretty simple. A file named config-overrides.js is created with the following content:

const path = require('path');
const fs = require('fs');

module.exports = function override(config, env) {
  // do stuff with the webpack config...
  config.module.rules.push({
    test: /\.js$|\.jsx$/,
    enforce: 'post',
    use: {
      loader: 'istanbul-instrumenter-loader',
      options: {
        esModules: true
      }
    },
    include: path.resolve(fs.realpathSync(process.cwd()), 'src')
  });
  return config;
};

Also, package.json has to be changed. The default react-scripts start/build/test is changed to react-app-rewired start/build/test. In order to verify that code coverage is enabled, go to Dev Tools (hit keyboard F12), then go to Console and search for __coverage__ variable.

Dockerization

In order to make it easy to run a Dockerfile has been added. It installs Yarn as a package manager, then copies package.json. Important is to copy yarn.lock as well since the actual dependencies are in it. If this is not copied, every time an install is run it will pick the latest dependencies, which may lead to instability. Then the installation of dependencies is done with command yarn, short for yarn install. Finally, all local files are copied. This is done in the end so installation is not triggered on every file change, but only on package.json or yarn.lock change.

FROM node:8.16.0-alpine

ENV APP /app
WORKDIR $APP

RUN npm install yarn -g

COPY package.json $APP
COPY yarn.lock $APP
RUN yarn

COPY . .

The docker-compose.yml file is also very simple. It has two services. The first is the backend which is exposed to 9000 port of the host. This is needed because Cypress tests directly access the APIs. It uses the image uploaded to the Docker hub repository: image: llatinov/nodejs-rest-stub. The second service is the frontend. It uses local Dockerfile: build: .. When frontend container is started yarn start command is executed and is exposed to port 3030 of the host machine. One more thing, that is added as configuration, is the backend API URL that can be controlled by setting API_URL environment variable, which then is set to REACT_APP_API_URL, used by the frontend. If no API_URL is provided then the default of http://localhost:9000 is taken.

version: '3'

services:
  backend:
    image: llatinov/nodejs-rest-stub
    ports:
      - '9000:3000'
  frontend:
    build: .
    command: yarn start
    environment:
      - REACT_APP_API_URL=${API_URL:-http://localhost:9000}
    ports:
      - '3030:3000'

Run the application

There are several ways to run the application under test in order to try Cypress examples. One way is to download both repositories of the backend and the frontend and run them separately.

Second is to run the backend with Docker command docker run -p 9000:3000 llatinov/nodejs-rest-stub. The command maps the 3000 port of the container to 9000 port of the host, this is where the APIs are available. I have uploaded the backend image to the public Docker hub repository. After backend is running, the frontend is run with yarn start command. In this case, frontend is running on port 3000, so you have to adjust the proper URL in the Cypress configurations.

The third option is to run with docker-compose with docker-compose up command. This runs the backend on port 9000 and the frontend on port 3030.

Functionality

The application is very simple, it has few pages where user can add a person or see already existing persons in the backend. On each successful action, there is a notification, in case of a network error, a message is shown.

Persons list


Add person


Version page


Conclusion

In order to demonstrate the Cypress examples, a separate React application with a backend is created with Create React App package. It is also configured to support code coverage with Istanbul.

Related Posts

Read more...

Build a REST API with .NET Core 2 and run it on Docker Linux container

Last Updated on by

Post summary: Code examples how to create RESTful API with .NET Core 2.0 and then run it on Docker Linux container.

Code below can be found in GitHub SampleDotNetCore2RestStub repository. In the current post is shown a sample application that can be a very good foundation for a real production application. This project can be easily used as a template for real API service.

Microsoft and open source

I was doing Java for about 2 years and got back to .NET six months ago. Recently we had to do a project in .NET Core 2.0, a technology I haven’t heard of before. I was truly amazed how much open source Microsoft had begun. .NET now can be developed and even run on Linux. This definitely makes it really competitive to Java which advantage was multi-platform ability. Another benefit is that documentation is very extensive and there is a huge community out there that makes solving issues really fast and easy.

.NET Core

In short .NET Core is a cross-platform development platform supporting Windows, macOS, and Linux, and can be used in device, cloud, and embedded/IoT scenarios. It is maintained by Microsoft and the .NET community on GitHub. More can be read on .NET Core Guide.

.NET Core 2.0

The special thing about .NET Core 2.0 is the implementation of .NET Standard 2.0. This makes it possible to use almost 70% of already existing NuGet packages, which is a big step forward and eases development of .NET applications because of reusability.

Create simple .NET Core project

Making default .NET Core console application is really simple:

  1. Download and install .NET Core SDK. For Windows and MacOS there are installers available. For Linux it depends on distribution used, see more at .NET Core Linux installation guide.
  2. Create an application with following command: dotnet new console -o ProjectName. Option -o specifies the output folder to be created which also becomes the project name. If -o is omitted then the project will be created in the current folder with current folder’s name.
  3. Run the newly created application with: dotnet run.

Using Visual Studio Code

Once the project is created it can be developed in any text editor. Most convenient is Visual Studio 2017 because it provides lots of tools that make development very fast and efficient. In this tutorial, I will be using Visual Studio Code – open-source multi-platform editor maintained by Microsoft. I admit it is much harder that Visual Studio 2017 but is free and multi-platform. Once project folder is imported, hitting Ctrl+F5 runs the project.

ASP.NET Core MVC

ASP.NET Core MVC provides features to build web APIs or web UIs. It has to be used in order to continue with the current example. Dependency to its NuGet package is added with the following command:

dotnet add package Microsoft.AspNetCore
dotnet add package Microsoft.AspNetCore.All

Create REST API

After project structure is done it is time to add classes needed to make the REST API. Functionality is very similar to one described in Build a RESTful stub server with Dropwizard post. There is a Person API which can retrieve, save or delete persons. They are kept in an in-memory data structure which mimics DB layer. Following classes are needed:

  • PersonController – a controller that exposes the API endpoints. By extending Controller class the runtime makes all endpoints available as long as they have proper routing. In current example routing is done inside action attributes [HttpGet(“person/get/{id}”)]. There are different routing options described in this extensive documentation Routing to Controller Actions. Adding of person is done with POST: [HttpPost(“person/save”)]. The important bit here is [FromBody] attribute which takes HTTP body and deserializes it to a Person object.
  • Person – this is data model class with properties.
  • PersonRepository – in-memory DB abstraction that keeps the data in a Dictionary. In reality, there will be DB layer responsible for managing data.
  • Startup – class with services configuration. Both ConfigureServices and Configure methods are called behind the scenes from the runtime. Any configurations needed goes to those two methods. Current configuration adds MVC to services and instructs the application to use it. This is not really Model View Controller pattern, but this is what is needed to enable controllers and get API running.
  • Program – main program entry point where web host is built and started. It uses Startup.cs to run the configurations. More details on WebHost can be found in Hosting in ASP.NET Core. This article also shows how the external configuration is managed, something that will be presented later in the current post.

PersonController

using System.Collections.Generic;
using System.Linq;
using Microsoft.AspNetCore.Mvc;
using SampleDotNetCore2RestStub.Models;
using SampleDotNetCore2RestStub.Repositories;

namespace SampleDotNetCore2RestStub.Controllers
{
	public class PersonController : Controller
	{
		[HttpGet("person/get/{id}")]
		public Person GetPerson(int id)
		{
			return PersonRepository.GetById(id);
		}

		[HttpGet("person/remove")]
		public string RemovePerson()
		{
			PersonRepository.Remove();
			return "Last person remove. Total count: " 
						+ PersonRepository.GetCount();
		}

		[HttpGet("person/all")]
		public List<Person> GetPersons()
		{
			return PersonRepository.GetAll();
		}

		[HttpPost("person/save")]
		public string AddPerson([FromBody]Person person)
		{
			return PersonRepository.Save(person);
		}
	}
}

Person

namespace SampleDotNetCore2RestStub.Models
{
	public class Person
	{
		public int Id { get; set; }
		public string FirstName { get; set; }
		public string LastName { get; set; }
		public string Email { get; set; }
	}
}

PersonRepository

using System.Collections.Generic;
using System.Linq;
using SampleDotNetCore2RestStub.Models;

namespace SampleDotNetCore2RestStub.Repositories
{
	public class PersonRepository
	{
		private static Dictionary<int, Person> PERSONS 
								= new Dictionary<int, Person>();

		static PersonRepository()
		{
			PERSONS.Add(1, new Person
			{
				Id = 1,
				FirstName = "FN1",
				LastName = "LN1",
				Email = "email1@email.na"
			});
			PERSONS.Add(2, new Person
			{
				Id = 2,
				FirstName = "FN2",
				LastName = "LN2",
				Email = "email2@email.na"
			});
		}

		public static Person GetById(int id)
		{
			return PERSONS[id];
		}

		public static List<Person> GetAll()
		{
			return PERSONS.Values.ToList();
		}

		public static int GetCount()
		{
			return PERSONS.Count();
		}

		public static void Remove()
		{
			if (PERSONS.Keys.Any())
			{
				PERSONS.Remove(PERSONS.Keys.Last());
			}
		}

		public static string Save(Person person)
		{
			var result = "";
			if (PERSONS.ContainsKey(person.Id))
			{
				result = "Updated Person with id=" + person.Id;
			}
			else
			{
				result = "Added Person with id=" + person.Id;
			}
			PERSONS.Add(person.Id, person);
			return result;
		}
	}
}

Startup

using Microsoft.Extensions.Configuration;
using Microsoft.Extensions.DependencyInjection;
using Microsoft.AspNetCore.Hosting;
using Microsoft.AspNetCore.Builder;

namespace SampleDotNetCore2RestStub
{
	public class Startup
	{
		public Startup(IConfiguration configuration)
		{
			Configuration = configuration;
		}

		public IConfiguration Configuration { get; }

		public void ConfigureServices(IServiceCollection services)
		{
			services.AddMvc();
		}

		public void Configure(IApplicationBuilder app,
					IHostingEnvironment env)
		{
			app.UseMvc();
		}
	}
}

Program

using System;
using Microsoft.AspNetCore;
using Microsoft.AspNetCore.Hosting;

namespace SampleDotNetCore2RestStub
{
	public class Program
	{
		public static void Main(string[] args)
		{
			BuildWebHost(args).Run();
		}

		public static IWebHost BuildWebHost(string[] args) =>
			WebHost.CreateDefaultBuilder(args)
				.UseStartup<Startup>()
				.Build();
	}
}

External configuration

Service so far is pretty much useless as it does not give an opportunity for external configurations. Adding external configuration consist of adding and changing following files:

    • VersionController – controller to actually show full working configuration. Routing in this controller is handled by [Route(“api/[controller]”)]. This exposes /api/version endpoint because [controller] is a template that stands for controller name. Controller constructor takes IOptions object and extracts Value out of it. Actual object value is injected in Startup.cs.
    • appsettings.json – JSON file with application configurations.
    • AppConfig – data model class that represents JSON configuration as an object.
    • Startup – change is needed to read file appsettings.json and bind it to AppConfig object. Configuration is read with: var configurationBuilder = new ConfigurationBuilder().AddJsonFile(“appsettings.json”, false, true) then it is saved internally with Configuration = configurationBuilder.Build(). JSON configuration is bound to a AppConfig object with following line: services.Configure<AppConfig>(Configuration).
    • SampleDotNetCore2RestStub.csproj – change is needed in the project file to instruct build process to copy appsettings.json to the output folder. This is where VS 2017 makes it much easier as it exposes property config to change, with VS Code you have to edit the csproj XML.

VersionController

using Microsoft.AspNetCore.Mvc;
using Microsoft.Extensions.Options;

namespace SampleDotNetCore2RestStub.Controllers
{
	[Route("api/[controller]")]
	public class VersionController : Controller
	{
		private readonly AppConfig _config;

		public VersionController(IOptions<AppConfig> options)
		{
			_config = options.Value;
		}

		[HttpGet]
		public string Version()
		{
			return _config.Version;
		}
	}
}

appsettings.json

{
	"Version": "1.0"
}

AppConfig

namespace SampleDotNetCore2RestStub
{
	public class AppConfig
	{
		public string Version { get; set; }
	}
}

Startup

using Microsoft.Extensions.Configuration;
using Microsoft.Extensions.DependencyInjection;
using Microsoft.AspNetCore.Hosting;
using Microsoft.AspNetCore.Builder;

namespace SampleDotNetCore2RestStub
{
	public class Startup
	{
		public Startup()
		{
			var configurationBuilder = new ConfigurationBuilder()
				.AddJsonFile("appsettings.json", false, true);

			Configuration = configurationBuilder.Build();
		}

		public IConfiguration Configuration { get; }

		public void ConfigureServices(IServiceCollection services)
		{
			services.AddMvc();
			services.Configure<AppConfig>(Configuration);
		}

		public void Configure(IApplicationBuilder app, 
					IHostingEnvironment env)
		{
			app.UseMvc();
		}
	}
}

csproj

<ItemGroup>
	<None Include="appsettings.json" CopyToOutputDirectory="Always" />
</ItemGroup>

Request filtering

An almost mandatory feature is to have some kind of filtering on the request. The current example will provide a very basic implementation of authentication filter achieved with an attribute. Following files are needed:

  • SecurePersonController – controller that demonstrates filtering. The controller is no more different than other discussed above. Important bit is [ServiceFilter(typeof(AuthenticationFilterAttribute))] which assigns AuthenticationFilterAttribute to current controller.
  • AuthenticationFilterAttribute – very basic implementation to illustrate how it works. Request headers are extracted from HttpContext and are checked for the existence of Authorization. If not found Exception is thrown. In next section, I will show how to handle this exception more gracefully.
  • StartupAuthenticationFilterAttribute is registered to runtime with: services.AddScoped<AuthenticationFilterAttribute>(). .NET Core dependency injection mechanism is used here, which I have described it in more details in separate section below.

SecurePersonController

using System.Collections.Generic;
using Microsoft.AspNetCore.Mvc;
using SampleDotNetCore2RestStub.Attributes;
using SampleDotNetCore2RestStub.Models;
using SampleDotNetCore2RestStub.Repositories;

namespace SampleDotNetCore2RestStub.Controllers
{
	[ServiceFilter(typeof(AuthenticationFilterAttribute))]
	public class SecurePersonController : Controller
	{
		[HttpGet("secure/person/all")]
		public List<Person> GetPersons()
		{
			return PersonRepository.GetAll();
		}
	}
}

AuthenticationFilterAttribute

using System;
using System.Linq;
using Microsoft.AspNetCore.Mvc.Filters;

namespace SampleDotNetCore2RestStub.Attributes
{
	public class AuthenticationFilterAttribute : ActionFilterAttribute
	{
		public override void OnActionExecuting(ActionExecutingContext ctx)
		{
			string authKey = ctx.HttpContext.Request
					.Headers["Authorization"].SingleOrDefault();

			if (string.IsNullOrWhiteSpace(authKey))
				throw new Exception();
		}
	}
}

Startup

public void ConfigureServices(IServiceCollection services)
{
	services.AddMvc();
	services.Configure<AppConfig>(Configuration);
	services.AddScoped<AuthenticationFilterAttribute>();
}

If endpoint /secure/person/all is queried without Authorization header there is 500 Internal Server Error response from the application. If Authorization header is present with any value all persons are retrieved.

Middleware

Middleware is a software that is assembled into an application pipeline to handle requests and responses. Each component chooses whether to pass the request to the next component in the pipeline or perform work before that. More on middleware can be found in ASP.NET Core Middleware Fundamentals. In current example middleware is used to handle better exceptions. In the previous point, AuthenticationFilterAttribute was throwing an exception which was transformed to 500 Internal Server Error which is not pretty. In case of not authorized application should return 401 Unauthorized. In order to do this following files are needed:

  • HttpException – a custom exception which then will be caught and processed in HttpExceptionMiddleware.
  • HttpExceptionMiddleware – this is where handling happens. Code checks for custom HttpException and if such is thrown pipeline changes HttpContext.Response object with proper values.
  • AuthenticationFilterAttribute – instead of Exception filter attribute throws new
    HttpException(HttpStatusCode.Unauthorized). This way middleware will get invoked.
  • Startup – middleware get registered here with app.UseMiddleware<HttpExceptionMiddleware>(). It is extremely important that this stands before app.UseMvc() otherwise it will not work.

HttpException

using System;
using System.Net;

namespace SampleDotNetCore2RestStub.Exceptions
{
	public class HttpException : Exception
	{
		public int StatusCode { get; }

		public HttpException(HttpStatusCode httpStatusCode)
			: base(httpStatusCode.ToString())
		{
			this.StatusCode = (int)httpStatusCode;
		}
	}
}

HttpExceptionMiddleware

using System.Threading.Tasks;
using Microsoft.AspNetCore.Http;
using Microsoft.AspNetCore.Http.Features;
using SampleDotNetCore2RestStub.Exceptions;

namespace SampleDotNetCore2RestStub.Middleware
{
	public class HttpExceptionMiddleware
	{
		private readonly RequestDelegate _next;

		public HttpExceptionMiddleware(RequestDelegate next)
		{
			_next = next;
		}

		public async Task Invoke(HttpContext context)
		{
			try
			{
				await _next.Invoke(context);
			}
			catch (HttpException httpException)
			{
				context.Response.StatusCode = httpException.StatusCode;
				var feature = context.Features.Get<IHttpResponseFeature>();
				feature.ReasonPhrase = httpException.Message;
			}
		}
	}
}

AuthenticationFilterAttribute

public override void OnActionExecuting(ActionExecutingContext context)
{
	string authKey = context.HttpContext.Request
			.Headers["Authorization"].SingleOrDefault();

	if (string.IsNullOrWhiteSpace(authKey))
		throw new HttpException(HttpStatusCode.Unauthorized);
}

Startup

public void Configure(IApplicationBuilder app, IHostingEnvironment env)
{
	app.UseMiddleware<HttpExceptionMiddleware>();
	app.UseMvc();
}

Dependency Injection

So far there is running service with basic functionality. It is missing very important bit though, something that should have been considered and added earlier. Actually, it was added but only when registering AuthenticationFilterAttribute, but here I will go into more details. Dependency injection (DI) is a technique for achieving loose coupling between objects and their dependencies. Rather than directly instantiating an object or using static references, the objects a class needs are provided to the class in some fashion. ASP.NET Core provides its own dependency injection mechanisms, read more on Introduction to Dependency Injection in ASP.NET Core. The code will now get refactored to match this pattern.

  • IPersonRepository – all database operations are declared in this interface.
  • PersonRepository – implements all methods of IPersonRepository interface. It still does not have real interaction with the database, data is kept in a dictionary. Refactor is that all static methods are removed. In order to use this class, you need an instance of it. Sample data is populated on object creation in its constructor.
  • SecurePersonController – an instance of an implementation of IPersonRepository is passed through the constructor and is used internally. By using interfaces a level of abstraction is achieved, where multiple implementations may be used for the same interface.
  • PersonController – same as SecurePersonController.
  • Startup – this is where DI is used to register that PersonRepository is the implementation of IPersonRepositoryservices.AddSingleton<IPersonRepository, PersonRepository>().

Three different object life scopes are available in .NET Core DI. It is important to know the difference in order to use them properly. If object creation is expensive operation misuse of proper DI lifetime scope might be crucial for performance:

  • AddSingleton – only one instance is created for the whole application. In the example above PersonRepository needed to have one instance because sample data is initialized in the constructor.
  • AddScoped – one instance is created per HTTP request scope. 
  • AddTransient – instance is created every time it is needed. Let us say there are 3 places where an object is needed and an HTTP request is coming to the application. AddTransient will create 3 different objects, while AddScoped will create just one that will be used for current HTTP request scope.

IPersonRepository

using System.Collections.Generic;
using SampleDotNetCore2RestStub.Models;

namespace SampleDotNetCore2RestStub.Repositories
{
	public interface IPersonRepository
	{
		Person GetById(int id);
		List<Person> GetAll();
		int GetCount();
		void Remove();
		string Save(Person person);
	}
}

PersonRepository

using System.Collections.Generic;
using System.Linq;
using SampleDotNetCore2RestStub.Models;

namespace SampleDotNetCore2RestStub.Repositories
{
	public class PersonRepository : IPersonRepository
	{
		private Dictionary<int, Person> _persons 
						= new Dictionary<int, Person>();

		public PersonRepository()
		{
			_persons .Add(1, new Person
			{
				Id = 1,
				FirstName = "FN1",
				LastName = "LN1",
				Email = "email1@email.na"
			});
			_persons .Add(2, new Person
			{
				Id = 2,
				FirstName = "FN2",
				LastName = "LN2",
				Email = "email2@email.na"
			});
		}

		public Person GetById(int id)
		{
			return _persons[id];
		}

		public List<Person> GetAll()
		{
			return _persons.Values.ToList();
		}

		public int GetCount()
		{
			return _persons.Count();
		}

		public void Remove()
		{
			if (_persons.Keys.Any())
			{
				_persons.Remove(_persons.Keys.Last());
			}
		}

		public string Save(Person person)
		{
			if (_persons.ContainsKey(person.Id))
			{
				_persons[person.Id] = person;
				return "Updated Person with id=" + person.Id;
			}
			else
			{
				_persons.Add(person.Id, person);
				return "Added Person with id=" + person.Id;
			}
		}
	}
}

SecurePersonController

using System.Collections.Generic;
using Microsoft.AspNetCore.Mvc;
using SampleDotNetCore2RestStub.Attributes;
using SampleDotNetCore2RestStub.Models;
using SampleDotNetCore2RestStub.Repositories;

namespace SampleDotNetCore2RestStub.Controllers
{
	[ServiceFilter(typeof(AuthenticationFilterAttribute))]
	public class SecurePersonController : Controller
	{
		private readonly IPersonRepository _personRepository;

		public SecurePersonController(IPersonRepository personRepository)
		{
			_personRepository = personRepository;
		}

		[HttpGet("secure/person/all")]
		public List<Person> GetPersons()
		{
			return _personRepository.GetAll();
		}
	}
}

Startup

public void ConfigureServices(IServiceCollection services)
{
	services.AddMvc();
	services.Configure<AppConfig>(Configuration);
	services.AddScoped<AuthenticationFilterAttribute>();
	services.AddSingleton<IPersonRepository, PersonRepository>();
}

Docker file

Docker file that packs application is shown below:

FROM microsoft/dotnet:2.0-sdk
COPY pub/ /root/
WORKDIR /root/
ENV ASPNETCORE_URLS="http://*:80"
EXPOSE 80/tcp
ENTRYPOINT ["dotnet", "SampleDotNetCore2RestStub.dll"]

Docker container that is used is microsoft/dotnet:2.0-sdk. Everything from pub folder is copied to container root folder. ASPNETCORE_URLS is used to set the URLs that the server listens on by default. Current config runs and exposes application at port 80 in the container. With ENTRYPOINT is configured the command that is run when the container is started.

Build, package and run Docker

The application is built and published in Release mode into pub folder with the following command:

dotnet publish --configuration=Release -o pub

Docker container is packaged with tag netcore-rest with the following command:

docker build . -t netcore-rest

Docker container is run with exposing port 80 from the container to port 9000 on the host with the following command:

docker run -e Version=1.1 -p 9000:80 netcore-rest

Notice the -e Version=1.1 which sets an environment variable to be used inside the container. The intention is to use this variable in application. This can be enabled by modifying Startup.cs file by adding AddEnvironmentVariables():

public Startup()
{
	var configurationBuilder = new ConfigurationBuilder()
		.AddJsonFile("appsettings.json", optional: false, reloadOnChange: true)
		.AddEnvironmentVariables();

	Configuration = configurationBuilder.Build();
}

If invoked now /api/version returns 1.1.

Docker optimisation

When the container with microsoft/dotnet:2.0-sdk is packed it gets to a size of 1.7GB which is quite a lot. There is much leaner container image: microsoft/dotnet:2.0-runtime, but it requires all runtime assemblies to be present in pub folder. This can be done by changing the csproj file by adding PublishWithAspNetCoreTargetManifest = false:

<PropertyGroup>
	<OutputType>Exe</OutputType>
	<TargetFramework>netcoreapp2.0</TargetFramework>
	<PublishWithAspNetCoreTargetManifest>false</PublishWithAspNetCoreTargetManifest> 
</PropertyGroup>

This makes pub folder about 37MB, but container size is 258MB. Problem with this proposal is that it might not be very reliable as some assemblies might not be copied or might not be the correct version.

Since Docker is keeping layers in the repository, proposed optimization might turn out not to be actual optimization. It will consume much more space in the repository since layer that changes and is always saved is 258MB. Layers with OS might not change often if it changes at all.

Testing

How to given application can be integration tested is described in .NET Core integration testing and mock dependencies post.

Conclusion

In the current tutorial, I have shown how to create API from scratch with .NET Core 2.0 SDK on any platform. It is very easy to run .NET Core app and even run it Docker with Linux container.

Related Posts

Read more...

Run multiple machines in a single Vagrant file

Last Updated on by

Post summary: How to run multiple machines on Vagrant described in a single Vagrantfile.

The code below can be found in GitHub sample-dropwizard-rest-stub repository in Vagrantfile file. This post is part of Vagrant series. All of other Vagrant related posts, as well as more theoretical information what is Vagrant and why to use it, can be found in What is Vagrant and why to use it post.

Vagrantfile

As described in Vagrant introduction post all configurations are done in a single text file called Vagrantfile. Below is a Vagrant file which can be used to initialize two machines. One is same as described in Run Dropwizard Java application on Vagrant post, the other is the one described in Run Docker container on Vagrant post.

Vagrant.configure('2') do |config|

  config.vm.hostname = 'dropwizard'
  config.vm.box = 'opscode-centos-7.2'
  config.vm.box_url = 'http://opscode-vm-bento.s3.amazonaws.com/vagrant/virtualbox/opscode_centos-7.2_chef-provisionerless.box'

  config.vm.synced_folder './', '/vagrant'

  config.vm.define 'jar' do |jar|
    jar.vm.network :forwarded_port, guest: 9000, host: 9100
    jar.vm.network :forwarded_port, guest: 9001, host: 9101

    jar.vm.provider :virtualbox do |vb|
      vb.name = 'dropwizard-rest-stub-jar'
    end

    jar.vm.provision :shell do |shell|
      shell.inline = <<-SHELL
        sudo service dropwizard stop
        sudo yum -y install java
        sudo mkdir -p /var/dropwizard-rest-stub
        sudo mkdir -p /var/dropwizard-rest-stub/logs
        sudo cp /vagrant/target/sample-dropwizard-rest-stub-1.0-SNAPSHOT.jar /var/dropwizard-rest-stub/dropwizard-rest-stub.jar
        sudo cp /vagrant/config-vagrant.yml /var/dropwizard-rest-stub/config.yml
        sudo cp /vagrant/linux_service_file /etc/init.d/dropwizard
        # Replace CR+LF with LF because of Windows
        sudo sed -i -e 's/\r//g' /etc/init.d/dropwizard
        sudo chmod +x /etc/init.d/dropwizard
        sudo service dropwizard start
      SHELL
    end
  end

  config.vm.define 'docker' do |docker|
    docker.vm.network :forwarded_port, guest: 9000, host: 9000
    docker.vm.network :forwarded_port, guest: 9001, host: 9001

    docker.vm.provider :virtualbox do |vb|
      vb.name = 'dropwizard-rest-stub-docker'
      vb.customize ['modifyvm', :id, '--memory', '768', '--cpus', '2']
    end
  
    docker.vm.provision :shell do |shell|
      shell.inline = <<-SHELL
        sudo yum -y install epel-release
        sudo yum -y install python-pip
        sudo pip install --upgrade pip
        sudo pip install six==1.4
        sudo pip install docker-py
      SHELL
    end
  
    docker.vm.provision :docker do |docker|
      docker.build_image '/vagrant/.', args: '-t dropwizard-rest-stub'
      docker.run 'dropwizard-rest-stub', args: '-it -p 9000:9000 -p 9001:9001 -e ENV_VARIABLE_VERSION=1.1.1'
    end
  end
  
end

Vagrantfile explanation

The file starts with a Vagrant.configure(‘2’) do |config| which states that version 2 of Vagrant API will be used and defines constant with name config to be used below. Guest operating system hostname is set to config.vm.hostname. If you use vagrant-hostsupdater plugin it will add it to your hosts file and you can access it from a browser in case you are developing web applications. With config.vm.box you define which would be the guest operating system. Vagrant maintains config.vm.box = “hashicorp/precise64” which is Ubuntu 12.04 (32 and 64-bit), they also recommend to use Bento’s boxes, but I found issues with Vagrant’s as well as Bento’s boxes so I’ve decided to use one I know is working. I specify where it is located with config.vm.box_url. It is It is CentOS 7.2. With config.vm.synced_folder command, you specify that Vagrantfile location folder is shared as /vagrant/ in the guest operating system. This makes it easy to transfer files between guest and host operating systems. Now comes the part where two different machines are defined. First one is defined with config.vm.define ‘jar’ do |jar|, which declares variable jar to be used later in configurations. All other configurations are well described in Run Dropwizard Java application on Vagrant post. The specific part here is port mapping. In order to avoid port collision port 9000 from the guest is mapped to port 9100 to host with jar.vm.network :forwarded_port, guest: 9000, host: 9100 line. This is because the second machine uses port 9000 from the host. The second machine is defined in config.vm.define ‘docker’ do |docker|, which declares variable docker to be used in further configurations. All other configurations are described in Run Docker container on Vagrant post.

Running Vagrant

Command to start Vagrant machine is: vagrant up. Then in order to invoke provisioning section with actual deployment, you have to call: vagrant provision. All can be done in one step: vagrant up –provision. To shut down the machine use vagrant halt. To delete machine: vagrant destroy.

Conclusion

It is very easy to create Vagrantfile that builds and runs several machines with different applications. It possible to make those machine communicate with each other, hence simulation real environment. Once created file can be reused by all team members. It is executed over and over again making provisioning extremely easy.

Related Posts

Read more...

Run Docker container on Vagrant

Last Updated on by

Post summary: How to run Docker container on Vagrant.

The code below can be found in GitHub sample-dropwizard-rest-stub repository in Vagrantfile-docker file. Since Vagrant requires to have only one Vagrantfile if you want to run this example you have to rename Vagrantfile-docker to Vagrantfile then run Vagrant commands described at the end of this post. This post is part of Vagrant series. All of other Vagrant related posts, as well as more theoretical information what is Vagrant and why to use it, can be found in What is Vagrant and why to use it post.

Vagrantfile

As described in Vagrant introduction post all configurations are done in a single text file called Vagrantfile. Below is a Vagrant file which can be used to deploy and start Docker container on Vagrant. The example here uses Dockerised application that is described in Run Dropwizard application in Docker with templated configuration using environment variables post.

Vagrant.configure('2') do |config|

  config.vm.hostname = 'dropwizard'
  config.vm.box = 'opscode-centos-7.2'
  config.vm.box_url = 'http://opscode-vm-bento.s3.amazonaws.com/vagrant/virtualbox/opscode_centos-7.2_chef-provisionerless.box'

  config.vm.synced_folder './', '/vagrant'

  config.vm.network :forwarded_port, guest: 9000, host: 9000
  config.vm.network :forwarded_port, guest: 9001, host: 9001

  config.vm.provider :virtualbox do |vb|
    vb.name = 'dropwizard-rest-stub-docker'
    vb.customize ['modifyvm', :id, '--memory', '768', '--cpus', '2']
  end

  config.vm.provision :shell do |shell|
    shell.inline = <<-SHELL
      sudo yum -y install epel-release
      sudo yum -y install python-pip
      sudo pip install --upgrade pip
      sudo pip install six==1.4
      sudo pip install docker-py
    SHELL
  end

  config.vm.provision :docker do |docker|
    docker.build_image '/vagrant/.', args: '-t dropwizard-rest-stub'
    docker.run 'dropwizard-rest-stub', args: '-it -p 9000:9000 -p 9001:9001 -e ENV_VARIABLE_VERSION=1.1.1'
  end

end

Vagrantfile explanation

The file starts with a Vagrant.configure(‘2’) do |config| which states that version 2 of Vagrant API will be used and defines constant with name config to be used below. Guest operating system hostname is set to config.vm.hostname. If you use vagrant-hostsupdater plugin it will add it to your hosts file and you can access it from a browser in case you are developing web applications. With config.vm.box you define which would be the guest operating system. Vagrant maintains config.vm.box = “hashicorp/precise64” which is Ubuntu 12.04 (32 and 64-bit), they also recommend to use Bento’s boxes. I have found issues with Vagrant’s as well as Bento’s boxes so I’ve decided to use one I know is working. I specify where it is located with config.vm.box_url. It is CentOS 7.2. With config.vm.synced_folder command, you specify that Vagrantfile location folder is shared as /vagrant/ in the guest operating system. This makes it easy to transfer files between guest and host operating systems. This mount is done by default, but it is good to explicitly state it for better readability. With config.vm.network :forwarded_port port from guest OS is forwarded to your hosting OS. Without exposing any port you will not have access to guest OS, only port open by default is 22 for SSH. With config.vm.provider :virtualbox do |vb| you access VirtualBox provider for more configurations, vb.name = ‘dropwizard-rest-stub-docker’ sets the name that you see in Oracle VirtualBox Manager. With vb.customize [‘modifyvm’, :id, ‘–memory’, ‘768’, ‘–cpus’, ‘2’] you modify default hardware settings for the machine, RAM is set to 768MB and 2 CPUs are configured. Finally, the provisioning part takes place which is done by shell commands inside config.vm.provision :shell do |shell| block. This block installs Python as well as docker-py. It is CentOS specific as it uses YUM which is CentOS package manager. Next provisioning part is to run docker provisioner that builds docker image and then runs it by mapping ports and setting an environment variable. For more details how to build and run Docker containers read Run Dropwizard application in Docker with templated configuration using environment variables post.

Running Vagrant

Command to start Vagrant machine is: vagrant up. Then in order to invoke provisioning section with actual deployment, you have to call: vagrant provision. All can be done in one step: vagrant up –provision. To shut down the machine use vagrant halt. To delete machine: vagrant destroy.

Conclusion

It is very easy to create Vagrantfile that builds and runs Docker container. Once created file can be reused by all team members. It is executed over and over again making provisioning extremely easy.

Related Posts

Read more...

Run Dropwizard application in Docker with templated configuration using environment variables

Last Updated on by

Post summary: How to run Dropwizard application inside a Docker container with configuration template file which later gets replaced by environment variables.

In Build a RESTful stub server with Dropwizard post I have described how to build a Dropwizard application and run it. In the current post, I will show how this application can be inserted into Docker container and run with different configurations, based on different environment variables. Code sample here can be found as a buildable and runnable project in GitHub sample-dropwizard-rest-stub repository.

Dropwizard templated config

Dropwizard supports replacing variables from config file with environment variables if such is defined. The first step is to make the config file with a special notation.

version: ${ENV_VARIABLE_VERSION:- 0.0.2}

Dropwizard substitution is based on Apache’s StrSubstitutor library. ${ENV_VARIABLE_VERSION:- 0.0.2} means that Dropwizard will search for environment variable with name ENV_VARIABLE_VERSION and replace its value with given variable. If no variable is configured then it will replace with a default value of 0.0.2. If default is not needed then just ${ENV_VARIABLE_VERSION} can be used.

Next step is to make Dropwizard substitute config file with environment variables on its startup before the file is being read. This is done with following code:

@Override
public void initialize(Bootstrap<RestStubConfig> bootstrap) {
	bootstrap.setConfigurationSourceProvider(new SubstitutingSourceProvider(
			bootstrap.getConfigurationSourceProvider(), 
			new EnvironmentVariableSubstitutor(false)));
}

EnvironmentVariableSubstitutor is used with false in order to suppress throwing of UndefinedEnvironmentVariableException in case environment variable is not defined. There is an approach to pack config.yml file into JAR file and use it from there, then bootstrap.getConfigurationSourceProvider() should be changed with path -> Thread.currentThread().getContextClassLoader().getResourceAsStream(path).

Docker

Docker is a platform for building software inside containers which then can be deployed in different environments. A container is like a virtual machine with the significant difference that it does not build full operating system. In this way host’s resources are optimized, container consumes as much memory as needed by the application. Virtual machine itself consumes memory to run the operating system as well. Containers have resource (CPU, RAM, HDD) isolation so that application sees the container as a separate operating system.

Dockerfile

A Dockerfile is a text document that contains all the commands a user could call on the command line to assemble an image. Using docker build users can create an automated build that executes several command-line instructions in succession. In given example Dockerfile looks like this:

FROM openjdk:8u121-jre-alpine
MAINTAINER Automation Rhapsody https://automationrhapsody.com/

WORKDIR /var/dropwizard-rest-stub

ADD target/sample-dropwizard-rest-stub-1.0-SNAPSHOT.jar /var/dropwizard-rest-stub/dropwizard-rest-stub.jar
ADD config-docker.yml /var/dropwizard-rest-stub/config.yml

EXPOSE 9000 9001

ENTRYPOINT ["java", "-jar", "dropwizard-rest-stub.jar", "server", "config.yml"]

Dockerfile starts with FROM openjdk:8u121-jre-alpine which instructs docker to use this already prepared image as a base image for the container. At https://hub.docker.com/ there are numerous of images maintained by different organizations or individuals that provide different frameworks and tools. They can save you a lot of work allowing you to skip configuration and installation of general things. In given case openjdk:8u121-jre-alpine has OpenJDK JRE 1.8.121 already installed with minimalist Linux libraries. MAINTAINER documents who is the author of this file. WORKDIR sets working directory of the container. Then ADD copies JAR file and config.yml to the container. ENTRYPOINT configures the container to be run as executable. This instruction translates to java -jar dropwizard-rest-stub.jar server config.yml command. More info can be found at Dockerfile reference link.

Build Docker container

Docker container can be built with the following command:

docker build -t dropwizard-rest-stub .

dropwizard-rest-stub is the name of the container, it is later used to run container with this name. Note that dot, in the end, is mandatory.

Run Docker container

docker run -it -p 9000:9000 -p 9001:9001 -e ENV_VARIABLE_VERSION=1.1.1 dropwizard-rest-stub

The name of the container is dropwizard-rest-stub and is put in the end. With -p 9000:9000 port 9000 form guest machine is exposed to host machine, otherwise the container will not be accessible. With -e ENV_VARIABLE_VERSION=1.1.1 environment variable is being set. If not passed it will be substituted with 0.0.2 in config.yml file as described above. In the case of many environment variables, it is more comfortable to put them in a file with content KEY=VALUE. Then use this file with –env-file=<PATH_TO_FILE> instead of specifying each individual variable.

Conclusion

Dropwizard has a very easy mechanism for making configuration dependant on environment variables. This makes Dropwizard applications extremely suitable to be built into Docker containers and run in different environments just by changing environment variables being passed to the container.

Related Posts

Read more...