Monthly Archives: March 2015

FIX messages simulator

Last Updated on by

Post summary: General thoughts how to test FIX messages with a FIX simulator.

FIX stands for Financial Information eXchange and is most probably the most used protocol for exchanging electronic messages in the financial world.

FIX sessions

In order to exchange data systems in financial world use FIX messages. The first important step before exchanging messages is to establish a connection between each other. There are two roles for counterparties

  • Acceptor – acts as a server. Stays and listens for clients that will connect
  • Initiator – acts as a client. It is the active participant in the connection

Once roles are defined fix session should be established between both. They can maintain as many different sessions as they need. A session is uniquely identified by FIX protocol version and IDs of both counterparties.

A session is started by initiator by sending Logon request and receiving Logon Acknowledgement. A session is kept alive by both sides. They send Heartbeat messages to each other. A session is ended by Logout message send from one of the counterparties. The other acknowledges the Logout.

FIX messages

Once all the ceremony of setting a session is done and the session is alive both counterparties can start exchanging FIX messages with data. FIX message in short is a string containing key-value pairs in format <TagNumber>=<Value> separated by SOH (\u0001) character. Each tag has a name and in some cases vast specification what values accept, what each value means, etc. FIXimate is a pretty good online tool which gives information about tags. Each tag is represented by its integer number in the message. Tags are separated in three parts of the message:

  • Header – contains information needed for session identification
  • Body – contains business data
  • Trailer – checksum for message validation

An example where SOH is replaced with |

8=FIX.4.2|9=76|35=A|49=Initiator|56=Acceptor|34=1|52=20150321-15:39:28.762|98=0|108=30|141=Y|10=187|

Testing of FIX message scenarios

Depending on business logic behind actual testing of FIX messages could be a pretty complicated task. Each message alone could have tens of tags with data. Each tag is meaningful and the system can react in a different manner based on its value. Each message could depend on the previous message. The combination and complex business logic could be made through a very difficult testing task.

How to do it

There are numerous FIX simulators available out there. They will work for most of the cases but since FIX communication can be really boutique in some cases external tool is not a good idea. The internal tool is what I suggest and propose a solution in the current post.

Visualise the message

This is maybe the hardest part of everything. How to show messages so they can be easy to comprehend and edit. Obviously editing long string with user-unfriendly data is not the best solution. I admit not the perfect solution but couldn’t think of better than good old-fashioned Excel. In short, each column is a specific tag. Each row is a single fix message and you fill the tag value for this particular fix message. There could be separation rows to make different tests scenarios.

Convert the messages

Once Excel test cases are ready they are exported with a macro to special XML format. XML is then read from FIX simulator and converted to real fix messages.

Send the messages

FIX messages are then sent on the wire. In order to send them, you need fix engine. Very popular is QuickFIX engine. It has Java and .NET version. There are example applications which help for better understanding how to use the engine.

Conclusion

Testing FIX messages based on business rules is definitely a very important task. It also is not the simplest task you might think of as a QA. Still, it is achievable. I would say creating custom solution will initially take some time but in the long run, it will pay off as you will have total control over features you have and need.
Read more...

What about code coverage

Last Updated on by

Post summary: Code coverage is a measurement of what percentage of program source code is being executed by your tests. Code coverage is a nice to have, but in no case make code coverage ultimate goal!

Code coverage is a useful metric to check what part of the code your tests are exercising. Is really depends on the tools to be used for gathering code coverage metrics but in general, they work in similar fashion.

How it works

One approach is to instrument application under test. Instrumentation is to modify original executables by adding metadata so code coverage tool is able to understand which line of code is being executed. Another option is to run the application through code coverage tool. In both ways, once the application is running tests are being executed.

What tests to run

Tests that can be run to measure code coverage can be unit tests, functional automation tests or even manual tests. It doesn’t matter the important part is to see how our tests are impacting application under test.

Results

Once tests are finished code coverage metrics are obtained from code coverage tool. To have detailed information most of the tools take the original source code and generate a visual report with color information which line is executed and which not. There are different levels of coverage, method, line, code block, etc. I personally prefer lines and when speaking further I’ll mean lines of code executed.

Benefits

Code coverage information is equally useful for QA and developers. QA analyze code that has not being executed during tests to identify what tests conditions they are missing and improve their tests. Developers analyze the results to identify and remove dead or unused code.

When to do it

Code coverage of unit tests is good to be done on each build. Those can be scheduled in continuous integration jobs and can be run unattended. Code coverage on automated or manual tests is more like a nice to have activity. We can live with or without it. It is useful for big matured products where there are automation test suites. You can also do them against your tests code in order to optimize it. Removing dead code optimizes the product and makes its maintenance easier. I would say doing it too often should be avoided. Everything depends on context but for me best is once or twice a year.

What does code coverage percentage mean

In one word – nothing. You may have 30% of code coverage but to cover most important user functionality and bug rate to be relatively low and you may have 90% with dummy tests made especially to exercise some code without the idea of actually testing it. I was lucky to work on a project where developers keep the code tidy and clean and my tests easily accomplished 81% just by verifying all user requirements. I may say 80-85% is the maximum you may get.

Pitfalls

I would not recommend putting code coverage as an important measurement or key performance indicator (KPI) in your testing strategy. Doing so and making people try to increase the code coverage will in most cases result in dummy tests made especially this percentage to go up. Code coverage is in most cases insignificant aspect of your testing strategy.

How to do it

Practical tutorials on how to do code coverage with Java, C#, and JavaScript can be found on my blog:

Conclusion

Code coverage is an interesting aspect of testing. It might enhance your tests if done wisely or it can ruin them. Remember tests scenarios should be extracted from user requirements and features. Code coverage data should be used to see if you have some blind spots reading the requirements. It can help developers remove dead or unused code.

Related Posts

Read more...

Advanced WPF automation – memory usage

Last Updated on by

Post summary: Highlight eventual memory issue when using Telerik Testing Framework and TestStack White for desktop automation.

Memory is an important aspect. When you have several test cases it is not a problem. But on large projects with many tests memory turn out to be a serious issue.

Reference

This post is part of Advanced WPF desktop automation with Telerik Testing Framework and TestStack White series. The sample application can be found on GitHub.

Problem

Like every demo on certain technology automating WPF applications looks cool. And also like every technology problems occur when you start to use it on a large scale. Problem with WFP automation with Telerik Testing Framework and TestStack White is the memory. When your tests’ number grows frameworks start to use too much memory. By too much, I mean over 1GB which might not seem a lot but for a single process actually is. Increasing RAM of test machine is an only temporary solution and is not one that can be scaled.

Why so much memory

I have a project with 580 tests and 7300 verification points spread in 50 test classes. I’ve spent lots of hours debugging and profiling with several .NET profiling tools. In the end, all profilers show that a large amount of memory used is in unmanaged objects. So generally there is nothing you can do. It seems like some of the frameworks or both have memory issues and do not free all memory they use.

Solution

The solution is pretty simple to suggest but harder to implement – run each test class in the separate process. I’m using a much more enhanced version of NTestsRunner. It is running each test class in separate windows process. Once the test is finished results are serialized in results directory, the process is exited and all memory and object used for this test are released.

Conclusion

The memory could be a crucial factor in an automation project. Be prepared to have a solution for it. At this point, I’m not planning to put running tests in a separate process in NTestsRunner. If there is demand it is a pretty easy task to do it.

Related Posts

Read more...

Complete guide to email verifications with Automation SMTP Server

Last Updated on by

Post summary: How to do complete email verification with your own Automation SMTP server.

SMTP is protocol initially defined in 1982 and is still used nowadays. In order to automate application which sends out emails, you need SMTP server which reads messages and saves them to disk for further processing. Note that this is only in the case when your application sends emails.

Windows SMTP server

One option is to use SMTP server provided by Windows. Problems here are two. First is that from Vista SMTP server is no more supported. There is SMTP server in Windows Server distributions but the license for them is more expensive. The second problem comes from the configuration of the server. You might have several machines and configurations should be maintained on all of them. It is a feasible option to use Windows SMTP server but the current post is not dedicated to it.

Automation SMTP Server

What I offer in this post is your own Automation SMTP Server. It is located in following GitHub project. The solution is actually a mixture of two open source projects. For the server, I use Antix SMTP Server For Developers, which is really good SMTP server. It is windows application and is more suitable for manual SMTP testing rather than automation. I’ve extracted the SMTP core with some modifications as a console application which saves emails as EML file on disk. For the reading of emails, I use the source code of Easily Retrieve Email Information from .EML Files article with several modifications. What you need to do in order to make successful email verification is download executable from GitHub and follow instructions below. More info for it can be found on its homepage Automation SMTP Server.

Automation SMTP Server usage

In GitHub AutomationSMTPServer repository there is an example that shows how to use Automation SMTP Server. The server should be added as a reference to your automation project. Since it is a reference it gets copied into compiled executables folder.

Delete recent emails

Before doing anything in your tests it is good to delete old emails. Automation SMTP Server is saving mail into a folder named “temp”. This is how it works and cannot be changed.

private string currentDir =
	Directory.GetCurrentDirectory() + Path.DirectorySeparatorChar;
private string mailsDir = currentDir + "temp";

if (Directory.Exists(mailsDir))
{
	Directory.Delete(mailsDir, true);
}

Start Automation SMTP Server

The server is a console application. It receives emails and saves them to disk. If counterparty sends a QUIT message to disconnect server gets restarted to wait for next connection. The server should be started as a process. Port should be provided as arguments. If not provided it can be configured in SMTP Server config file. If not configured there it gives a message and takes 25 for default port.

Process smtpServer = new Process();
smtpServer.StartInfo.FileName = currentDir + "AutomationSMTPServer.exe";
smtpServer.StartInfo.Arguments = "25";
smtpServer.Start();

Send emails

This is the point where your application under test is sending emails which you will later verify.

Read emails

Once emails have been sent out from the application under test you are ready to read and process them.

string[] files = Directory.GetFiles(mailsDir);
List<EMLFile> mails = new List<EMLFile>();

foreach (string file in files)
{
	EMLFile mail = new EMLFile(file);
	mails.Add(mail);
	File.Delete(file);
}

Verify emails

Here you can use EMLFile class which is parsing the EML file and is representing is an object so you can do operations on it. Once you have the mail as an object you can access all its attributes and verify some of them. It all depends on your testing strategy. Another option is to define on expected EML file, read it and compare both actual and expected. EMLFile class has predefined Equals method which is comparing all the attributes of the emails.

bool compare1 = mails[0].Equals(mails[1]);
bool compare2 = mails[0].Equals(mails[2]);
bool compare3 = mails[1].Equals(mails[2]);

Stop Automation SMTP Server

This part is important. If not stopped server will continue to work and will block the port. Its architecture is defined in such manner that only way to stop it is it to terminate console application. In a case where you have started it from C# code as process way to stop it is to kill the process.

smtpServer.Kill();

Conclusion

Proper email verification can be a challenge. In case your application under tests send emails I would say it is crucial to have correct email testing as mail is what customers receive. And in the end, it is all about customers! So give it a try and enjoy this easy way of email verification.

Read more...

Extract and verify text from PDF with C#

Last Updated on by

Post summary: How to extract text from PDF in C#.

PDF verification is pretty rare case in automation testing. Still it could happen.

iTextSharp

iTextSharp is a library that allows you to manipulate PDF files. We need very small of this library. It has build in reader that iterates through pages and returns only text.

using iTextSharp.text.pdf;
using iTextSharp.text.pdf.parser;
using System.Text;

namespace PDFExtractor
{
	public class PDFExtractor
	{
		public static string ExtractTextFromPDF(string pdfFileName)
		{
			StringBuilder result = new StringBuilder();
			// Create a reader for the given PDF file
			using (PdfReader reader = new PdfReader(pdfFileName))
			{
				// Read pages
				for (int page = 1; page <= reader.NumberOfPages; page++)
				{
					SimpleTextExtractionStrategy strategy =
						new SimpleTextExtractionStrategy();
					string pageText =
						PdfTextExtractor.GetTextFromPage(reader, page, strategy);
					result.Append(pageText);
				}
			}
			return result.ToString();
		}
	}
}

Verification

Once extracted text can be verified against expected as described in Text verification post.

Related Posts

Read more...

Text verification

Last Updated on by

Post summary: Verify actual text with expected one by ignoring what is not relevant during compare.

In automation testing, there is no definitive way what text verification is best to be done. One strategy is to check that an expected word or a phrase exists in actual text shown in the application under test. Another strategy is to prepare a large amount of text to verify. Later strategy is expensive in case of effort for preparation and maintenance. The first strategy might not be sufficient to do correct verifications.

In between

What I suggest here is something in between. Not too much but not too less. Problem with a paragraph of text to be verified is it might contain data we do not have control over, e.g. date, time, unique values, etc.

Example

Imagine an e-commerce website. When you place the order there is order confirmation page. You want to verify not only that you are on this page but also that text is correct as per specification. Most likely text will contain data you do not have control over – order number and date. Breaking verification is small chunks is an option. Another option is to manipulate the actual text. The third option is to define the text as expected with special strings that will get ignored during compare.

Actual vs Expected

Actual text could be: “Order 123456 has been successfully placed on 01.01.1970! Thank you for your order. ”
The expected text could be: “Order ~SKIP~ has been successfully placed on ~SKIP~! Thank you for your order. ”
And then you can compare both where ~SKIP~ will be ignored during compare.

Compare code

Code to do the compare shown above is incorporated in NTestsRunner also:

public const string IgnoreDuringCompare = "~SKIP~";

public static bool EqualsWithIgnore(this string value1, string value2)
{
	string regexPattern = "(.*?)";
	// If value is null set it to empty
	value1 = value1 ?? string.Empty;
	value2 = value2 ?? string.Empty;
	string input = string.Empty;
	string pattern = string.Empty;
	// Unify new lines symbols
	value1 = value1.Replace("\r\n", "\n");
	value2 = value2.Replace("\r\n", "\n");
	// If no one conains ignore string then compare directly
	if (!value1.Contains(IgnoreDuringCompare) &&
		!value2.Contains(IgnoreDuringCompare))
	{
		return value1.Equals(value2);
	}
	else if (value1.Contains(IgnoreDuringCompare))
	{
		pattern = Regex.Escape(value1).Replace(IgnoreDuringCompare, regexPattern);
		input = value2;
	}
	else if (value2.Contains(IgnoreDuringCompare))
	{
		pattern = Regex.Escape(value2).Replace(IgnoreDuringCompare, regexPattern);
		input = value1;
	}

	Match match = Regex.Match(input, pattern);
	return match.Success;
}

Use in tests

In your tests you will do something like:

string actual = OrderConfirmationPage.GetConfirmationText();
string expected = "Order " + ExtensionMethods.IgnoreDuringCompare +
	" has been successfully placed on " + ExtensionMethods.IgnoreDuringCompare +
	"! Thank you for your order. ";
Assert.IsTrue(actual.EqualsWithIgnore(expected));

Conclusion

It might take little bit more effort to prepare expected strings but verification will be more accurate and correct rather than just to expect a word or a phrase.

Related Posts

Read more...

Advanced WPF automation – read dependency property

Last Updated on by

Post summary: What is dependency property in .NET and how to read it from Telerik Testing Framework.

In this post, I’ll show an advanced way of getting more details from an object and sophisticate your automation.

Reference

This post is part of Advanced WPF desktop automation with Telerik Testing Framework and TestStack White series. The sample application can be found in GitHub SampleAppPlus repository.

Dependency property

Dependency properties are an easy way to extend available in .NET framework functionality. In SampleAppPlus there is CustomControl defined. Purpose of this control is to store text and visualize this text as image. The text is stored in dependency property.

public partial class CustomControl : UserControl
{
	public static readonly DependencyProperty MessageProperty =
			DependencyProperty.Register("Message",
									typeof(string), typeof(CustomControl),
									new PropertyMetadata(OnChange));

	...

	public string Message
	{
		get { return (string)GetValue(MessageProperty); }
		set { SetValue(MessageProperty, value); }
	}

	...

}

Read dependency property

In order to be able to properly automate something, you have to know the internal structure of the application. Generally, you will try to locate and read the element and it will not work in the ways you are used working with elements. At this point, you have to inspect the source code of application under test and see how it is done internally. Most important if dependency property is used you should know its name. Once you know the name reading is easy.

public class MainWindow : XamlElementContainer
{
	...

	private UserControl CustomControl_Image
	{
		get
		{
			return Get<UserControl>(mainPath + "CustomControl[0]");
		}
	}

	public Verification VerifyCustomImageText(string expected)
	{
		string actual =
			CustomControl_Image.GetAttachedProperty<string>("", "Message");
		return BaseTest.VerifyText(expected, actual);
	}
}

GetAttachedProperty

GetAttachedProperty is a powerful method. Along with reading dependency properties, you can read much more. In some cases, WPF elements are nested in each other or in tooltip windows. In other cases, some object is bound to WPF element. In such situations you can try to access the elements and method will return you FrameworkElement object. From this object, you can again get GetAttachedProperty to access some class specific property. In all cases, you will need access to the application under test code to see how it is working internally.

FrameworkElement tooltip = wpfElement.
	GetAttachedProperty<FrameworkElement>("", "ToolTip");
string value = tooltip.GetAttachedProperty<string>("", "SomeSpecificProperty");

Conclusion

GetAttachedProperty is a powerful method. Once you get stuck with normal processing of elements you can always try it. I would say definitely give it a try.

Related Posts

Read more...

Advanced WPF automation – working with WinForms grid

Last Updated on by

Post summary: Example how to work with WinForms grid with TestStack White.

TestStack White is a really powerful framework. It works on top of Windows UI Automation framework hiding its complexity. If White is not able to locate element you have access to underlying UI Automation and you can do almost anything you need.

Reference

This post is part of Advanced WPF desktop automation with Telerik Testing Framework and TestStack White series. The sample application can be found on GitHub.

MainGrid

For single responsibility separation grid logic is in separate class MainGrid.cs. The constructor takes White.Core.UIItems.WindowItems.Window object. Inside the window, we search for an element with control type ControlType.Table. It is the only one of its kind. If there are more we should narrow down the SearchCriteria.

public class MainGrid
{
	private Table table;
	public MainGrid(Window window)
	{
		SearchCriteria search = SearchCriteria.ByControlType(ControlType.Table);
		table = window.Get<Table>(search);
	}

	public string GetCellText(int index)
	{
		TableCell cell = GetCell(index);
		string value = cell.Value as string;
		return value;
	}

	public void ClickAtRow(int row)
	{
		TableCell cell = GetCell(row);
		Point topLeft = cell.Bounds.TopLeft;
		topLeft.X += 5;
		topLeft.Y += 5;
		Mouse.instance.Click(topLeft);
	}

	private TableCell GetCell(int index)
	{
		TableRows rows = table.Rows;
		TableCells cells = rows[index - 1].Cells;
		return cells[0];
	}
}

Access the grid

MainGrid is property inside MainWindow page object. On access to the property new object is instantiated. This might lead to performance issues if grid search and instantiation is slow. So, in this case, you can use Singleton design pattern. Singleton might lead to issues with old object state which will be hard to debug. It depends what your priorities are.

public class MainWindow : XamlElementContainer
{
	public static string WINDOW_NAME = "MainWindow";
	private Application app;
	private string mainPath =
		"XamlPath=/Border[0]/AdornerDecorator[0]/ContentPresenter[0]/Grid[0]/";
	public MainWindow(VisualFind find, Application application)
		: base(find)
	{
		app = application;
	}

	private MainGrid MainGrid
	{
		get
		{
			return new MainGrid(app.GetWindowByName(WINDOW_NAME));
		}
	}

	public void ClickTableAtRow(int row)
	{
		MainGrid.ClickAtRow(row);
	}

	public Verification VerifyTableCell(int index, string text)
	{
		return BaseTest.VerifyText(text, MainGrid.GetCellText(index));
	}
}

Conclusion

TestStack White is a powerful framework. It will be perfect if you can do the job without it. If you cannot you are lucky it exists.

Related Posts

Read more...

Advanced WPF automation – page objects inheritance

Last Updated on by

Post summary: re-use of page objects code through inheritance.

Inheritance is one of the pillars of object-oriented programming. It is a way to re-use functionality of already existing objects.

Reference

I’ve started a series with details of Advanced WPF desktop automation with Telerik Testing Framework and TestStack White. The sample application can be found in GitHub SampleAppPlus repository.

Abstract class

An abstract class is one that cannot be instantiated. An abstract class may or may not have abstract methods. If one method is marked as abstract then its containing class should also be marked as abstract. We have two similar windows with text box, save and cancel button that is shown on both of them. AddEditText class following Page Objects pattern. It is marked as abstract thought. It has an implementation of all three elements except TextBox_Text.

public abstract class AddEditText : XamlElementContainer
{
	protected string mainPath =
		"XamlPath=/Border[0]/AdornerDecorator[0]/ContentPresenter[0]/Grid[0]/";
	public AddEditText(VisualFind find) : base(find) { }

	protected abstract TextBox TextBox_Text { get; }
	private Button Button_Save
	{
		get
		{
			return Get<Button>(mainPath + "Button[0]");
		}
	}
	private Button Button_Cancel
	{
		get
		{
			return Get<Button>(mainPath + "Button[1]");
		}
	}

	public void EnterText(string text)
	{
		TextBox_Text.Clear();
		TextBox_Text.User.TypeText(text, 50);
	}

	public void ClickSaveButton()
	{
		Button_Save.User.Click();
		Thread.Sleep(500);
	}

	public void ClickCancelButton()
	{
		Button_Cancel.User.Click();
	}
}

Add Text page object

The only thing we have to do in Add Text window is to implement TextBox_Text property. All other functionality has already been implemented in AddEditText class.

public class AddText : AddEditText
{
	public static string WINDOW_NAME = "Add Text";
	public AddText(VisualFind find) : base(find) { }

	protected override TextBox TextBox_Text
	{
		get
		{
			return Get<TextBox>(mainPath + "TextBox[0]");
		}
	}
}

Edit Text page object

In Edit Text page object we have to implement “TextBox_Text” property. Also on this window, there is one more element which needs to be defined.

public class EditText : AddEditText
{
	public static string WINDOW_NAME = "Edit Text";
	public EditText(VisualFind find) : base(find) { }

	private TextBlock TextBlock_CurrentText
	{
		get
		{
			return Get<TextBlock>(mainPath + "TextBlock[0]");
		}
	}

	protected override TextBox TextBox_Text
	{
		get
		{
			return Get<TextBox>(mainPath + "TextBox[1]");
		}
	}

	public Verification VerifyCurrentText(string text)
	{
		return BaseTest.VerifyText(text, TextBlock_CurrentText.Text);
	}
}

Conclusion

Inheritance is a powerful tool. We as automation engineers should use it whenever possible.

Related Posts

Read more...

Advanced WPF desktop automation

Last Updated on by

Post summary: In this series of posts I’ll expand the examples and ideas started in Automation of WPF applications series.

Telerik Testing Framework and TestStack White are powerful tools for desktop automation. You can automate almost everything with a combination of those frameworks. This series of posts will give more details how to automate more complex applications.

Reference

Code samples are located in GitHub SampleAppPlus repository. Telerik Testing Framework requires installation as it copies lots of assemblies in GAC.

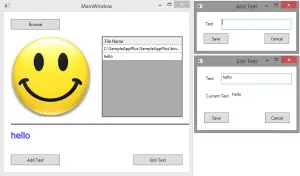
SampleAppPlusThere is SampleAppPlus which is actually a dummy application with only one purpose to be used to demonstrate automation principles. With this application, you can upload an image file. Once uploaded image is visualized. The image path is listed in a table. The image path is also visualized as an image in a custom control in the bottom of the main window. The user is able to add more text which is added to the table as long as editing already existing text. Add and edit are reflected on custom image element.

Topics

  • Page objects inheritance of similar windows
  • Working with WinForms grid
  • Windows themes and XamlPath
  • Read dependency property
  • NTestsRunner in action
  • Extension methods
  • Memory usage

Page objects inheritance

It is common to have similar windows in an application. Each window is modeled as page object in automation code. If windows are also similar in terms of internal structure it is efficient to re-use similar part and avoid duplications. Re-use is achieved with inheritance. Given SampleAppPlus application has very similar windows for adding and editing text. Code examples show how to optimize your effort and re-use what is possible to be re-used. More details can be found in Advanced WPF automation – page objects inheritance post.

Working with WinForms grid

As mentioned before Telerik Testing Framework is not very good with WinForms elements. This is the main reason to use TestStack White. It is not very likely to have WinForms elements in WPF application but in order to complete the big picture I’ve added such grid in a SampleAppPlus application. Code examples show how to manage WinForms grid. More details can be found in Advanced WPF automation – working with WinForms grid post.

Windows themes and XamlPath

In given examples elements are located with exact XamlPath find expression. This approach has a serious problem related to Windows themes. For complex user interfaces, XamlPath could be different on a different theme. Windows Classic theme sometimes produces different XamlPath in comparison with standard Windows themes. Yes, it is no more available from Windows 8 but Server editions are working only with Windows Classic theme. So one and the same tests could have differences. I couldn’t find a way to automatically detect which is current theme. The solution is to have different XamlPath for both standard and classic themes. Once you have it you can switch them manually with some configuration or you can try to automate the switch by locating element for which you know is different and save variable based on its location result.

Read dependency property

A dependency property is a way in C# to extend the standard provided functionality. It can happen in a real application that developers use such functionality. Given SampleAppPlus application has a special element with dependency property. Code examples show how to extract property value and use it in your tests. More details can be found in Advanced WPF automation – read dependency property post.

NTestsRunner in action

I’ve introduced NTestsRunner which is a custom way for running functional automated tests. Code samples show how to use it and create good tests that are run only with this tool.

Extension methods

Extension methods are one extremely good feature of .NET framework. I personally like them very much. I assume everyone writing code in C# is aware of them. Still, in code examples show how they can be used.

Memory usage

Memory is not a problem on small projects. But when the number of tests continue to grow it actually becomes a problem. More details can be found in Advanced WPF automation – memory usage post.

Related Posts

Read more...

Multilingual automation testing with enumerations

Last Updated on by

Post summary: Solution for automated testing of multilingual sites by using string values in all supported languages for enumerations.

In efficiently use of enumerations with string values in C# post I’ve described how you can add text to an enumeration element and then use it. Current post is elaboration with code samples for testing multilingual applications.

The challenge

Multilingual automation is always a challenge. If you use text to locate elements or verify condition then trying to run a test with different language will fail. Enumerations with language dependent string values is a pretty good solution. How to do it is described below.

Define attribute

StringValue class is extending System.Attribute. It has two properties for text and language. It should have AllowMultiple = true in order to be applied as many times as many languages you have.

namespace System
{
	[AttributeUsage(AttributeTargets.Field, AllowMultiple = true)]
	public class StringValue : Attribute
	{
		public string Value { get; private set; }
		public string Lang { get; private set; }

		public StringValue(string lang, string value)
		{
			Lang = lang;
			Value = value;
		}
	}
}

Read attribute

With reflection read all StringValue attributes. Iterate them and return the one that matches language given as parameter.

using System.Reflection;

namespace System
{
	public static class ExtensionMethods
	{
		public static string GetStringValue(this Enum value, string lang)
		{
			string stringValue = value.ToString();
			Type type = value.GetType();
			FieldInfo fieldInfo = type.GetField(value.ToString());
			StringValue[] attrs = fieldInfo.
				GetCustomAttributes(typeof(StringValue), false) as StringValue[];
			foreach (StringValue attr in attrs)
			{
				if (attr.Lang == lang)
				{
					return attr.Value;
				}
			}
			return stringValue;
		}
	}
}

Apply to enumerations

All supported languages can be defined as string constants. It will be pretty cool if can define an enumeration with languages and pass it in the StringValue constructor as a language but it is not possible as it is not a compile-time constant.

public class Constants
{
	public const string LangEn = "en";
	public const string LangFr = "fr";
	public const string LangDe = "de";
}

public enum Messages
{
	[StringValue(Constants.LangEn, "Problem occured, try again later")]
	[StringValue(Constants.LangFr, "Problème survenu, réessayer plus tard")]
	[StringValue(Constants.LangDe, "Problem aufgetreten, " +
		"versuchen Sie es später erneut")]
	ProblemOccured,
	[StringValue(Constants.LangEn, "Successfully done")]
	[StringValue(Constants.LangFr, "Fait avec succès")]
	[StringValue(Constants.LangDe, "Erfolgreich durchgeführt")]
	Success
}

Use in code

Somewhere at a top level of your tests, you should have property or field which most likely will be read from conflagration and will define for which locale is the current test run.

string lang = Constants.LangFr;

This is then used to read correct text value for given enumeration element.

Assert.AreEqual(Messages.ProblemOccured.GetStringValue(lang), 
	App.MessageBox.GetText());

Conclusion

Multilingual testing is a challenge. Be smart and use all tricks you might get. In this post, I’ve revealed pretty good trick to do the automation. Challenge with this approach will be initially set up of enumerations with all the translations.

Related Posts

Read more...

Efficiently use of enumerations with string values in C#

Last Updated on by

Post summary: Using enumerations or specialized classes makes your automation tests easy to understand and maintain. Show with code samples how to define and read string value to enumeration elements.

When you do automation tests and have to pass a value to a method it is so easy and natural to just use strings. There are many cases where a string is a correct solution. There are also many cases where a string can be a solution, but enumeration or specialized class are better and more efficient solution.

Why not strings

Having the following example – web application with drop down which has several options. We are using Page objects pattern to model the page. Page object has a method which accepts the option to be selected. String seems like a natural solution but is wrong. Although string will work enumeration is the only right solution. Drop down has limited and already defined options that can be selected. Exposing just string may cause misinterpretations for the consumer of your method. It is much more easy to limit the consumer to several enumeration values. In this way, consumer knows what data to provide and this automatically keeps code clean from magic strings. If changes are needed they will be done only in the enumeration making code easier to maintain.

Problem with enumerations in C#

Using enumerations for example given above will not work. Unlike Java enumerations in C# are wrappers for int or other numeric types value. You are not able to use text with enumeration element.

Using string values with enumerations

Only way to use string values in enumerations is by adding it as an attribute to each enumeration’s element. It takes several steps in order to accomplish this.

  1. Create the attribute class that will be applied to enumeration element
  2. Create extension method that is responsible for reading a string value from enumeration element
  3. Apply string value attribute to enumeration element
  4. Use in code

Below are code samples how to use string values with enumerations in C#. Defining and reading of the attribute is functionality built in NTestsRunner.

Define attribute

The first step is to create a class that extends System. Attribute. It has only one string property to hold the text in it. The text is passed in the constructor. Note that this class is defined in System namespace in order to have it by default skipping the need of importing namespace you might not be aware of.

namespace System
{
	public class StringValue : Attribute
	{
		public string Value { get; private set; }

		public StringValue(string value)
		{
			Value = value;
		}
	}
}

Read the attribute

C# provides so-called extension methods, a great way to add new functionality to the existing type without creating new derived type. Reading of string value from enumeration element is done with a GetStringValue extension method. With reflection, all StringValue custom attributes of an element are obtained. If some found text of first is returned. If not then string representation of the element is returned.

using System.Reflection;

namespace System
{
	public static class ExtensionMethods
	{
		public static string GetStringValue(this Enum value)
		{
			string stringValue = value.ToString();
			Type type = value.GetType();
			FieldInfo fieldInfo = type.GetField(value.ToString());
			StringValue[] attrs = fieldInfo.
				GetCustomAttributes(typeof(StringValue), false) as StringValue[];
			if (attrs.Length > 0)
			{
				stringValue = attrs[0].Value;
			}
			return stringValue;
		}
	}
}

Apply to enumerations

Once StringValue class is ready it can be applied as an attribute to any enumeration.

public enum Messages
{
	[StringValue("Problem occured, try again later")]
	ProblemOccured,
	[StringValue("Successfully done")]
	Success
}

Use in code

In code string value can be obtained from enumeration’s element with a GetStringValue method.

Assert.AreEqual(Messages.ProblemOccured.GetStringValue(), App.MessageBox.GetText());

Conclusion

Using enumerations is mandatory to make readable and maintainable automation. Working effectively with enumerations will increase your value as automation specialist.

Related Posts

Read more...