Monthly Archives: June 2019

Testing with Cypress – Code coverage with Istanbul

Last Updated on by

Post summary: This article describes how to extract and process Istanbul code coverage, and generate HTML reports.

This post is part of a Cypress series, you can see all post from the series in Testing with Cypress – lessons learned in a complete framework. Examples code is located in cypress-testing-framework GitHub repository.

Code coverage instrumentation

In Testing with Cypress – Build a React application with Node.js backend is described how the application is instrumented to track code coverage. This is a very essential part, without it, measurement is not possible.

Code coverage capturing data

Capturing of code coverage results is done in cypress/support/core/cypress_code_coverage.js file. It is included in cypress/support/index.js file with import ‘./core/cypress_code_coverage’; statement. For each and every test suite separate file with coverage data is created. Depending on the application those files can get pretty big, and writing and reading them slows the tests. So code coverage is controlled with TEST_CODE_COVERAGE environment variable. By default, it is set to false. Once all tests are run and coverage data is saved then it has to be merged. Merging is invoked with yarn cypress:report command.

Code coverage report

An important prerequisite is to generate the code coverage report is to have nyc installed as a global NPM package. Since the paths in the container are not the same as the paths locally, in order to read correct sources there is reprocessing of the paths, DOCKER_CONTAINER_PATH is replaced with the current folder. You can see how code coverage looks like in Istanbul-report. For this particular example only save_person_spec.js has been run with yarn cypress:run –spec=’cypress/tests/persons/save_person_spec.js’ command.

Conclusion

Code coverage is not a crucial part of the whole QA process but is very nice to have feature. With code coverage, we can improve on our tests, make them cover bits of the code that we have missed during analysis and creating of the tests themselves.

Related Posts

Read more...

Testing with Cypress – Custom logging of errors and JUnit results

Last Updated on by

Post summary: Description of the custom error logger and also custom JUnit XML file creator.

This post is part of a Cypress series, you can see all post from the series in Testing with Cypress – lessons learned in a complete framework. Examples code is located in cypress-testing-framework GitHub repository.

The issue

Cypress is not good at error tracking and reporting. If a test fails it is hard to understand why. Errors sometimes are vague, stacktrace is not useful as it does not lead to the proper line of your code since it is being wrapped into Cypress’ code. Forget about the nice stack traces that Java/C# code is producing, where you just go, find, and eliminate the error without even debugging. Debugging errors in tests is much harder with Cypress.

The solution

Gleb Bahmutov, currently a VP of Engineering at Cypress.io has a nice NPM package, called cypress-failed-log. It gathers commands that Cypress was executing during a test run and in case of a failure saves them to a file. You can inspect the file and trace what parts of your test were executed.

Modified solution

I started with that solution but did not enjoy it much. What I did is to take the base code and modify it. Those modifications are still tracking the Cypress commands, but also they track requests and response being exchanged by application and the backend, so in case of error you can also inspect the backend response. One important thing is that each test should have a unique name, otherwise overlapping may occur. The logging code is located in cypress/support/core/cypress_logging.js file, it is registered to Cypress within cypress/support/index.js file with import ‘./core/cypress_logging’;. The code also copies the screenshot of the test failure for better understanding of the error.

Capturing of request/response between the backend and the frontend can be controlled with TEST_CAPTURE_RESPONSES environment variable, it is true by default. Sometimes you will need to avoid certain requests/responses from being captured as they are not important. This can be done with TEST_CAPTURE_RESPONSES_EXCLUDE_PATHS variable, use asterisks to match the URLs. For e.g. I am testing a Ruby on Rails application which has a profiler enabled, which massively pollutes the logs, so I exclude those with ‘*/mini-profiler-resources/*’ pattern.

All this data is saved as a file with the name of the test inside a folder with the name of the suite. For e.g. cypress/logs/logging/multiple_testsuites_mix_spec.js/Test suite mix #1 — test case #2 (failed).json. The name of the JSON file is same as the name of the automatically generated screenshot on failure.

JUnit results with Cypress

In order to make Cypress output the test results into JUnit XML file following steps has to be done. Add the following configuration into cypress.json. This configuration makes Cypress create JUnit XML file. The important bit here is [hash] in the file name, otherwise, Cypress will overwrite the files.

{
    "reporter": "junit",
    "reporterOptions": {
        "mochaFile": "results/my-test-output-[hash].xml"
    }
}

If you use some CI tool then you can pass the XML results to it and it will visualize them.

Additionally, you can manipulate the XML results, you can merge them into just one XML file by installing junit-merge as a global NPM package and run junit-merge -d results -o results/merged.xml.

You can generate an HTML from XMLs with xunit-viewer NPM package. In case you have merged the XMLs into one then the command is xunit-viewer –results=results/merged.xml –output=results/merged.html, in case you have not the command is xunit-viewer –results=results –output=results/merged.html.

Custom JUnit results

Well, the out of the box solution is good but not enough for me. It does not show the skipped tests, it adds one more testsuite with name Root Suite, which is empty and Jenkins for e.g. avoids it, but if you want to visualize the results into HTML then it is a problem. What I have done is to generate JUnit XML on my own. This happens automatically in cypress_logging.js file. Files are put into the cypress/logs folder and have the name of the suite. Processing of the custom results is additionally made in provided code, you can read mode in Testing with Cypress – Code with Istanbul post.

Compare of JUnit reports

In this section, I will put some comparison of Cypress JUnit results and the one I have created. See the images below how HTML report looks like. HTML files can be opened from Cypress-report.html and Custom-report.html. XML results can be downloaded from xmls.zip.

Cypress standard HTML report

Cypress custom HTML report

I also made a quick Jenkins installation from its Docker container and uploaded the results for comparison. Below are the images of the comparison. Both JUnit reports are not visualized very well. Mostly this is because of the fact that JUnit is a format for Java tests, where we have packages and Jenkins is visualizing the results based on this assumption.

Cypress Jenkins standard

Cypress Jenkins custom

HTML Reports

HTML report is generated with xunit-viewer NPM package as described above. It is done by invoking the yarn cypress:report command. Above you can also see how HTML report looks like.

Semaphore file

Apart from the HTML report, there is one more file that is generated. It is named failed.txt. We are using AWS CodeBuild for CI/CD and we just need an indicator if the build passed or not. If this file is present then the build failed. The file content shows which are the failed suites. The whole artifacts are zipped and uploaded to an S3 bucket where can be investigated later.

Conclusion

In the current post, I have described the custom functionality I have for improving the debugging of failed tests by logging more information. Also, I have made a custom JUnit reporting of the test results. An HTML report is generated for better visualization of the results.

Related Posts

Read more...

Testing with Cypress – Basic API overview

Last Updated on by

Post summary: Basic overview of the Cypress API with code samples for some of the interesting features.

This post is part of a Cypress series, you can see all post from the series in Testing with Cypress – lessons learned in a complete framework. Examples code is located in cypress-testing-framework GitHub repository.

Cypress API

Cypress is so much different than Selenium, so it takes some time to get used to the way elements are located and interacted with. I am not going into details about the API here but will mention some basic things. Methods in the API are kind of self-explanatory, mainly used ones are: get, find, click, type, first, last, prev, next, children, parent, etc.

Cypress uses jQuery selectors to locate elements, so you can have things like contains, nth-child, .class, #id, [name*=”value”] (and all variations). A very interesting and sometimes useful feature is that you can make Cypress click hidden elements with click({force: true}), Cypress gives you an error that element is not clickable from a user point of view, and you can choose to find another element or just force the click. Also, you can click multiple elements with click({multiple: true}).

Explore Cypress API

When every project is created for the first time, Cypress installs examples for all their APIs. Those are very good and extensive. I have preserved their examples in the current project and they are available in cypress/examples folder. You can run all the examples with yarn cypress:examples:run command. You can explore them one by one in the Test Runner, which can be opened with yarn cypress:examples:open command.

Page Object Model

As mentioned in the main topic, Cypress recommends using custom commands instead of Page Objects. I do not like this idea, so I use page objects, as I believe they make the code more focused. Here is an example of a page object I am conformable with:

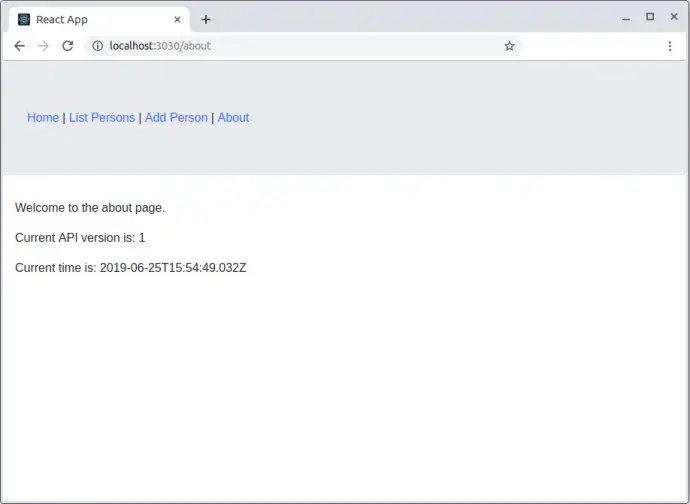
export default class AboutPage {
  constructor() {
    this.elements = {
      navigation: () => cy.getSilent('a[href$=about]'),
      paragraph: index => cy.getSilent('section.m-3 div p').eq(index),
    };
  }

  goTo() {
    cy.visit('/');
    this.elements.navigation().click();
  }

  /**
   * @param {string} version
   * @param {Date} datetime
   */
  verifyPage(version, datetime) {
    this.elements.paragraph(0)
      .should('text', 'Welcome to the about page.');
    this.elements.paragraph(1)
      .should('text', `Current API version is: ${version}`);
    this.elements.paragraph(2)
      .should('text', `Current time is: ${datetime.toISOString()}`);
  }
}

Clock

Cypress allows you to modify the clock in the browser. For e.g. About page of the application under test shows the current time. It makes much more easy to validate the visualization in case you control the current time. Otherwise, you have to parse the time and put some thresholds in the verifications.

Stub response

Another very handy feature is to be able to stub the response that API is supposed to return. In this way, you can very easily test for situations like timeout, incorrect response, error in response, etc.

Clock and Stub example

I have combined clock and stubbing into one example. The test suite file is cypress/tests/stub/response_and_clock_spec.js. The cy.clock(datetime.getTime()); sets the date to one you need. The cy.route(‘GET’, ‘/api/version’, version); simulates that API returns the version as a response. In the current case, it is a plain string, but in general case, this s JSON object.

response_and_clock_spec.js

import AboutPage from '../../pages/about_page';

describe('Check about page', () => {
  it('should show correct stubbed data and clock', () => {
    const aboutPage = new AboutPage();
    const version = '2.33';
    const datetime = new Date('2014-07-22T15:24:00');

    cy.server();
    cy.route('GET', '/api/version', version);
    cy.clock(datetime.getTime());

    aboutPage.goTo();

    aboutPage.verifyPage(version, datetime);
  });
});

about_page.js

  verifyPage(version, datetime) {
    this.elements.paragraph(0)
      .should('text', 'Welcome to the about page.');
    this.elements.paragraph(1)
      .should('text', `Current API version is: ${version}`);
    this.elements.paragraph(2)
      .should('text', `Current time is: ${datetime.toISOString()}`);
  }

Running custom Node.js code

Cypress runs into the browser, this is its biggest strength as you have direct access to your application and the browser. This is its weakness as well because the browser is much restrictive in terms of running code. In order to run custom Node.js code, you have to wrap it as a task. The Cypress task accepts only one argument, so if you need to pass more, you have to wrap them in a JSON object. The task should also return a promise. Tasks are registered into cypress/plugins/index.js file. See examples below. Task copyFile is used in cypress_loggin.js, a parameter that is passed to it is a JSON object with from and to keys. This task is registered with Cypress in index.js. Implementation is done in tasks.js where actual Node.js code is used to manipulate the file system and a Promise is returned.

cypress_logging.js

cy.task('copyFile', {
  from: `cypress/screenshots/${screenshotFilename}`,
  to: getFilePath(screenshotFilename),
});

index.js

const tasks = require('./tasks');

module.exports = (on, config) => {
  // `on` is used to hook into various events Cypress emits
  on('task', {
    copyFile: tasks.copyFile,
  });

  // `config` is the resolved Cypress config
  const newConfig = config;
  newConfig.watchForFileChanges = false;

  return newConfig;
};

tasks.js

const fs = require('fs');

const copyFile = args =>
  new Promise(resolve => {
    if (fs.existsSync(args.from)) {
      fs.writeFileSync(args.to, fs.readFileSync(args.from));
      resolve(`File ${args.from} copied to ${args.to}`);
    }
    resolve(`File ${args.from} does not exist`);
  });

module.exports = { copyFile };

Working with promises

Cypress is based on promises. Each Cypress command returns a command which is similar to a promise, but actually is different, read mode in Commands Are Not Promises. If you want to access the value from the previous operation you have to unwrap it with a then() method. If you have several dependencies then this nesting becomes bigger and bigger. This is why I have adopted some code from Nicholas Boll to avoid nesting. The article above is about using async/await but actually, it is not going to work with my custom logging, I will write in the next section. Initially, I started using directly the plugin from Nicholas, but I have observed strange bugs where a test fails but is not reported as such, so I modified it and it is proved stable now.

See examples below. The standard way of doing it is by unwrapping the command with the then() method. This is working but can get really ugly if you have too many nested unwrappings. The option is to use promisify() which wraps the Cypress command into a promise. The promise is then resolved only inside some other Cypress command, such as cy.log() or custom command cy.apiGetPerson(). If you print it directly the result in the console is a Promise.

with unwrap

it('should work with regular unwrap', () => {
  const person = new Person();
  // This is a command
  cy.apiSavePerson(person).then(personId => {
    // Value is unwrapped and printed properly
    cy.log(personId);
    console.log(personId);

    // Value is passed unwrapped
    cy.apiGetPerson(personId).then(res => cy.log(res));
  });
});

with promisify()

it('should work with promisify', () => {
  const person = new Person();
  // This is a promise
  const personId = cy.apiSavePerson(person).promisify();
  // Cypress internally resolves the promise
  cy.log(personId);
  // Prints a Promise
  console.log(personId);
  // Value is accessible after unwrap
  personId.then(pid => console.log(pid));

  // Cypress internally unwraps the value
  cy.apiGetPerson(personId).then(res => cy.log(res));
});

cypress_promisify.js

function promisify(chain) {
  return new Cypress.Promise((resolve, reject) => {
    chain.then(resolve);
  });
}

before(function() {
  cy.wrap('').__proto__.promisify = function() {
    return promisify(this);
  };
});

Working with async/await

The code above should work with async/await, which is an amazing JavaScript feature. It does work but it messes up with the custom logging I have described into Testing with Cypress – Custom logging of errors and JUnit results post. The code below works, but the custom logging is not triggered. So I would say, do not use async/await if you need those customizations. The bigger issue is that async/await does not seem to work in Electron, cy.apiGetPerson() is actually not invoked if you run the code in Electron browser.

it('should work with async/await', async () => {
  const person = new Person();
  // This is a resolved promise
  const personId = await cy.apiSavePerson(person).promisify();
  // Value is wrapped and printed properly
  cy.log(personId);
  console.log(personId);

  // Value is passed unwrapped
  cy.apiGetPerson(personId).then(res => cy.log(res));
});

Full API documentation

Cypress has very good and extensive documentation, you can read more at Cypress API article.

Conclusion

Cypress has a rich API which requires some time investments to get used to. You have good things like controlling the clock of the browser, controlling the API response from the backend. Good thing is that you have a way to run whatever code you want in your tests, but it has to wrapped as a task, otherwise you cannot just run any code in the browser.

Related Posts

Read more...

Testing with Cypress – Build a React application with Node.js backend

Last Updated on by

Post summary: Short introduction to the application under test that is created for and used in all Cypress examples. It is React frontend created with Create React App package. Backend is a Node.js application running on Express.

This post is part of a Cypress series, you can see all post from the series in Testing with Cypress – lessons learned in a complete framework. Examples code is located in cypress-testing-framework GitHub repository.

Backend

The backend is a simple Node.js application build with Express web server. It supports several APIs that can save a person, get a person by id, get all persons or delete the last person in the collection. You can read the full description in Build a REST API with Express on Node.js and run it on Docker post.

Frontend

Current post is mainly devoted to the frontend. It described how the React application is built. In order to make this part easy, Create React App is used. The best thing about it is that you do not need to handle lots of configurations and you just focus on your application. In order to create an application, Create React App has to be installed as a global NPM package with npm install -g create-react-app. The application itself is created with create-react-app my-application-name. Once this is done you can start building your application. See more details on application creation in How to Create a React App with create-react-app. I have added Bootstrap for better styles and Toastr for nicer notifications. I also use Axios for API calls. I am not going into details about how to work with React as this is a pretty huge topic and I am not really expert at it. You can inspect the GitHub repository given above of how controllers are structured.

Instrumented for code coverage

After having the application ready I wanted to add support for code coverage. The tool used to measure code coverage is Istanbul. Because of Create React App, adding the configuration is not straight-forward as practically there is no webpack.config.js file, it is hidden.

One option is to eject the application. Maybe for a big project where you need full control over the configurations, this is OK, but for this small application, I would not want to deal with it.

Another option is to use a package that builds on top of Create React App. One such plugin is react-app-rewired. It is installed along with istanbul-instrumenter-loader, the actual code coverage plugin. Once those two are installed the actual configuration is pretty simple. A file named config-overrides.js is created with the following content:

const path = require('path');
const fs = require('fs');

module.exports = function override(config, env) {
  // do stuff with the webpack config...
  config.module.rules.push({
    test: /\.js$|\.jsx$/,
    enforce: 'post',
    use: {
      loader: 'istanbul-instrumenter-loader',
      options: {
        esModules: true
      }
    },
    include: path.resolve(fs.realpathSync(process.cwd()), 'src')
  });
  return config;
};

Also, package.json has to be changed. The default react-scripts start/build/test is changed to react-app-rewired start/build/test. In order to verify that code coverage is enabled, go to Dev Tools (hit keyboard F12), then go to Console and search for __coverage__ variable.

Dockerization

In order to make it easy to run a Dockerfile has been added. It installs Yarn as a package manager, then copies package.json. Important is to copy yarn.lock as well since the actual dependencies are in it. If this is not copied, every time an install is run it will pick the latest dependencies, which may lead to instability. Then the installation of dependencies is done with command yarn, short for yarn install. Finally, all local files are copied. This is done in the end so installation is not triggered on every file change, but only on package.json or yarn.lock change.

FROM node:8.16.0-alpine

ENV APP /app
WORKDIR $APP

RUN npm install yarn -g

COPY package.json $APP
COPY yarn.lock $APP
RUN yarn

COPY . .

The docker-compose.yml file is also very simple. It has two services. The first is the backend which is exposed to 9000 port of the host. This is needed because Cypress tests directly access the APIs. It uses the image uploaded to the Docker hub repository: image: llatinov/nodejs-rest-stub. The second service is the frontend. It uses local Dockerfile: build: .. When frontend container is started yarn start command is executed and is exposed to port 3030 of the host machine. One more thing, that is added as configuration, is the backend API URL that can be controlled by setting API_URL environment variable, which then is set to REACT_APP_API_URL, used by the frontend. If no API_URL is provided then the default of http://localhost:9000 is taken.

version: '3'

services:
  backend:
    image: llatinov/nodejs-rest-stub
    ports:
      - '9000:3000'
  frontend:
    build: .
    command: yarn start
    environment:
      - REACT_APP_API_URL=${API_URL:-http://localhost:9000}
    ports:
      - '3030:3000'

Run the application

There are several ways to run the application under test in order to try Cypress examples. One way is to download both repositories of the backend and the frontend and run them separately.

Second is to run the backend with Docker command docker run -p 9000:3000 llatinov/nodejs-rest-stub. The command maps the 3000 port of the container to 9000 port of the host, this is where the APIs are available. I have uploaded the backend image to the public Docker hub repository. After backend is running, the frontend is run with yarn start command. In this case, frontend is running on port 3000, so you have to adjust the proper URL in the Cypress configurations.

The third option is to run with docker-compose with docker-compose up command. This runs the backend on port 9000 and the frontend on port 3030.

Functionality

The application is very simple, it has few pages where user can add a person or see already existing persons in the backend. On each successful action, there is a notification, in case of a network error, a message is shown.

Persons list


Add person


Version page


Conclusion

In order to demonstrate the Cypress examples, a separate React application with a backend is created with Create React App package. It is also configured to support code coverage with Istanbul.

Related Posts

Read more...

Testing with Cypress – lessons learned in a complete framework

Last Updated on by

Post summary: In the current post I will share some lessons I’ve learned using Cypress for quite a long time. Along this journey, I created a framework which solves some of the pain points that Cypress has.

Introduction

More than a year ago I made a bold presentation about Cypress. Back then I had been using Cypress on a small and very nice React application, and I was fascinated by the tool. You can read the presentation content in Cypress vs. Selenium, is this the end of an era? post.  Now more than a year later and 10K lines of test code I am still fascinated by Cypress and also I have discovered several things that were causing me pain during my work. In the current post, I will try to write for some of them, some of them I truly had forgotten. In the course of using Cypress, I had decided to change things I do not like and make them in the way I really enjoy it. The result of this is a framework, maybe this is too overrated, more likely a set of helper files which you can pick and directly use in your project. The code is located in cypress-testing-framework GitHub repository.

Post in the series

This is the first of series of posts dedicated to testing with Cypress and making your tests easier to write. All posts from the series are:

Application under test

In order to demonstrate some of the features, I have built a very simple React application. It has a backend that manipulates the data and the React application is consuming the backend APIs. More about the application itself can be found in Testing with Cypress – Build a React application with Node.js backend post.

Cypress API

Cypress has a rich API, offering lots of functionality. So far many of us are very used to Selenium, and it is a little surprise when you first deal with Cypress. There is some ramp-up time needed. Once you get acknowledged, things start to happen pretty fast and easy. Read more about the API along with some examples Testing with Cypress – Basic API overview post.

Page Object Model

Cypress does not recommend using POM but prefers using Cypress custom commands instead. See а very good and justified post on the topic, named Stop using Page Objects and Start using App Actions. Although the justification seems very logical, I do not agree with that approach. I still use custom commands, but not as a replacement of page objects, I am not giving up the Page Object Model. It gives me more focus, while with custom commands you can easily start duplicate functionality. Check an example of a Page Object Model I am comfortable with in Testing with Cypress – Basic API overview post.

Test Runner going out of memory

This is my biggest pain. I have tried a lot to overcome this but I could not find any solution. It happens in case of a long test suite with lots of actions in it. Cypress keeps a before/after version of the page on every action, memory drains pretty fast and the browser crashes with Aw snap error.

The most recommended option is to use numTestsKeptInMemory to reduce the memory footprint, but then you need it to be at least one, so you can debug and inspect data into the console.

I also tried to pass –max-old-space-size to Node process. If you pass it to Cypress directly it crashes, so what I did was to rename the node executable to node_exec, and then create a new file named node in which I put node_exec –max-old-space-size $@ to forward all arguments to node executable. This did not help either. 

Finally, I settled with the option to have custom commands to locate elements, which suppress more of the logging with {log: false}. Before/after version of locating the element is not needed, a snapshot is needed after a click or other significant action. Note that this log: false gave me a hard time when using cy.get because it was resetting the default timeout, so I had to pass the timeout as an option as well.

Cypress.Commands.add('getSilent', locator =>
  cy.get(locator, {
    log: false,
    timeout: Cypress.config('defaultCommandTimeout'),
  }),
);

This workaround did not solve the out of memory issue either, just allowed me to have a longer scenario before the Test Runner crashes.

On the other hand, this limitation is kind of a motivation for you to plan better, make more focused and short test suites.

Cypress error logging and JUnit results

Cypress does not provide very good logging, the stack trace is practically useless, as your code is wrapped into Cypress’ code. In order to work around this, I use some custom code which collects Cypress commands and then when a test fails it dumps the commands to a custom log file and a screenshot. The same code also creates custom JUnit test result files and it inserts the errors collected. Custom files are saved into cypress/logs folder of the project. You can read more about this custom logging in Testing with Cypress – Custom logging of errors and JUnit results post.

Rerun failed tests

Although Cypress is very stable, it still happens that some tests fail from time to time. I have added a task to rerun failed tests. This is done with yarn cypress:retry. This task iterates all custom created JUnit XMLs described in the previous section and makes a list of all tests that had failed. This list is saved into a file named retry-output.txt in cypress/logs folder. Those files are run again. The internal command that is called by retry code is yarn cypress:run –spec=’cypress/tests/TestSuite.js’. The same command you can use manually to run a single test suite or more using an asterisk as a wildcard.

Code coverage

Code coverage is not mandatory, more likely a nice to have a metric, we try to monitor and improve on. Read more about code coverage in What about code coverage post. For capturing code coverage Istanbul is used. Code coverage is described in more details in Testing with Cypress – Code coverage with Istanbul post.

Generate reports

An HTML report is generated in the end, it is invoked with yarn cypress:report command. This command relies on custom JUnit XMLs generated during the test run. You can read more details in Testing with Cypress – Custom logging of errors and JUnit results post.

Running tests in parallel

Cypress supports running tests in parallel. This is done with –parallel option when you run your tests. In order to do so, you need a subscription to Cypress Dashboard. There are various subscription plans, which are quite affordable. The idea is that Cypress records all your test runs and based on the timing and the available machines, it distributes evenly the tests across your machines. You can read more in Cypress Parallelization article. I have not tried that and also I do not know how it is going to work with current customizations I am doing in the current post.

Another option is to do the parallelism on your own. For this purpose, xargs Linux command can be used. The command that you run under Linux is:

find ./cypress/tests -name "*_spec.js" | xargs -n1 -P4 bash -c 'yarn cypress:run --spec="$@"' --

Where the P4 is the number you threads you want to have. The command finds all files ending with _spec.js with each if it, it invokes Cypress with a given number of simultaneous threads. Note that this parallelization is not very stable in case of Docker container. Randomly there are issues with Xvfb frame buffer.

What worked for me is to have a docker-compose-yml file with several Cypress services. Each one of them is running a group of the tests, which I manually split. All services share the same volume so results are kept in one place. After those services finish, then another service is run which retries failed tests and aggregates the results and the code coverage. This service is sharing the same volume so it has access to all the test results.

End to end process

To put the bits together. The process suggested in the current post consists of the following steps:

  • yarn cypress:run – run the tests. During the run JUnit XML files are generated. In order to speed up tests can be run in parallel as well. Set TEST_CODE_COVERAGE=true is code coverage is needed.
  • yarn cypress:retry – retry failed tests, based on the JUnit XMLs generated from the previous step. You can retry twice if you need to.
  • yarn cypress:report – generate code coverage report, HTML report with results and also semaphore file that indicates if the tests passed or not.

Conclusion

Cypress is a great tool, I strongly recommend it. It is very stable and reliable. With the improvements, you can find with this series of posts, you can make automation with Cypress even more effective, reliable and enjoyable. Very good article with useful Cypress tips is Bahmutov’s Cypress tips and tricks, I suggest you read it as well.

Related Posts

Read more...

Code coverage of Ruby on Rails application with simplecov

Last Updated on by

Post summary: How to measure code coverage of Ruby on Rails application with simplecov.

This is going to be a pretty short post. In general, it is very easy to measure code coverage on Ruby on Rails applications with a gem called simplecov.

Add coverage to Gemfile

gem 'simplecov', require: false

By using the require: false, Gem gets installed but it is not included when bundler is called. In order to use the Gem you manually have to call require ‘simplecov’.

Start code coverage

Starting the code coverage should be the first thing that the application is doing. So it can be invoked in config/boot.rb file. Add the following lines:

if ENV['ENABLE_CODE_COVERAGE']
    require 'simplecov'
    SimpleCov.start 'rails'
end

Do the testing

A small part in the current post, huge part in the actual effort. Run all the tests that you have, manual, automated, etc.

Gather code coverage

There are basically two ways to get the code coverage: shutdown the application or somehow call SimpleCov.result.format!. Not much to say on the first one. In many cases, it is more convenient to keep the application running, but only the coverage report. For the latter, you may have some controller which is available on for non-production environments, which you can hit with an HTTP call and it executed the code. The code coverage report is located in a folder called coverage in the root application folder.

Conclusion

It is pretty easy to measure code coverage on Ruby on Rails applications with the simplecov Gem.

Related Posts

Read more...