Distributed system observability: Instrument Selenium tests with OpenTelemetry

Last Updated on by

Post summary: Instrument Selenium tests with OpenTelemetry and be able to custom trace the tests themselves.

This post is part of Distributed system observability: complete end-to-end example series. The code used for this series of blog posts is located in selenium-observability-java GitHub repository.

Selenium

Selenium is browser automation software. It’s been around for many years and is de-facto the tool for web automation testing. It has bindings in all popular programming languages, which means people can write web automation tests in those languages.

Selenium observability

Selenium 4 comes with a pack of features. One of those features is the Selenium observability feature. It uses OpenTracing to keep track of the request’s lifecycle. This feature was the main driving factor for me to start to research the current examples. I pictured in my head end-to-end observability, from the test action down to the database call. I have to come up with a custom tracing solution, that is described in this post.

Selenium WebDriver architecture

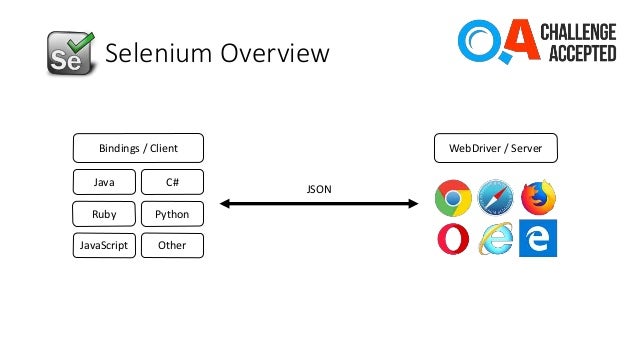
Selenium consist of a client, those are the bindings and server, these are the executables that control the given browser. Both communicate via HTTP calls with JSON payload. This is described in detail in the W3C Selenium specification. I attach a small diagram, I used in a presentation I did a long time ago.
Selenium client instrumentation

Enabling the default selenium observability is very easy. A Jar dependency has to be added in pom.xml, environment variables to be set, and of course running Jaeger instance to collect the traces. Note that this works only for the RemoteWebDriver. It is described in detail in Remote WebDriver.

<dependency>
    <groupId>io.opentelemetry</groupId>
    <artifactId>opentelemetry-exporter-jaeger</artifactId>
    <version>1.6.0</version>
</dependency>
<dependency>
    <groupId>io.grpc</groupId>
    <artifactId>grpc-netty</artifactId>
    <version>1.41.0</version>
</dependency>

This goes along with the WebDriver instantiation code.

System.setProperty("otel.traces.exporter", "jaeger");
System.setProperty("otel.exporter.jaeger.endpoint", "http://localhost:14250");
System.setProperty("otel.resource.attributes", "service.name=selenium-java-client");
System.setProperty("otel.metrics.exporter", "none");
WebDriver driver = new RemoteWebDriver(
                new URL("http://localhost:4444"),
                new ImmutableCapabilities("browserName", "chrome"));

Selenium server instrumentation

Server instrumentation examples are shown in manoj9788/tracing-selenium-grid. Both the standalone server and Selenium grid can be instrumented. In the current examples, I am working only with the standalone server. Unlike the examples, I used Docker to do the instrumentation. I take the default selenium/standalone-chrome:4.0.0 image and install Coursier, a dependency resolver tool, on top of it. Then I run the dependency fetch, so this build sted gets cached for a faster rebuild. Selenium provides –ext flag, which can be set after the standalone command option. I could not make this work only by changing the SE_OPTS environment variable, so I made this rewrite of the startup command in /opt/bin/start-selenium-standalone.sh file. What I did was to change from java -jar to java -cp command, as -cp flag is ignored in case -jar flag is used.

FROM selenium/standalone-chrome:4.0.0

# Install coursier in order to fetch the dependencies
RUN cd /tmp && curl -k -fLo cs https://git.io/coursier-cli-"$(uname | tr LD ld)" && chmod +x cs && ./cs install cs && rm cs

# Download dependencies, so they are availble during run
RUN /home/seluser/.local/share/coursier/bin/cs fetch -p io.opentelemetry:opentelemetry-exporter-jaeger:1.6.0 io.grpc:grpc-netty:1.41.0

# Modify the run command to include dependent JARs in it
RUN sudo sed -i 's~-jar /opt/selenium/selenium-server.jar~-cp "/opt/selenium/selenium-server.jar:$(/home/seluser/.local/share/coursier/bin/cs fetch -p io.opentelemetry:opentelemetry-exporter-jaeger:1.6.0 io.grpc:grpc-netty:1.41.0)" org.openqa.selenium.grid.Main~g' /opt/bin/start-selenium-standalone.sh

# Enable OpenTelemetry
ENV JAVA_OPTS "$JAVA_OPTS \
  -Dotel.traces.exporter=jaeger \
  -Dotel.exporter.jaeger.endpoint=http://jaeger:14250 \
  -Dotel.resource.attributes=service.name=selenium-java-server"

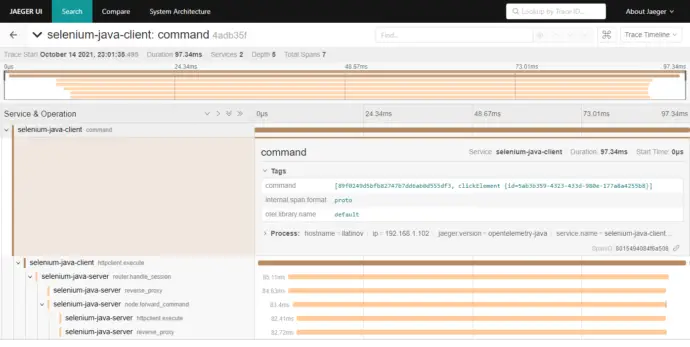
Selenium default traces in Jaeger

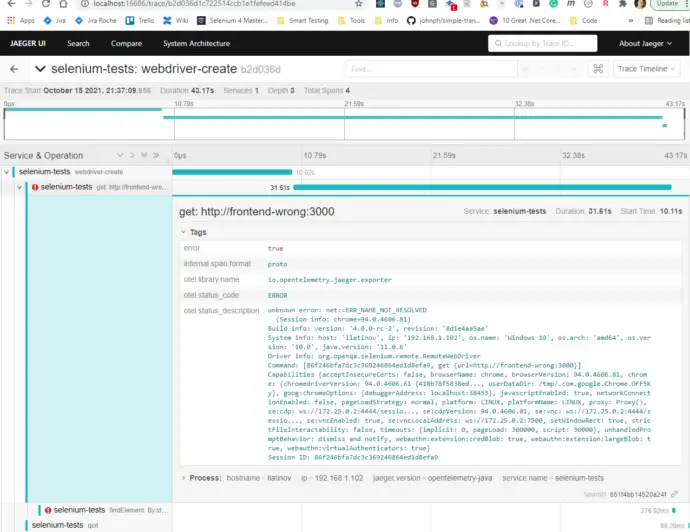
RemoteWebDriver client is passing down the traceparent header when making the request to the server, this is why both client and server traces are connected.

Selenium tests custom observability

As stated before, in the case of HTTP calls, the OpenTelemetry binding between both parties is the traceparent header. I want to bind the Selenium tests with the frontend, so it comes naturally to mind – open the URL in the browser and provide this HTTP header. After research, I could not find a way to achieve this. I implemented a custom solution, which is WebDriver independent and can be customized as needed. Moreover, it is a web automation framework independent, this approach can be used with any web automation tool. An example of how tracing can be done with Cypress is shown in Distributed system observability: Instrument Cypress tests with OpenTelemetry post.

Instrument the frontend

In order to achieve linking, a JavaScript function is exposed in the frontend, which creates a parent Span. Then this JS function is called from the tests when needed. This function is named startBindingSpan() and is registered with the window global object. It creates a binding span with the same attributes (traceId, spanId, traceFlags) as the span used in the Selenium tests. This span never ends, so is not recorded in the traces. In order to enable this span, the traceSpan() function has to be manually used in the frontend code, because it links the current frontend context with the binding span. I have added another function, called flushTraces(). It forces the OpenTelemetry library to report the traces to Jaeger. Reporting is done with an HTTP call and the browser should not exit before all reporting requests are sent.

Note: some people consider exposing such a window-bound function in the frontend to modify React state as an anti-pattern. Frontend code is in src/helpers/tracing/index.ts:

declare const window: any
var bindingSpan: Span | undefined

window.startBindingSpan = (traceId: string, spanId: string, traceFlags: number) => {
  bindingSpan = webTracerWithZone.startSpan('')
  bindingSpan.spanContext().traceId = traceId
  bindingSpan.spanContext().spanId = spanId
  bindingSpan.spanContext().traceFlags = traceFlags
}

window.flushTraces = () => {
  provider.activeSpanProcessor.forceFlush().then(() => console.log('flushed'))
}

export function traceSpan<F extends (...args: any)
    => ReturnType<F>>(name: string, func: F): ReturnType<F> {
  var singleSpan: Span
  if (bindingSpan) {
    const ctx = trace.setSpan(context.active(), bindingSpan)
    singleSpan = webTracerWithZone.startSpan(name, undefined, ctx)
    bindingSpan = undefined
  } else {
    singleSpan = webTracerWithZone.startSpan(name)
  }
  return context.with(trace.setSpan(context.active(), singleSpan), () => {
    try {
      const result = func()
      singleSpan.end()
      return result
    } catch (error) {
      singleSpan.setStatus({ code: SpanStatusCode.ERROR })
      singleSpan.end()
      throw error
    }
  })
}

Instrument the Selenium tests

I have created a custom TracingWebDriver wrapper over the WebDriver. It instantiates the OpenTracing client with initializeTracer() method. It has a built-in custom logic when to generate a tracking span, which is the parent of this span, and when to link the tests’ span with the frontend span. Finding an element is done with the custom findElement() method. It creates a child span, linking it to the previously defined currentSpan. Then the window.startBindingSpan() function is being called in the browser in order to create the binding span in the frontend. This is the way to link tests and the frontend. In case of error, Span is recorded as an error and this can be tracked in Jaeger. On driver quit, or on URL change, or maybe on page change via a button, or whenever needed, window.flushTraces() function can be called by invoking forceFlushTraces() method in the tests. This has 1 second of Thread.sleep(), which waits for the tracing request to be fired from the frontend to the Jaeger. Sleeping like this is an anti-pattern for test automation, but I could not find a better way to wait for the traces. If the browser is prematurely closed or the page is navigated, then tracing is incorrect.

package com.automationrhapsody.observability;

import io.opentelemetry.api.trace.Span;
import io.opentelemetry.api.trace.StatusCode;
import io.opentelemetry.api.trace.Tracer;
import io.opentelemetry.context.Context;
import io.opentelemetry.exporter.jaeger.JaegerGrpcSpanExporter;
import io.opentelemetry.sdk.OpenTelemetrySdk;
import io.opentelemetry.sdk.resources.Resource;
import io.opentelemetry.sdk.trace.SdkTracerProvider;
import io.opentelemetry.sdk.trace.export.SimpleSpanProcessor;
import org.openqa.selenium.*;
import org.openqa.selenium.remote.tracing.opentelemetry.OpenTelemetryTracer;
import org.openqa.selenium.support.ui.ExpectedConditions;
import org.openqa.selenium.support.ui.WebDriverWait;

import java.io.File;
import java.time.Duration;
import java.util.List;

public class TracingWebDriver {

    private static final Duration WAIT_SECONDS = Duration.ofSeconds(5);
    private static final String JAEGER_GRPC_URL = "http://localhost:14250";

    private WebDriver driver;
    private Tracer tracer;
    private Span mainSpan;
    private Span currentSpan;

    public TracingWebDriver(boolean isRemote, String className, String methodName) {
        System.setProperty("otel.traces.exporter", "jaeger");
        System.setProperty("otel.exporter.jaeger.endpoint", JAEGER_GRPC_URL);
        System.setProperty("otel.resource.attributes", "service.name=selenium-java-client");
        System.setProperty("otel.metrics.exporter", "none");

        initializeTracer();

        mainSpan = tracer.spanBuilder("webdriver-create").startSpan();
        mainSpan.setAttribute("test.class.name", className);
        mainSpan.setAttribute("test.method.name", methodName);
        setCurrentSpan(mainSpan);
        driver = WebDriverFactory.createDriver(isRemote);
        mainSpan.end();
    }

    public void get(String url) {
        waitToLoad();
        setCurrentSpan(mainSpan);
        Span span = createChildSpan("get: " + url);
        try {
            forceFlushTraces();
            driver.get(url);
            createBrowserBindingSpan(span);
        } catch (Exception ex) {
            span.setStatus(StatusCode.ERROR, ex.getMessage());
            captureScreenshot();
        } finally {
            span.end();
        }
    }

    public WebElement findElement(By by) {
        waitToLoad();
        Span span = createChildSpan("findElement: " + by.toString());
        try {
            createBrowserBindingSpan(span);
            WebDriverWait wait = new WebDriverWait(driver, WAIT_SECONDS);
            return wait.until(ExpectedConditions.visibilityOfElementLocated(by));
        } catch (Exception ex) {
            span.setStatus(StatusCode.ERROR, ex.getMessage());
            captureScreenshot();
            return null;
        } finally {
            span.end();
        }
    }

    public void quit() {
        waitToLoad();
        forceFlushTraces();
        setCurrentSpan(mainSpan);
        Span span = createChildSpan("quit");
        driver.quit();
        span.end();
    }

    public Object executeJavaScript(String script) {
        return ((JavascriptExecutor) driver).executeScript(script);
    }

    public String captureScreenshot() {
        File screenshotFile = ((TakesScreenshot) driver).getScreenshotAs(OutputType.FILE);
        String output = screenshotFile.getAbsolutePath();
        System.out.println(output);
        return output;
    }

    private void waitToLoad() {
        WebDriverWait wait = new WebDriverWait(driver, WAIT_SECONDS);
        wait.until(ExpectedConditions.invisibilityOfElementLocated(By.id("test-progress-indicator")));
    }

    private void initializeTracer() {
        JaegerGrpcSpanExporter exporter = JaegerGrpcSpanExporter.builder().setEndpoint(JAEGER_GRPC_URL).build();
        Resource resource = Resource.builder()
                .put("service.name", "selenium-tests")
                .build();
        SdkTracerProvider provider = SdkTracerProvider.builder()
                .addSpanProcessor(SimpleSpanProcessor.create(exporter))
                .setResource(resource)
                .build();
        OpenTelemetrySdk openTelemetrySdk = OpenTelemetrySdk.builder()
                .setTracerProvider(provider)
                .build();
        tracer = openTelemetrySdk.getTracer("io.opentelemetry.jaeger.exporter");
    }

    private Span createChildSpan(String name) {
        Span span = tracer.spanBuilder(name)
                .setParent(Context.current().with(currentSpan))
                .startSpan();
        setCurrentSpan(span);
        return span;
    }

    private void setCurrentSpan(Span span) {
        currentSpan = span;
        OpenTelemetryTracer.getInstance().setOpenTelemetryContext(Context.current().with(span));
    }

    private void createBrowserBindingSpan(Span span) {
        executeJavaScript("window.startBindingSpan('"
                + span.getSpanContext().getTraceId() + "', '"
                + span.getSpanContext().getSpanId() + "', '"
                + span.getSpanContext().getTraceFlags().asHex() + "')");
    }

    private void forceFlushTraces() {
        executeJavaScript("if (window.flushTraces) window.flushTraces()");
        try {
            Thread.sleep(1000);
        } catch (InterruptedException e) {
            // Do nothing
        }
    }
}

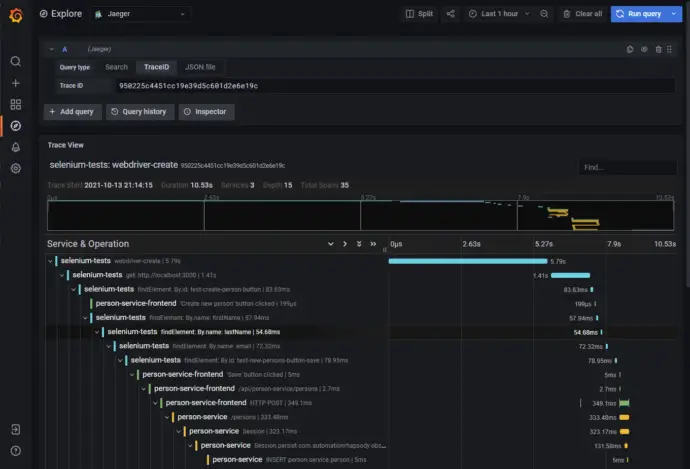
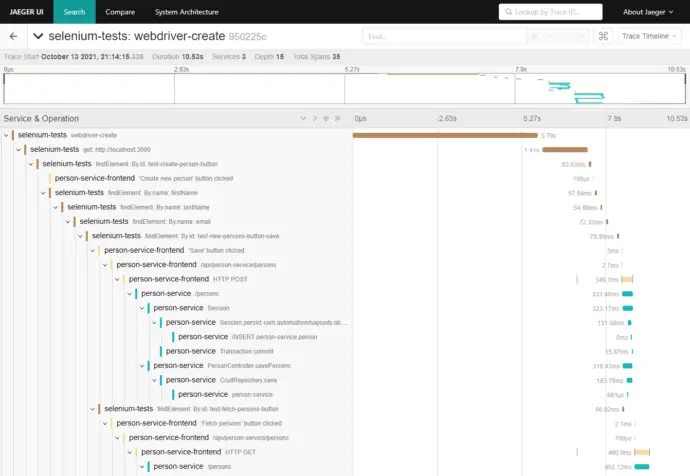
End-to-end traces in Jaeger

In case of error, this is also recorded.

Linking default and custom traces

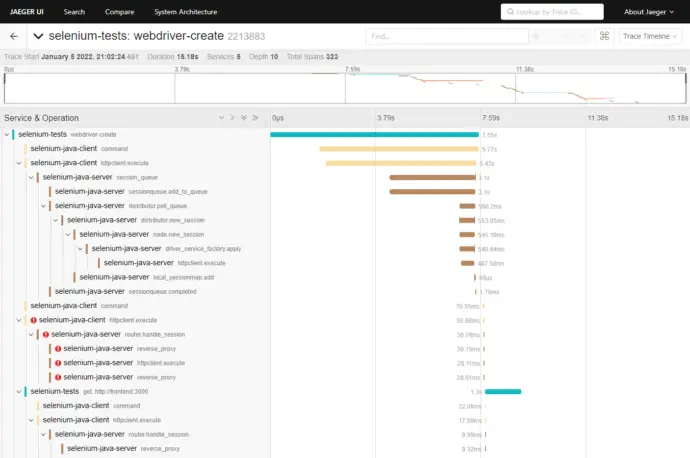
In an ideal world, I would like to make my custom Span parent of the default Selenium tracing spans, so I can attach the debug information to the custom tracing information. I was not able to do this. I have raised an issue with Selenium, OpenTelementry tracing: be able to link the default tracing with a custom tracing. I contributed to Selenium by adding this possibility to link Selenium traces to the custom traces. This is done with the following code OpenTelemetryTracer.getInstance().setOpenTelemetryContext(Context.current().with(span)). Finally, the full tracing looks as shown on the image:

Conclusion

The out-of-the-box Selenium observability is useful to trace what is happening in a complex grid. It does not give the possibility to trace tests performance and how test steps are affecting the application itself. In the current post, I have described a way to create a custom tracing, which provides end-to-end traceability from the tests down to the database calls. This approach gives the flexibility to be customized for different needs. It involves changes in the application’s frontend code though, which involves the application architecture topic in the discussions.
Related Posts

Read more...

Distributed system observability: Instrument Spring Boot application with OpenTelemetry

Last Updated on by

Post summary: Instrumenting a Spring Boot Java application with OpenTelemetry.

This post is part of Distributed system observability: complete end-to-end example series. The code used for this series of blog posts is located in selenium-observability-java GitHub repository.

Spring Boot

Spring Boot makes it easy to create stand-alone, production-grade Spring-based Applications that you can “just run”. Most Spring Boot applications need minimal Spring configuration. Creating a basic Spring Boot application takes a few steps.

Application

The application class is the entry point. It should have @SpringBootApplication annotation. I have added additional @ServletComponentScan annotation in order to register a custom response filter. I want to output the TraceId as a response header.

Application

import org.springframework.boot.SpringApplication;
import org.springframework.boot.autoconfigure.SpringBootApplication;
import org.springframework.boot.web.servlet.ServletComponentScan;

@ServletComponentScan
@SpringBootApplication
public class PersonServiceApplication {

    public static void main(String[] args) {
        SpringApplication.run(PersonServiceApplication.class, args);
    }
}

Filter

import io.opentelemetry.api.trace.Span;

import javax.servlet.*;
import javax.servlet.annotation.WebFilter;
import javax.servlet.http.HttpServletResponse;
import java.io.IOException;

@WebFilter("*")
public class AddResponseHeaderFilter implements Filter {

    @Override
    public void doFilter(ServletRequest request, ServletResponse response, FilterChain chain) throws IOException, ServletException {
        HttpServletResponse httpServletResponse = (HttpServletResponse) response;
        httpServletResponse.setHeader("x-trace-id", Span.current().getSpanContext().getTraceId());
        chain.doFilter(request, response);
    }
}

Controller

In the current example, there is only one controller with two APIs, a POST and GET endpoints with the same path. The class has to be annotated with @RestController. Each API endpoint is annotated with @RequestMapping, with more details about the path and the method. I have used Spring’s constructor-based dependency injection. I have omitted the @Autowired annotation because there is just one constructor.

import com.automationrhapsody.observability.services.PersonService;
import org.slf4j.Logger;
import org.slf4j.LoggerFactory;
import org.springframework.web.bind.annotation.RequestBody;
import org.springframework.web.bind.annotation.RequestMapping;
import org.springframework.web.bind.annotation.RequestMethod;
import org.springframework.web.bind.annotation.RestController;

import java.util.List;

@RestController
public class PersonController {

    private static final Logger LOGGER 
            = LoggerFactory.getLogger(PersonController.class);

    private PersonService personService;

    public PersonController(PersonService personService) {
        this.personService = personService;
    }

    @RequestMapping(value = "/persons", method = RequestMethod.GET)
    public List<PersonDto> getPersons() {
        LOGGER.info("Processing GET /persons request.");

        List<PersonDto> persons = personService.getPersons();
        return persons;
    }

    @RequestMapping(value = "/persons", method = RequestMethod.POST)
    public Long savePersons(@RequestBody PersonDto person) {
        LOGGER.info("Processing POST /persons request with {}", person);

        Long resultId = personService.savePerson(person);
        return resultId;
    }
}

Repository

Defining a very basic repository can be really easy with Spring, all needed is to extend the CrudRepository interface. If fine-tuning and custom methods are needed then it is needed to create an interface that extends the Spring’s Repository interface and defines custom repository methods inside. Read more in Working with Spring Data Repositories.

import org.springframework.data.repository.CrudRepository;
import org.springframework.stereotype.Repository;

@Repository
public interface FlightRepository extends CrudRepository<PersonEntity, Long> {
}

Service

A service layer is a good idea to handle the business logic between the controller and the repository. In this case, dependency is injected with @Autowired annotation. findAll() is a method that comes from CrudRepository interface. It gets the data from the database. @WithSpan annotation creates a new span in the OpenTelemetry traces. This will be explained in more detail.

import com.automationrhapsody.observability.controllers.PersonDto;
import com.automationrhapsody.observability.repositories.person.FlightRepository;
import com.automationrhapsody.observability.repositories.person.PersonEntity;
import io.opentelemetry.api.common.AttributeKey;
import io.opentelemetry.api.common.Attributes;
import io.opentelemetry.api.trace.Span;
import io.opentelemetry.extension.annotations.WithSpan;
import org.slf4j.Logger;
import org.slf4j.LoggerFactory;
import org.springframework.beans.factory.annotation.Autowired;
import org.springframework.stereotype.Service;

import java.util.List;
import java.util.stream.Collectors;
import java.util.stream.StreamSupport;

@Service
public class PersonService {

    private static final Logger LOGGER =
            LoggerFactory.getLogger(PersonService.class);

    @Autowired
    private FlightRepository flightRepository;

    public List<PersonDto> getPersons() {
        doSomeWorkNewChildSpan();
        Iterable<PersonEntity> persons = flightRepository.findAll();
        return StreamSupport.stream(persons.spliterator(), false)
                .map(this::toPersonDto)
                .collect(Collectors.toList());
    }

    @WithSpan
    public void doSomeWorkNewChildSpan() {
        LOGGER.info("Doing some work In New child span");
        Span span = Span.current();
        span.setAttribute("template.a2", "some value");
        span.addEvent("template.processing2.start", attributes("321"));
        span.addEvent("template.processing2.end", attributes("321"));
    }

    private Attributes attributes(String id) {
        return Attributes.of(AttributeKey.stringKey("app.id"), id);
    }

    private PersonDto toPersonDto(PersonEntity person) {
        PersonDto personDto = new PersonDto();
        personDto.setFirstName(person.getFirstName());
        personDto.setLastName(person.getLastName());
        personDto.setEmail(person.getEmail());
        return personDto;
    }
}

Instrumentation

OpenTelemetry provides a way for manual instrumentation, which will be covered in the subsequent Selenium-based post. OpenTelemetry also provides a Java agent JAR, that can be attached to any Java 8+ application and dynamically injects bytecode to capture telemetry from a number of popular libraries and frameworks. This JAR agent is attached to the Spring Boot application described above. This is done in the Docker file. Jaeger exporter and Jaeger backend endpoint are configured with otel.traces.exporter and otel.exporter.jaeger.endpoint environment variables.


# ========= BUILD =========
FROM maven:3-openjdk-11 as builder
WORKDIR /build

COPY pom.xml pom.xml
RUN mvn dependency:resolve

COPY . .
RUN mvn install

# ========= RUN =========
FROM openjdk:11
ENV APP_NAME person-service
# https://github.com/open-telemetry/opentelemetry-java-instrumentation
ENV JAVA_OPTS "$JAVA_OPTS \
  -Dotel.traces.exporter=jaeger \
  -Dotel.exporter.jaeger.endpoint=http://jaeger:14250 \
  -Dotel.metrics.exporter=none \
  -Dotel.resource.attributes="service.name=${APP_NAME}" \
  -Dotel.javaagent.debug=false \
  -javaagent:/app/opentelemetry-javaagent-all.jar"

ADD https://github.com/open-telemetry/opentelemetry-java-instrumentation/releases/download/v1.6.2/opentelemetry-javaagent-all.jar /app/opentelemetry-javaagent-all.jar
COPY --from=builder /build/target/$APP_NAME-*.jar /app/$APP_NAME.jar

CMD java $JAVA_OPTS -jar /app/$APP_NAME.jar

This is it. Just by attaching the Java agent application is instrumented and OpenTelemetry is ready to report traces. OpenTelemetry supports a large number of libraries and frameworks, the full list can be found in Supported libraries, frameworks, application servers, and JVMs.

Custom tracking

In many cases, apart from the standard tracing, the application has to report additional traces. This can be very easily done with the @WithSpan annotation. This annotation marks that the execution of this method or constructor should result in a new Span. It can be used to signal OpenTelemetry auto-instrumentation that a new span should be created whenever a marked method is executed. In the example above, a custom attribute has been added to the new Span. This is not mandatory though, just adding the annotation will record the method invocation as a new span in the trace output.

Traces output

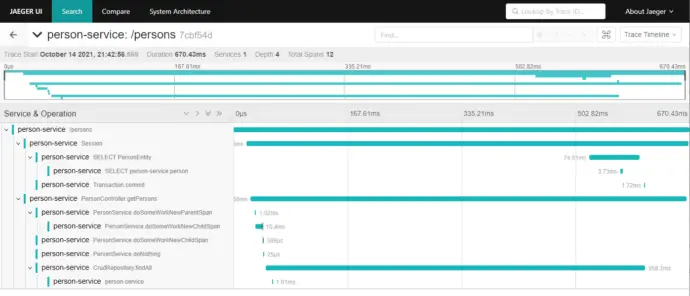
In order to monitor a trace, run the examples as described in Distributed system observability: complete end-to-end example with OpenTracing, Jaeger, Prometheus, Grafana, Spring Boot, React and Selenium. Accessing http://localhost:8090/persons generates a trace in Jaeger:

Conclusion

With the steps described above, create a basic Spring Boot application is fairly easy. It is even easier instrumenting the application with OpenTelemetry tracing, just by adding the Java agent JAR. Custom tracing is also made easy with @WithSpan annotation. Traces give very valuable information about the performance of the different parts of the application.

Related Posts

Read more...

Distributed system observability: complete end-to-end example with OpenTracing, Jaeger, Prometheus, Grafana, Spring Boot, React and Selenium

Last Updated on by

Post summary: Code examples and explanations on an end-to-end example showcasing a distributed system observability from the Selenium tests through React front end, all the way to the database calls of a Spring Boot application. Examples are implemented with the OpenTracing toolset and traces are saved in Jaeger. This example also shows a complete observability setup including tools like Grafana, Prometheus, Loki, and Promtail.

This post is part of Distributed system observability: complete end-to-end example series. The code used for this series of blog posts is located in selenium-observability-java GitHub repository.

Introduction

Nowadays, the MIcroservices architecture is very popular. It certainly has its benefits, allowing the companies to deliver faster products to the market. It is much easier to manage several small applications, each one of them with isolated responsibilities, rather than one big fat monolithic application. Microservices architecture has its challenges as well. One of those challenges is traceability. What happens in case of error, where did it occur, what microservices were involved, what were the requests flow through the system, where is the stack trace? In a monolithic application, the stack trace is shown into the logs, giving the exact location of the error. In a microservices landscape, errors are in many cases meaningless, unless there is full traceability of the request flow.

Observability and distributed tracing

Distributed tracing, also called distributed request tracing, is a method used to profile and monitor applications, especially those built using a microservices architecture. Distributed tracing helps pinpoint where failures occur and what causes poor performance. Logs, metrics, and traces are often known as the three pillars of observability. Further reading on observability can be done in The Three Pillars of Observability article.

OpenTracing

OpenTracing is an API specification and libraries, that enables the instrumentation of distributed applications. It is not locked to any particular vendors and allows flexibility just by changing the configuration of already instrumented applications. More details can be found in Instrumenting your application and What is Distributed Tracing?. Current examples are based on OpenTracing libraries and tools.

End-to-end traceability and observability

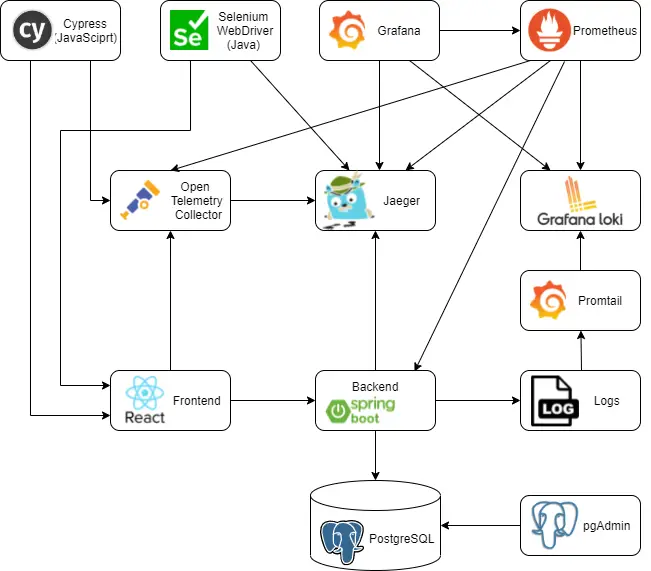
In the current examples, I am going to give an end-to-end solution, how observability can be achieved in a distributed system. I have used mnadeem/boot-opentelemetry-tempo project as a basis and have extended it with React Frontend and Selenium tests, to provide a complete end-to-end example. Below is a diagram of the full setup. All applications involved will be explained on a higher level.

PostgreSQL and pgAdmin

The basic examples used PostgreSQL, I thought of changing it to MySQL, but when I did short research, I found that PostgreSQL has some advantages. PostgreSQL is an object-relational database, while MySQL is a purely relational database. This means that Postgres includes features like table inheritance and function overloading, which can be important to certain applications. Postgres also adheres more closely to SQL standards. See more in MySQL vs PostgreSQL — Choose the Right Database for Your Project.

pgAdmin is the default user interface to manage a PostgreSQL database, so it is present in the architecture as well.

Spring Boot backend

Spring Boot is used as a backend. I did want to get some exposure to the technology, so I created a very basic application in Spring Boot. It uses the PostgreSQL database for reading and writing data. Spring Boot application is instrumented with OpenTelemetry Java library and exports the traces in Jaeger format directly to the Jaeger backend. It also writes application log files on a file system. Backend exposes APIs, which are consumed by the frontend. More details on the backend can be found in Distributed system observability: Instrument Spring Boot application with OpenTelemetry post.

React frontend

I am very experienced with React, so this was the natural choice for the frontend technology. The frontend uses fetch() to consume the backend APIs. It is instrumented with OpenTelementry JavaScript libraries to trace all communication happening through fetch() and to exports the traces in OpenTelemetry format to the OpenTelemetry collector. The frontend also has manual instrumentation which traces the actions done by end-users on it. More details on the frontend can be found in Distributed system observability: Instrument React application with OpenTelemetry post.

OpenTelemetry collector

OpenTelemetry collector converts the data received from the frontend in OpenTelemetry format into Jaeger format and exports it to the Jaeger backend. The collector is also extracting the span metrics, which are read by Prometheus, read more in Distributed system observability: extract and visualize metrics from OpenTelemetry spans post. Configurations are described in the collector configuration. Local configurations are in otel-config.yaml.

Selenium tests

Selenium was chosen for the web testing framework because of its observability feature. Actually, this was the reason for which I created the current examples. After getting to know the tracing features of Selenium better, I find them not much useful. Selenium does not provide traceability of the tests, but rather on its internal operations and performance. Having started with the tracing and the whole project, I could not ditch it in the middle, so I have to create a custom way to make Selenium trace the tests. Selenium tests export tracing information in Jaeger format directly into the Jaeger backend. More details on the tests can be found in Distributed system observability: Instrument Selenium tests with OpenTelemetry post.

Cypress tests

Cypress is a front-end testing tool built for the modern web. It is most often compared to Selenium. The initial driver of the current post series was Selenium observability. After I got a better understanding of the observability topic, I’ve decided to add examples on Cypress tests observability for more completeness of the examples. Cypress interacts with the Frontend and exports its traces to OpenTelemetry Collector, which then forwards the traces into Jaeger. More details on the tests can be found in Distributed system observability: Instrument Cypress tests with OpenTelemetry post.

Jaeger

Jaeger, inspired by Dapper and OpenZipkin, is an open-source distributed tracing system. It is used for monitoring and troubleshooting microservices-based distributed systems. Jaeger collects all the traces and provides a search and visualization of the traces. In the original examples, Grafana Tempo was used as a backend and Jaeger UI via the jaeger-query module to open the traces. I initially started with it, but Tempo does not provide a possibility to search the traces. I find this rather inconvenient, so I switched completely to Jaeger.

Promtail

Promtail is an agent which ships the contents of the Spring Boot backend logs to a Loki instance. It is usually deployed to every machine that has applications needed to be monitored. Local configurations are in promtail-local.yaml.

Loki

Grafana Loki is a log aggregation system inspired by Prometheus. It does not index the contents of the logs, but rather a set of labels for each log stream. Log data itself is then compressed and stored in chunks. In the current example, logs are being pushed to Loki by Promtrail. Local configurations are in loki-local.yaml.

Prometheus

Prometheus is an open-source monitoring and alerting toolkit. Prometheus collects and stores its metrics as time-series data, i.e. metrics information is stored with the timestamp at which it was recorded, alongside optional key-value pairs called labels. In the current example, Prometheus is monitoring the Sprint Boot backend, Loki, Jaeger, and OpenTelemetry Collector. It pulls the metrics data from those applications at a regular interval and stores them in its database. Alerts can be configured based on the metrics. Local configurations are in prometheus.yaml.

Grafana

Grafana is an open-source solution for running data analytics, pulling up metrics from different data sources, and monitoring applications with the help of customizable dashboards. The tool helps to study, analyze and monitor data over a period of time, technically called time-series analytics. In the current example, Grafana pulls data from Prometheus, Jaeger, and Loki. Local configurations are in grafana-dashboards.yaml and grafana-datasource.yml.

Explore the example

Running the example is very easy. What is needed is Docker compose and IDE that can run JUnit tests, I prefer IntelliJ IDEA. Run the examples:

  1. Check out the source code from https://github.com/llatinov/selenium-observability-java
  2. Run: docker-compose build
  3. Run: docker-compose up
  4. Open selenium-tests Maven project and run all the unit tests

Explore the example artifacts:

pgAdmin

pgAdmin is accessible at http://localhost:8005/. In order to log in, use the following credentials: pgadmin4@pgadmin.org / admin. This is needed only if the database records have to be read or modified.

Jaeger

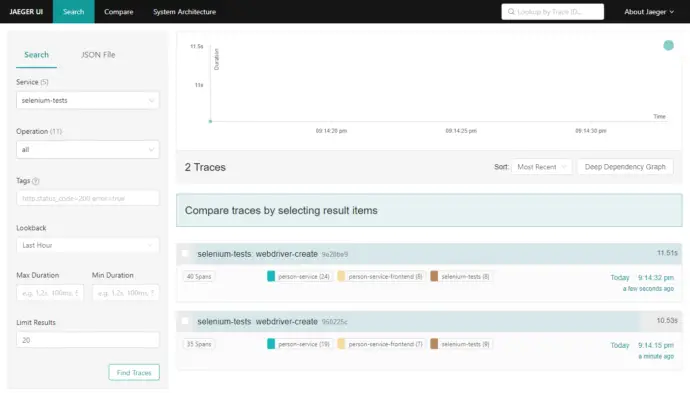
Jaeger is accessible at http://localhost:16686. The home page shows rich search functionality. There is a dropdown with all available services, then operations performed by the selected service can be also filtered.

A trace can be opened from the search results. It shows all the actions for this trace that have been recorded.

Grafana

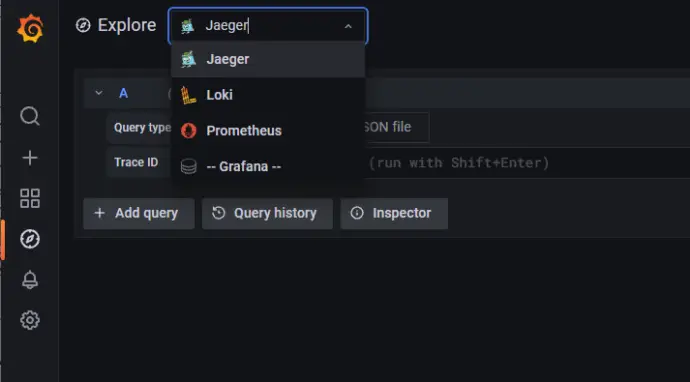
Grafana is accessible at http://localhost:3001. Different data sources can be accessed from the left-hand side menu, there is a small compass, the Explore menu. From the top, there is a dropdown with the available data sources.

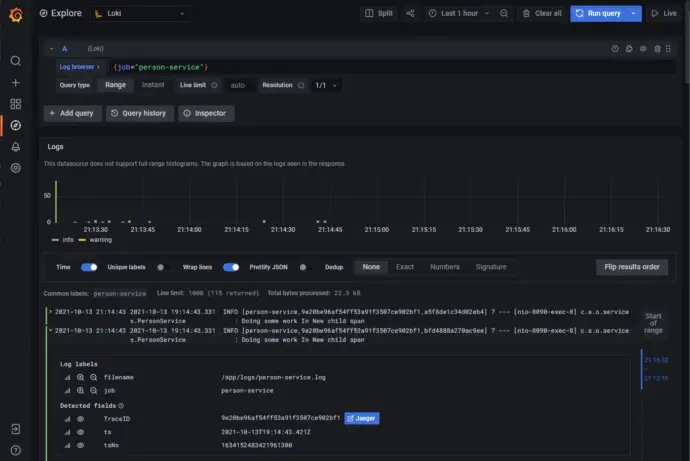
Grafana -> Loki

From Grafana select Loki as datasource. Search for {job=”person-service”}, this shows all logs for the Spring Boot backend.

Grafana -> Jaeger

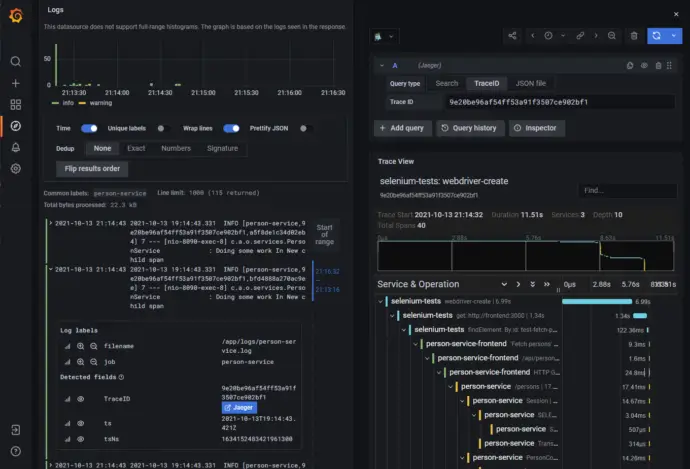
Jaeger data source can open a trace by its id. This data source can be used in conjunction with Loki. Search logs in Loki, then open a log, this exposes a Jaeger button.

Jaeger data source can be opened directly from the dropdown, then type the TraceID.

Grafana -> Prometheus

From Grafana select Prometheus as a data source. Search for {job=”person-service”}, this shows all metrics for the Spring Boot backend.

Prometheus

Prometheus is accessible at http://localhost:9090/. Search for {job=”person-service”}, this shows all metrics for the Spring Boot backend.

Furter posts with details

This is an introductory post, more details, explanations, and code examples on actual implementation can be found in the following posts:

Conclusion

Microservices architecture is used more often. Alongside its advantages, it comes with specific challenges. Observability is one of those challenges and is a very important topic in a distributed software system. In the current example, I have shown end-to-end observability achieved with popular open-source tools. The main objective of my experiments was to be able to trace Selenium test execution through all the systems involved in the distributed architecture.

Related Posts

Read more...

Java 8 features – Stream API advanced examples

Last Updated on by

Post summary: This post explains Java 8 Stream API with very basic code examples.

In Java 8 features – Lambda expressions, Interface changes, Stream API, DateTime API post I have briefly described most interesting Java 8 features. In the current post, I will give special attention to Stream API. This post is with more advanced code examples to elaborate on basic examples described in Java 8 features – Stream API basic examples post. Code examples here can be found in GitHub java-samples/java8 repository.

Memory consumption and better design

Stream API has operations that are short-circuiting, such as limit(). Once their goal is achieved they stop processing the stream. Most of the operators are not such. Here I have prepared an example for possible pitfall when using not short-circuiting operators. For testing purposes, I have created PeekObject which outputs a message to the console once its constructor is called.

public class PeekObject {
	private String message;

	public PeekObject(String message) {
		this.message = message;
		System.out.println("Constructor called for: " + message);
	}

	public String getMessage() {
		return message;
	}
}

Assume a situation where there is a stream of many instances of PeekObject, but only several elements of the stream are needed, thus they have to be limited. Only 2 constructors are called in this case.

limit the stream

public static List<PeekObject> limit_shortCircuiting(List<String> stringList,
							int limit) {
	return stringList.stream()
		.map(PeekObject::new)
		.limit(limit)
		.collect(Collectors.toList());
}

unit test

@Test
public void test_limit_shortCircuiting() {
	System.out.println("limit_shortCircuiting");

	List<String> stringList = Arrays.asList("a", "b", "a", "c", "d", "a");

	List<PeekObject> result = AdvancedStreamExamples
		.limit_shortCircuiting(stringList, 2);

	assertThat(result.size(), is(2));
}

console output

limit_shortCircuiting
Constructor called for: a
Constructor called for: b

Now stream has to be sorted before the limit is applied.

code

public static List<PeekObject> sorted_notShortCircuiting(
					List<String> stringList, int limit) {
	return stringList.stream()
		.map(PeekObject::new)
		.sorted((left, right) -> 
			left.getMessage().compareTo(right.getMessage()))
		.limit(limit)
		.collect(Collectors.toList());
}

unit test

@Test
public void test_sorted_notShortCircuiting() {
	System.out.println("sorted_notShortCircuiting");

	List<String> stringList = Arrays.asList("a", "b", "a", "c", "d", "a");

	List<PeekObject> result = AdvancedStreamExamples
		.sorted_notShortCircuiting(stringList, 2);

	assertThat(result.size(), is(2));
}

console output

sorted_notShortCircuiting
Constructor called for: a
Constructor called for: b
Constructor called for: a
Constructor called for: c
Constructor called for: d
Constructor called for: a

Notice that constructors for all objects in the stream are called. This will require Java to allocate enough memory for all the objects. There are 6 objects in this example, but what if there are 6 million. Also, current objects are very lightweight, but what if they are much bigger. The conclusion is that you have to know very well Stream API operations and apply them carefully when designing your stream pipeline.

Convert comma separated List to a Map with handling duplicates

There is a List of comma separated values which need to be converted to a Map. List value “11,21” should become Map entry with key 11 and value 21. Duplicated keys also should be considered: Arrays.asList(“11,21”, “12,21”, “13,23”, “13,24”).

code

public static Map<Long, Long> splitToMap(List<String> stringsList) {
	return stringsList.stream()
		.filter(StringUtils::isNotEmpty)
		.map(line -> line.split(","))
		.filter(array -> array.length == 2 
			&& NumberUtils.isNumber(array[0])
			&& NumberUtils.isNumber(array[1]))
		.collect(Collectors.toMap(array -> Long.valueOf(array[0]), 
			array -> Long.valueOf(array[1]), (first, second) -> first)));
}

unit test

@Test
public void test_splitToMap() {
	List<String> stringList = Arrays
			.asList("11,21", "12,21", "13,23", "13,24");

	Map<Long, Long> result = AdvancedStreamExamples.splitToMap(stringList);

	assertThat(result.size(), is(3));
	assertThat(result.get(11L), is(21L));
	assertThat(result.get(12L), is(21L));
	assertThat(result.get(13L), is(23L));
}

The important bit in this conversion is (first, second) -> first), if it is not present there will be error java.lang.IllegalStateException: Duplicate key 23 (slightly misleading error, as the duplicated key is 13, the value is 23). This is a merge function which resolves collisions between values associated with the same key. It evaluates two values found for the same key – first and second where current lambda returns the first. If overwrite is needed, hence keep the last entered value then lambda would be: (first, second) -> second).

Examples of custom object

Examples to follow use custom object Employee, where Position is an enumeration: public enum Position { DEV, DEV_OPS, QA }.

import java.util.List;

public class Employee {
	private String firstName;
	private String lastName;
	private Position position;
	private List<String> skills;
	private int salary;

	public Employee() {
	}

	public Employee(String firstName, String lastName,
				Position position, int salary) {
		this.firstName = firstName;
		this.lastName = lastName;
		this.position = position;
		this.salary = salary;
	}

	public void setSkills(String... skills) {
		this.skills = Arrays.stream(skills).collect(Collectors.toList());
	}

	public String getName() {
		return this.firstName + " " + this.lastName;
	}

	... Getters and Setters
}

A company has been created, it consists of 6 developers, 2 QAs and 2 DevOps..

private List<Employee> createCompany() {
	Employee dev1 = new Employee("John", "Doe", Position.DEV, 110);
	dev1.setSkills("C#", "ASP.NET", "React", "AngularJS");
	Employee dev2 = new Employee("Peter", "Doe", Position.DEV, 120);
	dev2.setSkills("Java", "MongoDB", "Dropwizard", "Chef");
	Employee dev3 = new Employee("John", "Smith", Position.DEV, 115);
	dev3.setSkills("Java", "JSP", "GlassFish", "MySql");
	Employee dev4 = new Employee("Brad", "Johston", Position.DEV, 100);
	dev4.setSkills("C#", "MSSQL", "Entity Framework");
	Employee dev5 = new Employee("Philip", "Branson", Position.DEV, 140);
	dev5.setSkills("JavaScript", "React", "AngularJS", "NodeJS");
	Employee dev6 = new Employee("Nathaniel", "Barth", Position.DEV, 99);
	dev6.setSkills("Java", "Dropwizard");
	Employee qa1 = new Employee("Ronald", "Wynn", Position.QA, 100);
	qa1.setSkills("Selenium", "C#", "Java");
	Employee qa2 = new Employee("Erich", "Kohn", Position.QA, 105);
	qa2.setSkills("Selenium", "JavaScript", "Protractor");
	Employee devOps1 = new Employee("Harold", "Jess", Position.DEV_OPS, 116);
	devOps1.setSkills("CentOS", "bash", "c", "puppet", "chef", "Ansible");
	Employee devOps2 = new Employee("Karl", "Madsen", Position.DEV_OPS, 123);
	devOps2.setSkills("Ubuntu", "bash", "Python", "chef");

	return Arrays.asList(dev1, dev2, dev3, dev4, dev5, dev6,
				qa1, qa2, devOps1, devOps2);
}

Company skill set

This method accepts none, one or many positions. If no positions are provided then information for all positions is printed. Positions array is transferred to List<String> because all objects used in lambda should be effectively final. Transferring array to stream is done with Arrays.stream() method. Employees are filtered based on the desired position. Each skills list is concatenated and flattened to a stream with flatMap(). After this operation, there is a stream of strings with all skills. Duplicates are removed with distinct(). Finally, stream is collected to a list.

code

public static List<String> gatherEmployeeSkills(
		List<Employee> employees, Position... positions) {
	positions = positions == null || positions.length == 0 
		? Position.values() : positions;
	List<Position> searchPositions = Arrays.stream(positions)
			.collect(Collectors.toList());
	return employees == null ? Collections.emptyList()
		: employees.stream()
			.filter(employee 
				-> searchPositions.contains(employee.getPosition()))
			.flatMap(employee -> employee.getSkills().stream())
			.distinct()
			.collect(Collectors.toList());
}

unit test

@Test
public void test_gatherEmployeeSkills() {
	List<Employee> company = createCompany();

	List<String> skills = AdvancedStreamExamples
			.gatherEmployeeSkills(company);

	assertThat(skills.size(), is(25));
}

Skillset per position

This method first received a list of all skills per position and converts it to a stream. The stream can be collected to a String with Collectors.joining() method. It accepts delimiter, prefix, and suffix.

code

public static String printEmployeeSkills(
		List<Employee> employees, Position position) {
	List<String> skills = gatherEmployeeSkills(employees, position);
	return skills.stream()
		.collect(Collectors.joining("; ",
			"Our " + position + "s have: ", " skills"));
}

unit test

@Test
public void test_printEmployeeSkills() {
	List<Employee> company = createCompany();

	String skills = AdvancedStreamExamples
			.printEmployeeSkills(company, Position.QA);

	assertThat(skills, is("Our employees have: "
		+ "Selenium; C#; Java; JavaScript; Protractor skills"));
}

Salary statistics

This method returns Map with Position as key and IntSummaryStatistics as value. Collectors.groupingBy() groups employees by position key and then using Collectors.summarizingInt() to get statistics of employee’s salary.

code

public static Map<Position, IntSummaryStatistics> salaryStatistics(
		List<Employee> employees) {
	return employees.stream()
		.collect(Collectors.groupingBy(Employee::getPosition,
			Collectors.summarizingInt(Employee::getSalary)));
}

unit test

@Test
public void test_salaryStatistics() {
	List<Employee> company = createCompany();

	Map<Position, IntSummaryStatistics> salaries = AdvancedStreamExamples
			.salaryStatistics(company);

	assertThat(salaries.get(Position.DEV).getAverage(), is(114D));
	assertThat(salaries.get(Position.QA).getAverage(), is(102.5D));
	assertThat(salaries.get(Position.DEV_OPS).getAverage(), is(119.5D));
}

Position with the lowest average salary

Map with position and salary summary is retrieved and then with entrySet().stream() map is converted to stream of Entry<Position, IntSummaryStatistics> objects. Entries are sorted by average value in ascending order by custom comparator Double.compare(). findFirst() returns Optional<Entry>. The entry itself is obtained with get() method. The key which is basically the position is obtained with getKey() method.

code

public static Position positionWithLowestAverageSalary(
		List<Employee> employees) {
	return salaryStatistics(employees)
		.entrySet().stream()
		.sorted((entry1, entry2) 
			-> Double.compare(entry1.getValue().getAverage(),
				entry2.getValue().getAverage()))
		.findFirst()
		.get()
		.getKey();
}

unit test

@Test
public void test_positionWithLowestAverageSalary() {
	List<Employee> company = createCompany();

	Position position = AdvancedStreamExamples
			.positionWithLowestAverageSalary(company);

	assertThat(position, is(Position.QA));
}

Employees per each position

Grouping is done per position and employees are aggregated to list with Collectors.toList() method.

code

public static Map<Position, List<Employee>> employeesPerPosition(
		List<Employee> employees) {
	return employees.stream()
		.collect(Collectors.groupingBy(Employee::getPosition,
				Collectors.toList()));
}

unit test

@Test
public void test_employeesPerPosition() {
	List<Employee> company = createCompany();

	Map<Position, List<Employee>> employees = AdvancedStreamExamples
			.employeesPerPosition(company);

	assertThat(employees.get(Position.QA).size(), is(2));
	assertThat(employees.get(Position.QA).get(0).getName(),
		is("Ronald Wynn"));
	assertThat(employees.get(Position.QA).get(1).getName(),
		is("Erich Kohn"));
}

Employee names per each position

Similar to the method above, but one more mapping is needed here. Employee name should be extracted and converted to List<String>. This is done with Collectors.mapping(Employee::getName, Collectors.toList()) method.

code

public static Map<Position, List<String>> employeeNamesPerPosition(
		List<Employee> employees) {
	return employees.stream()
		.collect(Collectors.groupingBy(Employee::getPosition,
			Collectors.mapping(Employee::getName,
						Collectors.toList())));
}

unit test

@Test
public void test_employeeNamesPerPosition() {
	List<Employee> company = createCompany();

	Map<Position, List<String>> employees = AdvancedStreamExamples
			.employeeNamesPerPosition(company);

	assertThat(employees.get(Position.QA).size(), is(2));
	assertThat(employees.get(Position.QA).get(0), is("Ronald Wynn"));
	assertThat(employees.get(Position.QA).get(1), is("Erich Kohn"));
}

Employee count per position

Getting the count is done by Collectors.counting() method. It returns Long by default. If Integer is needed then this can be changed to Collectors.reducing(0, e -> 1, Integer::sum).

code

public static Map<Position, Long> employeesCountPerPosition(
			List<Employee> employees) {
	return employees.stream()
		.collect(Collectors.groupingBy(Employee::getPosition,
						Collectors.counting()));
}

unit test

@Test
public void test_employeesCountPerPosition() {
	List<Employee> company = createCompany();

	Map<Position, Long> employees = AdvancedStreamExamples
				.employeesCountPerPosition(company);

	assertThat(employees.get(Position.DEV), is(6L));
	assertThat(employees.get(Position.QA), is(2L));
	assertThat(employees.get(Position.DEV_OPS), is(2L));
}

Employees with duplicated first name

Employees are grouped into a map with key first name and List<Employee> as value. This map is converted to stream and filtered for List<Employee> greater than 1 element. The list is flattened with flatMap() and collected to List<Employee>.

code

public static List<Employee> employeesWithDuplicateFirstName(
		List<Employee> employees) {
	return employees.stream()
		.collect(Collectors.groupingBy(Employee::getFirstName,
						Collectors.toList()))
		.entrySet().stream()
		.filter(entry -> entry.getValue().size() > 1)
		.flatMap(entry -> entry.getValue().stream())
		.collect(Collectors.toList());
}

unit test

@Test
public void test_employeesWithDuplicateFirstName() {
	List<Employee> company = createCompany();

	List<Employee> employees = AdvancedStreamExamples
			.employeesWithDuplicateFirstName(company);

	assertThat(employees.size(), is(2));
	assertThat(employees.get(0).getName(), is("John Doe"));
	assertThat(employees.get(1).getName(), is("John Smith"));
}

Conclusion

In this post, I have just scratched the Java 8 Stream API. It offers a vast amount of functionalities which can be very useful for data processing. Beware when generating stream pipeline because it might end up consuming too many resources.

Related Posts

Read more...

Java 8 features – Stream API basic examples

Last Updated on by

Post summary: This post explains Java 8 Stream API with very basic code examples.

In Java 8 features – Lambda expressions, Interface changes, Stream API, DateTime API post I have briefly described most interesting Java 8 features. In the current post, I will give special attention to Stream API. This post is with very basic code examples to explain the theory described in Java 8 features – Stream API explained post. Code examples here can be found in GitHub java-samples/java8 repository.

Example for filter, map, distinct, sorted, peek and collect

I will cover all those operations in one example. Code below takes a list of strings and converts it to stream by stream() method. For debug purposes peek() is used in the beginning and at the end of stream operations. It only prints to the console elements from the stream. Filtering of the elements is done by filter() method. Lambda expression is used as a predicate. This lambda expression is a method call to verify current element is a number: element-> NumberUtils.isNumber(element). Since it is a single method call it is substituted with method reference: NumberUtils::isNumber. All elements that are evaluated to false are removed from further processing. It is good practice to use filtering at the beginning of stream pipeline so stream elements are reduced. Next operation is converting String values in the stream to Long values. This is done with map() method again with method reference. Duplicated elements are removed by calling distinct(). Stream elements are sorted by element’s natural order, in the current example, they are Long values. In the end, the stream is materialized into a List by using collect(Collectors.toList()) method. If this code has to be written without streams it would have looked as shown in “no stream code” tab. Note that using stream code is much more readable. Actually, in the beginning, it is not that easy to think in a stream-oriented way, but once you get used to it, you will never want to see the non-streams code.

code

public static List<Long> toLongList(List<String> stringList) {
	return stringList.stream()
		.peek(element -> System.out.println("Before: " + element))
		.filter(NumberUtils::isNumber)
		.map(Long::valueOf)
		.distinct()
		.sorted()
		.peek(element -> System.out.println("After: " + element))
		.collect(Collectors.toList());
}

unit test

@Test
public void test_toLongList() {
	List<String> stringList = Arrays
		.asList(null, "", "aaa", "345", "123", "234", "123");

	List<Long> result = BasicStreamExamples.toLongList(stringList);

	assertEquals(3, result.size());
	assertEquals(123L, (long) result.get(0));
	assertEquals(234L, (long) result.get(1));
	assertEquals(345L, (long) result.get(2));
}

console output

Before: null
Before: 
Before: aaa
Before: 345
Before: 123
Before: 234
Before: 123
After: 123
After: 234
After: 345

no stream code

public static List<Long> toLongListWithoutStream(List<String> stringList) {
	List<Long> result = new ArrayList<>();
	for (String value : stringList) {
		System.out.println("Before: " + value);
		if (NumberUtils.isNumber(value)) {
			Long longValue = Long.valueOf(value);
			if (!result.contains(longValue)) {
				result.add(longValue);
				System.out.println("After: " + value);
			}
		}
	}
	Collections.sort(result);
	return result;
}

Example for toArray

This example is similar to the example above, instead of collecting as a list here stream elements are returned in the array.

toArray code

public static Long[] toLongArray(String[] stringArray) {
	return Arrays.stream(stringArray)
		.filter(NumberUtils::isNumber)
		.map(Long::valueOf)
		.toArray(Long[]::new);
}

unit test

@Test
public void test_toLongArray() {
	String[] stringArray = new String[] {null, "", "aaa", "123", "234"};

	Long[] result = BasicStreamExamples.toLongArray(stringArray);

	assertEquals(2, result.length);
	assertEquals(123L, (long) result[0]);
	assertEquals(234L, (long) result[1]);
}

Example for flatMap

This function is pretty complex and hard to understand. In the current example, there is a map with String for key and List for value. The example below merges all list values in one result list. Note that Map interface does not have stream() method. Instead, first entrySet() is invoked which returns Set and then invoke its stream() method. Once stream is created flatMap() is called and result of Function argument should be stream: map -> map.getValue().stream(). This resultant stream is a merge of all list values streams, which is then collected to a List.

flatMap code

public static List<String> flapMap(Map<String, List<String>> mapToProcess) {
	return mapToProcess.entrySet()
		.stream()
		.flatMap(map -> map.getValue().stream())
		.collect(Collectors.toList());
}

unit test

@Test
public void test_flapMap() {
	Map<String, List<String>> map = new HashMap<>();
	map.put("1", Arrays.asList("a", "b"));
	map.put("2", Arrays.asList("C", "D"));

	List<String> expectedResult = Arrays.asList("a", "b", "C", "D");

	List<String> result = BasicStreamExamples.flapMap(map);

	assertEquals(expectedResult, result);
}

Examples of limit and skip

limit code

public static List<String> limitValues(List<String> stringList, long limit) {
	return stringList.stream()
		.limit(limit)
		.collect(Collectors.toList());
}

limit unit test

@Test
public void test_limitValues() {
	List<String> stringList = Arrays.asList("a", "b", "c", "d");

	List<String> result = BasicStreamExamples.limitValues(stringList, 2);

	assertEquals(2, result.size());
	assertEquals("a", result.get(0));
	assertEquals("b", result.get(1));
}

skip code

public static List<String> skipValues(List<String> stringList, long skip) {
	return stringList.stream()
		.skip(skip)
		.collect(Collectors.toList());
}

skip unit test

@Test
public void test_skipValues() {
	List<String> stringList = Arrays.asList("a", "b", "c", "d");

	List<String> result = BasicStreamExamples.skipValues(stringList, 2);

	assertEquals(2, result.size());
	assertEquals("c", result.get(0));
	assertEquals("d", result.get(1));
}

Example for forEach

forEach code

public static void printEachElement(List<String> stringList) {
	stringList.stream()
		.forEach(element -> System.out.println("Element: " + element));
}

unit test

@Test
public void test_printEachElement() {
	List<String> stringList = Arrays.asList("a", "b", "c", "d");

	BasicStreamExamples.printEachElement(stringList);
}

console output

Element: a
Element: b
Element: c
Element: d

Examples of min and max

min code

public static Optional<Integer> getMin(List<Integer> stringList) {
	return stringList.stream()
		.min(Long::compare);
}

min unit test

@Test
public void test_getMin() {
	List<Integer> integerList = Arrays.asList(234, 123, 345);

	Optional<Integer> result = BasicStreamExamples.getMin(integerList);

	assertEquals(123, (int) result.get());
}

max code

public static Optional<Integer> getMax(List<Integer> integers) {
	return integers.stream()
		.max(Long::compare);
}

max unit test

@Test
public void test_getMax() {
	List<Integer> integerList = Arrays.asList(234, 123, 345);

	Optional<Integer> result = BasicStreamExamples.getMax(integerList);

	assertEquals(345, (int) result.get());
}

Example for reduce

This also is a bit complex method. The method that is given below sums all elements in the provided stream.

reduce code

public static Optional<Integer> sumByReduce(List<Integer> integers) {
	return integers.stream()
		.reduce((x, y) -> x + y);
}

unit test

@Test
public void test_sumByReduce() {
	List<Integer> integerList = Arrays.asList(100, 200, 300);

	Optional<Integer> result = BasicStreamExamples.sumByReduce(integerList);

	assertEquals(600, (int) result.get());
}

Example for count

count code

public static long count(List<Integer> integers) {
	return integers.stream()
		.count();
}

unit test

@Test
public void test_count() {
	List<Integer> integerList = Arrays.asList(234, 123, 345);

	long result = BasicStreamExamples.count(integerList);

	assertEquals(3, result);
}

Example for anyMatch, allMatch, and noneMatch

anyMatch code

public static boolean isOddElementPresent(List<Integer> integers) {
	return integers.stream()
		.anyMatch(element -> element % 2 != 0);
}

allMatch code

public static boolean areAllElementsOdd(List<Integer> integers) {
	return integers.stream()
		.allMatch(element -> element % 2 != 0);
}

noneMatch code

public static boolean areAllElementsEven(List<Integer> integers) {
	return integers.stream()
		.noneMatch(element -> element % 2 != 0);
}

unit test 1

@Test
public void test_anyMatch_allMatch_noneMatch_allEven() {
	List<Integer> integerList = Arrays.asList(234, 124, 346, 124);

	assertFalse(BasicStreamExamples.isOddElementPresent(integerList));
	assertFalse(BasicStreamExamples.areAllElementsOdd(integerList));
	assertTrue(BasicStreamExamples.areAllElementsEven(integerList));
}

unit test 2

@Test
public void test_anyMatch_allMatch_noneMatch_evenAndOdd() {
	List<Integer> integerList = Arrays.asList(234, 123, 345, 123);

	assertTrue(BasicStreamExamples.isOddElementPresent(integerList));
	assertFalse(BasicStreamExamples.areAllElementsOdd(integerList));
	assertFalse(BasicStreamExamples.areAllElementsEven(integerList));
}

unit test 3

@Test
public void test_anyMatch_allMatch_noneMatch_allOdd() {
	List<Integer> integerList = Arrays.asList(233, 123, 345, 123);

	assertTrue(BasicStreamExamples.isOddElementPresent(integerList));
	assertTrue(BasicStreamExamples.areAllElementsOdd(integerList));
	assertFalse(BasicStreamExamples.areAllElementsEven(integerList));
}

Examples for findFirst

In case of List stream has an order and it will return always 234 as result.

findFirst code for List

public static Optional<Integer> getFirstElementList(List<Integer> integers) {
	return integers.stream()
		.findFirst();
}

findFirst unit test for List

@Test
public void test_getFirstElementList() {
	List<Integer> integerList = Arrays.asList(234, 123, 345, 123);

	Optional<Integer> result = BasicStreamExamples
		.getFirstElementList(integerList);

	assertEquals(Integer.valueOf(234), result.get());
}

Since Set has no natural order then there is no guarantee which element is to be returned by findFirst(). On my machine, with my JVM it is 345, but on another machine, with other JVM it might be a different value, so this test most likely will fail for someone else.

findFirst code for Set

public static Optional<Integer> getFirstElementSet(Set<Integer> integers) {
	return integers.stream()
		.findFirst();
}

findFirst unit test for Set

@Test
public void test_getFirstElementSet() {
	Set<Integer> integerSet = new HashSet<>();
	integerSet.add(234);
	integerSet.add(123);
	integerSet.add(345);
	integerSet.add(123);

	Optional<Integer> result = BasicStreamExamples
		.getFirstElementSet(integerSet);

	assertEquals(Integer.valueOf(345), result.get());
}

Examples for findAny

There is no guarantee which element is to be returned by findAny(). On my machine, with my JVM it is 234, but on another machine, with other JVM it might be a different value, so this test most likely will fail for someone else.

findAny code

public static Optional<Integer> getAnyElement(List<Integer> integers) {
	return integers.stream()
		.findAny();
}

findAny unit test

@Test
public void test_getGetAnyElement() {
	List<Integer> integerList = Arrays.asList(234, 123, 345, 123);

	Optional<Integer> result = BasicStreamExamples
		.getAnyElement(integerList);

	assertEquals(Integer.valueOf(234), result.get());
}

Conclusion

These basic code examples give an idea how Java 8 Stream API operations work. More advanced examples are shown in Java 8 features – Stream API advanced examples post.

Related Posts

Read more...

Java 8 features – Stream API explained

Last Updated on by

Post summary: Code examples of Java 8 Stream API showing useful use cases.

In Java 8 features – Lambda expressions, Interface changes, Stream API, DateTime API post I have briefly described most interesting Java 8 features. In the current post, I will give special attention to Stream API. This post is more theoretical which lays the foundation for next posts: Java 8 features – Stream API basic examples and Java 8 features – Stream API advanced examples that gives code examples to explain the theory. Code examples here can be found in GitHub java-samples/java8 repository.

Functional interfaces

Before explaining Stream API it is needed to understand the idea of a functional interface as they are leveraged for use with lambda expressions. A functional interface is an interface that has only one abstract method that is to be implemented. A functional interface may or may not have default or static methods. Although not mandatory, a good practice is to annotate a functional interface with @FunctionalInterface. Functional interfaces mostly used in Stream API operations are explained below. You can also use functional interfaces in a method signature, hence lambda expressions can be passed when calling a method. If one’s below are not suitable you can always create own functional interface.

Predicate

Method for implementation is: boolean test(T t). This interface is used in order to evaluate condition to an input object to a boolean expression.

Supplier

Method for implementation is: T get(). This interface is used in order to get output object as a result.

Function

Method for implementation is: R apply(T t). This interface is used in order to produce a result object based on a given input object.

Consumer

Method for implementation is: void accept(T t). This interface is used in order to do an operation on a single input object that does not produce any result.

BiConsumer

Method for implementation is: void accept(T t, U u). This interface is used in order to do an operation on two input objects that do not produce any result.

Method reference

Sometimes when using lambda expression all that is done is calling a single method by name. Method reference provides an easy way to call the method making the code more readable. In short it is calling NumberUtils::isNumber instead of element-> NumberUtils.isNumber(element).

Stream API

Stream API is used for data processing which supports parallel operations. It enables data processing in a declarative way. Streams are sequences of elements that support different operations. Streams are lazily computed on demand when elements are needed. The stream is like a recipe that gets executed when actual result is needed.

Stream operations

Stream operations are divided into intermediate and terminal operations combined to form stream pipelines. Intermediate operations return a new stream. They are always lazy. Executing an intermediate operation such as filter() does not actually perform any filtering, but instead creates a new stream. Terminal operations on the other hand, such as collect() generates a result or final value. After the terminal operation is performed, the stream pipeline is considered consumed, and can no longer be used. Intermediate and terminal operators, such as limit() or findFirst() can be short-circuiting, once they achieve their goal they stop further stream processing. Intermediate operations are further divided into stateless and stateful operations. Stateless operations, such as filter() and map(), retain no state from the previously seen element when processing a new element, hence each element can be processed independently of operations on other elements. Stateful operations, such as distinct() and sorted(), may incorporate state from previously seen elements when processing new elements. For example, one cannot produce any results from sorting a stream until one has seen all elements of the stream. As a result, under parallel computation, some pipelines containing stateful intermediate operations may require multiple passes on the data or may need to buffer significant data. Stateful operations should be carefully considered when constructing stream pipeline because they might require significant resources.

Stream API methods

Below is a list of most of the methods available in Stream interface with a short description. Code examples with explanations are in the following post.

filter

Stream filter(Predicate<? super T> predicate) – a stateless intermediate operation that returns a stream consisting of the elements of this stream matching the given predicate.

map

Stream map(Function<? super T, ? extends R> mapper) – a stateless intermediate operation that converts a value of one type into another by applying a function that does the conversion. Result is one output value for one input value.

distinct

Stream distinct() – stateful intermediate operation that removes duplicated elements using equals() method.

sorted

Stream sorted() or Stream sorted(Comparator<? super T> comparator) – stateful intermediate operation that sorts stream elements according to given or default comparator.

peek

Stream peek(Consumer<? super T> action) – a stateless intermediate operation that performs an action on an element once the stream is consumed. It does not change the stream or alter stream elements. It is mainly used for debugging purposes.

collect

<R, A> R collect(Collector<? super T, A, R> collector) or R collect(Supplier supplier, BiConsumer<R, ? super T> accumulator, BiConsumer<R, R> combiner) – terminal operation that performs mutable reduction operation on the stream elements reducing the stream to a mutable result collector, such as an ArrayList. Stream elements are incorporated into the result by updating it instead of replacing.

toArray

Object[] toArray() – terminal operation that returns array containing elements of this stream.

flatMap

<R> Stream<R> flatMap(Function<? super T, ? extends Stream<? extends R>> mapper) – stateless intermediate operation that replaces value with a stream. A result is an arbitrary number of output values to a single input value.

limit

Stream<T> limit(long maxSize) – a short-circuiting stateful intermediate operation that truncates a stream to a given length.

skip

Stream<T> skip(long n) – a stateful intermediate operation that skips first elements from a stream.

forEach

void forEach(Consumer<? super T> action) – a terminal operation that performs an action for each element in the stream

reduce

T reduce(T identity, BinaryOperator<T> accumulator) or Optional<T> reduce(BinaryOperator<T> accumulator) or <U> U reduce(U identity, BiFunction<U, ? super T, U> accumulator, BinaryOperator<U> combiner) – terminal operation that performs reduction on the elements in the stream.

min

Optional<T> min(Comparator<? super T> comparator) – terminal operation that returns min element in stream based on given comparator. Special case of reduce operator.

max

Optional<T> max(Comparator<? super T> comparator) – terminal operation that returns max element in stream based on given comparator. Special case of reduce operator.

count

long count() – a terminal operation that counts elements in a stream.

anyMatch

boolean anyMatch(Predicate<? super T> predicate) – a short-circuiting terminal operation that returns a boolean result if an element in stream conforms to given predicate. Once the result is true operation is cancelled and the result is returned.

allMatch

boolean allMatch(Predicate<? super T> predicate) – a short-circuiting terminal operation that returns a boolean result if all elements in stream conforms to given predicate. Once the result is false operation is cancelled and the result is returned.

noneMatch

boolean noneMatch(Predicate<? super T> predicate) – a short-circuiting terminal operation that returns a boolean result if none elements in stream conform to given predicate. Once the result is false operation is cancelled and the result is returned.

findFirst

Optional<T> findFirst() – a short-circuiting terminal operation that returns an Optional with the first element of this stream or an empty Optional if the stream is empty. If the stream has no order, such as Map or Set, then any element may be returned.

findAny

Optional<T> findAny()  – a short-circuiting terminal operation that returns an Optional with some element of the stream or an empty Optional if the stream is empty.

Conclusion

Stream API is very powerful instrument provided in Java 8. They allow data processing in a declarative way and in parallel. Code looks very neat and easy to read.

Related Posts

Read more...

Java 8 features – Lambda expressions, Interface changes, Stream API, DateTime API

Last Updated on by

Post summary: Short overview of the most interesting and useful Java 8 features.

More details and code examples are available for Stream API in a post to follow.

Java 8

Java 8 is released March 2014, more than three years ago, so we should have already been familiar with its features, which are really nice and can significantly improve our code. Below are some of them I find most interesting and important.

Lambda expressions

In math, Lambda calculus is a way for expressing computation based on function abstraction and was first introduced in the 1930s. This is where the name of Lambda expressions in Java comes from. Functional interface is another concept that is closely related to lambda expressions. A functional interface is an interface with just one method that is to be implemented. Lambda expression is an inline code that implements this interface without creating a concrete or anonymous class. Lambda expression is basically an anonymous method. With lambda expression code is treated as data and lambda expression can be passed as an argument to another method allowing code itself to be invoked at a later stage. Sometimes when using lambda expression all you do is call a single method by name. Method reference is a shortcut for calling a method making the code more readable. Lambdas, functional interfaces, and method reference are very much used with Stream API and will be covered in detail in Java 8 features – Stream API explained post.

Method implementation in an Interface

With this feature interfaces are not what they used to be. It is now possible to have method implementation inside an interface. There are two types of methods – default and static. Default methods have implementation and all classes implementing this interface inherit this implementation. It is possible to override the existing default method. Static methods also have an implementation, but cannot be overridden. Static methods are accessible from interfaces only (InterfaceName.methodName()), they are not accessible from classes implementing those interfaces. Having said that it seems now that interface with static methods is a good candidate for utility class, instead of having a final class with private constructor as it is usually done. I will not give code examples for this feature, there are lots of resources online.

Stream API

This might be the most significant feature in Java 8 release. It is related to lambda expressions as Stream methods have functional interfaces in their signature, so it is nice and easy to pass lambda expression. Stream API was introduced because default methods in interfaces were allowed. Interface java.util.Collection was extended with stream() method and if default methods were not allowed this would have meant a lot of custom implementations broken, essentially an incompatible change. Stream API provides methods for building pipelines for data processing. Unlike collections streams are not physical objects, they are abstractions and become physical when they are needed. The huge benefits of streams are that they are designed to facilitate multi-core architectures without developers to worry about it. Everything happens behind the scenes. Stream API is explained in more details in the following posts:

Date and Time API

Prior to Java 8 date-time classes were not thread-safe and calculations and date-time manipulations were very hard. Also, time zones management was hard. In Java 8 date-time classes are now immutable which makes then thread-safe. In most of the projects, I’ve seen prior to Java 8 instead of using default Java time classes Joda-Time library was used. It is an amazing library providing so many features to manipulate date and time. In Java 8 date and time classes follow principles from Joda-Time which makes Java 8 Date and Time API very efficient. Actually, the Joda-Time designer was the Java specification lead for JSR 310. In Java 8 there are local and zoned date-time classes. I’m not going to get into details here, there are many tutorials online for Java 8 Date and Time API usage. I just say – start using it! It is located in java.time.* package.

Conclusion

Java 8 has really great features. I anticipate you are already using it, if not – start right now!

Related Posts

Read more...

Run Dropwizard Java application on Vagrant

Last Updated on by

Post summary: How to run Dropwizard or any other Java application on Vagrant.

The code below can be found in GitHub sample-dropwizard-rest-stub repository in Vagrantfile-jar file. Since Vagrant requires to have only one Vagrantfile if you want to run this example you have to rename Vagrantfile-jar to Vagrantfile then run Vagrant commands described at the end of this post. This post is part of Vagrant series. All of other Vagrant related posts, as well as more theoretical information what is Vagrant and why to use it, can be found in What is Vagrant and why to use it post.

Vagrantfile

As described in Vagrant introduction post all configurations are done in a single text file called Vagrantfile. Below is a Vagrant file which can be used to deploy and start as service Dropwizard Java application described in Build a RESTful stub server with Dropwizard post.

Vagrant.configure('2') do |config|

  config.vm.hostname = 'dropwizard'
  config.vm.box = 'opscode-centos-7.2'
  config.vm.box_url = 'http://opscode-vm-bento.s3.amazonaws.com/vagrant/virtualbox/opscode_centos-7.2_chef-provisionerless.box'

  config.vm.synced_folder './', '/vagrant'

  config.vm.network :forwarded_port, guest: 9000, host: 9000
  config.vm.network :forwarded_port, guest: 9001, host: 9001

  config.vm.provider :virtualbox do |vb|
    vb.name = 'dropwizard-rest-stub-jar'
  end

  config.vm.provision :shell do |shell|
    shell.inline = <<-SHELL
      sudo service dropwizard stop
      sudo yum -y install java
      sudo mkdir -p /var/dropwizard-rest-stub
      sudo mkdir -p /var/dropwizard-rest-stub/logs
      sudo cp /vagrant/target/sample-dropwizard-rest-stub-1.0-SNAPSHOT.jar /var/dropwizard-rest-stub/dropwizard-rest-stub.jar
      sudo cp /vagrant/config-vagrant.yml /var/dropwizard-rest-stub/config.yml
      sudo cp /vagrant/linux_service_file /etc/init.d/dropwizard
      # Replace CR+LF with LF because of Windows
      sudo sed -i -e 's/\r//g' /etc/init.d/dropwizard
      sudo chmod +x /etc/init.d/dropwizard
      sudo service dropwizard start
    SHELL
  end

end

Vagrantfile explanation

The file starts with a Vagrant.configure(‘2’) do |config| which states that version 2 of Vagrant API will be used and defines constant with name config to be used below. Guest operating system hostname is set to config.vm.hostname. If you use vagrant-hostsupdater plugin it will add it to your hosts file and you can access it from a browser in case you are developing web applications. With config.vm.box you define which would be the guest operating system. Vagrant maintains config.vm.box = “hashicorp/precise64” which is Ubuntu 12.04 (32 and 64-bit), they also recommend to use Bento’s boxes. I have found issues with Vagrant’s as well as Bento’s boxes so I’ve decided to use one I know is working. I specify where it is located with config.vm.box_url. It is CentOS 7.2. With config.vm.synced_folder command, you specify that Vagrantfile location folder is shared as /vagrant/ in the guest operating system. This makes it easy to transfer files between guest and host operating systems. This mount is done by default, but it is good to explicitly state it for better readability. With config.vm.network :forwarded_port port from guest OS is forwarded to your hosting OS. Without exposing any port you will not have access to guest OS, only port open by default is 22 for SSH. With config.vm.provider :virtualbox do |vb| you access VirtualBox provider for more configurations, vb.name = ‘dropwizard-rest-stub-jar’ sets the name that you see in Oracle VirtualBox Manager. Finally, the deployment part takes place which is done by shell commands inside config.vm.provision :shell do |shell| block. Service dropwizard is stopped, if does not exist an error is shown, but it does not interrupt provisioning process. Command yum -y install java is CentOS specific and it installs Java by YUM which is CentOS package manager. For other Linux distributions, you have to use a command with their package manager. Folders are created, then JAR and YML files are copied to the machine. Notice that files are copied from /vagrant/ folder, this is actually the shared folder to your host OS. Installing Java application as service is done by copying linux_service_file to /etc/init.d/dropwizard. This creates service with name dropwizard. See more how to install Linux service in Install Java application as a Linux service post. Since I’m on Windows its line endings (CR+LF) is different than on Linux (LF) and service is not working, giving env: /etc/init.d/dropwizard: No such file or directory error. This is why CF+LF should be replaced with LF with sudo sed -i -e ‘s/\r//g’ /etc/init.d/dropwizard command. Script has to be made executable with sudo chmod +x /etc/init.d/dropwizard. Finally, the script starts the dropwizard service. The nicer way to do this is all installation steps to be extracted as separate batch file and in Vagrantfile just to call that file. I’ve put it in Vagrantfile just to have it in one place.

Running Vagrant

Command to start Vagrant machine is: vagrant up. Then in order to invoke provisioning section with actual deployment, you have to call: vagrant provision. All can be done in one step: vagrant up –provision. To shut down the machine use vagrant halt. To delete machine: vagrant destroy.

Conclusion

It is very easy to create Vagrantfile that install Java application. Once created file can be reused by all team members. It is executed over and over again making provisioning extremely easy.

Related Posts

Read more...

What is Vagrant and why to use it

Last Updated on by

Post summary: Brief description on Vagrant and when and why to use it.

This post is a preface to a series of posts where I will describe in details with examples how to configure and run Vagrant.

What is Vagrant

Vagrant is a tool for building and managing virtual machine environments in a single workflow. With an easy-to-use workflow and focus on automation, Vagrant lowers development environment setup time, increases production parity, and makes the “works on my machine” excuse a relic of the past. Vagrant is convenient to share virtual environment setup and configurations.

How Vagrant works

Vagrant does not provide virtualization engines but builds on top of already existing such as VirtualBox which is the default provider, VMWare, Hyper-V or Docker. Vagrant providers are available as plugins so can be easily installed and used. Simply said Vagrant spins up a virtual machine for you, configures it and installs software on it. All those actions are described in a single text file, called Vagrantfile, that can be shared among team members allowing everyone to have one and the same setup.

Why use Vagrant

Vagrant allows us very easily to share setups between team members allowing very easy spin up of a work environment. For me, the important reason to use Vagrant is test how your deployment works, i.e. provisioning, locally before pushing those changes to other environments. Other important use cases I’ve seen is to create own development/test environment which is very hard to create on a local machine. This was a huge Tomcat application consisting of tens of configuration files with hundreds of configuration values which was not possible to provision on the local box, here Vagrant came to a rescue applying Chef cookbook used for deployment on physical hosts.

Provisioning

Provisioning is all tasks related to deployment and configurations of applications making them ready to use. In the past, this was done with many scripts or manual steps, which was quite unreliable and error-prone. Nowadays tools like Chef or Ansible allow automatic deployment and configuration of applications. This is a proper way to do deployments as it eliminates the human error and speeds up deployment. Once you have your Chef cookbook or Ansible playbook ready you want to test them if they work properly. Here comes the true value of Vagrant, you can test locally changes which otherwise may break some shared environment and stop work for many people.

Why is this post existing?

This post has no real practical value. Its purpose is to introduce Vagrant and to serve as a preface to three other posts from Vagrant series:

Conclusion

Vagrant provides an easy way to define and share a different application or environment setup in a single text file called Vagrantfile. Vagrant uses virtualization engines like VirtualBox, VMWare or Hyper-V and builds on top of them. Most valuable usage I’ve seen Vagrant used for is to test your provisioning scripts and also provision an application which otherwise would be very hard to run manually on a local machine. Enjoy reading post with actual configurations and Vagrantfile examples.

Related Posts

Read more...

Install Java application as a Linux service

Last Updated on by

Post summary: Code snippet how to start Java application as a Linux service.

The code below can be found in GitHub sample-dropwizard-rest-stub repository in linux_service_file file. This post is related to Build a RESTful stub server with Dropwizard post. REST server builds there is being set up to run as Linux service with the code snippet shown below.

Service snippet

This snippet can be used for other applications to be run as Linux service, not only Java.

#!/bin/bash

BASE_DIR=/var/dropwizard-rest-stub
START_COMMAND="java -jar $BASE_DIR/dropwizard-rest-stub.jar server $BASE_DIR/config.yml"
PID_FILE=$BASE_DIR/dropwizard-rest-stub.pid
LOG_DIR=$BASE_DIR/logs

start() {
  PID=`$START_COMMAND > $LOG_DIR/init.log 2>$LOG_DIR/init.error.log & echo $!`
}

case "$1" in
start)
    if [ -f $PID_FILE ]; then
        PID=`cat $PID_FILE`
        if [ -z "`ps axf | grep ${PID} | grep -v grep`" ]; then
            start
        else
            echo "Already running [$PID]"
            exit 0
        fi
    else
        start
    fi

    if [ -z $PID ]; then
        echo "Failed starting"
        exit 1
    else
        echo $PID > $PID_FILE
        echo "Started [$PID]"
        exit 0
    fi
;;
status)
    if [ -f $PID_FILE ]; then
        PID=`cat $PID_FILE`
        if [ -z "`ps axf | grep ${PID} | grep -v grep`" ]; then
            echo "Not running (process dead but PID file exists)"
            exit 1
        else
            echo "Running [$PID]"
            exit 0
        fi
    else
        echo "Not running"
        exit 0
    fi
;;
stop)
    if [ -f $PID_FILE ]; then
        PID=`cat $PID_FILE`
        if [ -z "`ps axf | grep ${PID} | grep -v grep`" ]; then
            echo "Not running (process dead but PID file exists)"
            rm -f $PID_FILE
            exit 1
        else
            PID=`cat $PID_FILE`
            kill -term $PID
            echo "Stopped [$PID]"
            rm -f $PID_FILE
            exit 0
        fi
    else
        echo "Not running (PID not found)"
        exit 0
    fi
;;
restart)
    $0 stop
    $0 start
;;
*)
    echo "Usage: $0 {status|start|stop|restart}"
    exit 0
esac

Install as a Linux service

In order to make it a Linux service following file has to be copied into /etc/init.d/ Linux folder with the name that you want your service to be. If you want your service to be named service_name then you put the same name as filename: /etc/init.d/service_name.

Nota bene: If you are creating the service and copying the file from Windows machine it has different new line endings (CR + LF) than Linux (LF). Also by default Git amends line endings on a pull and push depending on the OS. If you receive message: env: /etc/init.d/service_name: No such file or directory then you have to replace CR+LF to LF only. This can be done with following command: sed -i -e ‘s/\r//g’ /etc/init.d/service_name.

Manage service

Assume you have named your file dropwizard then you manage your service with that name. Service has 4 commands: status, start, stop and restart. You start the service with service dropwizard start command. If you input something different than 4 options given above service will output its usage pattern.

Conclusion

In current post I have provided sample bash script that is used to install Java or any other application as a Linux service and then start, stop or restart it.

Related Posts

Read more...

Build a Dropwizard project with Gradle

Last Updated on by

Post summary: Code examples how to create Dropwizard project with Gradle.

Code sample here can be found as a buildable and runnable project in GitHub sample-dropwizard-rest-stub repository in separate git branch called gradle.

Project structure

All classes have been thoroughly described in Build a RESTful stub server with Dropwizard post. In this post, I will describe how to make project build-able with Gradle. In order to make it more understandable, I will compare with Maven’s pom.xml file elements by XPath.

Gradle

Gradle is an open source build automation system that builds upon the concepts of Apache Ant and Apache Maven and introduces a Groovy-based domain-specific language (DSL) instead of the XML form used by Apache Maven for declaring the project configuration. Gradle is much more powerful and more complex than Maven. There is a significant tendency for Java projects moving towards Gradle so I’ve decided to make this post.

Gradle artefacts

In order to make your project work with Gradle, you need several files. The list below is how files are placed in project’s root folder:

  • gradle/wrapper/gradle-wrapper.jar – Gradle Wrapper allows you to make builds without installing Gradle on your machine. This is very convenient and makes Gradle usage easy. This JAR is managing the Gradle Wrapper automatic download and installation on the first build.
  • gradle\wrapper\gradle-wrapper.properties – a configuration which Gradle Wrapper version to be downloaded and installed on the first build.
  • build.gradle – the most import file. This is where you configure your project.
  • gradlew – this Gradle Wrapper executable for Linux.
  • gradlew.bat – this is Gradle Wrapper executable for Windows.
  • settings.gradle – Project settings. Mainly used in case of multi-module projects.

setting.gradle file

This file is mainly used in case of a multi-module project. In it, we currently define project name: rootProject.name = ‘sample-dropwizard-rest-stub’. This is the same value as in /project/name form pom.xml file.

Constructing build.gradle file

This is the main file where you configure your project. You need to define version (/project/version in pom.xml), group (/project/groupId in pom.xml) and optionally description. Since this is Java project you need to apply plugin: ‘java’. Also, you need need to specify Java version, 1.8 in this case by sourceCompatibility and targetCompatibility values. Next is to set repositories. You can use mavenCentral or add a custom one by the following code, which is not shown in the example below: maven { url ‘https://plugins.gradle.org/m2/’ }. You need to define dependencies (/project/dependencies/dependency in pom.xml file) to tell Gradle what libraries this project needs. In the current example, it is a compile dependency to io.dropwizard:dropwizard-core:0.8.0 and testCompile dependency to junit:junit:4.12. This is enough to have fully functional Dropwizard project with code examples given in Build a RESTful stub server with Dropwizard post.

version '1.0-SNAPSHOT'
group 'com.automationrhapsody.reststub'
description 'Sample Dropwizard REST Stub'

apply plugin: 'java'

sourceCompatibility = 1.8
targetCompatibility = 1.8

repositories {
	mavenCentral()
}

dependencies {
	compile 'io.dropwizard:dropwizard-core:0.8.0'

	testCompile 'junit:junit:4.12'
}

The beauty of Dropwizard is the ability to pack everything into a single JAR file and then run that file. In Maven this was done by maven-shade-plugin in Gradle the best way to do it is Shadow JAR plugin. You need to define it via plugins closure. Now lets configure shadowJar. You can specify archiveName or exclude some artefacts from packed JAR. Optionally you can enhance you MANIFEST.MF file by adding more details to manifest closure. Nice thing for Gradle is that you can use Groovy as well as pure Java code. Constructing Build-Time requires import some Java DateTime classes and using them to make human readable time. Next piece that you need to add to your build.gradle file is:

import java.time.ZoneId
import java.time.ZonedDateTime
import java.time.format.DateTimeFormatter

plugins {
	id 'com.github.johnrengelman.shadow' version '1.2.4'
}

mainClassName = 'com.automationrhapsody.reststub.RestStubApp'

shadowJar {
	mergeServiceFiles()
	exclude 'META-INF/*.DSA', 'META-INF/*.RSA', 'META-INF/*.SF'
	manifest {
		attributes 'Implementation-Title': rootProject.name
		attributes 'Implementation-Version': rootProject.version
		attributes 'Implementation-Vendor-Id': rootProject.group
		attributes 'Build-Time': ZonedDateTime.now(ZoneId.of("UTC"))
				.format(DateTimeFormatter.ISO_ZONED_DATE_TIME)
		attributes 'Built-By': InetAddress.localHost.hostName
		attributes 'Created-By': 'Gradle ' + gradle.gradleVersion
		attributes 'Main-Class': mainClassName
	}
	archiveName 'sample-dropwizard-rest-stub.jar'
}

Once you build your JAR file with command: gradlew shadowJar you can run it with java -jar build/sample-dropwizard-rest-stub.jar server config.yml command. Gradle has another option to run your project for testing purposes. It is done by first apply plugin: ‘application’. You need to specify which is mainClassName to be run and configure run args. In order to run your project from Gradle with gradlew run command you just add:

apply plugin: 'application'

mainClassName = 'com.automationrhapsody.reststub.RestStubApp'

run {
	args = ['server', 'config.yml']
}

build.gradle file

Full build.gradle file content is shown below:

import java.time.ZoneId
import java.time.ZonedDateTime
import java.time.format.DateTimeFormatter

plugins {
	id 'com.github.johnrengelman.shadow' version '1.2.4'
}

version '1.0-SNAPSHOT'
group 'com.automationrhapsody.reststub'
description 'Sample Dropwizard REST Stub'

apply plugin: 'java'
apply plugin: 'application'

sourceCompatibility = 1.8
targetCompatibility = 1.8

repositories {
	mavenCentral()
}

dependencies {
	compile 'io.dropwizard:dropwizard-core:0.8.0'

	testCompile 'junit:junit:4.12'
}

mainClassName = 'com.automationrhapsody.reststub.RestStubApp'

run {
	args = ['server', 'config.yml']
}

shadowJar {
	mergeServiceFiles()
	exclude 'META-INF/*.DSA', 'META-INF/*.RSA', 'META-INF/*.SF'
	manifest {
		attributes 'Implementation-Title': rootProject.name
		attributes 'Implementation-Version': rootProject.version
		attributes 'Implementation-Vendor-Id': rootProject.group
		attributes 'Build-Time': ZonedDateTime.now(ZoneId.of("UTC"))
				.format(DateTimeFormatter.ISO_ZONED_DATE_TIME)
		attributes 'Built-By': InetAddress.localHost.hostName
		attributes 'Created-By': 'Gradle ' + gradle.gradleVersion
		attributes 'Main-Class': mainClassName
	}
	archiveName 'sample-dropwizard-rest-stub.jar'
}

Conclusion

This post is an extension to Build a RESTful stub server with Dropwizard post, in which I have described how to build REST service with Dropwizard and Maven. In the current post, I have shown how to do the same with Gradle.

Related Posts

Read more...

PowerMock examples and why better not to use them

Last Updated on by

Post summary: In this post, I have summarised all PowerMock examples I’ve given so far. More important I will try to give some justification why I think necessity to use PowerMock is considered an indicator for a bad code design.

All code examples are available in GitHub java-samples/junit repository.

PowerMock

PowerMock is a framework that extends other mock libraries giving them more powerful capabilities. PowerMock uses a custom classloader and bytecode manipulation to enable mocking of static methods, constructors, final classes and methods, private methods, removal of static initializers and more.

PowerMock series

So far in my blog, I have written a lot for PowerMock. Even more than I have written for Mockito which actually deserves better attention. Post from PowerMock series are:

Why avoid PowerMock

I have worked on a project where PowerMock was not needed at all. We had 91.6% code coverage only with Mockito. Initially, it was 85% but when we utilized PITest we increased the code coverage. See more on PITest in Mutation testing for Java with PITest post. I also have worked on an old product where without PowerMock you cannot do decent unit testing. PowerMock was a must in order to achieve our goal of 80% code coverage. I can easily compare those two projects. The old one had large classes with lots of private methods and used lots of static methods. It was really hard to maintain that code. In this post, I’m not going to talk about SOLID because I do not consider myself a total expert on the subject. There are lots of discussions over the internet about pros and cons of static methods so everyone can decide personally. For me, I’ve come to a conclusion that necessity of using PowerMock in a project is an indicator for bad code design. In later projects, PowerMock is not used at all. If something cannot be unit tested with Mockito then the class is refactored.

How to avoid PowerMock

PowerMock features described here are related to static methods, public methods and creating new objects.

Mock or verify static methods

I’m not saying don’t use static methods, but they should be deterministic and not very complex. Not being able to verify static method was called is a little pain but most important is input and output of your method under test, what internal call it is doing is not that important.

Mock or call private methods

Private methods are not supposed to be tested at all. It is like they do not exist. If a class is complex enough so you have to call private methods or to test individually private methods then this class might be good to be split up.

Mock new object creation

Instead of creating the object in the class use dependency injection to provide it to the class from outside either via a constructor or via a setter. This was you can very easily test this class by injecting a mock.

Conclusion

This is a very controversial post. On one hand, I describe how to use PowerMock and what features it has, on the other hand, I state that you’d better not use it. PowerMock is extremely powerful and can do almost anything you need in your testing, but for me, the necessity of using PowerMock is an indicator of bad code design.

Related Posts

Read more...

Mock new object creation with PowerMock

Last Updated on by

Post summary: How to control what objects are being instantiated when using PowerMock.

This post is part of PowerMock series examples. The code shown in examples below is available in GitHub java-samples/junit repository.

Mock new object creation

You might have a method which instantiates some object and works with it. This case could be very tricky to automate because you do not have any control over this newly created object. This is where PowerMock comes to help to allow you to control what object is being created by replacing it with an object you can control.

Code to test

Below is a simple method where a new object is being created inside a method that has to be unit tested.

public class PowerMockDemo {

	public Point publicMethod() {
		return new Point(11, 11);
	}
}

Unit test

What we want to achieve in the unit test is to control instantiation of new Point object so that it is replaced with an object we have control over. The first thing to do is to annotate unit test with @RunWith(PowerMockRunner.class) telling JUnit to use PowerMock runner and with @PrepareForTest(PowerMockDemo.class) telling PowerMock to get inside PowerMockDemo class and prepare it for mocking. Mocking is done with PowerMockito.whenNew(Point.class).withAnyArguments().thenReturn(mockPoint). It tells PowerMock when a new object from class Point is instantiated with whatever arguments to return mockPoint instead. It is possible to return different objects based on different arguments Point is created with withArguments() method. Full code is below:

import org.junit.Before;
import org.junit.Test;
import org.junit.runner.RunWith;
import org.powermock.api.mockito.PowerMockito;
import org.powermock.core.classloader.annotations.PrepareForTest;
import org.powermock.modules.junit4.PowerMockRunner;

import static org.hamcrest.CoreMatchers.is;
import static org.hamcrest.MatcherAssert.assertThat;
import static org.mockito.Mockito.mock;

@RunWith(PowerMockRunner.class)
@PrepareForTest(PowerMockDemo.class)
public class PowerMockDemoTest {

	private PowerMockDemo powerMockDemo;

	@Before
	public void setUp() {
		powerMockDemo = new PowerMockDemo();
	}

	@Test
	public void testMockNew() throws Exception {
		Point mockPoint = mock(Point.class);

		PowerMockito.whenNew(Point.class)
			.withAnyArguments().thenReturn(mockPoint);

		Point actualMockPoint = powerMockDemo.publicMethod();

		assertThat(actualMockPoint, is(mockPoint));
	}
}

Conclusion

PowerMock allows you to control want new objects are being created and replacing them with an object you have control over.

Related Posts

Read more...

Mock private method call with PowerMock

Last Updated on by

Post summary: How to mock private method with PowerMock by using spy object.

This post is part of PowerMock series examples. The code shown in examples below is available in GitHub java-samples/junit repository.

Mock private method

In some cases, you may need to alter the behavior of private method inside the class you are unit testing. You will need to mock this private method and make it return what needed for the particular case. Since this private method is inside your class under test then mocking it is little more specific. You have to use spy object.

Spy object

A spy is a real object which mocking framework has access to. Spied objects are partially mocked objects. Some their methods are real some mocked. I would say use spy object with great caution because you do not really know what is happening underneath and whether are you actually testing your class or mocked version of it.

Code to be tested

Below is a simple code that has a private method which created new Point object based on given as argument one. This private method is used to demonstrate how private methods can be called in Call private method with PowerMock post. In the current example, there is also a public method which calls this private method with a Point object.

public class PowerMockDemo {

	public Point callPrivateMethod() {
		return privateMethod(new Point(1, 1));
	}

	private Point privateMethod(Point point) {
		return new Point(point.getX() + 1, point.getY() + 1);
	}
}

Unit test

What we want to achieve in the unit test is to mock private method so that each call to it returns an object we have control over. The first thing to do is to annotate unit test with @RunWith(PowerMockRunner.class) telling JUnit to use PowerMock runner and with @PrepareForTest(PowerMockDemo.class) telling PowerMock to get inside PowerMockDemo class and prepare it for mocking. Then a spy object has to be created with PowerMockito.spy(new PowerMockDemo()). Actually, this is real PowerMockDemo object, but PowerMock is spying on it. The mocking of the private method is done with following code: PowerMockito.doReturn(mockPoint).when(powerMockDemoSpy, “privateMethod”, anyObject()). When “privateMethod” is called with whatever object then return mockPoint which is actually a mocked object. The full code example is shown below:

import org.junit.Before;
import org.junit.Test;
import org.junit.runner.RunWith;
import org.powermock.api.mockito.PowerMockito;
import org.powermock.core.classloader.annotations.PrepareForTest;
import org.powermock.modules.junit4.PowerMockRunner;

import static org.hamcrest.CoreMatchers.is;
import static org.hamcrest.MatcherAssert.assertThat;
import static org.mockito.Matchers.anyObject;
import static org.mockito.Mockito.mock;

@RunWith(PowerMockRunner.class)
@PrepareForTest(PowerMockDemo.class)
public class PowerMockDemoTest {

	private PowerMockDemo powerMockDemoSpy;

	@Before
	public void setUp() {
		powerMockDemoSpy = PowerMockito.spy(new PowerMockDemo());
	}

	@Test
	public void testMockPrivateMethod() throws Exception {
		Point mockPoint = mock(Point.class);

		PowerMockito.doReturn(mockPoint)
			.when(powerMockDemoSpy, "privateMethod", anyObject());

		Point actualMockPoint = powerMockDemoSpy.callPrivateMethod();

		assertThat(actualMockPoint, is(mockPoint));
	}
}

Conclusion

PowerMock provides a way to mock private methods by using spy objects. Mockito also has spy objects, but they are not so powerful as PowerMock’s. One example is that PowerMock can spy on final objects.

Related Posts

Read more...

Call private method with PowerMock

Last Updated on by

Post summary: How to invoke a private method with PowerMock.

This post is part of PowerMock series examples. The code shown in examples below is available in GitHub java-samples/junit repository.

Unit test private method

Mainly public methods are being tested, so it is a very rare case where you want to unit test a private method. PowerMock provides utilities that can invoke private methods via a reflection and get output which can be tested.

Code to be tested

Below is a sample code that shows a class with a private method in it. It does nothing else but increases the X and Y coordinates of given as argument Point.

public class PowerMockDemo {

	private Point privateMethod(Point point) {
		return new Point(point.getX() + 1, point.getY() + 1);
	}
}

Unit test

Assume that this private method has to be unit tested for some reason. In order to do so, you have to use PowerMock’s Whitebox.invokeMethod(). You give an instance of the object, method name as a String and arguments to call the method with. In the example below argument is new Point(11, 11).

import org.junit.Before;
import org.junit.Test;
import org.powermock.reflect.Whitebox;

import static org.hamcrest.CoreMatchers.is;
import static org.hamcrest.MatcherAssert.assertThat;

public class PowerMockDemoTest {

	private PowerMockDemo powerMockDemo;

	@Before
	public void setUp() {
		powerMockDemo = new PowerMockDemo();
	}

	@Test
	public void testCallPrivateMethod() throws Exception {
		Point actual = Whitebox.invokeMethod(powerMockDemo, 
			"privateMethod", new Point(11, 11));

		assertThat(actual.getX(), is(12));
		assertThat(actual.getY(), is(12));
	}
}

Conclusion

PowerMock provides utilities which uses reflection to do certain things, as shown in the example above to invoke a private method.

Related Posts

Read more...

Soft assertions that do not fail JUnit test

Last Updated on by

Post summary: Code examples how to use assertions that do not fail the unit test immediately.

The code shown in examples below is available in GitHub java-samples/jersey1 repository.

Unit vs Functional testing

Unit testing paradigm states that each test exercises particular code behavior. So in a perfect world, one unit test would have one assertion which defines unit test result – either passed or failed. This is why unit testing frameworks provide only asserts which stop further execution of current test method. In functional testing usually, one test verifies several conditions. Not debating if this is good or bad. Assume you are doing GUI testing, once you have opened particular page you’d better do as much verification as possible to reduce the risk of bugs. Having this page opened over and over for every single check is not the most efficient way of testing. This is why when you run functional tests you need some kind of assert that indicates whether passed or failed but to let the test continue in no critical issue is present. Those are generally called “soft” asserts.

Soft assertions and JUnit

TestNG provides org.testng.asserts.SoftAssert class for soft asserts as it is more oriented towards functional testing. JUnit is a unit testing framework, so it does not provide any soft assertions. In order to create such behavior, additional libraries are needed.

AssertJ

AssertJ is a library providing fluent assertions. It is very similar to Hamcrest which comes by default with JUnit. Along with all the asserts, AssertJ provides soft assertions with its SoftAssertions class inside org.assertj.core.api package.

Usage

Below is a functional test run against Dropwizard stub described in Build a RESTful stub server with Dropwizard post. Important is to instantiate a new SoftAssertions object before the test verifications and to call assertAll() method in the end to collect results. Best way to do this is to use JUnit’s @Before and @After annotated methods.

package com.automationrhapsody.jersey1;

import com.automationrhapsody.jersey1.model.Person;
import com.automationrhapsody.jersey1.rules.PersonServiceJerseyClient;

import java.util.List;

import org.assertj.core.api.SoftAssertions;
import org.junit.After;
import org.junit.Before;
import org.junit.ClassRule;
import org.junit.Test;

import static org.hamcrest.MatcherAssert.assertThat;
import static org.hamcrest.core.Is.is;

public class PersonServiceTest {

	@ClassRule
	public static final PersonServiceJerseyClient CLIENT 
		= new PersonServiceJerseyClient();

	private SoftAssertions softAssertions;

	private Person person;

	@Before
	public void setUp() {
		person = new Person();
		person.setId(123);
		person.setFirstName("First Name");
		person.setLastName("Last Name");
		person.setEmail("Email");

		softAssertions = new SoftAssertions();
	}

	@After
	public void tearDown() {
		softAssertions.assertAll();
	}

	@Test
	public void testAllOperations() {
		String saveResult = CLIENT.save(person);
		assertThat(saveResult, is("Added Person with id=123"));

		Person actual = CLIENT.get(person.getId());
		softAssertions
			.assertThat(actual.getId()).isEqualTo(person.getId());
		softAssertions
			.assertThat(actual.getFirstName()).isEqualTo(person.getFirstName());
		softAssertions
			.assertThat(actual.getLastName()).isEqualTo(person.getLastName());
		softAssertions
			.assertThat(actual.getEmail()).isEqualTo(person.getEmail());

		String result = CLIENT.remove();
		assertThat(result, is("Last person remove. Total count: 4"));
	}
}

Conclusion

Soft assertions are needed in case of functional tests being run with JUnit. Since such is not available out of the box because JUnit is targeted for unit tests soft assertions can be used from external libraries such as AssertJ.

Related Posts

Read more...

Verify static method was called with PowerMock

Last Updated on by

Post summary: How to verify that static method was called during a unit test with PowerMock.

This post is part of PowerMock series examples. The code shown in examples below is available in GitHub java-samples/junit repository.

In Mock static methods in JUnit with PowerMock example post, I have given information about PowerMock and how to mock a static method. In the current post, I will demonstrate how to verify given static method was called during execution of a unit test.

Example class for unit test

We are going to unit test a class called LocatorService that internally uses a static method from utility class Utils. Method randomDistance(int distance) in Utils is returning random variable, hence it has no predictable behavior and the only way to test it is by mocking it:

public class LocatorService {

	public Point generatePointWithinDistance(Point point, int distance) {
		return new Point(point.getX() + Utils.randomDistance(distance), 
			point.getY() + Utils.randomDistance(distance));
	}
}

And Utils class is:

import java.util.Random;

public final class Utils {

	private static final Random RAND = new Random();

	private Utils() {
		// Utilities class
	}

	public static int randomDistance(int distance) {
		return RAND.nextInt(distance + distance) - distance;
	}
}

Nota bene: it is good code design practice to make utility classes final and with a private constructor.

Verify static method call

This is the full code. Additional details are shown below it.

package com.automationrhapsody.junit;

import org.junit.Before;
import org.junit.Test;
import org.junit.runner.RunWith;
import org.mockito.internal.verification.VerificationModeFactory;
import org.powermock.api.mockito.PowerMockito;
import org.powermock.core.classloader.annotations.PrepareForTest;
import org.powermock.modules.junit4.PowerMockRunner;

@RunWith(PowerMockRunner.class)
@PrepareForTest(Utils.class)
public class LocatorServiceTest {

	private LocatorService locatorServiceUnderTest;

	@Before
	public void setUp() {
		PowerMockito.mockStatic(Utils.class);

		locatorServiceUnderTest = new LocatorService();
	}

	@Test
	public void testStaticMethodCall() {
		locatorServiceUnderTest
			.generatePointWithinDistance(new Point(11, 11), 1);
		locatorServiceUnderTest
			.generatePointWithinDistance(new Point(11, 11), 234);

		PowerMockito.verifyStatic(VerificationModeFactory.times(2));
		Utils.randomDistance(1);

		PowerMockito.verifyStatic(VerificationModeFactory.times(2));
		Utils.randomDistance(234);

		PowerMockito.verifyNoMoreInteractions(Utils.class);
	}
}

Explanation

Class containing static method should be prepared for mocking with PowerMockito.mockStatic(Utils.class) code. Then call to static method is done inside locatorServiceUnderTest .generatePointWithinDistance() method. In this test, it is intentionally called 2 times with different distance (1 and 234) in order to show the verification which consists of two parts. First part is PowerMockito.verifyStatic(VerificationModeFactory.times(2)) which tells PowerMock to verify static method was called 2 times. The second part is Utils.randomDistance(1) which tells exactly which static method should be verified. Instead of 1 in the brackets you can use anyInt() or anyObject(). 1 is used to make verification explicit. As you can see there is second verification that randomDistance() method was called with 234 as well: PowerMockito.verifyStatic(VerificationModeFactory.times(2)); Utils.randomDistance(234);.

Conclusion

PowerMock provides additional power to Mockito mocking library which is described in Mock JUnit tests with Mockito example post. In the current post, I have shown how to verify static method was called. It is very specific as verification actually consists of two steps.

Related Posts

Read more...

Manage Microsoft Excel files in Java with Apache POI

Last Updated on by

Post summary: Code examples how to manage Microsoft Excel documents with Apache POI Java library.

Code examples in the current post can be found in GitHub java-samples/apache-poi repository.

Two most important use cases where MS Excel documents are useful in automation testing are:

  • Data-driven testing where test data is input from an Excel file
  • Output test results to an Excel file for stakeholders

So far I did not need to use Excel in my automation. Where data-driven testing was needed I either used JUnit data provider (see more in Data driven testing with JUnit parameterized tests and Data driven testing with JUnit and Gradle posts) or feeding data in CSV format and reading them with Apache Commons CSV library. My colleague Petar Yordanov introduced me to Apache POI which is very powerful for Excel and other MS format documents management.

Apache POI

The Apache POI Project’s mission is to create and maintain Java APIs for manipulating various file formats based upon the Office Open XML standards (OOXML) and Microsoft’s OLE 2 Compound Document format (OLE2). In short, you can read and write MS Excel files using Java. In addition, you can read and write MS Word and MS PowerPoint files using Java. Apache POI is your Java Excel solution (for Excel 97-2008). See more on Apache POI home page. Full details on supported POI formats can be found in Apache POI Component Overview. From this page, you can navigate to more details how to work with a specific type of document. Full details on Excel management can be found on Apache POI Spreadsheet Guide.

Usage

Include in Maven project

In the current example, I will use the poi-ooxml library which for XML based formats introduced in Microsoft Office 2007.

<dependency>
	<groupId>org.apache.poi</groupId>
	<artifactId>poi-ooxml</artifactId>
	<version>3.16</version>
</dependency>

Creating a Workbook

Excel file is actually a XSSFWorkbook object from org.apache.poi.xssf.usermodel package. Workbook can be created empty or from existing file:

// Create empty workbook
XSSFWorkbook newWorkBook = new XSSFWorkbook();
// Create workbook from existing file
XSSFWorkbook existingWorkBook = new XSSFWorkbook(new File("fileName.xlsx"));

Manage sheets

XSSFWorkbook class provides different methods for sheet management: createSheet(), cloneSheet(), getNumberOfSheets(), getSheet(), getSheetAt(), getSheetName()getSheetIndex(). Create or get sheet methods return a XSSFSheet object.

Manage sheet content

Once you have the XSSFSheet object, either from create or get, you can manage rows in it. Some of the methods are: createRow()getRow(), removeRow(), getLastRowNum(), getPhysicalNumberOfRows()rowIterator(). Create or get row methods return a XSSFRow object. Inside row you can manage cells. Some of the methods are: createCell(), getCell(), removeCell(), getLastCellNum(), getPhysicalNumberOfCells(), cellIterator(). Create or get cell methods return a XSSFCell object. Some the methods are: setCellComment(), setCellFormula(), setCellStyle(), setCellType(), setCellValue().

Manage Excel documents

Below are shown examples of simple ExcelWriter class that writes to Excel file. This class is used in SampleExcelApp showing how to write the text. Reading from Excel is shown in SampleExcelAppTest verifying the correct saving of the document.

ExcelWriter

package com.automationrhapsody.apachepoi;

import java.io.File;
import java.io.FileOutputStream;
import java.io.IOException;
import java.util.HashMap;
import java.util.Map;

import org.apache.poi.ss.usermodel.CellType;
import org.apache.poi.ss.usermodel.FillPatternType;
import org.apache.poi.ss.usermodel.IndexedColors;
import org.apache.poi.xssf.usermodel.XSSFCell;
import org.apache.poi.xssf.usermodel.XSSFCellStyle;
import org.apache.poi.xssf.usermodel.XSSFRow;
import org.apache.poi.xssf.usermodel.XSSFSheet;
import org.apache.poi.xssf.usermodel.XSSFWorkbook;

public class ExcelWriter {

	private final XSSFWorkbook workBook;

	private Map<String, Integer> nextRows = new HashMap<>();
	private String currentSheet;
	private boolean isSaved;

	public ExcelWriter() {
		workBook = new XSSFWorkbook();
	}

	public void writeAndClose(File excelFile) {
		if (isSaved) {
			throw new IllegalArgumentException("Workbook already saved!");
		}
		try {
			workBook.write(new FileOutputStream(excelFile));
			workBook.close();
			isSaved = true;
		} catch (IOException ioe) {
			// TODO log
		}
	}

	public void switchToSheet(String sheetName) {
		currentSheet = sheetName;
		if (workBook.getSheet(sheetName) == null) {
			workBook.createSheet(currentSheet);
			nextRows.put(currentSheet, 0);
		}
	}

	public void writeRow(String... values) {
		XSSFSheet sheet = workBook.getSheet(currentSheet);
		int nextRow = nextRows.get(currentSheet);
		XSSFRow row = sheet.createRow(nextRow);

		for (int i = 0; i < values.length; i++) { 
			XSSFCell cell = row.createCell(i);
			cell.setCellType(CellType.STRING);
			cell.setCellValue(values[i]);
		}

		nextRows.put(currentSheet, nextRow + 1);
	}

	public void setCellColour(int rowNumber, int cellNumber,
			IndexedColors colour) {
		XSSFCellStyle style = workBook.createCellStyle();
		style.setFillForegroundColor(colour.getIndex());
		style.setFillPattern(FillPatternType.SOLID_FOREGROUND);

		int nextRow = nextRows.get(currentSheet);
		if (rowNumber > nextRow) {
			// TODO log or exception?
			rowNumber = nextRow;
		}
		XSSFSheet sheet = workBook.getSheet(currentSheet);
		int lastCell = sheet.getRow(rowNumber - 1).getLastCellNum();
		if (cellNumber > lastCell) {
			// TODO log or exception?
			cellNumber = lastCell;
		}

		sheet.getRow(rowNumber - 1).getCell(cellNumber - 1)
			.setCellStyle(style);
	}
}

SampleExcelApp

package com.automationrhapsody.apachepoi;

import java.io.File;

import org.apache.poi.ss.usermodel.IndexedColors;

public class SampleExcelApp {

	public static void main(String[] args) {
		String sheetName = "SheetName";

		ExcelWriter excelWriter = new ExcelWriter();
		excelWriter.switchToSheet(sheetName);
		excelWriter.writeRow("A1-blue", "B1", "C1");
		excelWriter.writeRow("A2", "B2", "C2");
		excelWriter.setCellColour(1, 1, IndexedColors.BLUE);

		excelWriter.switchToSheet("NewSheetName");
		excelWriter.writeRow("A1", "B1");
		excelWriter.writeRow("A2", "B2-red");
		excelWriter.setCellColour(2, 2, IndexedColors.RED);

		excelWriter.switchToSheet(sheetName);
		excelWriter.writeRow("A3", "B3", "C3");
		excelWriter.writeRow("A4", "B4", "C4");

		File excelFile = new File("testReport.xlsx");
		excelWriter.writeAndClose(excelFile);
	}
}

SampleExcelAppTest

package com.automationrhapsody.apachepoi;

import java.io.File;

import org.apache.poi.ss.usermodel.IndexedColors;
import org.apache.poi.xssf.usermodel.XSSFSheet;
import org.apache.poi.xssf.usermodel.XSSFWorkbook;
import org.junit.BeforeClass;
import org.junit.Test;

import static org.hamcrest.MatcherAssert.assertThat;
import static org.hamcrest.Matchers.is;

public class SampleExcelAppTest {

	private static final File FILE = new File("testReport.xlsx");

	private static XSSFWorkbook workbookUnderTest;

	@BeforeClass
	public static void beforeClass() throws Exception {
		if (FILE.exists()) {
			FILE.delete();
		}

		App.main(null);

		workbookUnderTest = new XSSFWorkbook(FILE);
	}

	@Test
	public void testNumberOfSheets() {
		assertThat(workbookUnderTest.getNumberOfSheets(), is(2));
	}

	@Test
	public void testSheetName() {
		assertThat(workbookUnderTest.getSheetName(0), is("SheetName"));
		assertThat(workbookUnderTest.getSheetName(1), is("NewSheetName"));
	}

	@Test
	public void testFirstSheetContent() {
		XSSFSheet sheet = workbookUnderTest.getSheetAt(0);
		assertThat(sheet.getLastRowNum(), is(3));
		assertThat(sheet.getRow(3).getLastCellNum(), is((short) 3));
		assertThat(sheet.getRow(3).getCell(2).getStringCellValue(), 
				is("C4"));

		assertThat(sheet.getRow(0).getCell(0).getCellStyle()
			.getFillForegroundColor(), is(IndexedColors.BLUE.getIndex()));
		assertThat(sheet.getRow(1).getCell(1).getCellStyle()
			.getFillForegroundColor(), 
				is(IndexedColors.AUTOMATIC.getIndex()));
	}

	@Test
	public void testSecondSheetContent() {
		XSSFSheet sheet = workbookUnderTest.getSheetAt(1);
		assertThat(sheet.getLastRowNum(), is(1));
		assertThat(sheet.getRow(1).getLastCellNum(), is((short) 2));
		assertThat(sheet.getRow(1).getCell(1).getStringCellValue(), 
				is("B2-red"));

		assertThat(sheet.getRow(1).getCell(1).getCellStyle()
			.getFillForegroundColor(), is(IndexedColors.RED.getIndex()));	
		assertThat(sheet.getRow(0).getCell(0).getCellStyle()
			.getFillForegroundColor(), 
				is(IndexedColors.AUTOMATIC.getIndex()));
	}
}

Conclusion

Apache POI is a very powerful toolkit for managing MS documents especially Excel, which might be needed in your test automation for reporting of data-driven testing.

Related Posts

Read more...

Manage and automatically select needed WebDriver in Java 8 Selenium project

Last Updated on by

Post summary: Example code how to efficiently manage and automatically select needed local WebDriver using Java 8 method reference used as lambda expression.

Code examples in the current post can be found in GitHub selenium-samples-java/design-patterns repository.

Java 8 features

In this example lambda expression and method reference, Java 8 features are used. More in Java 8 features can be found in Java 8 features – Lambda expressions, Interface changes, Stream API, DateTime API post.

Functional interface

Before explaining lambda it is needed to understand the idea of a functional interface as they are leveraged for use with lambda expressions. A functional interface is an interface that has only one abstract method that is to be implemented. A functional interface may or may not have default or static methods (again new Java 8 feature). Although not mandatory, a good practice is to annotate the functional interface with @FunctionalInterface.

Lambda expressions

There is no such term in Java, but you can think of lambda expression as an anonymous method. Lambda expression is a piece of code that provides an inline implementation of a functional interface, eliminating the need for using anonymous classes. Lambda expressions facilitate functional programming and ease development by reducing the amount of code needed.

Method reference

Sometimes when using lambda expression all you do is call a method by name. Method reference provides an easy way to call the method making the code more readable.

Managing WebDriver

The proposed solution of managing WebDriver has enumeration called Browser and class called WebDriverFactory. Another important thing is web drivers should be placed in a folder with name webdrivers and named with a special pattern.

Browser enum

The code is shown below:

package com.automationrhapsody.designpatterns;

import java.util.Arrays;
import java.util.function.Supplier;

import org.openqa.selenium.WebDriver;
import org.openqa.selenium.chrome.ChromeDriver;
import org.openqa.selenium.firefox.FirefoxDriver;
import org.openqa.selenium.ie.InternetExplorerDriver;

public enum Browser {
	FIREFOX("gecko", FirefoxDriver::new),
	CHROME("chrome", ChromeDriver::new),
	IE("ie", InternetExplorerDriver::new);

	private String name;
	private Supplier<WebDriver> driverSupplier;

	Browser(String name, Supplier<WebDriver> driverSupplier) {
		this.name = name;
		this.driverSupplier = driverSupplier;
	}

	public String getName() {
		return name;
	}

	public WebDriver getDriver() {
		return driverSupplier.get();
	}

	public static Browser fromString(String value) {
		for (Browser browser : values()) {
			if (value != null && value.toLowerCase().equals(browser.getName())) {
				return browser;
			}
		}
		System.out.println("Invalid driver name passed as 'browser' property. "
			+ "One of: " + Arrays.toString(values()) + " is expected.");
		return FIREFOX;
	}
}

Enumeration’s constructor has Supplier functional interface as a parameter. When the constructor is called method reference FirefoxDriver::new is called as a lambda expression which purpose is to instantiate new Firefox driver. If only lambda expression is used is would be: () -> new FirefoxDriver(). Notice that method reference is much shorter and easy to read. getDriver() method invokes Supplier’s get() method which is implemented by the lambda expression, so lambda expression is executed hence instantiating new web driver. With this approach Firefox web driver object is created only when getDriver() method is called.

WebDriverFactory

Code is:

package com.automationrhapsody.designpatterns;

import java.io.File;

import org.openqa.selenium.WebDriver;

class WebDriverFactory {

	private static final String WEB_DRIVER_FOLDER = "webdrivers";

		public static WebDriver createWebDriver() {
		Browser browser = Browser.fromString(System.getProperty("browser"));
		String arch = System.getProperty("os.arch").contains("64") ? "64" : "32";
		String os = System.getProperty("os.name").toLowerCase().contains("win") 
				? "win.exe" : "linux";
		String driverFileName = browser.getName() + "driver-" + arch + "-" + os;
		String driverFilePath = driversFolder(new File("").getAbsolutePath());
		System.setProperty("webdriver." + browser.getName() + ".driver", 
				driverFilePath + driverFileName);
		return browser.getDriver();
	}

	private static String driversFolder(String path) {
		File file = new File(path);
		for (String item : file.list()) {
			if (WEB_DRIVER_FOLDER.equals(item)) {
				return file.getAbsolutePath() + "/" + WEB_DRIVER_FOLDER + "/";
			}
		}
		return driversFolder(file.getParent());
	}
}

This code recursively searches for a folder named webdrivers in the project. This is done because when you have a multi-module project running from IDE and from Maven has different root folder and finding web drivers is not possible from both simultaneously. Once the folder is found then proper web driver is selected based on OS and architecture. The code reads browser system property which can be passed from outside hence making the selection of web driver easy to configure. The important part is to have web drivers with special naming convention.

Web drivers naming convention

In order code above to work the web drivers should be placed in webdrivers folder in the project and their names should match the pattern: {DIVER_NAME}-{ARCHITECTURE}-{OS}, e.g. geckodriver-64-win.exe for Windows 64 bit and geckodriver-64-linux for Linux 64 bit.

Conclusion

The proposed solution is a very elegant way to manage your web drivers and select proper one just by passing -Dbrowser={BROWSER} Java system property.

Related Posts

Read more...

Run Dropwizard application in Docker with templated configuration using environment variables

Last Updated on by

Post summary: How to run Dropwizard application inside a Docker container with configuration template file which later gets replaced by environment variables.

In Build a RESTful stub server with Dropwizard post I have described how to build a Dropwizard application and run it. In the current post, I will show how this application can be inserted into Docker container and run with different configurations, based on different environment variables. Code sample here can be found as a buildable and runnable project in GitHub sample-dropwizard-rest-stub repository.

Dropwizard templated config

Dropwizard supports replacing variables from config file with environment variables if such is defined. The first step is to make the config file with a special notation.

version: ${ENV_VARIABLE_VERSION:- 0.0.2}

Dropwizard substitution is based on Apache’s StrSubstitutor library. ${ENV_VARIABLE_VERSION:- 0.0.2} means that Dropwizard will search for environment variable with name ENV_VARIABLE_VERSION and replace its value with given variable. If no variable is configured then it will replace with a default value of 0.0.2. If default is not needed then just ${ENV_VARIABLE_VERSION} can be used.

Next step is to make Dropwizard substitute config file with environment variables on its startup before the file is being read. This is done with following code:

@Override
public void initialize(Bootstrap<RestStubConfig> bootstrap) {
	bootstrap.setConfigurationSourceProvider(new SubstitutingSourceProvider(
			bootstrap.getConfigurationSourceProvider(), 
			new EnvironmentVariableSubstitutor(false)));
}

EnvironmentVariableSubstitutor is used with false in order to suppress throwing of UndefinedEnvironmentVariableException in case environment variable is not defined. There is an approach to pack config.yml file into JAR file and use it from there, then bootstrap.getConfigurationSourceProvider() should be changed with path -> Thread.currentThread().getContextClassLoader().getResourceAsStream(path).

Docker

Docker is a platform for building software inside containers which then can be deployed in different environments. A container is like a virtual machine with the significant difference that it does not build full operating system. In this way host’s resources are optimized, container consumes as much memory as needed by the application. Virtual machine itself consumes memory to run the operating system as well. Containers have resource (CPU, RAM, HDD) isolation so that application sees the container as a separate operating system.

Dockerfile

A Dockerfile is a text document that contains all the commands a user could call on the command line to assemble an image. Using docker build users can create an automated build that executes several command-line instructions in succession. In given example Dockerfile looks like this:

FROM openjdk:8u121-jre-alpine
MAINTAINER Automation Rhapsody https://automationrhapsody.com/

WORKDIR /var/dropwizard-rest-stub

ADD target/sample-dropwizard-rest-stub-1.0-SNAPSHOT.jar /var/dropwizard-rest-stub/dropwizard-rest-stub.jar
ADD config-docker.yml /var/dropwizard-rest-stub/config.yml

EXPOSE 9000 9001

ENTRYPOINT ["java", "-jar", "dropwizard-rest-stub.jar", "server", "config.yml"]

Dockerfile starts with FROM openjdk:8u121-jre-alpine which instructs docker to use this already prepared image as a base image for the container. At https://hub.docker.com/ there are numerous of images maintained by different organizations or individuals that provide different frameworks and tools. They can save you a lot of work allowing you to skip configuration and installation of general things. In given case openjdk:8u121-jre-alpine has OpenJDK JRE 1.8.121 already installed with minimalist Linux libraries. MAINTAINER documents who is the author of this file. WORKDIR sets working directory of the container. Then ADD copies JAR file and config.yml to the container. ENTRYPOINT configures the container to be run as executable. This instruction translates to java -jar dropwizard-rest-stub.jar server config.yml command. More info can be found at Dockerfile reference link.

Build Docker container

Docker container can be built with the following command:

docker build -t dropwizard-rest-stub .

dropwizard-rest-stub is the name of the container, it is later used to run container with this name. Note that dot, in the end, is mandatory.

Run Docker container

docker run -it -p 9000:9000 -p 9001:9001 -e ENV_VARIABLE_VERSION=1.1.1 dropwizard-rest-stub

The name of the container is dropwizard-rest-stub and is put in the end. With -p 9000:9000 port 9000 form guest machine is exposed to host machine, otherwise the container will not be accessible. With -e ENV_VARIABLE_VERSION=1.1.1 environment variable is being set. If not passed it will be substituted with 0.0.2 in config.yml file as described above. In the case of many environment variables, it is more comfortable to put them in a file with content KEY=VALUE. Then use this file with –env-file=<PATH_TO_FILE> instead of specifying each individual variable.

Conclusion

Dropwizard has a very easy mechanism for making configuration dependant on environment variables. This makes Dropwizard applications extremely suitable to be built into Docker containers and run in different environments just by changing environment variables being passed to the container.

Related Posts

Read more...