.NET Core integration testing and mock dependencies

Last Updated on by

Post summary: How to do integration testing on .NET Core application and stub or mock some inconvenient dependencies.

Code below can be found in GitHub SampleDotNetCore2RestStub repository. In Build a REST API with .NET Core 2 and run it on Docker Linux container post I have shown how to create .NET Core application. In the current post, I will show how to do integration testing on the same application. The post is for REST API, but principles here apply for web UI as well, the difference is that the response will be HTML, which is slightly harder to process compared to JSON.

Refactor project structure

Currently, there is only one project created which contains .NET Core application. Since this is going to grow it has to be refactored and structured properly.

  • SampleDotNetCore2RestStub folder which contains the API is moved to src folder.
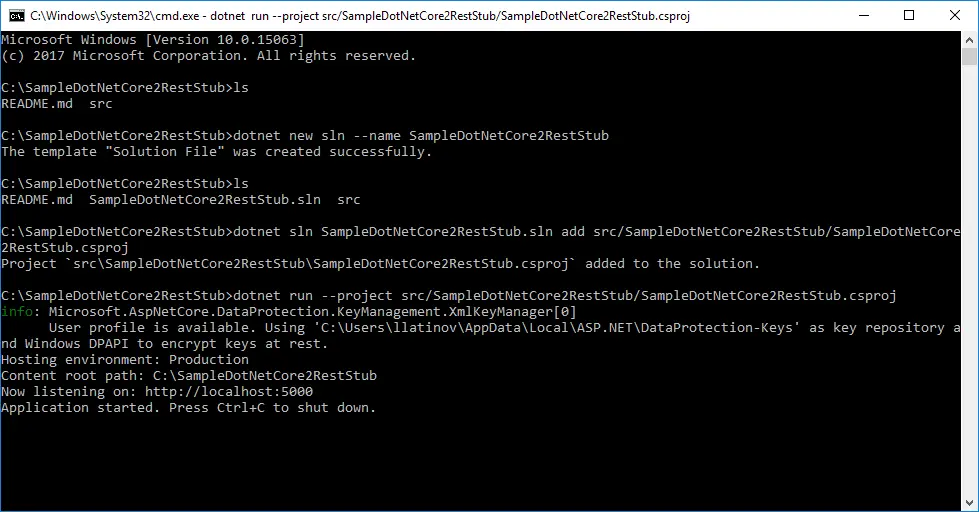
  • Solution file is created with dotnet new sln –name SampleDotNetCore2RestStub. Note that .sln extension is omitted as it is added automatically. Although everything in the example is done with open source tools, it is good to have solution file to keep compatibility with Visual Studio 2017.
  • API project file is added to solution file with:
    dotnet sln SampleDotNetCore2RestStub.sln add src/SampleDotNetCore2RestStub/SampleDotNetCore2RestStub.csproj.
  • In order to test that moving of files did not affected the functionality, API can be run with: dotnet run –project src/SampleDotNetCore2RestStub/SampleDotNetCore2RestStub.csproj.

Add test project

It is time to create integration tests project. We speak for integration tests, but they will be run with unit testing framework MSTest. I do not have some particular favor of it, it comes by default with .NET Core, along with xUnit, and I do not want to change it.

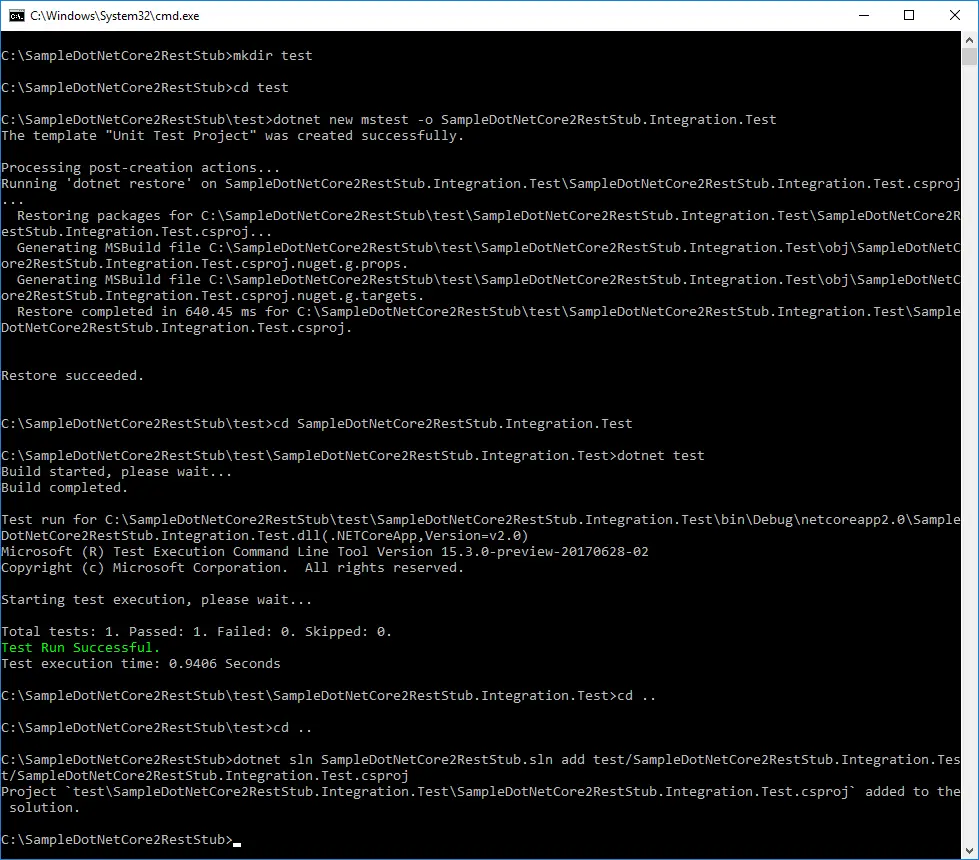
  • Create test folder: mkdir test.
  • Navigate to it: cd test.
  • MSTest project is created with: dotnet new mstest -o SampleDotNetCore2RestStub.Integration.Test.
  • Navigate to test project: cd SampleDotNetCore2RestStub.Integration.Test.
  • Run the unit tests: dotnet test. By default, there is one dummy test that passes.
  • Go to root folder: cd .. and cd ..
  • Add test project to solution file: dotnet sln SampleDotNetCore2RestStub.sln add test/SampleDotNetCore2RestStub.Integration.Test/SampleDotNetCore2RestStub.Integration.Test.csproj.

Open with Visual Studio Code

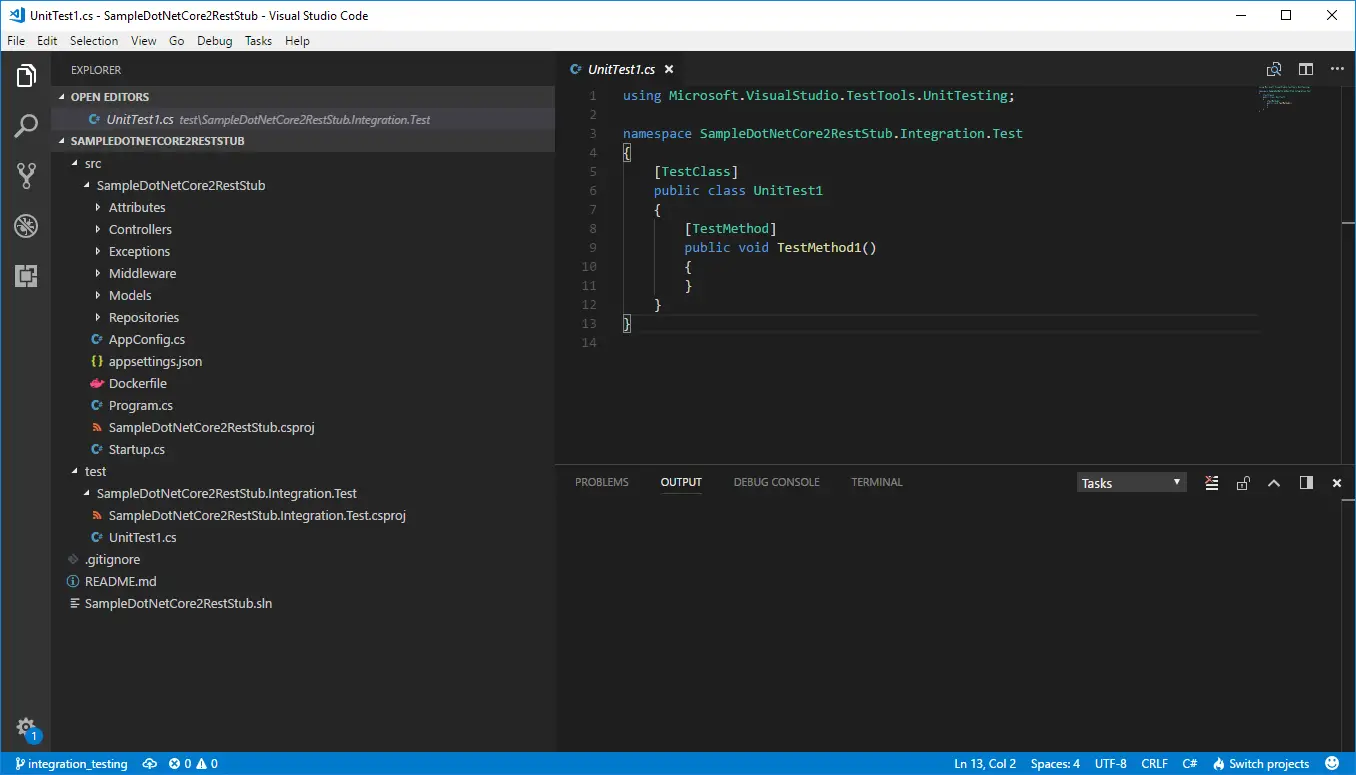
Once refactored and opened in Visual Studio Code project has following structure:

Unit vs Integration testing

I would not like to focus on theory and terminology as this post is not intended to, but I have to do some theoretical setup before proceeding with the code. Generally speaking, term integration testing is used in two cases. One is when different systems are interconnected together and tested, other is when different components of one system are grouped together and tested. In the current post with term integration testing, I will refer the latter. In unit testing, each separate class is tested in isolation. In order to do so all external dependencies, like a database, file system, web requests, and response, etc., are mocked. This makes tests run very fast but has a very high risk of false positives because of mocking. When mocking a dependency there is always an assumption how it works and is being used. The mocked behavior might be significantly different than actual one, then the unit test is compromised. On the other hand, integration testing verifies that different parts of the application work correctly when grouped together. It is much slower than unit testing because more and real resources are being used. Some parts of the application still can be mocked which can increase execution time. In the current post, I will show how to run a full application with only the database being mocked.

The Test Host

One way to run the fully assembled application is by building and deploying it. Then, the application will use real resources to work. Functional testing should also be done during testing but is not part of the current post. A more interesting scenario is to run fully assembled or partially mocked application in memory, without deployment and run tests against it. This approach has benefits, e.g. since the application is run locally its response time is very low, which speeds up tests; some parts, like database connection, can be mocked and thus speed up tests. .NET Core Test Host is a tool that can host web or API .NET Core applications serving requests and responses. It eliminates the need for having a testing environment.

Add dependencies

In order to use test host dependency to its NuGet package should be added. Navigate to test/SampleDotNetCore2RestStub.Integration.Test and add a dependency:

dotnet add package Microsoft.AspNetCore.TestHost

SampleDotNetCore2RestStub.Integration.Test project should depend on SampleDotNetCore2RestStub in order to use its code. This is done with:

dotnet add reference ../../src/SampleDotNetCore2RestStub/SampleDotNetCore2RestStub.csproj

Create the first test

Existing UnitTest1 class will be changed to start application inside test host and make a request.

using System.Net.Http;
using System.Threading.Tasks;
using Microsoft.AspNetCore.Hosting;
using Microsoft.AspNetCore.TestHost;
using Microsoft.VisualStudio.TestTools.UnitTesting;
using Newtonsoft.Json;
using SampleDotNetCore2RestStub.Models;

namespace SampleDotNetCore2RestStub.Integration.Test
{
	[TestClass]
	public class PersonsTest
	{
		private TestServer _server;
		private HttpClient _client;

		[TestInitialize]
		public void TestInitialize()
		{
			_server = new TestServer(new WebHostBuilder()
				.UseStartup<Startup>());
			_client = _server.CreateClient();
		}

		[TestMethod]
		public async Task GetPerson()
		{
			var response = await _client.GetAsync("/person/get/1");
			response.EnsureSuccessStatusCode();

			var result = await response.Content.ReadAsStringAsync();
			var person = JsonConvert.DeserializeObject<Person>(result);

			Assert.AreEqual("LN1", person.LastName);
		}
	}
}

TestServer uses an instance of IWebHostBuilder. Startup from UseStartup<Startup> is same class that is used to run the application, but here it is run inside TestServer instance. CreateClient() method returns instance of standard HttpClient, with which request to /person/get/1 endpoint is made. EnsureSuccessStatusCode() throws exception if response code is not inside 200-299 range. The response is then taken as a string and deserialized to Person object with Newtonsoft.Json, which is now part of .NET Core.

Test can be run from test\SampleDotNetCore2RestStub.Integration.Test folder with the command: dotnet test. If you type dotnet test from root folder it will search for tests inside all projects.

Debug tests in Visual Studio Code

Before proceeding any further with the code it should be possible to debug unit tests inside VS Code. It is not as easy as with VS 2017, but still manageable. First, you need to run your test from the command prompt in debug mode:

set VSTEST_HOST_DEBUG=1
dotnet test

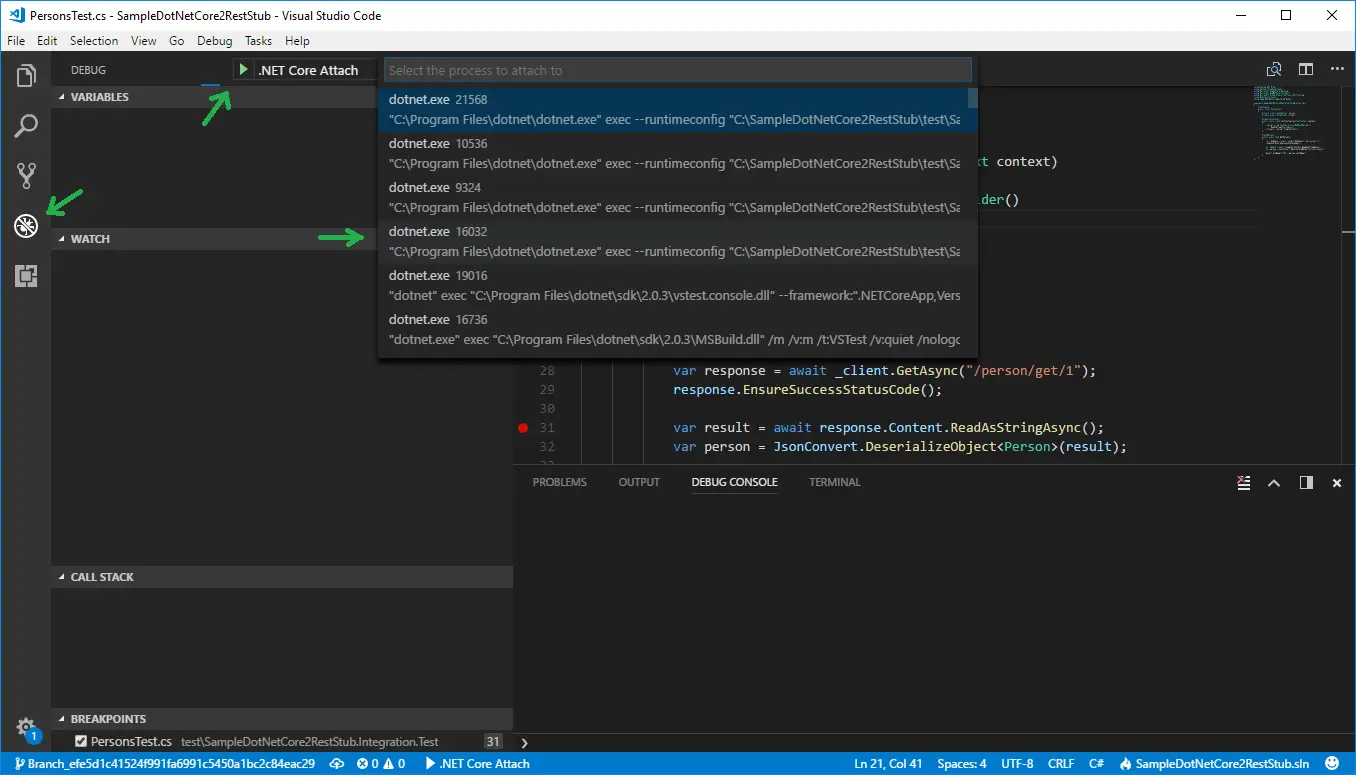
Once this is done there is a message with specific process ID:

Starting test execution, please wait...
Host debugging is enabled. Please attach debugger to testhost process to continue.
Process Id: 16032, Name: dotnet

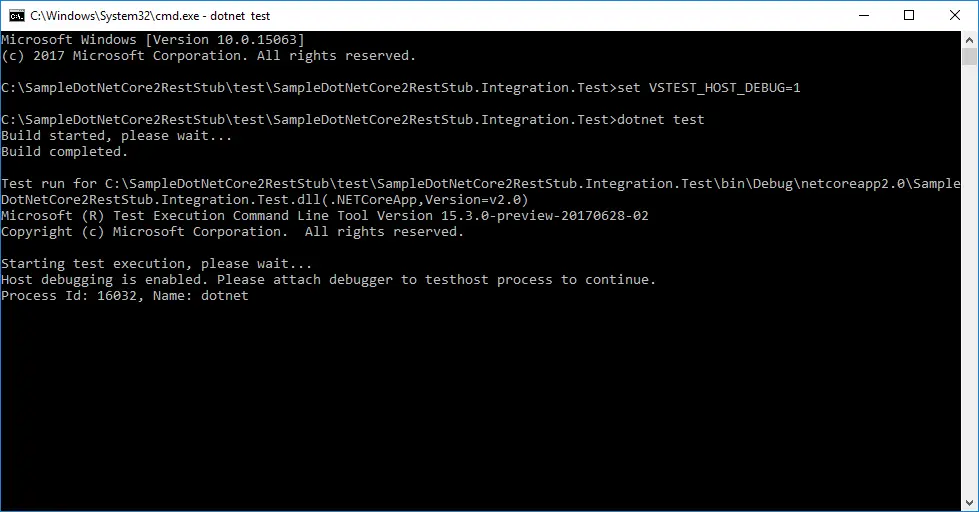
Now from Visual Studio Code, you have to attach to given process, 16032 in the current example. This is done from Debug View, then select .Net Core Attach launch configuration. If such is not existing, add it. Running this configuration shows a list of all processes with name dotnet. Select the proper one, 16032 in the current example.

Create PersonServiceClient and BaseTest

Tests should be easy to write, read and maintain, thus PersonServiceClient class is created. It exposes methods that hit the endpoints and return the result. Since testing is not only happy path, it should be possible to have some negative scenarios. You may want to hit the API with invalid data and verify it returns BadRequest (400) HTTP response code, or Unauthorized (401) HTTP response code, etc. In order to fulfill this test requirement, a separate class ApiResponse<T> is created. It stores response code along with response content as a string. In case that response string can be deserialized to an object of given generic type T it is also stored in ApiResponse object.

Client is instantiated as a protected variable in BaseTest constructor. PersonsTest extends BaseTest and has access to PersonServiceClient.

ApiResponse

using System.Net;

namespace SampleDotNetCore2RestStub.Integration.Test.Client
{
	public class ApiResponse<T>
	{
		public HttpStatusCode StatusCode { get; set; }
		public T Result { get; set; }
		public string ResultAsString { get; set; }
	}
}

PersonServiceClient

using System;
using System.Collections.Generic;
using System.Net.Http;
using System.Threading.Tasks;
using Newtonsoft.Json;
using SampleDotNetCore2RestStub.Models;

namespace SampleDotNetCore2RestStub.Integration.Test.Client
{
	public class PersonServiceClient
	{
		private readonly HttpClient _httpClient;

		public PersonServiceClient(HttpClient httpClient)
		{
			_httpClient = httpClient;
		}

		public async Task<ApiResponse<Person>> GetPerson(string id)
		{
			var person = await GetAsync<Person>($"/person/get/{id}");
			return person;
		}

		public async Task<ApiResponse<List<Person>>> GetPersons()
		{
			var persons = await GetAsync<List<Person>>("/person/all");
			return persons;
		}

		public async Task<ApiResponse<string>> Version()
		{
			var version = await GetAsync<string>("api/version");
			return version;
		}

		private async Task<ApiResponse<T>> GetAsync<T>(string path)
		{
			var response = await _httpClient.GetAsync(path);
			var value = await response.Content.ReadAsStringAsync();
			var result = new ApiResponse<T>
			{
				StatusCode = response.StatusCode,
				ResultAsString = value
			};

			try
			{
				result.Result = JsonConvert.DeserializeObject<T>(value);
			}
			catch (Exception)
			{
				// Nothing to do
			}

			return result;
		}
	}
}

BaseTest

using System.Net.Http;
using Microsoft.AspNetCore.Hosting;
using Microsoft.AspNetCore.TestHost;
using Microsoft.VisualStudio.TestTools.UnitTesting;
using SampleDotNetCore2RestStub.Integration.Test.Client;

namespace SampleDotNetCore2RestStub.Integration.Test
{
	public abstract class BaseTest
	{
		protected PersonServiceClient PersonServiceClient;

		public BaseTest()
		{
			var server = new TestServer(new WebHostBuilder()
				.UseStartup<Startup>());
			var httpClient = server.CreateClient();
			PersonServiceClient = new PersonServiceClient(httpClient);
		}
	}
}

PersonsTest

using System.Net;
using System.Net.Http;
using System.Threading.Tasks;
using Microsoft.AspNetCore.Hosting;
using Microsoft.AspNetCore.TestHost;
using Microsoft.VisualStudio.TestTools.UnitTesting;
using Newtonsoft.Json;
using SampleDotNetCore2RestStub.Models;

namespace SampleDotNetCore2RestStub.Integration.Test
{
	[TestClass]
	public class PersonsTest : BaseTest
	{
		[TestMethod]
		public async Task GetPerson()
		{
			var response = await PersonServiceClient.GetPerson("1");

			Assert.AreEqual(HttpStatusCode.OK, response.StatusCode);
			Assert.AreEqual("LN1", response.Result.LastName);
		}

		[TestMethod]
		public async Task GetPersons()
		{
			var response = await PersonServiceClient.GetPersons();

			Assert.AreEqual(HttpStatusCode.OK, response.StatusCode);
			Assert.AreEqual(4, response.Result.Count);
			Assert.AreEqual("LN1", response.Result[0].LastName);
		}
    }
}

Stub the database

So far there is integration test that starts the application with its actual external dependencies and makes requests against it. Current API service does not connect to a real database, because this will make running the API harder. Instead, there is a fake PersonRepository which stores data in memory. In reality, the repository will connect to a database with a given connection string in appsettings.json, and will perform CRUD operations on it. Database operations might slow down the application response time, or test might not have full control over data in the database, which makes testing harder. In order to solve those two issues database can be stubbed to serve test data. Actually, anything that is not convenient can be stubbed with the examples given below.

In order to make stubbing possible and to keep application structure intact Startup has to be changed. Registering PersonRepository to .NET Core IoC container is extracted to separate virtual method that can be overridden later. All dependencies that are to be stubbed or mocked can be extracted to such methods. Then StartupStub overrides this method and registers stubbed repository PersonRepositoryStub. In it all database operations are substituted with an in-memory equivalence, hence skipping database calls. It might not be a full and accurate substitution, as long as it serves your testing purpose. After all this PersonRepositoryStub will be used only for testing. BaseTest should be changed to start the application with StartupStub instead of Statup. Finally, PersonsTest should be changed to assert on new data that is configured in PersonRepositoryStub.

Startup

public void ConfigureServices(IServiceCollection services)
{
	services.AddMvc();
	services.Configure<AppConfig>(Configuration);
	services.AddScoped<AuthenticationFilterAttribute>();

	ConfigureRepositories(services);
}

public virtual void ConfigureRepositories(IServiceCollection services)
{
	services.AddSingleton<IPersonRepository, PersonRepository>();
}

StartupStub

using Microsoft.Extensions.DependencyInjection;
using SampleDotNetCore2RestStub.Repositories;

namespace SampleDotNetCore2RestStub.Integration.Test.Mocks
{
	public class StartupStub : Startup
	{
		public override void ConfigureRepositories(IServiceCollection services)
		{
			services.AddSingleton<IPersonRepository, PersonRepositoryStub>();
		}
	}
}

PersonRepositoryStub

using System.Collections.Generic;
using System.Linq;
using SampleDotNetCore2RestStub.Models;
using SampleDotNetCore2RestStub.Repositories;

namespace SampleDotNetCore2RestStub.Integration.Test.Mocks
{
	public class PersonRepositoryStub : IPersonRepository
	{
		private Dictionary<int, Person> _persons 
					= new Dictionary<int, Person>();

		public PersonRepositoryStub()
		{
			_persons.Add(1, new Person
			{
				Id = 1,
				FirstName = "Stubed FN1",
				LastName = "Stubed LN1",
				Email = "stubed.email1@email.na"
			});
		}

		public Person GetById(int id)
		{
			return _persons[id];
		}

		public List<Person> GetAll()
		{
			return _persons.Values.ToList();
		}

		public int GetCount()
		{
			return _persons.Count();
		}

		public void Remove()
		{
			if (_persons.Keys.Any())
			{
				_persons.Remove(_persons.Keys.Last());
			}
		}

		public string Save(Person person)
		{
			if (_persons.ContainsKey(person.Id))
			{
				_persons[person.Id] = person;
				return "Updated Person with id=" + person.Id;
			}
			else
			{
				_persons.Add(person.Id, person);
				return "Added Person with id=" + person.Id;
			}
		}
	}
}

BaseTest

using System.Net.Http;
using Microsoft.AspNetCore.Hosting;
using Microsoft.AspNetCore.TestHost;
using Microsoft.VisualStudio.TestTools.UnitTesting;
using SampleDotNetCore2RestStub.Integration.Test.Client;
using SampleDotNetCore2RestStub.Integration.Test.Mocks;

namespace SampleDotNetCore2RestStub.Integration.Test
{
	public abstract class BaseTest
	{
		protected PersonServiceClient PersonServiceClient;

		public BaseTest()
		{
			var server = new TestServer(new WebHostBuilder()
				.UseStartup<StartupStub>());
			var httpClient = server.CreateClient();
			PersonServiceClient = new PersonServiceClient(httpClient);
		}
	}
}

PersonsTest

using System.Net;
using System.Net.Http;
using System.Threading.Tasks;
using Microsoft.AspNetCore.Hosting;
using Microsoft.AspNetCore.TestHost;
using Microsoft.VisualStudio.TestTools.UnitTesting;
using Newtonsoft.Json;
using SampleDotNetCore2RestStub.Models;

namespace SampleDotNetCore2RestStub.Integration.Test
{
	[TestClass]
	public class PersonsTest : BaseTest
	{
		[TestMethod]
		public async Task GetPerson()
		{
			var response = await PersonServiceClient.GetPerson("1");

			Assert.AreEqual(HttpStatusCode.OK, response.StatusCode);
			Assert.AreEqual("Stubed LN1", response.Result.LastName);
		}

		[TestMethod]
		public async Task GetPersons()
		{
			var response = await PersonServiceClient.GetPersons();

			Assert.AreEqual(HttpStatusCode.OK, response.StatusCode);
			Assert.AreEqual(1, response.Result.Count);
			Assert.AreEqual("Stubed LN1", response.Result[0].LastName);
		}
	}
}

Mock the database

Stubbing is an option, but mocking is much better as you have direct control over the mock itself. The most famous .NET mocking framework is Moq. It is added to the project with the command:

dotnet add package Moq

StartupMock extends Starup and overrides its ConfigureRepositories. It registers an instance of IPersonRepository which is injected by its constructor. BaseTest is changed to use StartupMock in UseStartup method. Repository mock is instantiated with PersonRepositoryMock = new Mock<IPersonRepository>(). It is injected into StartupMock constructor with ConfigureServices(services => services.AddSingleton(PersonRepositoryMock.Object)). This is how mock instance is registered into IoC container of .NET Core application that is being tested. Once the mock instance is registered it can be controlled. In BaseTest it is reset to defaults after each test with BaseTearDown method. It is run after each test because of [TestCleanup] MSTest attribute. Inside, the PersonRepositoryMock.Reset() resets mock state.

Test specific setup can be done for each test. For e.g. GetPerson_ReturnsCorrectResult has following setup: PersonRepositoryMock.Setup(x => x.GetById(It.IsAny<int>())).Returns(_person); That means when mock’s GetById method is called with whatever int value the _person object is returned. Another example is GetPerson_ThrowsException test. When mock’s GetById is called then InvalidOperationException is thrown. In this way, you can test exception handling, which in current demo application is missing. The exception is not that easy to reproduce if you are using repository stubbing.

StartupMock

using Microsoft.Extensions.DependencyInjection;
using SampleDotNetCore2RestStub.Repositories;

namespace SampleDotNetCore2RestStub.Integration.Test.Mocks
{
	public class StartupMock : Startup
	{
		private IPersonRepository _personRepository;
		
		public StartupMock(IPersonRepository personRepository)
		{
			_personRepository = personRepository;
		}

		public override void ConfigureRepositories(IServiceCollection services)
		{
			services.AddSingleton(_personRepository);
		}
	}
}

BaseTest

using System.Net.Http;
using Microsoft.AspNetCore.Hosting;
using Microsoft.AspNetCore.TestHost;
using Microsoft.VisualStudio.TestTools.UnitTesting;
using Microsoft.Extensions.DependencyInjection;
using Moq;
using SampleDotNetCore2RestStub.Integration.Test.Client;
using SampleDotNetCore2RestStub.Integration.Test.Mocks;
using SampleDotNetCore2RestStub.Repositories;

namespace SampleDotNetCore2RestStub.Integration.Test
{
	public abstract class BaseTest
	{
		protected PersonServiceClient PersonServiceClient;
		protected Mock<IPersonRepository> PersonRepositoryMock;

		public BaseTest()
		{
			PersonRepositoryMock = new Mock<IPersonRepository>();

			var server = new TestServer(new WebHostBuilder()
				.UseStartup<StartupMock>()
				.ConfigureServices(services =>
				{
					services.AddSingleton(PersonRepositoryMock.Object);
				}));

			var httpClient = server.CreateClient();
			PersonServiceClient = new PersonServiceClient(httpClient);
		}

		[TestCleanup]
		public void BaseTearDown()
		{
			PersonRepositoryMock.Reset();
		}
	}
}

PersonsTest

using System;
using System.Collections.Generic;
using System.Net;
using System.Net.Http;
using System.Threading.Tasks;
using Microsoft.AspNetCore.Hosting;
using Microsoft.AspNetCore.TestHost;
using Microsoft.VisualStudio.TestTools.UnitTesting;
using Moq;
using Newtonsoft.Json;
using SampleDotNetCore2RestStub.Models;

namespace SampleDotNetCore2RestStub.Integration.Test
{
	[TestClass]
	public class PersonsTest : BaseTest
	{
		private readonly Person _person = new Person
		{
			Id = 1,
			FirstName = "Mocked FN1",
			LastName = "Mocked LN1",
			Email = "mocked.email1@email.na"
		};

		[TestMethod]
		public async Task GetPerson_ReturnsCorrectResult()
		{
			PersonRepositoryMock.Setup(x => x.GetById(It.IsAny<int>()))
				.Returns(_person);

			var response = await PersonServiceClient.GetPerson("1");

			Assert.AreEqual(HttpStatusCode.OK, response.StatusCode);
			Assert.AreEqual("Mocked LN1", response.Result.LastName);
		}

		[TestMethod]
		[ExpectedException(typeof(InvalidOperationException))]
		public async Task GetPerson_ThrowsException()
		{
			PersonRepositoryMock.Setup(x => x.GetById(It.IsAny<int>()))
				.Throws(new InvalidOperationException());

			var result = await PersonServiceClient.GetPerson("1");
		}

		[TestMethod]
		public async Task GetPersons()
		{
			PersonRepositoryMock.Setup(x => x.GetAll())
				.Returns(new List<Person> { _person });

			var response = await PersonServiceClient.GetPersons();

			Assert.AreEqual(HttpStatusCode.OK, response.StatusCode);
			Assert.AreEqual(1, response.Result.Count);
			Assert.AreEqual("Mocked LN1", response.Result[0].LastName);
		}
	}
}

Nicer database mock

As of version 2.1.0 of Microsoft.AspNetCore.TestHost, which is currently in pre-release, there is a method called ConfigureTestServices, which saves us from having separate StartupMock class. You can directly inject your mocks with following code:

var server = new TestServer(new WebHostBuilder()
	.UseStartup<Startup>()
	.ConfigureTestServices(services =>
	{
		services.AddSingleton(PersonRepositoryMock.Object);
	}));

Conclusion

In the current post, I have shown how to do integration testing on .NET Core applications. This is a very convenient approach which eliminates some of the disadvantages of stubbing or mocking all dependencies in unit testing. Because of using all dependencies, integration testing can be much slower. This can be improved by mocking some of them. Integration testing is not a substitute for unit testing, nor for functional testing, but it is a good approach in you testing portfolio that should be considered.

Related Posts

Read more...

Partial JSON deserialize by JsonPath with Json.NET

Last Updated on by

Post summary: Code examples how to deserialize only part of a big JSON file by JsonPath when using Newtonsoft Json.NET.

The code shown in the examples below is available in GitHub DotNetSamples/JsonPathConverter repository.

Use case description

Imagine you have a big JSON which you want to deserialize into a C# object.

{
  "node1": {
    "node1node1": "node1node1value",
    "node1node2": [ "value1", "value2" ],
    "node1node3": {
      "node1node3node1": "node1node3node1value"
    }
  },
  "node2": true,
  "node3": {
    "node3node1": "node3SubNode1Value",
    "node3node2": {
      "node3node2node1": {
        "node3node2node1node1": [ 1, 2, 3 ]
      },
      "node3node2node2": "node3node2node1value"
    }
  },
  "node4": "{\"node4node1\": \"n4n1value\", \"node4node2\": \"n4n1value\"}"
}

The file above is actually pretty small and used for demo purposes. In practice, you can stumble upon terrifyingly big JSON files. NewtonSoft.Json or Json.NET is defacto the JSON standard for .NET, so it is being used to parse the JSON file. In order to deserialize this JSON to a C# object, you need a model class that represents the JSON nodes. Although immense effort you can create such, why bother if you are going to use just a fraction of all JSON data. This is where JsonPath comes into play. Json.NET allows you to query JSON by JsonPath, so one option is to manually query the JSON, find data you need and assign it to your C# object. This is not an elegant solution. Since query by JsonPath is possible this can be used in a JsonConverter that will automatically do the job. What is needed is a custom JsonPathConverter and a model class that will be deserialized to, both are described below.

JSON model class

It is easier to describe the JSON model first. Below is a code for JSON model class that will collect only data we need.

using System.Collections.Generic;
using Newtonsoft.Json;

namespace JsonPathConverter
{
	[JsonConverter(typeof(JsonPathConverter))]
	public class JsonModel
	{
		[JsonProperty("node1.node1node2")]
		public IList<string> Node1Array { get; set; }

		[JsonProperty("node2")]
		public bool Node2 { get; set; }

		[JsonProperty("node3.node3node2.node3node2node1.node3node2node1node1")]
		public IList<int> Node3Array { get; set; }

		[JsonConverter(typeof(JsonPathConverter))]
		[JsonProperty("node4")]
		public NestedJsonModel Node4 { get; set; }
	}

	public class NestedJsonModel
	{
		[JsonProperty("node4node2")]
		public string NestedNode2 { get; set; }
	}
}

JSON model class is annotated with [JsonConverter(typeof(JsonPathConverter))] which tells Json.NET to use JsonPathConverter class to do the conversion. JsonPathConverter is implemented in such a way that JsonProperty is a mandatory for each property in order to be parsed: [JsonProperty(“node1.node1node2”)].

JSON as a string

You may have noticed already the weird case where node4 in JSON file has actually a string value which is escaped JSON string. This is something unusual and may not be pretty good programming practice, but I’ve encountered it in a production code, so examples given here cover this weirdo as well. There is a special NestedJsonModel class which this JSON string is being deserialized to.

JsonPathConverter

Code below implements JsonConverter abstract class and implements needed methods.

public class JsonPathConverter : JsonConverter
{
	public override bool CanWrite => false;

	public override object ReadJson(JsonReader reader, Type objectType, object existingValue, JsonSerializer serializer)
	{
		var jObject = JObject.Load(reader);
		var targetObj = Activator.CreateInstance(objectType);

		foreach (var prop in objectType.GetProperties().Where(p => p.CanRead && p.CanWrite))
		{
			var jsonPropertyAttr = prop.GetCustomAttributes(true).OfType<JsonPropertyAttribute>().FirstOrDefault();
			if (jsonPropertyAttr == null)
			{
				throw new JsonReaderException($"{nameof(JsonPropertyAttribute)} is mandatory when using {nameof(JsonPathConverter)}");
			}

			var jsonPath = jsonPropertyAttr.PropertyName;
			var token = jObject.SelectToken(jsonPath);

			if (token != null && token.Type != JTokenType.Null)
			{
				var jsonConverterAttr = prop.GetCustomAttributes(true).OfType<JsonConverterAttribute>().FirstOrDefault();
				object value;
				if (jsonConverterAttr == null)
				{
					serializer.Converters.Clear();
					value = token.ToObject(prop.PropertyType, serializer);
				}
				else
				{
					value = JsonConvert.DeserializeObject(token.ToString(), prop.PropertyType,
						(JsonConverter)Activator.CreateInstance(jsonConverterAttr.ConverterType));
				}
				prop.SetValue(targetObj, value, null);
			}
		}

		return targetObj;
	}

	public override bool CanConvert(Type objectType)
	{
		return true;
	}

	public override void WriteJson(JsonWriter writer, object value, JsonSerializer serializer)
	{
		throw new NotImplementedException();
	}
}

Deserialization work is done in public override object ReadJson(JsonReader reader, Type objectType, object existingValue, JsonSerializer serializer) method. JSON is loaded to a NewtonSoft JObject and instance of result object is created. All properties of this result object are iterated in a foreach loop. It is important to note that properties should have both get and set in order to be considered in deserialization: objectType.GetProperties().Where(p => p.CanRead && p.CanWrite). If you have properties with just get or just set they will be ignored. JsonPropertyAttribute for each property is taken. If there is no such then an exception is thrown. This part can be changed. JsonPath can be considered to be the property name: var jsonPath = jsonPropertyAttr == null ? prop.Name : jsonPropertyAttr.PropertyName. This is tricky though as C# is case sensitive and it might not work as property could start with capital letter, but JSON itself to be with lower case. Once there is JsonPath defined JObject is queried with jObject.SelectToken(jsonPath). This should return a valid token. In case of a valid token result, object property is checked for JsonConverterAttribute. If such exists then JSON is deserialized with this newly found JsonConverter instance. If there is no converter attached to this property then all existing converters are cleared and the token is converted into an object. Clearing part is important as in case of recursive call it will throw an exception.

Usage

Once job above is done usage is pretty easy:

var fileContent = File.ReadAllText("jsonFile.json");
var result = JsonConvert.DeserializeObject<JsonModel>(fileContent);

result.Node1Array.Should().BeEquivalentTo(new List<string> {"value1", "value2"});
result.Node2.Should().Be(true);
result.Node3Array.Should().BeEquivalentTo(new List<int> { 1, 2, 3 });
result.Node4.NestedNode2.Should().Be("n4n1value");

Conclusion

In this post, I have shown how to partially deserialize JSON by JsonPath picking only data that you need.

Read more...

Soft assertions for C# unit testing frameworks (MSTest, NUnit, xUnit.net)

Last Updated on by

Post summary: Code example of very easy and useful custom implementation of soft assertions in C# unit testing frameworks such as MSTest, NUnit or xUnit.net.

The code shown in examples below is available in GitHub DotNetSamples/SoftAssertions repository.

Unit vs Functional testing

Unit testing paradigm states that each test exercises particular code behavior. So in a perfect world, one unit test would have one assertion which defines unit test result – either passed or failed. This is why unit testing frameworks provide only asserts which stop further execution of current test method. In functional testing usually, one test verifies several conditions. Not debating if this is good or bad. Assume you are doing GUI testing, once you have opened particular page you’d better do as much verification as possible to reduce the risk of bugs. Having this page opened over and over for every single check is not the most efficient way of testing. This is why when you run functional tests you need some kind of assert that indicates whether passed or failed but to let the test continue in no critical issue is present. Those are generally called “soft” asserts.

Soft assertions code

Following code is an implementation of soft assertions:

using System.Collections.Generic;
using System.Linq;
using FluentAssertions;

public class SoftAssertions
{
	private readonly List<SingleAssert> 
		_verifications = new List<SingleAssert>();

	public void Add(string message, string expected, string actual)
	{
		_verifications.Add(new SingleAssert(message, expected, actual));
	}

	public void Add(string message, bool expected, bool actual)
	{
		Add(message, expected.ToString(), actual.ToString());
	}

	public void Add(string message, int expected, int actual)
	{
		Add(message, expected.ToString(), actual.ToString());
	}

	public void AddTrue(string message, bool actual)
	{
		_verifications
			.Add(new SingleAssert(message, true.ToString(), actual.ToString()));
	}

	public void AssertAll()
	{
		var failed = _verifications.Where(v => v.Failed).ToList();
		failed.Should().BeEmpty();
	}

	private class SingleAssert
	{
		private readonly string _message;
		private readonly string _expected;
		private readonly string _actual;

		public bool Failed { get; }

		public SingleAssert(string message, string expected, string actual)
		{
			_message = message;
			_expected = expected;
			_actual = actual;

			Failed = _expected != _actual;
			if (Failed)
			{
				// TODO Act in case of failure, e.g. take screenshot
				var screenshot = "MethodToSaveScreenshotAndReturnFilename";
				_message += $". Screenshot captured at: {screenshot}";
			}
		}

		public override string ToString()
		{
			return $"'{_message}' assert was expected to be " +
					$"'{_expected}' but was '{_actual}'";
		}
	}
}

Soft assertions details

The actual assertion is handled by SingleAssert class. It contains a message to be displayed to the user in case of failing test as well as expected and actual values. It is possible to extend the SingleAssert class so in case of failure you can do some specific actions, such as taking a screenshot. They are stored as strings. All asserts during testing are stored in a List<SingleAssert>. There are several methods that add assert. There are such that accept bool, string, and int. You can extend and add as many as you want. It is mandatory to call AssertAll() method so asserts can be evaluated. The evaluation consists of filtering out passed asserts leaving only failed: var failed = _verifications.Where(v => v.Failed).ToList(). Then list with failed is checked for empty failed.Should().BeEmpty(). In this case, FluentAssertions framework is used, but the code can be changed to such that suits your particular needs.

Soft assertions usage

Usage is pretty straightforward. SoftAssertions object should be created before each test and asserted after each test:


[TestClass]
public class UnitTest
{
	private SoftAssertions _softAssertions;

	[TestInitialize]
	public void SetUp()
	{
		_softAssertions = new SoftAssertions();
	}

	[TestCleanup]
	public void TearDown()
	{
		_softAssertions.AssertAll();
	}

	[TestMethod]
	public void TestMixedSoftAssertions()
	{
		_softAssertions.Add("Passing bool Add assertion", true, true);
		_softAssertions.Add("Failing bool Add assertion", true, false);
		_softAssertions
			.Add("Passing string Add assertion", "SameString", "SameString");
		_softAssertions
			.Add("Failing string Add assertion", "SameString", "OtherString");
		_softAssertions.Add("Passing int Add assertion", 1, 1);
		_softAssertions.Add("Failing int Add assertion", 1, 2);
		_softAssertions.AddTrue("Passing AddTrue assertion", true);
		_softAssertions.AddTrue("Failing AddTrue assertion", false);
	}
}

Soft assertions result

Result of test shown above is: Result Message: Expected collection to be empty, but found {‘Failing bool Add assertion’ assert was expected to be ‘True’ but was ‘False’, ‘Failing string Add assertion’ assert was expected to be ‘SameString’ but was ‘DifferentString’, ‘Failing int Add assertion’ assert was expected to be ‘1’ but was ‘2’, ‘Failing AddTrue assertion’ assert was expected to be ‘True’ but was ‘False’}.

This comes out of the box because FluentAssertions is used. Otherwise, you have to do some other output and assertions.

Other soft assertions

Some custom implementation of soft assertions is as well available in NTestRunner framework, but it is more complex and demanding special approach for writing tests.

Conclusion

Soft assertions are very useful in functional testing. With this simple class, you can directly have them in your functional tests.

Related Posts

Read more...

Build a Dropwizard project with Gradle

Last Updated on by

Post summary: Code examples how to create Dropwizard project with Gradle.

Code sample here can be found as a buildable and runnable project in GitHub sample-dropwizard-rest-stub repository in separate git branch called gradle.

Project structure

All classes have been thoroughly described in Build a RESTful stub server with Dropwizard post. In this post, I will describe how to make project build-able with Gradle. In order to make it more understandable, I will compare with Maven’s pom.xml file elements by XPath.

Gradle

Gradle is an open source build automation system that builds upon the concepts of Apache Ant and Apache Maven and introduces a Groovy-based domain-specific language (DSL) instead of the XML form used by Apache Maven for declaring the project configuration. Gradle is much more powerful and more complex than Maven. There is a significant tendency for Java projects moving towards Gradle so I’ve decided to make this post.

Gradle artefacts

In order to make your project work with Gradle, you need several files. The list below is how files are placed in project’s root folder:

  • gradle/wrapper/gradle-wrapper.jar – Gradle Wrapper allows you to make builds without installing Gradle on your machine. This is very convenient and makes Gradle usage easy. This JAR is managing the Gradle Wrapper automatic download and installation on the first build.
  • gradle\wrapper\gradle-wrapper.properties – a configuration which Gradle Wrapper version to be downloaded and installed on the first build.
  • build.gradle – the most import file. This is where you configure your project.
  • gradlew – this Gradle Wrapper executable for Linux.
  • gradlew.bat – this is Gradle Wrapper executable for Windows.
  • settings.gradle – Project settings. Mainly used in case of multi-module projects.

setting.gradle file

This file is mainly used in case of a multi-module project. In it, we currently define project name: rootProject.name = ‘sample-dropwizard-rest-stub’. This is the same value as in /project/name form pom.xml file.

Constructing build.gradle file

This is the main file where you configure your project. You need to define version (/project/version in pom.xml), group (/project/groupId in pom.xml) and optionally description. Since this is Java project you need to apply plugin: ‘java’. Also, you need need to specify Java version, 1.8 in this case by sourceCompatibility and targetCompatibility values. Next is to set repositories. You can use mavenCentral or add a custom one by the following code, which is not shown in the example below: maven { url ‘https://plugins.gradle.org/m2/’ }. You need to define dependencies (/project/dependencies/dependency in pom.xml file) to tell Gradle what libraries this project needs. In the current example, it is a compile dependency to io.dropwizard:dropwizard-core:0.8.0 and testCompile dependency to junit:junit:4.12. This is enough to have fully functional Dropwizard project with code examples given in Build a RESTful stub server with Dropwizard post.

version '1.0-SNAPSHOT'
group 'com.automationrhapsody.reststub'
description 'Sample Dropwizard REST Stub'

apply plugin: 'java'

sourceCompatibility = 1.8
targetCompatibility = 1.8

repositories {
	mavenCentral()
}

dependencies {
	compile 'io.dropwizard:dropwizard-core:0.8.0'

	testCompile 'junit:junit:4.12'
}

The beauty of Dropwizard is the ability to pack everything into a single JAR file and then run that file. In Maven this was done by maven-shade-plugin in Gradle the best way to do it is Shadow JAR plugin. You need to define it via plugins closure. Now lets configure shadowJar. You can specify archiveName or exclude some artefacts from packed JAR. Optionally you can enhance you MANIFEST.MF file by adding more details to manifest closure. Nice thing for Gradle is that you can use Groovy as well as pure Java code. Constructing Build-Time requires import some Java DateTime classes and using them to make human readable time. Next piece that you need to add to your build.gradle file is:

import java.time.ZoneId
import java.time.ZonedDateTime
import java.time.format.DateTimeFormatter

plugins {
	id 'com.github.johnrengelman.shadow' version '1.2.4'
}

mainClassName = 'com.automationrhapsody.reststub.RestStubApp'

shadowJar {
	mergeServiceFiles()
	exclude 'META-INF/*.DSA', 'META-INF/*.RSA', 'META-INF/*.SF'
	manifest {
		attributes 'Implementation-Title': rootProject.name
		attributes 'Implementation-Version': rootProject.version
		attributes 'Implementation-Vendor-Id': rootProject.group
		attributes 'Build-Time': ZonedDateTime.now(ZoneId.of("UTC"))
				.format(DateTimeFormatter.ISO_ZONED_DATE_TIME)
		attributes 'Built-By': InetAddress.localHost.hostName
		attributes 'Created-By': 'Gradle ' + gradle.gradleVersion
		attributes 'Main-Class': mainClassName
	}
	archiveName 'sample-dropwizard-rest-stub.jar'
}

Once you build your JAR file with command: gradlew shadowJar you can run it with java -jar build/sample-dropwizard-rest-stub.jar server config.yml command. Gradle has another option to run your project for testing purposes. It is done by first apply plugin: ‘application’. You need to specify which is mainClassName to be run and configure run args. In order to run your project from Gradle with gradlew run command you just add:

apply plugin: 'application'

mainClassName = 'com.automationrhapsody.reststub.RestStubApp'

run {
	args = ['server', 'config.yml']
}

build.gradle file

Full build.gradle file content is shown below:

import java.time.ZoneId
import java.time.ZonedDateTime
import java.time.format.DateTimeFormatter

plugins {
	id 'com.github.johnrengelman.shadow' version '1.2.4'
}

version '1.0-SNAPSHOT'
group 'com.automationrhapsody.reststub'
description 'Sample Dropwizard REST Stub'

apply plugin: 'java'
apply plugin: 'application'

sourceCompatibility = 1.8
targetCompatibility = 1.8

repositories {
	mavenCentral()
}

dependencies {
	compile 'io.dropwizard:dropwizard-core:0.8.0'

	testCompile 'junit:junit:4.12'
}

mainClassName = 'com.automationrhapsody.reststub.RestStubApp'

run {
	args = ['server', 'config.yml']
}

shadowJar {
	mergeServiceFiles()
	exclude 'META-INF/*.DSA', 'META-INF/*.RSA', 'META-INF/*.SF'
	manifest {
		attributes 'Implementation-Title': rootProject.name
		attributes 'Implementation-Version': rootProject.version
		attributes 'Implementation-Vendor-Id': rootProject.group
		attributes 'Build-Time': ZonedDateTime.now(ZoneId.of("UTC"))
				.format(DateTimeFormatter.ISO_ZONED_DATE_TIME)
		attributes 'Built-By': InetAddress.localHost.hostName
		attributes 'Created-By': 'Gradle ' + gradle.gradleVersion
		attributes 'Main-Class': mainClassName
	}
	archiveName 'sample-dropwizard-rest-stub.jar'
}

Conclusion

This post is an extension to Build a RESTful stub server with Dropwizard post, in which I have described how to build REST service with Dropwizard and Maven. In the current post, I have shown how to do the same with Gradle.

Related Posts

Read more...

Soft assertions that do not fail JUnit test

Last Updated on by

Post summary: Code examples how to use assertions that do not fail the unit test immediately.

The code shown in examples below is available in GitHub java-samples/jersey1 repository.

Unit vs Functional testing

Unit testing paradigm states that each test exercises particular code behavior. So in a perfect world, one unit test would have one assertion which defines unit test result – either passed or failed. This is why unit testing frameworks provide only asserts which stop further execution of current test method. In functional testing usually, one test verifies several conditions. Not debating if this is good or bad. Assume you are doing GUI testing, once you have opened particular page you’d better do as much verification as possible to reduce the risk of bugs. Having this page opened over and over for every single check is not the most efficient way of testing. This is why when you run functional tests you need some kind of assert that indicates whether passed or failed but to let the test continue in no critical issue is present. Those are generally called “soft” asserts.

Soft assertions and JUnit

TestNG provides org.testng.asserts.SoftAssert class for soft asserts as it is more oriented towards functional testing. JUnit is a unit testing framework, so it does not provide any soft assertions. In order to create such behavior, additional libraries are needed.

AssertJ

AssertJ is a library providing fluent assertions. It is very similar to Hamcrest which comes by default with JUnit. Along with all the asserts, AssertJ provides soft assertions with its SoftAssertions class inside org.assertj.core.api package.

Usage

Below is a functional test run against Dropwizard stub described in Build a RESTful stub server with Dropwizard post. Important is to instantiate a new SoftAssertions object before the test verifications and to call assertAll() method in the end to collect results. Best way to do this is to use JUnit’s @Before and @After annotated methods.

package com.automationrhapsody.jersey1;

import com.automationrhapsody.jersey1.model.Person;
import com.automationrhapsody.jersey1.rules.PersonServiceJerseyClient;

import java.util.List;

import org.assertj.core.api.SoftAssertions;
import org.junit.After;
import org.junit.Before;
import org.junit.ClassRule;
import org.junit.Test;

import static org.hamcrest.MatcherAssert.assertThat;
import static org.hamcrest.core.Is.is;

public class PersonServiceTest {

	@ClassRule
	public static final PersonServiceJerseyClient CLIENT 
		= new PersonServiceJerseyClient();

	private SoftAssertions softAssertions;

	private Person person;

	@Before
	public void setUp() {
		person = new Person();
		person.setId(123);
		person.setFirstName("First Name");
		person.setLastName("Last Name");
		person.setEmail("Email");

		softAssertions = new SoftAssertions();
	}

	@After
	public void tearDown() {
		softAssertions.assertAll();
	}

	@Test
	public void testAllOperations() {
		String saveResult = CLIENT.save(person);
		assertThat(saveResult, is("Added Person with id=123"));

		Person actual = CLIENT.get(person.getId());
		softAssertions
			.assertThat(actual.getId()).isEqualTo(person.getId());
		softAssertions
			.assertThat(actual.getFirstName()).isEqualTo(person.getFirstName());
		softAssertions
			.assertThat(actual.getLastName()).isEqualTo(person.getLastName());
		softAssertions
			.assertThat(actual.getEmail()).isEqualTo(person.getEmail());

		String result = CLIENT.remove();
		assertThat(result, is("Last person remove. Total count: 4"));
	}
}

Conclusion

Soft assertions are needed in case of functional tests being run with JUnit. Since such is not available out of the box because JUnit is targeted for unit tests soft assertions can be used from external libraries such as AssertJ.

Related Posts

Read more...

Mock/Stub REST API with WireMock for better unit testing

Last Updated on by

Post summary: Examples how to use WireMock to stub (mock also is possible as a term) REST API in order make better unit testing.

The code shown in examples below is available in GitHub java-samples/wiremock repository.

WireMock

WireMock is a simulator for HTTP-based APIs. Some might consider it a service virtualization tool or a mock server. It enables you to stay productive when an API you depend on doesn’t exist or isn’t complete. It supports testing of edge cases and failure modes that the real API won’t reliably produce. And because it’s fast it can reduce your build time from hours down to minutes.

When to use it

One case where WireMock is very helpful is when building a REST API client. Create simple REST API client using Jersey post describes a way to achieve this with Jersey. In most of the cases REST API might not be forced to fail with certain errors, so WireMock is an excellent addition to standard functional tests to verify that client is working correctly in corner cases. Also, it is mandatory for unit testing because it eliminates dependencies to external services. The mock server is extremely fast and under complete control. Another case where WireMock helps is if you need to create API tests, but API is not ready yet or not working. WireMock can be used to stub the service in order to make testing framework and structure. Once the real server is ready tests will just be elaborated and details cleared up.

How to use it

WireMock is used in JUnit as a rule. More info on JUnit rules can be found in Use JUnit rules to debug failed API tests post. There are WireMockClassRule and WireMockRule. The most appropriate is the class rule, there is no need to create a mock server for each and every test, also additional logic is needed for port collision avoidance. In case you use other unit testing framework there is WireMockServer which can be started before tests and stopped afterward. The code given below is used to REST API client from Create simple REST API client using Jersey post. First JUnit class rule is created.

public class JerseyPersonRestClientTest {

	private static final int WIREMOCK_PORT = 9999;

	@ClassRule
	public static final WireMockClassRule WIREMOCK_RULE
		= new WireMockClassRule(WIREMOCK_PORT);

	private JerseyPersonRestClient clientUnderTest;

	@Before
	public void setUp() throws Exception {
		clientUnderTest
			= new JerseyPersonRestClient("http://localhost:" + WIREMOCK_PORT);
	}
}

Port should be free, otherwise there is com.github.tomakehurst.wiremock.common.FatalStartupException: java.lang.RuntimeException: java.net.BindException: Address already in use: bind exception thrown.

Usage is very simple. There are several methods which are important. Method stubFor() is initializing the stub. Method get() notifies that stub is called with HTTP GET request. Method urlMatching() uses regular expression to match which API path is invoked, then willReturn() returns aResponse() withBody(). There are several with() methods which gives a variety of options for testing. Complete test is below:

@Test
public void testGet_WithBody_PersonJson() {
	String personString = "{\"firstName\":\"FN1\",\"lastName\":\"LN1\"}";
	stubFor(get(urlMatching(".*/person/get/.*"))
		.willReturn(aResponse().withBody(personString)));

	Person actual = clientUnderTest.get(1);

	assertEquals("FN1", actual.getFirstName());
	assertEquals("LN1", actual.getLastName());
}

This is the very straightforward case, where the client should work, but when you start to elaborate on with() scenarios you can sometimes catch an issue with the code being tested. See test below is working correctly in a case where API returns HTTP response code 500 – Internal Server Error. The client might need to add some verification on response codes as well:

@Test
public void testGet_WithStatus() {
	String personString = "{\"firstName\":\"FN1\",\"lastName\":\"LN1\"}";
	stubFor(get(GET_URL)
		.willReturn(aResponse()
		.withStatus(500)
		.withBody(personString)));

	Person actual = clientUnderTest.get(1);

	assertEquals("FN1", actual.getFirstName());
	assertEquals("LN1", actual.getLastName());
}

Wiremock stateful behavior

You can configure Wiremock to respond with series of different responses, hence keeping an internal state. This might happen when you want to perform tests with more steps or some end-to-end scenario. On the first request, Wiremock can respond with one response, on the second request it can respond with a totally different response. See more in Wiremock stateful behaviour.

Difference between stub and mock

In Mock JUnit tests with Mockito example post, I’ve shown how to use Mockito to mock given classes and control their behavior in order to control and eliminate dependencies. Mockito is not suitable for this particular case because if you mock JerseyPersonRestClient‘s get() method it will just return an object, there is no testing whatsoever. Stubbing with WireMock on other hand tests all code for invoking the service, getting a response (controlled by you) and deserializing this response from network stream to Java object. It is much more adequate and close to reality testing.

Conclusion

WireMock is a very powerful framework for API stubbing in order to make your test better and it is a must for unit testing some REST API client.

Related Posts

Read more...

Create simple REST API client using Jersey

Last Updated on by

Post summary: Code examples how to create REST API client using Jersey.

In the current post, I will give code examples how to build REST API client using Jersey. The code shown in examples below is available in GitHub java-samples/wiremock repository.

REST API client

REST API client is needed when you want to consume given REST API, either for production usage or for testing this API. In the latter case, the client does not need to be very sophisticated since it is used just for testing the API with Java code. In the current post, I will show how to create REST API client for Persons functionality of Dropwizard Rest Stub described in Build a RESTful stub server with Dropwizard post.

Jersey 2 and Jackson

Jersey is a framework which allows an easier building of RESTful services. It is one of the most used such frameworks nowadays. Jackson is JSON parser for Java. It is also one of the most used ones. The first step is to import libraries you are going to use:

<dependency>
	<groupId>org.glassfish.jersey.core</groupId>
	<artifactId>jersey-client</artifactId>
	<version>2.25.1</version>
</dependency>
<dependency>
	<groupId>org.glassfish.jersey.media</groupId>
	<artifactId>jersey-media-json-jackson</artifactId>
	<version>2.25.1</version>
</dependency>
<dependency>
	<groupId>com.fasterxml.jackson.core</groupId>
	<artifactId>jackson-databind</artifactId>
	<version>2.8.7</version>
</dependency>
<dependency>
	<groupId>com.fasterxml.jackson.core</groupId>
	<artifactId>jackson-annotations</artifactId>
	<version>2.8.7</version>
</dependency>

Not mandatory but it is good practice to create an interface for this client and then do implementations. The idea is you may have different implementations and switch between them.

import com.automationrhapsody.wiremock.model.Person;

import java.util.List;

public interface PersonRestClient {

	List<Person> getAll();

	Person get(int id);

	String save(Person person);

	String remove();
}

Now you can start with implementation. In given example constructor take the host which also includes port and scheme. Then it creates ClientConfig object with specific properties. The full list is shown in ClientProperties Javadoc. In the example, I set up timeouts only. Next is to create WebTarget object to query different API endpoints. It could not be simpler than that:

import javax.ws.rs.client.ClientBuilder;
import javax.ws.rs.client.WebTarget;

import org.glassfish.jersey.client.ClientConfig;
import org.glassfish.jersey.client.ClientProperties;
import org.glassfish.jersey.filter.LoggingFilter;

public class JerseyPersonRestClient implements PersonRestClient {

	private final WebTarget webTarget;

	public JerseyPersonRestClient(String host) {
		ClientConfig clientConfig = new ClientConfig()
				.property(ClientProperties.READ_TIMEOUT, 30000)
				.property(ClientProperties.CONNECT_TIMEOUT, 5000);

		webTarget = ClientBuilder
				.newClient(clientConfig)
				.register(new LoggingFilter())
				.target(host);
	}
}

Once WebTarget is instantiated it will be used to query all the endpoints. I will show an implementation of one GET and one POST endpoints consumption:

@Override
public List<Person> getAll() {
	Person[] persons = webTarget
		.path(ENDPOINT_GET_ALL)
		.request()
		.get()
		.readEntity(Person[].class);
	return Arrays.stream(persons).collect(Collectors.toList());
}

@Override
public String save(Person person) {
	if (person == null) {
		throw new RuntimeException("Person entity should not be null");
	}
	return webTarget
		.path(ENDPOINT_SAVE)
		.request()
		.post(Entity.json(person))
		.readEntity(String.class);
}

The full code can be seen in GitHub repo: JerseyPersonRestClient full code.

jersey-media-json-jackson

This is the bonding between Jersey and Jackson. It should be used otherwise Jersey’s readEntity(Class var1) method throws:

Exception in thread “main” org.glassfish.jersey.message.internal.MessageBodyProviderNotFoundException: MessageBodyReader not found for media type=application/json, type=class …

or

Exception in thread “main” org.glassfish.jersey.message.internal.MessageBodyProviderNotFoundException: MessageBodyWriter not found for media type=application/json, type=class …

Client builder

In the code, there is a class called PersonRestClientBuilder. In the current case it does not do many things, but in reality, it might turn out that a lot of configurations or input is provided to build a REST API client instance. This is where such builder becomes very useful:

public class PersonRestClientBuilder {

	private String host;

	public PersonRestClientBuilder setHost(String host) {
		this.host = host;
		return this;
	}

	public PersonRestClient build() {
		return new JerseyPersonRestClient(host);
	}
}

Unit testing

It is common and best practice that each piece of code is covered by unit tests. In Mock JUnit tests with Mockito example post, I’ve described how Mockito can be used. The problem in the current example is if we use Mockito we have to mock readEntity() method to return some response objects. This is way too much mocking and will not do adequate testing, actually, it does not test at all. We want to test that out REST API client successfully communicates over the wire. In order to do proper testing, we need to use a library called WireMock. In Mock/Stub REST API with WireMock for better unit testing post, I will add more details how to use it.

Conclusion

REST API consuming or testing requires building a client. Jersey is a perfect candidate to be used as an underlying framework. WireMock can be used for unit testing the REST API client you have created.

Related Posts

Read more...

Introduction to Postman with examples

Last Updated on by

Post summary: This post is demonstrating different Postman features with examples.

All examples shown in this post are available at Postman Examples link and can be imported in Postman. Environments are also used in attached examples and are available in Admin environment and User environment. In order to run all the examples you need to download and run Dropwizard stub described in Build a RESTful stub server with Dropwizard post and available in sample-dropwizard-rest-stub GitHub repo, otherwise, you can just see the Postman code and screenshots.

Postman

Postman is a Chrome add-on and Mac application which is used to fire requests to an API. It is very lightweight and fast. Requests can be organized in groups, also tests can be created with verifications for certain conditions on the response. With its features, it is very good and convenient API tool. It is possible to make different kinds of HTTP requests – GET, POST, PUT, PATCH and DELETE. It is possible to add headers to the requests. In current post I will write about more interesting features it has Variables, Pre-Request Script, Environments, and Tests.

postman-main

Variables

There are two types of variables – global and environment. Global variables are for all requests, environment variables are defined per specific environment which can be selected from a drop-down or no environment can be selected. Environments will be discussed in details later in current port. Global variables are editable by a small eye-shaped icon in the top right corner. Once defined variables can be used in a request with format surrounded by curly brackets: {{VARIABLE_NAME}}.

postman-globals

Pre-Request Script

Postman allows users to do some JavaScript coding with which to manipulate the data being sent with the request. One such example is when testing and API with security as explained in How to implement secure REST API authentication over HTTP post – SHA256 hash (build from apiKey + secretKey + timestamp in seconds) is sent as a request parameter with the request. Calculating SHA256 hash is done with the following pre-request script and then stored as a global variable token.

var timeInSeconds = parseInt((new Date()).getTime() / 1000);
var sigString = postman.getGlobalVariable("apiKey") + 
	postman.getGlobalVariable("secretKey") + timeInSeconds
var token = CryptoJS.SHA256(sigString);
postman.setGlobalVariable("token", token);

Here CryptoJS library is used to create a SHA256 hash. All available libraries in Postman are described in Postman Sandbox page. Global variable {{token}} is then sent as token request parameter.

postman-pre-request-script

Environments

The code shown above is working fine with just one set of credentials because they are stored as global variables. If you need to switch between different credentials this is where environments come into play. By switching environment and with no change in the request you can send different parameters to API. Environments are managed from Settings icon in the top right corner which opens a menu with “Manage Environments” link.

postman-environments

Postman supports so-called shared environments, which means the whole team can use one and the same credentials managed centrally. It requires sign in and some plan though but might be a good investment in the long run.

In order to use environments, pre-request script has to be changed to:

var timeInSeconds = parseInt((new Date()).getTime() / 1000);
var sigString = environment.apiKey + environment.secretKey + timeInSeconds
var token = CryptoJS.SHA256(sigString);
postman.setEnvironmentVariable("token", token);

Both apiKey and secretKey are read from the environment. An environment can be changed from the top right corner.

Nota bene: There is specific behavior (I would not call it bug as it makes sense) in Postman. If select “No Environment” and fire request above Postman will automatically create an environment with the name “No Environment”. This is because it actually needs an environment to store a variable into. This might be very confusing the first time.

Post-Request Script

There is no such term defined in Postman. The idea is that in many cases you will need to do something with the response and extract a variable from it in order to use it at a later stage. This can be done in “Tests” tab. The example given below is to take all persons with API call and then to process the response and at random select one id which is stored as a global variable and then used in next request. You can put whatever JavaScript code you like in order to fulfill your logic.

var jsonData = JSON.parse(responseBody)
var size = jsonData.length
var index = parseInt(Math.random() * size)
postman.setGlobalVariable("userId", index);

postman-post-request

Then in the subsequent request you can use GET call to URL: http://localhost:9000/person/get/{{userId}}

Tests

After a response is received Postman has a functionality to make verifications on it. This is done in “Tests” tab. Below is an example of different verifications. Most interesting part is in case of JSON response it can be parsed to an array and then elements accessed by index and value jsonData[0].id or even iterated as shown below. Format is: tests[“TEST_NAME”] = BOOLEAN_CONDITION.

tests["Status code is 200"] = responseCode.code === 200;

tests["Response time is less than 200ms"] = responseTime < 200;

var expected = "email1@email.na"
tests["Body cointains string: " + expected] = responseBody.has(expected);

var jsonData = JSON.parse(responseBody);
var expectedCount = 4
tests["Response count is: " + expectedCount] = jsonData.length === expectedCount;

for(var i=1; i<=expectedCount; i++) {
	tests["Verify id is: " + i] = jsonData[i-1].id === i;
}

postman-test-response

postman-test-results

Nota bene: if you use responseTime verification you have to know that it measures just the TTFB (time to the first bite) it does not measure the time needed to transfer the data. If you have API with big responses or network is slow you may fire the request, wait a lot and then Postman shows very small response time which might be confusing.

Run from command line

In order to run Postman tests in the command line as part of some CI process, there is a separate tool called Newman. It requires NodeJS to be installed and runs on NodeJS environment. It is very well described in How to write powerful automated API tests with Postman, Newman and Jenkins.

Code reuse between requests

It is very convenient some piece of code to be re-used between a request to prevent copy/paste it. Postman does not support yet code re-use between requests. Good thing is that there is a workaround for this. It is possible to do it by defining a helper function with verifications which are saved as a global variable in the first request from your test scenario:

postman.setGlobalVariable("loadHelpers", function loadHelpers() {
	let helpers = {};

	helpers.verifyCount = function verifyCount(expectedCount) {
		var jsonData = JSON.parse(responseBody);
		tests["Response count is: " + expectedCount] 
			= jsonData.length === expectedCount;
	}

	// ...additional helpers

	return helpers;
} + '; loadHelpers();');

Then from other requests helpers are taken from global variables and verification functions can be used:

var helpers = eval(globals.loadHelpers);
helpers.verifyCount(4);

See more in Reusing pre-request scripts across requests in a collection issue thread.

Conclusion

Postman is a very nice tool to use when developing your API or manual test it. I would definitely recommend Postman, I use it on daily basis for probing the API. For serious API functional tests automation, I would say Postman is not ready yet and you’d better go for another approach. Good thing is that there is a big community around it which is growing and new features are added.

Related Posts

Read more...

Implement secure API authentication over HTTP with Dropwizard

Last Updated on by

Post summary: Reference implementation on suggested in How to implement secure REST API authentication over HTTP post authentication mechanism.

API authentication mechanism

Suggested authentication mechanism consists of following steps:

  • The secret key that is known only by API consumer and API provider is needed along with API key.
  • The secret key is used to one way hash a token which is sent to the server along with API key in the API call.
  • Token consists of API key + Secret key + Current time in seconds, which then gets hashed with SHA-256 algorithm preferably.
  • Server recreates all the tokens locally for every second for some time in the future, preferably not too long – 30~120 seconds.
  • Server recreates all the tokens for 30~120 seconds in the past, to take into account the time needed for a request to reach the server.
  • The server compares each of the tokens with received one.
  • If there is match consumer is authenticated and a response is returned.

Dropwizard implementation

Dropwizard stub introduced in Build a RESTful stub server with Dropwizard post will be used to create authentication. The full example can be found in GitHub sample-dropwizard-rest-stub repository. The implementation consists of following steps:

  • Implement javax.ws.rs.container.ContainerRequestFilter interface. Implementation will inspect every request and verify authentication.
  • Create custom annotation
  • Annotate RequestFilter and Dropwizard resource (API service) on which authentication should be applied.
  • Register RequestFilter implementation class into Dropwizard Jersey environment.

Create custom annotation

Starting with the easiest step. Creating custom annotation is pretty easy. It could be applied to a class (ElementType.TYPE) or to a method (ElementType.METHOD). It should live as long as program runs (RetentionPolicy.RUNTIME). In order to make it possible annotated request filter to be applied to a specific resource, only @NameBinding annotation is a must in Jersey. If not specified request filter will apply to all resources. Needed annotation is:

import java.lang.annotation.ElementType;
import java.lang.annotation.Retention;
import java.lang.annotation.RetentionPolicy;
import java.lang.annotation.Target;

import javax.ws.rs.NameBinding;

@Target({ElementType.TYPE, ElementType.METHOD})
@Retention(value = RetentionPolicy.RUNTIME)
@NameBinding
public @interface Authenticator {
}

ContainerRequestFilter implementation

Container request filter is applied to incoming requests. If used with @NameBinding annotation it is applied only where needed, if not it is applied globally. Mandatory is to override filter() method:

import com.automationrhapsody.reststub.persistence.AuthDB;

import java.io.IOException;
import java.util.List;

import javax.ws.rs.container.ContainerRequestContext;
import javax.ws.rs.container.ContainerRequestFilter;
import javax.ws.rs.core.MediaType;
import javax.ws.rs.core.Response;
import javax.ws.rs.core.UriInfo;

import org.apache.commons.codec.digest.DigestUtils;
import org.apache.commons.collections.CollectionUtils;
import org.apache.commons.lang3.StringUtils;

@Authenticator
public class AuthenticateFilter implements ContainerRequestFilter {

	private static final String PARAM_API_KEY = "apiKey";
	private static final String PARAM_TOKEN = "token";
	private static final long SECONDS_IN_MILLISECOND = 1000L;
	private static final int TTL_SECONDS = 60;

	@Override
	public void filter(ContainerRequestContext context) throws IOException {
		final String apiKey = extractParam(context, PARAM_API_KEY);
		if (StringUtils.isEmpty(apiKey)) {
			context.abortWith(responseMissingParameter(PARAM_API_KEY));
		}

		final String token = extractParam(context, PARAM_TOKEN);
		if (StringUtils.isEmpty(token)) {
			context.abortWith(responseMissingParameter(PARAM_TOKEN));
		}

		if (!authenticate(apiKey, token)) {
			context.abortWith(responseUnauthorized());
		}
	}
}

As seen above two GET parameters are mandatory in the request: “apiKey” and “token”. Those are first extracted and verified. If some of them are not existing BAD_REQUEST (HTTP Status code 400) Response is returned with an error message. Methods that extract params and build error response are:

private String extractParam(ContainerRequestContext context, String param) {
	final UriInfo uriInfo = context.getUriInfo();
	final List user = uriInfo.getQueryParameters().get(param);
	return CollectionUtils.isEmpty(user) ? null : String.valueOf(user.get(0));
}

private Response responseMissingParameter(String name) {
	return Response.status(Response.Status.BAD_REQUEST)
		.type(MediaType.TEXT_PLAIN_TYPE)
		.entity("Parameter '" + name + "' is required.")
		.build();
}

If both are present then code tried to authenticate the call by rebuilding all the hashes for 60 seconds in the past because the request cannot arrive instantly it takes some time. If the network is slower this time can be increased. It also rebuilds all hashes for 60 seconds in the future, this is token’s time to live. The server has access to the Secret key for any given API key. In the example above they are stored in fake DB provider and obtained by AuthDB.getSecretKey(apiKey):

private boolean authenticate(String apiKey, String token) {
	final String secretKey = AuthDB.getSecretKey(apiKey);

	// No need to calculate digest in case of wrong apiKey
	if (StringUtils.isEmpty(secretKey)) {
		return false;
	}

	final long nowSec = System.currentTimeMillis() / SECONDS_IN_MILLISECOND;
	long startTime = nowSec - TTL_SECONDS;
	long endTime = nowSec + TTL_SECONDS;
	for (; startTime < endTime; startTime++) {
		final String toHash = apiKey + secretKey + startTime;
		final String sha1 = DigestUtils.sha256Hex(toHash);
		if (sha1.equals(token)) {
			return true;
		}
	}

	return false;
}

As seen above server uses SHA-256 cryptographic algorithm. It is the best solution in terms of speed and security. In MD5, SHA-1, SHA-256 and SHA-512 speed performance post a comparison between MD5, SHA-1, SHA-256, and SHA-512 is made. If authentication cannot be verified then UNAUTHORIZED (HTTP Status code 401) Response response is returned:

private Response responseUnauthorized() {
	return Response.status(Response.Status.UNAUTHORIZED)
		.type(MediaType.TEXT_PLAIN_TYPE)
		.entity("Unauthorized")
		.build();
}

This is the hardest part. Now, this filter has to be registered with Jersey and applied to needed resources (services). See more on ContainerRequestFilter interface and @NameBinding annotation in Jersey filters and interceptors page.

Apply authentication filter on a resource

Indicating that given resource should be checked for authentication is done with custom @Authenticator annotation created previously. If needed just for specific API call it can be applied also on a method level:

import com.automationrhapsody.reststub.data.Book;
import com.automationrhapsody.reststub.filters.Authenticator;
import com.automationrhapsody.reststub.persistence.BookDB;
import com.codahale.metrics.annotation.Timed;

import java.util.List;

import javax.ws.rs.GET;
import javax.ws.rs.Path;
import javax.ws.rs.Produces;
import javax.ws.rs.core.MediaType;

@Authenticator
@Path("/secure/books")
public class BooksSecureService {

	@GET
	@Timed
	@Produces(MediaType.APPLICATION_JSON)
	public List<Book> getBooks() {
		return BookDB.getAll();
	}
}

Register in Dropwizard Jersey

The last step is to register the request filter and resource with Dropwizard’s Jersey:

@Override
public void run(RestStubConfig config, Environment env) {

	env.jersey().register(BooksSecureService.class);
	env.jersey().register(AuthenticateFilter.class);

}

Conclusion

Very easy to implement in Dropwizard and a relatively secure way to provide API authentication over HTTP protocol. For a mission-critical application, definitely more strict consideration and review of this authentication mechanism are needed.

Related Posts

Read more...

How to implement secure REST API authentication over HTTP

Last Updated on by

Post summary: How to implement secure API authentication even over HTTP.

Important: this post is not a complete and expert guide on API security. It is mainly done to test Postman Pre-request hook that is described in Introduction to Postman with examples post. It does not go into all the details about API security, SSL certificates, encrypting the data, etc. It gives basic information how you can protect your API’s consumers against their network traffic being sniffed and credentials, apiKeys, session keys, etc stolen.

Authentication vs. Authorisation

Authentication is defined as “Who you are”. It deals with usernames and password. The authorization is defined as “What you can do”. It deals with permissions. Before dealing with permissions application must know the user, so Authorisation comes after Authentication.

Basic Authentication

As it is stated it is very basic. The idea is to send a Base64 encoded username and password in the header of the request in the following format:

Authorization: Basic dXNlcjpwYXNz

Server decodes the username and password and uses them to authenticate and authorize the user. Problem with Basic authentication is it must be used only over HTTPS since network traffic is encrypted. Over HTTP request can be easily sniffed. Base64 is reversible and there are numerous tools on the web where you can put dXNlcjpwYXNz and they will return user:pass as plain text.

Nota bene: Never use this one without HTTPS.

OAuth and OAuth 2.0

OAuth is authorization protocol. It is intended mainly for web but can be used in API authorization. The idea is that authentication and authorization are done by a third party like Microsoft, Google, Facebook, Twitter, etc. This is easy for API as it does not have to deal with user data. Customer logins to the third party and then access token is being issued. Token has some validity which is not too long, but not too short, usually 1 or 2 days. The API can obtain user details from the third party by this token. The user authenticates itself to the API with this access token by sending it in the request header:

Authorization: Bearer 66408bd9-2bc0-40c3-9823-e9bec390532a

Problem with OAuth is it also must be used over HTTPS. Over HTTP traffic can be sniffed and the token can be stolen. Although token has some expiry time, it is long enough for a hacker to use API on your behalf.

Nota bene: Never use this one without HTTPS.

API keys

API keys have become the standard when consuming an API. API key is some random hash which uniquely identifies the consumer. API keys have numerous benefits over username/password mechanism. Again in case of HTTP network traffic can be sniffed and API key can be stolen.

HTTPS

Reading post so far turned out there is not a single API authentication protocol that is secure if not used over HTTPS. In the current post, a solution is proposed. It is commonly used in public APIs, it is possible to exist as a standard I’m just not aware of its name, which provides secure API authentication even over HTTP.

Implement API security over HTTP

In short, in order to have security over HTTP following steps should be done:

  • The secret key that is known only by API consumer and API provider is needed along with API key.
  • The secret key is used to one way hash a token which is sent to the server along with API key in the API call.
  • Token consists of API key + Secret key + Current time in seconds, which then gets hashed with SHA-256 algorithm preferably.
  • Server recreates all the tokens locally for every second for some time in the future, preferably not too long – 30~120 seconds.
  • Server recreates all the tokens for 30~120 seconds in the past, to take into account the time needed for the request to reach the server.
  • The server compares each of the tokens with received one.
  • If there is match consumer is authenticated and a response is returned.

Cryptographic hash algorithms

Most used hash algorithms nowadays are MD5, SHA-1, SHA-256, SHA-512. MD5 and SHA-1 are to week and are not recommended. SHA-512 takes more time to compute the hashes. SHA-256 is the most appropriate solution in terms of security and speed. In MD5, SHA-1, SHA-256 and SHA-512 speed performance post all 4 algorithms have been tested and compared with Apache’s Commons Codec implementation.

Hash with Salt

Timestamp into hashed token is used for so-called salt, a random data that is used to differentiate the hashed data against dictionary attacks. If just API key + Secret key are hashed, then the hash will always be one and the same. An intruder will take the hash and just use it. Using timestamp makes the hash always different. Another function of the time stamp is to set an expiration time on the token, so even if stolen not to be used for a long period of time.

Conclusion

There are already established standards to secure an API, but all of them are effective only over HTTPS. In the current post is given a proposal for secure API authentication which is very simple and relatively safe even over HTTP. Cons of this method are server has to recalculate hash many times, which in massive load would require some caching. In Implement secure API authentication over HTTP with Dropwizard post, there is a reference implementation of a proposed solution with Dropwizard.

Related Posts

Read more...

Retry JUnit failed tests immediately

Last Updated on by

Post summary: How to retry failed JUnit tests immediately and if a retry is OK then report test as passed.

Approaches

There are mainly three approaches to make JUnit retry failed tests.

  • Maven Surefire or Failsafe plugins – follow plugin name links for more details how to use and configure plugins
  • JUnit rules – code listed in the current post can be used as a rule. See more for rules in Use JUnit rules to debug failed API tests post. Problem is @Rule annotation works for test methods only. In order to have retry logic in @BeforeClass then the @ClassRule object should be instantiated.
  • JUnit custom runner – this post is dedicated to creating own JUnit retry runner and run tests with it.

Custom JUnit retry runner

A custom runner can be created by extending org.junit.runners.BlockJUnit4ClassRunner class and override public void run(final RunNotifier notifier) and protected void runChild(final FrameworkMethod method, RunNotifier notifier) methods. run() is accessed when test class is instantiated, runChild() is accessed when test method is run. Below is the code for custom JUnit retry runner class:

package com.automationrhapsody.junit.runners;

import org.junit.Ignore;
import org.junit.internal.AssumptionViolatedException;
import org.junit.internal.runners.model.EachTestNotifier;
import org.junit.runner.Description;
import org.junit.runner.notification.RunNotifier;
import org.junit.runner.notification.StoppedByUserException;
import org.junit.runners.BlockJUnit4ClassRunner;
import org.junit.runners.model.FrameworkMethod;
import org.junit.runners.model.InitializationError;
import org.junit.runners.model.Statement;

public class RetryRunner extends BlockJUnit4ClassRunner {

	private static final int RETRY_COUNT = 2;

	public RetryRunner(Class<?> clazz) throws InitializationError {
		super(clazz);
	}

	@Override
	public void run(final RunNotifier notifier) {
		EachTestNotifier testNotifier = new EachTestNotifier(notifier, getDescription());
		Statement statement = classBlock(notifier);
		try {
			statement.evaluate();
		} catch (AssumptionViolatedException ave) {
			testNotifier.fireTestIgnored();
		} catch (StoppedByUserException sbue) {
			throw sbue;
		} catch (Throwable t) {
			System.out.println("Retry class: " + getDescription().getDisplayName());
			retry(testNotifier, statement, t, getDescription());
		}
	}

	@Override
	protected void runChild(final FrameworkMethod method, RunNotifier notifier) {
		Description description = describeChild(method);
		if (method.getAnnotation(Ignore.class) != null) {
			notifier.fireTestIgnored(description);
		} else {
			runTest(methodBlock(method), description, notifier);
		}
	}

	private void runTest(Statement statement, Description description, RunNotifier notifier) {
		EachTestNotifier eachNotifier = new EachTestNotifier(notifier, description);
		eachNotifier.fireTestStarted();
		try {
			statement.evaluate();
		} catch (AssumptionViolatedException e) {
			eachNotifier.addFailedAssumption(e);
		} catch (Throwable e) {
			System.out.println("Retry test: " + description.getDisplayName());
			retry(eachNotifier, statement, e, description);
		} finally {
			eachNotifier.fireTestFinished();
		}
	}

	private void retry(EachTestNotifier notifier, Statement statement, Throwable currentThrowable, Description info) {
		int failedAttempts = 0;
		Throwable caughtThrowable = currentThrowable;
		while (RETRY_COUNT > failedAttempts) {
			try {
				System.out.println("Retry attempt " + (failedAttempts + 1) + " for " + info.getDisplayName());
				statement.evaluate();
				return;
			} catch (Throwable t) {
				failedAttempts++;
				caughtThrowable = t;
			}
		}
		notifier.addFailure(caughtThrowable);
	}
}

The code shown above is available in GitHub java-samples/junit repository.

Using JUnit RetryRunner

In order to configure JUnit test to use the runner, class holding tests should be annotated with @RunWith:

@RunWith(RetryRunner.class)
public class RetryRunnerTests {
	@Test
	public void testRetrySuccessFirstTime() {
		assertTrue(true);
	}
}

Conclusion

Making JUnit to rerun is easy, the harder thing to do is to fix your tests so they pass from the first time. Generally, it is not good to have tests that are flaky.

Read more...

Use JUnit rules to debug failed API tests

Last Updated on by

Post summary: What are JUnit rules and how to use them to improve debugging of failed API tests.

What are JUnit rules

Rules are an easy way to separate tests from non-tests code. In many cases, some kind of setup is required before starting the tests. Rules provide a way to define this setup code externally and just access it from your tests.

How to use JUnit rules

Instantiate a public variable with rule class you want to use. Depending on the specific rule you can invoke methods on this public variable. The example below is the simplest that gives you the name of current test method being executed.

@Rule
public TestName name = new TestName();

@Test
public void testPrintMethodName() {
	assertEquals("testPrintMethodName", name.getMethodName());
}

Types of JUnit rules

Below are shown rules that JUnit provides:

  • TemporaryFolder – allows the creation of files and folders that gets deleted when test method finishes.
  • ExternalResource – sets up external resources (file, socket, database connection) and then releases them. Same can be accomplished in @Before and @After methods.
  • ErrorCollector – execution of test continues after the first error and successive errors are collected and reported after test finishes.
  • Verifier – additional asserting on test conditions.
  • TestWatcher – has access to tests output – when test starts, finishes, and the test result.
  • TestName – gives current executing test method name.
  • Timeout – sets a timeout for all the test methods in the class. If some test takes longer it is terminated and failed.
  • ExpectedException – very handy way to test whether method throws correct exception. It is possible to use @Test(expected = NullPointerException.class), but it does not allow you to check what is the exception message.

ClassRule

@Rule annotation creates a new instance of the rule class before each and every test method is run. In some cases, rule object is needed into test class initialization method (annotated with @BeforeClass). In order to have it into initialization method, a @ClassRule annotation has to be used instead. Then the rule object is instantiated only once before @BeforeClass method has run, so the rule is available in it. @ClassRule is good to be used in situations where there are expensive resources to be created – better to create them on test class initialization rather before each test method. More details about execution sequence can be found in JUnit methods execution sequence post.

Debug API tests

API tests generally are a sequence of requests. One request depends on previous as it takes some data out of it. If some of the requests in the chain fail you will need the whole chain to be able to debug and trace why exactly the whole scenario failed.

Store API calls in a Queue

It is a good idea to have one class that is sending API requests and returning responses. Below is a simple example of such class. In real life, makeRequest methods will accept some parameters or request object and result will be some response object, not String.

public class RequestUtils {

	private static final Queue<String> MESSAGES_QUEUE = new LinkedList<>();

	public static String makeSomeRequest(String request) {
		getMessages().add(request);
		String response = "makeSomeRequestResponse";
		getMessages().add(response);
		return response;
	}

	public static String makeAnotherRequest(String request) {
		getMessages().add(request);
		String response = "makeAnotherRequestResponse";
		getMessages().add(response);
		return response;
	}

	public static void printMessages() {
		for (String message : getMessages()) {
			System.out.println(message);
		}
		clearMessages();
	}

	public static void clearMessages() {
		getMessages().clear();
	}

	private static Queue<String> getMessages() {
		return MESSAGES_QUEUE;
	}
}

Class collects all requests and responses in a queue of Strings. It has printMessages() and clearMessages() methods. It also has a getMessages() method which just returns the queue. This method is not bringing real value to code but rather used to easily switch to different types of queues.

Extend TestWatcher to have access to test results

As stated above TestWatcher provides access to tests output without the ability to modify it. Extending TestWatcher gives you access to those methods:

public class MessagesQueueRule extends TestWatcher {

	protected void succeeded(Description description) {
		RequestUtils.clearMessages();
	}

	protected void failed(Throwable e, Description description) {
		RequestUtils.printMessages();
	}

	protected void skipped(AssumptionViolatedException e, 
			Description description) {
		RequestUtils.printMessages();
	}
}

On success, messages queue get cleared, on skipped or failed it gets printed to enable you to debug.

Tests are a sequence of requests and responses

Test below is just an example to show how an API test generally looks like. It is possible to do some method chaining, but this is out of the scope of the current post.

@Test
public void test1() {
	String result1 = RequestUtils.makeSomeRequest("test1request1");
	String result2 = RequestUtils.makeAnotherRequest(result1);
	String actualResult = RequestUtils.makeAnotherRequest(result2);
	assertEquals("makeAnotherRequestResponse", actualResult);
}

If assertEquals() fails all requests/response in the test method will get printed into the logs.

Multithreading

You might have noticed that current solution is not thread-safe as Queue is one and the same and can be accessed from many threads which will lead to ConcurrentModification exception. In Avoid multithreading problems in Java using ThreadLocal post, there is a solution using ThreadLocal.

Conclusion

Rules provide flexibility make whatever is needed for your tests. They are an easy way to extract code which is not a test logic to external classes. All the details about rules are available at JUnit Rules page. In the current post, I showed you an easy way to store and output requests in case of API testing. The code shown above is available in GitHub java-samples/junit repository.

Related Posts

Read more...

JPS alternative for Dropwizard – Servlet with Apache Velocity template engine

Last Updated on by

Post summary: How to create a web application with Dropwizard with Servlet and Apache Velocity template engine since JSP is not supported.

JSP

JSP (Java Server Pages) is used to create web applications. It easy to separate presentation from business logic. JSP defines a page template with static content and tags inside which are evaluated in business logic and replaced in a template.

Dropwizard

Dropwizard is Java framework for building a RESTful web server in very short time. It has incorporated proven libraries like Jetty, Jersey, Jackson and many more to reliably do the job in shortest possible time. They have very good getting started tutorial how to make a project from scratch. Dropwizard doesn’t have support for JPS. This is because its purpose is to be REST server, not a web application server.

Dropwizard servlet support

JSP support is not in the scope of Dropwizard as it is designed for microservices not for Web application server see more in Any JSP support going on? thread. Dropwizard has servlet support though. Internally JSP is compiled to the servlet so it is alternative to use some template engine within a servlet.

Dropwizard views

Dropwizard provides so-called Views which actually uses FreeMarker or Mustache template engines. See more about views in Dropwizard Views page. This is Dropwizard’s build in JSP alternative. If you want to go that way then the rest of this post is not really helpful to you.

Apache Velocity

Apache Velocity is a template engine. HTML code is defined as a template with dynamic values substituted with special tags, similar to JSP.

Define Velocity template

The template contains HTML code and tags starting with $ sign, in the example below this is $productId. The template is put in project’s “resource” folder.

This is 'Product $productId name' details page.

Initialise Velocity engine

This is done in Servlet’s init() method. It is important to give as a property where Velocity should look for its resources. It is in the class loader.

private Template details;

public void init() throws ServletException {
	Properties props = new Properties();
	props.setProperty("resource.loader", "class");
	props.setProperty("class.resource.loader.class",
		"org.apache.velocity.runtime.resource.loader.ClasspathResourceLoader");
	VelocityEngine engine = new VelocityEngine(props);
	engine.init();
	details = engine.getTemplate("velocity.details.html");
}

Render template

In order to render the template $variable needs to be substituted with valued values in a VelocityContext map. Note that if given value is null then $variable is being outputted directly, so this case should be handled correctly.

public void doGet(HttpServletRequest request,
		HttpServletResponse response) throws ServletException, IOException {
	String productId = request.getParameter("id");
	if (StringUtils.isEmpty(productId)) {
		productId = "";
	}
	VelocityContext context = new VelocityContext();
	context.put("productId", productId);
	StringWriter writer = new StringWriter();
	details.merge(context, writer);
	String result = writer.toString();

	// Output
	response.setContentType("text/html");
	PrintWriter out = response.getWriter();
	out.println(result);
}

Full code

The full example can be found in GitHub sample-dropwizard-rest-stub repository ProductsServlet class.

Conclusion

This is a pretty easy way to create web application of Dropwizard with keeping the presentation code separate from business logic.

Related Posts

Read more...

Send SOAP request over HTTPS without valid certificates

Last Updated on by

Post summary: How to send SOAP request over HTTPS in Java without generating and installing certificates. NB: This MUST not be used for production code!

SOAP (Simple Object Access Protocol) is a protocol used in web services. It allows exchanging of XML data over HTTP or HTTPS.

Send SOAP over HTTP

Sending SOAP message over HTTP is Java is as simple as:

public SOAPMessage sendSoapRequest(String endpointUrl, SOAPMessage request) {
	try {
		// Send HTTP SOAP request and get response
		SOAPConnection soapConnection
				= SOAPConnectionFactory.newInstance().createConnection();
		SOAPMessage response = soapConnection.call(request, endpointUrl);
		// Close connection
		soapConnection.close();
		return response;
	} catch (SOAPException ex) {
		// Do Something
	}
	return null;
}

HTTPS

HTTPS is an HTTP over a security layer (SSL/TLS). This is the essence of secure internet communication. For valid HTTPS connection server needs a valid certificate signed by a certification authority. Establishing an HTTPS connection between client and server is by a procedure called SSL handshake in which client validates server certificate and both set session key which they use to encrypt messages. This level of security makes the code above to fail if executed against HTTPS host:

javax.net.ssl.SSLHandshakeException: java.security.cert.CertificateException: No subject alternative DNS name matching localhost found.

This error appears because the server is running on localhost and there is no valid certificate for localhost. The proper way for handling this is to generate a valid or test SSL certificate with IP or hostname of the machine running the server and install it on it.

Trust all hosts

Generating and installing SSL certificates for test servers is a good idea but is not worth the effort. So in order to overcome this, an HTTPS connection should be opened and it should be instructed to trust any hostname. First is to add dummy implementation of HostnameVerifier interface trusting all hosts:

/**
 * Dummy class implementing HostnameVerifier to trust all host names
 */
private static class TrustAllHosts implements HostnameVerifier {
	public boolean verify(String hostname, SSLSession session) {
		return true;
	}
}

Open HTTPS connection

Opening HTTPS connection is done with Java’s HttpsURLConnection. Instruction to trust all hosts is done with setHostnameVerifier(new TrustAllHosts()) method. The re-factored code is:

public SOAPMessage sendSoapRequest(String endpointUrl, SOAPMessage request) {
	try {
		final boolean isHttps = endpointUrl.toLowerCase().startsWith("https");
		HttpsURLConnection httpsConnection = null;
		// Open HTTPS connection
		if (isHttps) {
			// Open HTTPS connection
			URL url = new URL(endpointUrl);
			httpsConnection = (HttpsURLConnection) url.openConnection();
			// Trust all hosts
			httpsConnection.setHostnameVerifier(new TrustAllHosts());
			// Connect
			httpsConnection.connect();
		}
		// Send HTTP SOAP request and get response
		SOAPConnection soapConnection
				= SOAPConnectionFactory.newInstance().createConnection();
		SOAPMessage response = soapConnection.call(request, endpointUrl);
		// Close connection
		soapConnection.close();
		// Close HTTPS connection
		if (isHttps) {
			httpsConnection.disconnect();
		}
		return response;
	} catch (SOAPException | IOException ex) {
		// Do Something
	}
	return null;
}

Not valid certificate exception

Running code above throws an exception which generally means that server is either missing an SSL certificate or its SSL certificate is not valid, i.e. not signed by a certification authority. Error is:

javax.net.ssl.SSLHandshakeException: sun.security.validator.ValidatorException: PKIX path building failed: sun.security.provider.certpath.SunCertPathBuilderException: unable to find valid certification path to requested target

The proper way to handle this is to add server’s certificate to client’s JVM TrustStore certificates. But since test servers may change and server on which client is running may also change generating of certificates is an overhead. Since we are writing test code it is OK to lower the level of security of SSL.

Trust all certificates

Trusting all certificates is a very bad practice and MUST never be used in production code. This is undermining the whole concept and purpose of SSL certificates. For test code is not that bad to do this sin. A class implementing X509TrustManager interface is needed:

/**
 * Dummy class implementing X509TrustManager to trust all certificates
 */
private static class TrustAllCertificates implements X509TrustManager {
	public void checkClientTrusted(X509Certificate[] certs, String authType) {
	}

	public void checkServerTrusted(X509Certificate[] certs, String authType) {
	}

	public X509Certificate[] getAcceptedIssuers() {
		return null;
	}
}

Create SSL context trusting all certificates

Instructing HttpsURLConnection to trust all certificates is done with following code:

// Create SSL context and trust all certificates
SSLContext sslContext = SSLContext.getInstance("SSL");
TrustManager[] trustAll = new TrustManager[] {new TrustAllCertificates()};
sslContext.init(null, trustAll, new java.security.SecureRandom());
// Set trust all certificates context to HttpsURLConnection
HttpsURLConnection.setDefaultSSLSocketFactory(sslContext.getSocketFactory());

Send SOAP over HTTPS without having valid certificates

The final code is:

/**
 * Sends SOAP request and saves it in a queue.
 *
 * @param request SOAP Message request object
 * @return SOAP Message response object
 */
public SOAPMessage sendSoapRequest(String endpointUrl, SOAPMessage request) {
	try {
		final boolean isHttps = endpointUrl.toLowerCase().startsWith("https");
		HttpsURLConnection httpsConnection = null;
		// Open HTTPS connection
		if (isHttps) {
			// Create SSL context and trust all certificates
			SSLContext sslContext = SSLContext.getInstance("SSL");
			TrustManager[] trustAll
					= new TrustManager[] {new TrustAllCertificates()};
			sslContext.init(null, trustAll, new java.security.SecureRandom());
			// Set trust all certificates context to HttpsURLConnection
			HttpsURLConnection
					.setDefaultSSLSocketFactory(sslContext.getSocketFactory());
			// Open HTTPS connection
			URL url = new URL(endpointUrl);
			httpsConnection = (HttpsURLConnection) url.openConnection();
			// Trust all hosts
			httpsConnection.setHostnameVerifier(new TrustAllHosts());
			// Connect
			httpsConnection.connect();
		}
		// Send HTTP SOAP request and get response
		SOAPConnection soapConnection
				= SOAPConnectionFactory.newInstance().createConnection();
		SOAPMessage response = soapConnection.call(request, endpointUrl);
		// Close connection
		soapConnection.close();
		// Close HTTPS connection
		if (isHttps) {
			httpsConnection.disconnect();
		}
		return response;
	} catch (SOAPException | IOException
			| NoSuchAlgorithmException | KeyManagementException ex) {
		// Do Something
	}
	return null;
}

Conclusion

Although this code is very handy and eases a lot testing of SOAP over HTTPS it MUST never be used for production purpose!

Read more...

REST performance problems with Dropwizard and Jersey JAXB provider

Last Updated on by

Post summary: Dropwizard’s performance highly degrades when using REST with XML caused by Jersey’s Abstract JAXB provider. Solution is to inject your own JAXB provider.

Dropwizard is a Java-based framework for building a RESTful web server in very short time. I have created a short tutorial how to do so in Build a RESTful stub server with Dropwizard post.

Short overview

The current application is a Dropwizard based serving as a hub between several systems. Running on Java 7, it receives REST with XML and sends XML over REST to other services. JAXB is a framework for converting XML document to Java objects and vice versa. In order to do so, JAXB needs to instantiate a context for each and every Java object. Context creation is an expensive operation.

Problem

Jersey’s Abstract JAXB provider has weak references to JAXB contexts by using WeakHashMap. This causes context’s map to be garbage collected very often and new contexts to be added again to that map. Both garbage collection and context creation are expensive operations causing 100% CPU load and very poor performance.

Solution

The solution is to create your own JAXB context provider which keeps context forever. One approach is HashMap with context created on the fly on first access of specific Java object:

import javax.ws.rs.ext.ContextResolver;
import javax.xml.bind.JAXBContext;
import javax.xml.bind.JAXBException;
import java.util.HashMap;
import java.util.Map;

public class CustomJAXBContextProvider implements ContextResolver<JAXBContext> {
	private static final Map<Class, JAXBContext> JAXB_CONTEXT
			= new HashMap<Class, JAXBContext>();

	public JAXBContext getContext(Class<?> type) {
		try {
			JAXBContext context = JAXB_CONTEXT.get(type);
			if (context == null) {
				context = JAXBContext.newInstance(type);
				JAXB_CONTEXT.put(type, context);
			}
			return context;
		} catch (JAXBException e) {
			// Do something
			return null;
		}
	}
}

Another approach is one big context created for all the Java objects from specific packages separated with a colon:

import javax.ws.rs.ext.ContextResolver;
import javax.xml.bind.JAXBContext;
import javax.xml.bind.JAXBException;

public class CustomJAXBContextProvider implements ContextResolver<JAXBContext> {
	private static JAXBContext jaxbContext;

	public JAXBContext getContext(Class<?> type) {
		try {
			if (jaxbContext == null) {
				jaxbContext = JAXBContext
						.newInstance("com.acme.foo:com.acme.bar");
			}
			return jaxbContext;
		} catch (JAXBException e) {
			// Do something
			return null;
		}
	}
}

Both approaches have pros and cons. The first approach has fast startup time, but the first request will be slow. The second approach will have a fast first request, but slow server startup time. Once JAXB context is created in Dropwizard Application class a Jersey client should be created with this context and used for REST requests:

Client client = new JerseyClientBuilder(environment)
		.using(configuration.getJerseyClientConfiguration())
		.withProvider(CustomJAXBContextProvider.class).build(getName());

Conclusion

There is no practical need to garbage collect JAXB context so it should stay as long as application lives. This is why custom JAXB provider is a good solution even there are not actual performance issues.

Related Posts

Read more...

Build a RESTful stub server with Dropwizard

Last Updated on by

Post summary: How to make a RESTful server that can be used for stub during testing.

It might happen that you are testing a REST client against a server that is not under your control. It might happen that server is not in your network, the server is not very stable, has sensitive data, changing, and unstable data, etc. In such cases, it might be hard to do proper automation testing. Solution to such situation is a server stub that responds to REST request in a predictable manner. This is tutorial how to do it.

Dropwizard

Dropwizard is Java framework for building a RESTful web server in very yshort time. It has incorporated proven libraries like Jetty, Jersey, Jackson and many more to reliably do the job in shortest possible time. They have very good getting started tutorial how to make a project from scratch. I’ve used it to create a project on my own. Steps are described below.

How to do it

  1. Create Maven project
  2. Add Dropwizard dependency
  3. Build with Maven
  4. Add configuration file
  5. Add configuration class
  6. Add data classes
  7. Add service classes
  8. Add health check
  9. Add Dropwizard application
  10. Build everything into a single JAR file
  11. Run it
  12. Test and enjoy

Create Maven project

Maven is central build repository for JARs. It makes it very easy to manage dependencies between libraries. Before getting started with Maven it should be installed. Once you do this path to Maven bin folder should be added to your Path environment variable (Windows). Once you do this open command prompt and type mvn –version to test if everything is configured correctly. If OK then make the project with the command below. Important in command is groupId this is Java package and artifactId this is project name:

mvn -B archetype:generate \
	-DarchetypeGroupId=org.apache.maven.archetypes \
	-DgroupId=com.automationrhapsody.reststub \
	-DartifactId=sample-dropwizard-rest-stub

The project can be created directly from IntelliJ, but I would recommend to create it with Maven to get acknowledged to it.

Build with Gradle

How to build the same project with Gradle instead of Maven can be found in Build a Dropwizard project with Gradle post.

Add Dropwizard dependency

Run your favorite IDE and import already created Maven project. In this tutorial, I’ll use IntelliJ. From project structure open pom.xml file. If the project was created with Maven there should be <dependencies> section with junit in it. You can remove junit and add the following XML instead.

<dependency>
	<groupId>io.dropwizard</groupId>
	<artifactId>dropwizard-core</artifactId>
	<version>0.8.0</version>
</dependency>

Build with Maven

Since you have created project with Maven you have it configured and know how to use it. Navigate to projects folder and run mvn package command. When run first time it takes a while since all dependencies are being loaded to the local Maven repository.

Once build is done go to IntelliJ and refresh Maven JARs. Right click on project -> Maven (in the bottom) -> Reimport.

Add configuration file

Configurations in Dropwizard are managed with YAML. In short key-value pairs are separated with a colon. Child elements are indented with two spaces from their parent. Repeating items are shown with a dash in front. The configuration file is with *.yml extension. Add config.yml file in the project. Below is sample use of configuration we are about to use in this tutorial. version is our custom property to illustrate working with configurations. server is standard Dropwizard property. With these configurations, we set the application to listen port to 9000 and administration port to 9001. With -type is shown repetitive sequence. In the current situation, it is HTTP, but there may be several protocols provided. port is its child key/value pair.

version: 0.0.1

# Change default server ports
server:
  applicationConnectors:
  - type: http
    port: 9000
  adminConnectors:
  - type: http
    port: 9001

Add configuration class

Once we have configuration file we need a class that will handle it. As I said version is our custom configuration property. In order to handle it, our class should extend Configuration. Define field with getter and setter. Annotate getter and setter with @JsonProperty and you are ready to go. If more properties are needed more fields with getters and setters should be defined in the class.

package com.automationrhapsody.reststub;

import com.fasterxml.jackson.annotation.JsonProperty;
import io.dropwizard.Configuration;
import org.hibernate.validator.constraints.NotEmpty;

public class RestStubConfig extends Configuration {
	@NotEmpty
	private String version;

	@JsonProperty
	public String getVersion() {
		return version;
	}

	@JsonProperty
	public void setVersion(String version) {
		this.version = version;
	}
}

Create data classes

The term in Dropwizard for those POJOs is Representation Class but in general they are objects to exchange data. In our example, we have Person class which has very basic attributes. It has only getters in order to be immutable. Getters are annotated with @JsonProperty  which allows Jackson to serialize and deserialize from JSON. Note that there is empty constructor which is needed for Jackson’s deserialization.

package com.automationrhapsody.reststub.data;

import com.fasterxml.jackson.annotation.JsonProperty;

public class Person {
	private int id;
	private String firstName;
	private String lastName;
	private String email;

	public Person() {
		// Needed by Jackson deserialization
	}

	public Person(int id, String firstName, String lastName, String email) {
		this.id = id;
		this.firstName = firstName;
		this.lastName = lastName;
		this.email = email;
	}

	@JsonProperty
	public int getId() {
		return id;
	}

	@JsonProperty
	public String getFirstName() {
		return firstName;
	}

	@JsonProperty
	public String getLastName() {
		return lastName;
	}

	@JsonProperty
	public String getEmail() {
		return email;
	}
}

If data to be exchanged gets too much data classes will become enormous. One solution to reduce their size is to use Lombok. See how it is done in Get rid of Getters and Setters post.

Create service

The term in Dropwizard is Resource Class but this actually is the RESTful service with its endpoints. @Path provides where the endpoint is. In the current example, I have /person for the whole class and different paths for different operations. The result is that paths are concatenated. @GET and @POST indicate the type of the request. @Timed is put for analytics purposes. @Produces and @Consumes provide the type of data that is being exchanged. @PathParam indicates that id is part of the URL.

package com.automationrhapsody.reststub.resources;

import com.automationrhapsody.reststub.data.Person;
import com.automationrhapsody.reststub.persistence.PersonDB;
import com.codahale.metrics.annotation.Timed;

import javax.ws.rs.*;
import javax.ws.rs.core.MediaType;
import java.util.List;

@Path("/person")
public class PersonService {

	public PersonService() {
	}

	@GET
	@Timed
	@Path("/get/{id}")
	@Produces(MediaType.APPLICATION_JSON)
	public Person getPerson(@PathParam("id") int id) {
		return PersonDB.getById(id);
	}

	@GET
	@Timed
	@Path("/remove")
	@Produces(MediaType.TEXT_PLAIN)
	public String removePerson() {
		PersonDB.remove();
		return "Last person remove. Total count: " + PersonDB.getCount();
	}

	@GET
	@Timed
	@Path("/all")
	@Produces(MediaType.APPLICATION_JSON)
	public List<Person> getPersons() {
		return PersonDB.getAll();
	}

	@POST
	@Timed
	@Path("/save")
	@Produces(MediaType.TEXT_PLAIN)
	@Consumes({MediaType.APPLICATION_JSON})
	public String addPerson(Person person) {
		return PersonDB.save(person);
	}
}

Service operations

Example above is about RESTful service dealing with person data. There are 4 operations exposed on following URLs:

  • /person/get/{id} – by provided person unique “id” it returns JSON with person data
  • /person/remove – removes one person on random basis
  • /person/all – returns JSON with all person data
  • /person/save – receives JSON with the person data and saves it to persons if “id” is unique, if not updating person by its id.

Business logic

It is little overrated to call it business logic but this is how we manage persons. If this was a production application you might have lots of business logic and some DB (SQL or no-SQL). Since this is just a test stub it is enough to have some data structure where to keep persons. In our case, HashMap is selected. There are static methods manipulating data.

package com.automationrhapsody.reststub.persistence;

import com.automationrhapsody.reststub.data.Person;

import java.util.ArrayList;
import java.util.HashMap;
import java.util.List;
import java.util.Map;

public class PersonDB {
	private static Map<Integer, Person> persons = new HashMap<Integer, Person>();

	static {
		persons.put(1, new Person(1, "FN1", "LN1", "email1@email.com"));
		persons.put(2, new Person(2, "FN2", "LN2", "email2@email.com"));
		persons.put(3, new Person(3, "FN3", "LN3", "email3@email.com"));
		persons.put(4, new Person(4, "FN4", "LN4", "email4@email.com"));
	}

	public static Person getById(int id) {
		return persons.get(id);
	}

	public static List<Person> getAll() {
		List<Person> result = new ArrayList<Person>();
		for (Integer key : persons.keySet()) {
			result.add(persons.get(key));
		}
		return result;
	}

	public static int getCount() {
		return persons.size();
	}

	public static void remove() {
		if (!persons.keySet().isEmpty()) {
			persons.remove(persons.keySet().toArray()[0]);
		}
	}

	public static String save(Person person) {
		String result = "";
		if (persons.get(person.getId()) != null) {
			result = "Updated Person with id=" + person.getId();
		} else {
			result = "Added Person with id=" + person.getId();
		}
		persons.put(person.getId(), person);
		return result;
	}
}

Create health check

The health check is a smoke test that can be called from admin panel to give you information about the status of the system. In production systems, you might do things like checking DB connection, checking file system or network, checking important functionality. In the example here just to illustrate the functionality my health check is the count of persons in memory. If it goes to 0 then something is wrong and the system is not healthy. Also to illustrate how properties are used version is passed from configuration file to health check via its constructor.

package com.automationrhapsody.reststub;

import com.automationrhapsody.reststub.persistence.PersonDB;
import com.codahale.metrics.health.HealthCheck;

public class RestStubCheck extends HealthCheck {
	private final String version;

	public RestStubCheck(String version) {
		this.version = version;
	}

	@Override
	protected Result check() throws Exception {
		if (PersonDB.getCount() == 0) {
			return Result.unhealthy("No persons in DB! Version: " +
					this.version);
		}
		return Result.healthy("OK with version: " + this.version +
				". Persons count: " + PersonDB.getCount());
	}
}

Create application

This is the final piece. Once we have all (data, service, health check) then the application is the binding piece that brings them together. This is execution entry point. In main method new application is created and its run() method is called. This is it. In order to actually work service and health check should be registered. This is done in the run method. You create an instance of both service and health check. Configuration is passed in health check’s constructor.

package com.automationrhapsody.reststub;

import com.automationrhapsody.reststub.resources.BookService;
import com.automationrhapsody.reststub.resources.PersonService;
import io.dropwizard.Application;
import io.dropwizard.setup.Environment;

public class RestStubApp extends Application<RestStubConfig> {

	public static void main(String[] args) throws Exception {
		new RestStubApp().run(args);
	}

	@Override
	public void run(RestStubConfig config, Environment env) {
		final PersonService personService = new PersonService();
		env.jersey().register(personService);

		env.healthChecks().register("template", 
			new RestStubCheck(config.getVersion()));
	}
}

Build a single JAR

This was it now all have to be packed into a JAR. The strategy is to build everything into one JAR and just run it. It could not be more simple. Open pom.xml file. Add <build><plugins> … </plugins></build> in the end. Add XML below into this snippet. Only <mainClass> is customizable and should be changed according to your project structure.

<plugin>
	<groupId>org.apache.maven.plugins</groupId>
	<artifactId>maven-shade-plugin</artifactId>
	<version>1.6</version>
	<configuration>
		<createDependencyReducedPom>true</createDependencyReducedPom>
		<filters>
			<filter>
				<artifact>*:*</artifact>
				<excludes>
					<exclude>META-INF/*.SF</exclude>
					<exclude>META-INF/*.DSA</exclude>
					<exclude>META-INF/*.RSA</exclude>
				</excludes>
			</filter>
		</filters>
	</configuration>
	<executions>
		<execution>
			<phase>package</phase>
			<goals>
				<goal>shade</goal>
			</goals>
			<configuration>
				<transformers>
					<transformer implementation="org.apache.maven.plugins.shade.resource.ServicesResourceTransformer"/>
					<transformer implementation="org.apache.maven.plugins.shade.resource.ManifestResourceTransformer">
						<mainClass>com.automationrhapsody.reststub.RestStubApp</mainClass>
					</transformer>
				</transformers>
			</configuration>
		</execution>
	</executions>
</plugin>

Build and run

Once this is done use mvn package to make the JAR. Navigate to target folder in your project and run the JAR. Two arguments are needed in order to run the JAR. First is server which instructs Dropwizard to run as a server. Second is the path to *.yml configuration file.

java -jar sample-dropwizard-rest-stub-1.0-SNAPSHOT.jar server ../config.yml

If everything is fine you should see something like the code below which will mean the server is ready.

GET     /person/all (...)
GET     /person/get/{id} (...)
GET     /person/remove (...)
POST    /person/save (...)

Test and enjoy

Once all this hard work has been done it is time to enjoy our RESTful server. List of all persons can be found at this URL: http://localhost:9000/person/all. You can get a person by id: http://localhost:9000/person/get/1.

Health checks are found in admin panel: http://localhost:9001. Try removing all persons by invoking several times this URL: http://localhost:9000/person/remove

And the hardest part is to save a person. I’m using Postman plugin but you can use any REST client you want. You have to put POST data against http://localhost:9000/person/save URL.

{
	"id": 10,
	"firstName": "FN10",
	"lastName": "LN10",
	"email": "email10@email.com"
}

And most important DO not forget to put Content-Type: application/json in the request header. If you do not put you will get Error 415 Unsupported Media Type error.

PostmanRequest

The sample application can be found in GitHub sample-dropwizard-rest-stub repository. Postman requests can be downloaded from Dropwizard Postman requests link and directly imported into Postman.

Another way to test the stub is by building a client as described in Create simple REST API client using Jersey post.

Run with Docker

In Run Dropwizard application in Docker with templated configuration using environment variables post, I have described how to make Dropwizard application configuration be changed with environment variables which makes it very easy to build and run inside Docker container.

Conclusion

It could not be easier. If you really need to stub a RESTful server this is the proper way to do it.

Related Posts

Read more...

FIX messages simulator

Last Updated on by

Post summary: General thoughts how to test FIX messages with a FIX simulator.

FIX stands for Financial Information eXchange and is most probably the most used protocol for exchanging electronic messages in the financial world.

FIX sessions

In order to exchange data systems in financial world use FIX messages. The first important step before exchanging messages is to establish a connection between each other. There are two roles for counterparties

  • Acceptor – acts as a server. Stays and listens for clients that will connect
  • Initiator – acts as a client. It is the active participant in the connection

Once roles are defined fix session should be established between both. They can maintain as many different sessions as they need. A session is uniquely identified by FIX protocol version and IDs of both counterparties.

A session is started by initiator by sending Logon request and receiving Logon Acknowledgement. A session is kept alive by both sides. They send Heartbeat messages to each other. A session is ended by Logout message send from one of the counterparties. The other acknowledges the Logout.

FIX messages

Once all the ceremony of setting a session is done and the session is alive both counterparties can start exchanging FIX messages with data. FIX message in short is a string containing key-value pairs in format <TagNumber>=<Value> separated by SOH (\u0001) character. Each tag has a name and in some cases vast specification what values accept, what each value means, etc. FIXimate is a pretty good online tool which gives information about tags. Each tag is represented by its integer number in the message. Tags are separated in three parts of the message:

  • Header – contains information needed for session identification
  • Body – contains business data
  • Trailer – checksum for message validation

An example where SOH is replaced with |

8=FIX.4.2|9=76|35=A|49=Initiator|56=Acceptor|34=1|52=20150321-15:39:28.762|98=0|108=30|141=Y|10=187|

Testing of FIX message scenarios

Depending on business logic behind actual testing of FIX messages could be a pretty complicated task. Each message alone could have tens of tags with data. Each tag is meaningful and the system can react in a different manner based on its value. Each message could depend on the previous message. The combination and complex business logic could be made through a very difficult testing task.

How to do it

There are numerous FIX simulators available out there. They will work for most of the cases but since FIX communication can be really boutique in some cases external tool is not a good idea. The internal tool is what I suggest and propose a solution in the current post.

Visualise the message

This is maybe the hardest part of everything. How to show messages so they can be easy to comprehend and edit. Obviously editing long string with user-unfriendly data is not the best solution. I admit not the perfect solution but couldn’t think of better than good old-fashioned Excel. In short, each column is a specific tag. Each row is a single fix message and you fill the tag value for this particular fix message. There could be separation rows to make different tests scenarios.

Convert the messages

Once Excel test cases are ready they are exported with a macro to special XML format. XML is then read from FIX simulator and converted to real fix messages.

Send the messages

FIX messages are then sent on the wire. In order to send them, you need fix engine. Very popular is QuickFIX engine. It has Java and .NET version. There are example applications which help for better understanding how to use the engine.

Conclusion

Testing FIX messages based on business rules is definitely a very important task. It also is not the simplest task you might think of as a QA. Still, it is achievable. I would say creating custom solution will initially take some time but in the long run, it will pay off as you will have total control over features you have and need.

Read more...