AWS examples in C# – run the solution

Last Updated on by

Post summary: Explanation of how to install and use the solution in AWS examples in C# blog post series.

This post is part of AWS examples in C# – working with SQS, DynamoDB, Lambda, ECS series. The code used for this series of blog posts is located in aws.examples.csharp GitHub repository. In the current post, I give information on how to install and run the project.

Disclaimer

The solution has commands to deploy to the cloud as well as to clean resources. Note not all resources are cleaned, read more in the Cleanup section. In order to be run in AWS valid account is needed. I am not going to describe how to create an account. If an account is present, then there is also knowledge and awareness of how to use it.

Important: current examples generate costs on AWS account. Use cautiously at your own risk!

Restrictions

The project was tested to be working on Linux and Windows. For Windows, it is working only with Git Bash. The project requires a valid AWS account.

Required installations

In order to fully run and enjoy the project following needs to be installed:

Configurations

AWS CLI has to be configured in order to run properly. It happens with aws configure. If there is no AWS account, this is not an issue, put some values for access and secret key and put a correct region, like us-east-1.

Import Postman collection, in order to be able to try the examples. Postman collection is in aws.examples.csharp.postman_collection.json file in the code. This is an optional step, below there are cURL examples also.

Run the project in AWS

Running on AWS requires the setting of environment variables:

export AwsAccessKey=KIA57FV4.....
export AwsSecretKey=mSgsxOWVh...
export AwsRegion=us-east-1

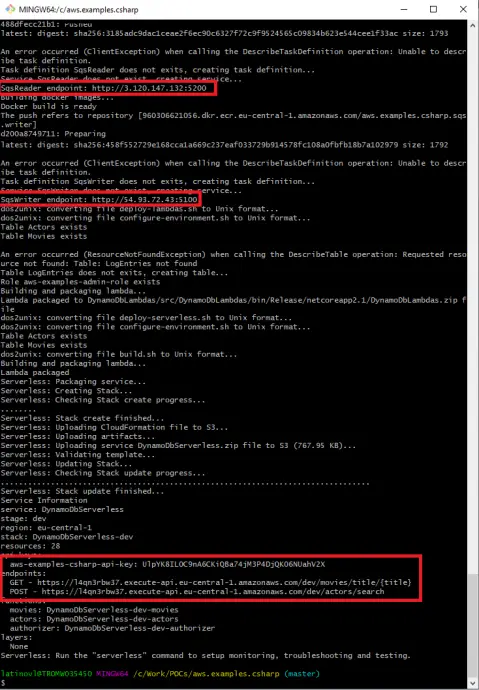
Then the solution is deployed to AWS with ./solution-deploy.sh script. Note that the output of the command gives the API Gateway URL and API key, as well as the SqsWriter and SqsReader endpoints. See image below:

Run the project partly in AWS

The most expensive part of the current setup is the running of the docker containers in EC2 (Elastic Compute Cloud). I have prepared a script called ./solution-deploy-hybrid.sh, which runs the containers locally and all other things are in AWS. Still, environment variables from the previous section are mandatory to be set. I believe this is the optimal variant if you want to test and run the code in a “production-like” environment.

Run the project in LocalStack

LocalStack provides an easy-to-use test/mocking framework for developing Cloud applications. It spins up a testing environment on local machines that provide the same functionality and APIs as the real AWS cloud environment. I have experimented with LocalStack, there is a localstack branch in GitHub. The solution can be run with solution-deploy-localstack.sh command. I cannot really estimate if this is a good alternative, because I am running the free tier in AWS and the most expensive part is ECS, which I skip by running the containers locally, instead of AWS. See the previous section on how to run a hybrid.

Usage

There is a Postman collection which allows easy firing of the requests. Another option is to use cURL, examples of all requests with their Postman names are available below.

SqsWriter

SqsWriter is a .NET Core 3.0 application, that is dockerized and run in AWS ECS (Elastic Container Service). It exposes an API that can be used to publish Actor or Movie objects. There is also a health check request. After AWS deployment proper endpoint is needed. The endpoint can be found as an output of deployment scripts. See the image above.

PublishActor

curl --location --request POST 'http://localhost:5100/api/publish/actor' \
--header 'Content-Type: application/json' \
--data-raw '{
	"FirstName": "Bruce",
	"LastName": "Willis"
}'

PublishMovie

curl --location --request POST 'http://localhost:5100/api/publish/movie' \
--header 'Content-Type: application/json' \
--data-raw '{
	"Title": "Die Hard",
	"Genre": "Action Movie"
}'

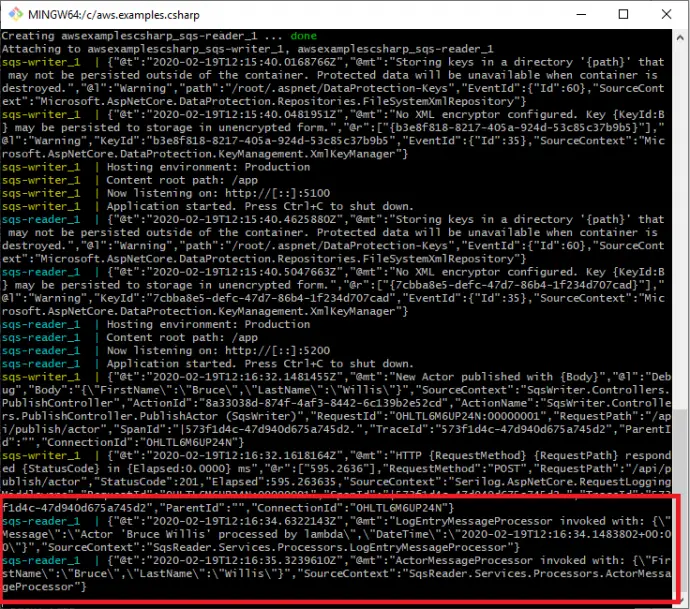
When Actor or Movie is published, it goes to the SQS queue, SqsReader picks it up from there and processes it. What is visible in the logs is that both LogEntryMessageProcessor and ActorMessageProcessor are invoked. See the screenshot:

SqsWriterHealthCheck

curl --location --request GET 'http://localhost:5100/health'

SqsReader

SqsReader is a .NET Core 3.0 application, that is dockerized and run in AWS ECS. It has a consumer that listens to the SQS queue and processes the messages by writing them into appropriate AQS DynamoDB tables. It also exposes API to stop or start processing, as long as reprocess the dead-letter queue or simply get the queue status. After AWS deployment proper endpoint is needed. The endpoint can be found as an output of deployment scripts. See the image above.

ConsumerStart

curl --location --request POST 'http://localhost:5200/api/consumer/start' \
--header 'Content-Type: application/json' \
--data-raw ''

ConsumerStop

curl --location --request POST 'http://localhost:5200/api/consumer/stop' \
--header 'Content-Type: application/json' \
--data-raw ''

ConsumerStatus

curl --location --request GET 'http://localhost:5200/api/consumer/status'

ConsumerReprocess
If this one is invoked with no messages in the dead-letter queue then it takes 20 seconds to finish, because it actually waits for long polling timeout.

curl --location --request POST 'http://localhost:5200/api/consumer/reprocess' \
--header 'Content-Type: application/json' \
--data-raw ''

SqsReaderHealthCheck

curl --location --request GET 'http://localhost:5200/health'

ActorsServerlessLambda

This lambda is managed by the Serverless framework. It is exposed as REST API via AWS API Gateway. It also has a custom authorizer as well as API Key attached. Those are described in a further post.

ServerlessActors

In the case of AWS, the API Key and URL are needed, those can be obtained from deployment command logs. See the screenshot above. Put correct values to CHANGE_ME and REGION placeholders. Request is:

curl --location --request POST 'https://CHANGE_ME.execute-api.REGION.amazonaws.com/dev/actors/search' \
--header 'Content-Type: application/json' \
--header 'x-api-key: CHANGE_ME' \
--header 'Authorization: Bearer validToken' \
--data-raw '{
    "FirstName": "Bruce",
    "LastName": "Willis"
}'

MoviesServerlessLambda

ServerlessMovies

Put correct values to CHANGE_ME and REGION placeholders. Request is:

curl --location --request GET 'https://CHANGE_ME.execute-api.REGION.amazonaws.com/dev/movies/title/Die Hard'

Cleanup

Nota bene: This is a very important step, as leaving the solution running in AWS will accumulate costs.

In order to stop and clean up all AWS resources run ./solution-delete.sh script.

Nota bene: There a resource that is not automatically deleted by the scripts. This is a Route53 resource created by AWS Cloud Map. It has to be deleted with the following commands. Note that the id in the delete command comes from the result of list-namespaces command.

aws servicediscovery list-namespaces
aws servicediscovery delete-namespace --id ns-kneie4niu6pwwela

Verify cleanup

In order to be sure there are no leftovers from the examples, following AWS services has to be checked:

  • SQS
  • DynamoDB
  • IAM -> Roles
  • EC2 -> Security Groups
  • ECS -> Clusters
  • ECS -> Task Definitions
  • ECR -> Repositories
  • Lambda -> Functions
  • Lambda -> Applications
  • CloudFormation -> Stacks
  • S3
  • CloudWatch -> Log Groups
  • Route 53
  • AWS Cloud Map

On top of it, Billing should be regularly monitored to ensure no costs are applied.

Conclusion

This post describes how to run and they the solution described in AWS examples in C# – working with SQS, DynamoDB, Lambda, ECS series

Related Posts

Read more...

Serialize and deserialize enum values to custom string in C# with Json.NET

Last Updated on by

Post summary: How to serialize and deserialize C# enum values to customs strings.

The code used for this blog post is located in dotnet.core.templates GitHub repository.

Use case description

Enums provide an efficient way to define a set of named integral constants that may be assigned to a variable. They are strongly typed values and are preferred choice over the string constants. In the given example there is an API that provides functionality to save or get movies with title and genre. Although not the best example, as the genre can have lots of values, but it still can be presented as an enum. In the same setup, there is a user interface that consumes the get API. In the UI it is more convenient to directly display the genre as text, so control over naming convention happens in the backend and there is no mapping in the frontend, and localization is ignored in the current example.

Serialize and deserialize

Serialization and deserialization to a custom string can be done with two steps. The first is to add an attribute to all enum values which gives the preferred string mapping.

using System.Runtime.Serialization;

public enum MovieGenre
{
	[EnumMember(Value = "Action Movie")]
	Action,
	[EnumMember(Value = "Drama Movie")]
	Drama
}

Then Json.NET is instructed to serialize/deserialize the enum value as a string with [JsonConverter(typeof(StringEnumConverter))] attribute.

using Newtonsoft.Json;
using Newtonsoft.Json.Converters;

public class Movie
{
	public string Title { get; set; }

	[JsonConverter(typeof(StringEnumConverter))]
	public MovieGenre Genre { get; set; }
}

This results in the following JSON:

{
	"Title": "Die Hard",
	"Genre": "Action Movie"
}

In the example above, if [EnumMember(Value = “Action Movie“)] is not provided in the enum declaration, then the string representation of the enum value is taken:

{
	"Title": "Die Hard",
	"Genre": "Action"
}

Conclusion

Although the current example is not ideal from a use-case point of view, it shows technically how Newtonsoft Json.NET can be instructed to serialize/deserialize enum values to custom strings or just string representation of the enum value.

Read more...

Create .NET Core health checks with custom response payload

Last Updated on by

Post summary: How to extend custom .NET Core health checks so the response JSON provides more information.

The code used for this blog post is located in dotnet.core.templates GitHub repository.

Heath checks in .NET Core

Health checks in .NET Core is a middleware that provides a possibility to report an application’s health. This allows monitoring of the application and taking corrective actions in case of issues. For e.g., if an application reports to be unhealthy, then the load balancer can exclude it from the infrastructure and appropriate alarms to be raised. More in about health checks can be read in Health checks in ASP.NET Core page.

Adding a health check

In order to add a health check in a .NET Core application, then reference to Microsoft.AspNetCore.Diagnostics.HealthChecks package has to be added. Health checks themselves are classes implementing IHealthCheck interface.

public class VersionHealthCheck : IHealthCheck
{
	private readonly AppConfig _config;

	public VersionHealthCheck(IOptions<AppConfig> options)
	{
		_config = options.Value;
	}

	public Task<HealthCheckResult> CheckHealthAsync(HealthCheckContext context,
				CancellationToken cancellationToken = new CancellationToken())
	{
		return Task.FromResult(string.IsNullOrEmpty(_config.Version)
			? HealthCheckResult.Unhealthy()
			: HealthCheckResult.Healthy());
	}
}

Health checks have to be registered in Startup.cs file:

public void ConfigureServices(IServiceCollection services)
{
	services.AddHealthChecks()
		.AddCheck<VersionHealthCheck>("Version Health Check");
}

As a last step health checks endpoint has to be configured in Startup.cs file:

public void Configure(IApplicationBuilder app)
{
	app.UseEndpoints(endpoints =>
	{
		endpoints.MapHealthChecks("/health");
	});
}

Now health checks report is available at <HOSTNAME>/health URL. If everything is good, the response is 200 OK with content Healthy. In case of issues, the response is 503 Service Unavailable with content Unhealthy.

Extend the health checks response

As stated above health checks are mainly intended for machine usage. I have had cases in practice, in which just looking into the health check allows faster problem solving rather than looking into the logs. For this reason, investing in more explanatory health checks is worth it. Below is a code snippet on how to have more information into the health check response payload. A new static class HealthCheckExtensions with MapCustomHealthChecks method can be added.

public static class HealthCheckExtensions
{
	public static IEndpointConventionBuilder MapCustomHealthChecks(
		this IEndpointRouteBuilder endpoints, string serviceName)
	{
		return endpoints.MapHealthChecks("/health", new HealthCheckOptions
		{
			ResponseWriter = async (context, report) =>
			{
				var result = JsonConvert.SerializeObject(
					new HealthResult
					{
						Name = serviceName,
						Status = report.Status.ToString(),
						Duration = report.TotalDuration,
						Info = report.Entries.Select(e => new HealthInfo
						{
							Key = e.Key,
							Description = e.Value.Description,
							Duration = e.Value.Duration,
							Status = Enum.GetName(typeof(HealthStatus),
													e.Value.Status),
							Error = e.Value.Exception?.Message
						}).ToList()
					}, Formatting.None,
					new JsonSerializerSettings
					{
						NullValueHandling = NullValueHandling.Ignore
					});
				context.Response.ContentType = MediaTypeNames.Application.Json;
				await context.Response.WriteAsync(result);
			}
		});
	}
}

All the formatting in the code depends on two additional data classes HealthInfo and HealthResult.

public class HealthInfo
{
	public string Key { get; set; }
	public string Description { get; set; }
	public TimeSpan Duration { get; set; }
	public string Status { get; set; }
	public string Error { get; set; }
}
public class HealthResult
{
	public string Name { get; set; }
	public string Status { get; set; }
	public TimeSpan Duration { get; set; }
	public ICollection<HealthInfo> Info { get; set; }
}

Registering the endpoint happens with the same code as in the default case, with the difference that the MapCustomHealthChecks extension method is used:

public void Configure(IApplicationBuilder app)
{
	app.UseEndpoints(endpoints =>
	{
		endpoints.MapCustomHealthChecks("Service Name");
	});
}

Now it is possible to have some more elaborate health checks, which can capture exception for e.g. and return it as well.

public Task<HealthCheckResult> CheckHealthAsync(HealthCheckContext context,
		CancellationToken cancellationToken = new CancellationToken())
{
	try
	{
		var message = $"Version is healthy: {_config.Version}";
		return Task.FromResult(HealthCheckResult.Healthy(message));
	}
	catch (Exception ex)
	{
		var message = "There is an error with version health check";
		return Task.FromResult(HealthCheckResult.Unhealthy(message, ex));
	}
}

In the case of 503 Service Unavailable, health check gives more details, which in some cases can be enough to resolve the issue without having to dig into the logs.

{
	"Name": "Service Name",
	"Status": "Unhealthy",
	"Duration": "00:00:00.0159186",
	"Info": [
		{
			"Key": "Version Health Check",
			"Description": "There is an error with version health check",
			"Duration": "00:00:00.0010564",
			"Status": "Unhealthy",
			"Error": "Exception's message text"
		}
	]
}

Conclusion

.NET Core health checks are a convenient way for automatic service monitoring and taking corrective actions. With a small effort, they can be enhanced so they can be made useful for people trying to identify what the issues with the services are.

Related Posts

Read more...

Optimize the size of Docker images

Last Updated on by

Post summary: How to optimize the size of the Docker images, by using intermediate build image and final runtime image.

The code used for this blog post is located in dotnet.core.templates GitHub repository. The code examples below are for .NET Core 3.0, but principles applied in this article are valid for any programming language, so it is worth reading.

Docker layers and images

Docker image is an executable version of a given application that runs on top of an operating system’s kernel. Docker image is the result of the execution of a Dockerfile. Usually, Dockerfile starts from some base image, for e.g. an operating system. Then commands are built on top of this base image and the result is a new image. This new image can be used as a base image somewhere else. Each and every command in Dockerfile results in a layer. This layering system is used for better reusability, as several images can reuse a given layer. The more layers are added to the image the bigger it gets in size.

All docker images can be listed with docker images command. Size is also present as an output of the command. Then for a given image, it is possible to list all the layers with docker history <IMAGE_NAME> command, which also shows the size of a given layer.

Images are kept in a Docker repository, either public or private. The bigger the image, the more time it takes to upload, to download and the more space it consumes in the repository. It is a good practice to optimize the images in terms of size.

Optimize the size

Usually when building software much more resources are needed, such as SDK, or compiler, or additional libraries, than if the software is run. One strategy for optimization is to build the software on a special build machine and then pack it to a Docker image. In this approach, the build machine should have the needed build software. This puts some demand on the build machine and also makes the image creating process dependant on certain software packages being installed. A more convenient option is to build the application as part of the Docker image creating and then packet into a separate container. See Dockerfile below.

FROM mcr.microsoft.com/dotnet/core/aspnet:3.0-buster-slim AS base
WORKDIR /app

FROM mcr.microsoft.com/dotnet/core/sdk:3.0-buster AS build
WORKDIR /src
COPY . .
RUN dotnet restore
RUN dotnet publish -c Release -o /pub

FROM base AS final
WORKDIR /app
COPY --from=build /pub .
ENTRYPOINT ["dotnet", "PROJECT_NAME.dll"]

In short, image sdk:3.0-buster is used to publish the application as it has .NET Core SDK on it, and then application code is copied into aspnet:3.0-buster-slim which has only the .NET Core runtime and is low in size.

No matter how the software is built, the most optimal image in terms of size and capabilities has to be selected to pack the code into. For e.g. Google provides “Distroless”, images that do not contain package managers, shells or any other programs you would expect to find in a standard Linux distribution. This makes images smaller and much more secure. I tried to build the application I am experimenting with into Distroless image and it gets 136MB in size, where if I pack it into .NET 3.0 runtime image it gets 209MB. Unfortunately, there is no Distroless image for .NET Core 3.0, so my experiment image fails to run, and I have to use aspnet:3.0-buster-slim in order to run my sample application.

.NET Core different images

.NET Core has different images, which are very well explained into .NET Core SDK images page. They are:

  • buster – Debian 10
  • alpine – Alpine
  • bionic – Ubuntu 18.04
  • disco – Ubuntu 19.04
  • stretch – Debian 9

.NET Core 3.0 error in stretch images

This section is not directly contributing to the main point of the topic, but it might be helpful to someone. When I experimented, I initially started with stretch base images. And I got the following errors:

  • System.MissingMethodException: Method not found: ‘Void Microsoft.AspNetCore.WebUtilities.FileBufferingReadStream..ctor(System.IO.Stream, Int32)’
  • System.TypeLoadException: Could not load type ‘Microsoft.AspNetCore.WebUtilities

These errors were not present when switching to buster base images.

Conclusion

In the current post, I describe how to construct Docker files so the build is done in Docker, eliminating the need of having specific software in order to pack the images. No matter how the software is built it is very important to pack it into the smallest possible image in order to save bandwidth and storage space during image usage. Google provides Distroless images that seem very lightweight and also secure as they do not contain package managers, shells or any other programs. Examples in this post are in .NET Core 3.0, but principles can be applied to different programming languages and technologies.

Related Posts

Read more...

Create project for .NET Core custom template

Last Updated on by

Post summary: How to create a custom .NET Core template, install it and create projects from it.

The code used for this blog post is located in dotnet.core.templates GitHub repository.

.NET Core

In short .NET Core is a cross-platform development platform supporting Windows, macOS, and Linux, and can be used in device, cloud, and embedded/IoT scenarios. It is maintained by Microsoft and the .NET community on GitHub. More can be read on .NET Core Guide.

Why .NET Core templates

When you create a new .NET Core project with dotnet new command it is possible to select from a list of predefined templates. This is a very handy feature, but out of the box templates are not really convenient, additional changes are required afterward to make the project fit for purpose. In a situation where many projects with similar structures are created, such as many micro-services, a custom template is very helpful. Users can define a custom template and easily create new projects out of it. In the current post, I will describe how to create an elaborate custom template.

Create template

What has to be done is just to create a project and customize it according to the needs. Once code is ready, a file named template.json located in .template.config folder should be added. The file should conform to http://json.schemastore.org/template JSON schema. See the file below, it is more or less self-explanatory. An important field is identity, which is basically the unique template name, it is not visible to users though. What is visible are name and shortName. ShortName is actually used when creating a project from this template: dotnet new shortName. Guids used in the template are defined in guids section in template.json file and they are replaced with a fresh set of guids on each project creation. More details on each and every possible option can be found in “Runnable-Project”-Templates page.

{
	"$schema": "http://json.schemastore.org/template",
	"author": "Lyudmil Latinov",
	"classifications": [
		"Common",
		"Code"
	],
	"identity": "dotnet.core.micro.service",
	"name": ".NET Core 3.0 micro-service",
	"shortName": "microservice",
	"tags": {
		"language": "C#",
		"type": "item"
	},
	"guids": [
		"9A19103F-16F7-4668-BE54-9A1E7A4F7556"
	]
}

This is it, the template is now ready to be installed and used.

Install template and create project

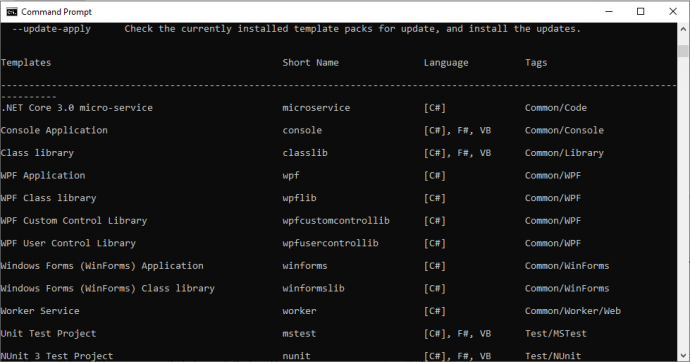
The template is installed with dotnet new -i <PATH_TO_FOLDER>. Once the template is installed dotnet new command lists it along with all predefined templates.

Creating a project is similar as it is created from standard templates: dotnet new <SHORT_NAME>, dotnet new microservice in this example.

Uninstalling of a template is done with dotnet new -u <PATH_TO_FOLDER> command. There is another command which uninstalls all custom template from the system: dotnet new –debug:reinit.

Replace project name

A custom template is a very handy thing and I would like to go one step further in making this template more flexible. When a new project is created it is good to have a proper name, which is reflected in the file names, folders’ names and into the namespace. For this reason, a custom replace task can be added to the template definition. A placeholder PROJECT_NAME is added to namespaces, Dockerfile, folder names, solution file name, and .csproj files names. This is done by adding and external required parameter in symbols section of template.json file. On project creation, this parameter is provided with value, which gets replaced in files content and file names.

{
	"$schema": "http://json.schemastore.org/template",
	...
	"symbols": {
		"ProjectName": {
			"type": "parameter",
			"replaces": "PROJECT_NAME",
			"FileRename": "PROJECT_NAME",
			"isRequired": true
		}
	}
}

When dotnet new microservice -h is executed it outputs the possible parameters that are needed to create a project from this template:

.NET Core 3.0 micro-service (C#)
Author: Lyudmil Latinov
Options:
  -P|--ProjectName
                    string - Required

Now, the project cannot be created without providing this parameter. Command dotnet new microservice returns error Mandatory parameter –ProjectName missing for template .NET Core 3.0 micro-service. The proper command now is dotnet new microservice –ProjectName SampleMicroservice.

Conditional files and features

So far template is much nicer and looks more real. It can be also further enhanced. For e.g. there are two major types of projects needed. One option is to have two separate templates, which means maintaining two templates. Another option, in case of insignificant differences, is to have conditional functionality added based on a parameter during template creation. A boolean parameter is added into symbols section of template.json file. Another thing to be done is to exclude files depending on this parameter. This is done in the sources section of template.json file.

{
	"$schema": "http://json.schemastore.org/template",
	...
	"symbols": {
		...
		"AddHealthChecks": {
			"type": "parameter",
			"datatype": "bool",
			"defaultValue": "false"
		}
	},
	"sources": [
		{
			"modifiers": [
				{
					"condition": "(!AddHealthChecks)",
					"exclude": [
						"src/**/HealthChecks/**",
						"test/**/Client/HealthCheckClient.cs",
						"test/**/Tests/HealthCheckTest.cs"
					]
				}
			]
		}
	]
}

Customize parameters switches

If you add several of those parameters, then .NET gives them an automatic name, which may not be very meaningful. So the names of those can be customized. In the example here, which is located in dotnet.core.templates GitHub repository, the default parameter names are (dotnet new microservice -h):

.NET Core 3.0 micro-service (C#)
Author: Lyudmil Latinov
Options:
  -P|--ProjectName
                         string - Required

  -A|--AddHealthChecks
                         bool - Optional
                         Default: false / (*) true

  -Ad|--AddSqsPublisher
                         bool - Optional
                         Default: false / (*) true

  -p:A|--AddSqsConsumer
                         bool - Optional
                         Default: false / (*) true


* Indicates the value used if the switch is provided without a value.

Short names like -p:A, -Ad does not seem too convenient. Those can be easily customized by adding dotnetcli.host.json file into .template.config folder:

{
	"$schema": "http://json.schemastore.org/dotnetcli.host",
	"symbolInfo": {
		"ProjectName": {
			"longName": "ProjectName",
			"shortName": "pn"
		},
		"AddHealthChecks": {
			"longName": "AddHealthChecks",
			"shortName": "ah"
		},
		"AddSqsPublisher": {
			"longName": "AddSqsPublisher",
			"shortName": "ap"
		},
		"AddSqsConsumer": {
			"longName": "AddSqsConsumer",
			"shortName": "ac"
		}
	}
}

Now options are much different:

.NET Core 3.0 micro-service (C#)
Author: Lyudmil Latinov
Options:
  -pn|--ProjectName
                         string - Required

  -ah|--AddHealthChecks
                         bool - Optional
                         Default: false / (*) true

  -ap|--AddSqsPublisher
                         bool - Optional
                         Default: false / (*) true

  -ac|--AddSqsConsumer
                         bool - Optional
                         Default: false / (*) true


* Indicates the value used if the switch is provided without a value.

Conclusion

.NET Core provides an easy and extensible way to make project templates, which are stored and maintained under version control and can be used for creating new projects. Those templates can be project-specific, product-specific, company-specific.

Related Posts

Read more...

.NET Core code coverage on Linux with MiniCover

Last Updated on by

Post summary: How to run code coverage of your unit tests as part of your build on Linux build agents.

Code below can be found in GitHub SampleDotNetCore2RestStub repository. In Code coverage of .NET Core unit tests with OpenCover post, I have shown how to do code coverage with OpenCover. Commands shown in that post can be made part of your CI or CD build. There is a but though, this works only for windows. If you are having build machines on Linux you need another alternative. In this post, I’m going to show this alternative.

MiniCover

MiniCover is a lightweight code coverage tool for .NET Core on Linux. It is in an early stage yet and there is no big community, but I really hope this is going to change soon as it looks a very promising tool.

Include in project

In order to use MiniCover it has to be installed as .NET CLI Tool. This is done with following code:

<ItemGroup>
	<DotNetCliToolReference Include="MiniCover" Version="2.0.0-ci-*" />
</ItemGroup>

In order to keep your original projects intact, the best approach is to create tools project and add it to its tools.csproj file, which will look:

<Project Sdk="Microsoft.NET.Sdk">

  <PropertyGroup>
    <TargetFramework>netcoreapp2.0</TargetFramework>
  </PropertyGroup>

  <ItemGroup>
    <DotNetCliToolReference Include="MiniCover" Version="2.0.0-ci-*" />
  </ItemGroup>

</Project>

Commands

At this stage following command line options are available:

  • instrument – Instrument assemblies
  • uninstrument – Uninstrument assemblies
  • reset – Reset hits count
  • report – Outputs coverage report
  • htmlreport -Write HTML report to a folder
  • xmlreport – Write an NCover-formatted XML report to folder

Run coverage

In case of a project structure where you have your code in src folder and your tests in test folder following bash script can be used directly. It accepts as parameter threshold coverage percentage, if not provided it uses 80% by default. Script restores NuGet packages and builds the projects. It navigates to tools folder and restores NuGet packages again. This is very important as it is the only way to get MiniCover NuGet package. Inside tools folder, it instruments assemblies and resets previous statistics. Script navigates to root folder and runs all tests inside every project in test folder. Afterward, script navigates again to tools folder and uninstruments all assemblies so far. No matter this operation is safe I would recommend to run one more build or publish before assemblies go into production. In the end, the script generates reports.

if [ ! -z $1 ]; then
  if [ $1 -lt 0 ] || [ $1 -gt 100 ]; then
    echo "Threshold should be between 0 and 100"
    threshold=80
  fi
  threshold=$1
else
  threshold=80
fi

dotnet restore
dotnet build

cd tools
dotnet restore

# Instrument assemblies inside 'test' folder to detect hits for source files inside 'src' folder
dotnet minicover instrument --workdir ../ --assemblies test/**/bin/**/*.dll --sources src/**/*.cs 

# Reset hits count in case minicover was run for this project
dotnet minicover reset

cd ..

for project in test/**/*.csproj; do dotnet test --no-build $project; done

cd tools

# Uninstrument assemblies, it's important if you're going to publish or deploy build outputs
dotnet minicover uninstrument --workdir ../

# Create HTML reports inside folder coverage-html
# This command returns failure if the coverage is lower than the threshold
dotnet minicover htmlreport --workdir ../ --threshold $threshold

# Print console report
# This command returns failure if the coverage is lower than the threshold
dotnet minicover report --workdir ../ --threshold $threshold

# Create NCover report
dotnet minicover xmlreport --workdir ../ --threshold $threshold

cd ..

Reports

There are 3 types of reports: Console, HTML and NCover XML.

Console report

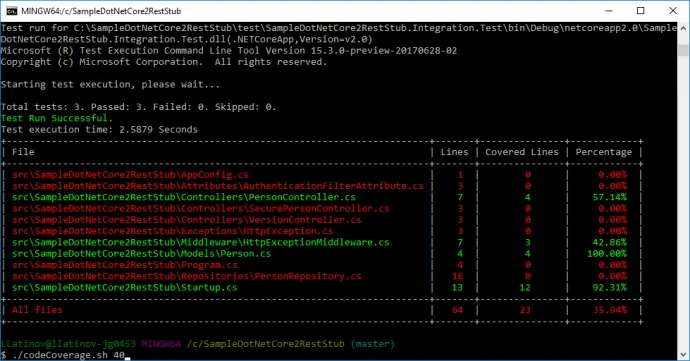
Console report is dumping results to the console and returns 1 if given threshold is not met, which basically fails the CI/CD build. In the example below, codeCoverage.sh was called with argument 40, which means threshold is 40%.

HTML report

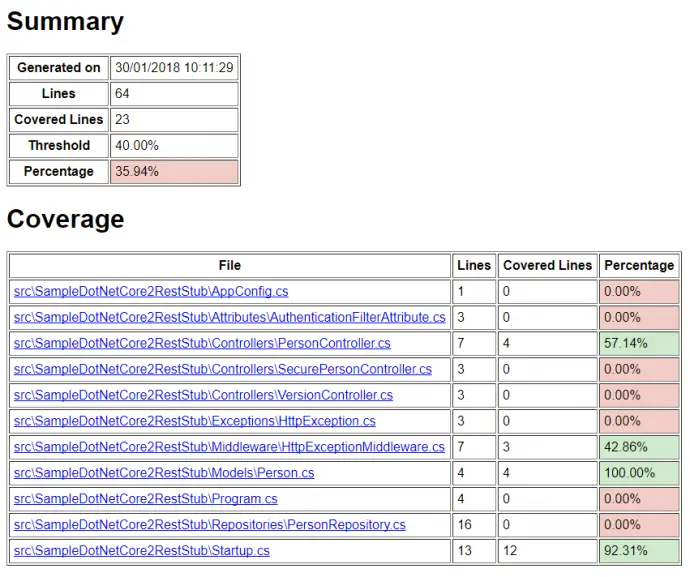
HTML report is also failing the build and gives similar summary information as console report, but also give detailed information for each class coverage. An example report can be found in MiniCover HTML report. I have to praise myself, as the summary file that is shown below was something I contributed, because I like the project very much.

NCover report

NCover report creates XML file in its format. The beauty of it is that you can additionally use ReportGenerator on Windows machine and convert XML to nice HTML report. Assuming ReportGenerator is extracted on your C:\ then the command is shown below. The report can be found in MiniCover ReportGenerator report.

C:\ReportGenerator\ReportGenerator.exe -reports:coverage.xml -targetdir:coverage

Compare with OpenCover

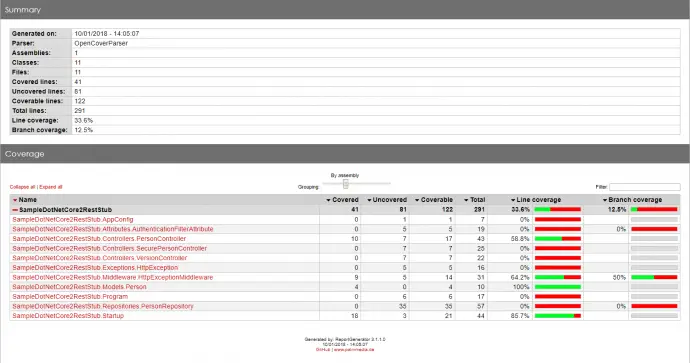
If you check both OpenCover .Net Core report and MiniCover ReportGenerator report you can notice some difference in metrics. First is that MiniCover does not support branch coverage. This is not that bad after all if you have your code nicely indented, line coverage is sufficient. For e.g., if your ternary operator is not on one line, but on three and you have missed testing one of the conditions, then line coverage will state that there is a not tested line. If the ternary operator is on one line though then line coverage will miss this test problem. Another difference is Coverable lines and Covered lines. OpenCover counts opening and closing brackets as such, so its numbers are bigger. Because of this conceptual difference Line coverage percentage has a small difference. MiniCover (35%) is more generous and give more percentage than OpenCover (33.6%).

Conclusion

MiniCover is very nice and compact tool that can be put in place during your continuous integration or continuous delivery to measure code coverage on each build. The most important advantage is that it is designed and works on Linux.

Related Posts

Read more...

Code coverage of .NET Core unit tests with OpenCover

Last Updated on by

Post summary: Examples how to measure code coverage of .NET Core unit tests with OpenCover.

Examples below are based on GitHub SampleDotNetCore2RestStub repository. Examples use code from .NET Core integration testing and mock dependencies post. Those are integration tests because they test more than one application module at a time, but they are run with a unit testing framework, this is why current post title is such.

Code coverage

This topic is how to do the code coverage on .NET Core unit tests with OpenCover. Theory on what is code coverage, why it is needed can be found in What about code coverage post.

OpenCover

OpenCover is open source tool for code coverage for .NET 2.0 and above applications for Windows only. You can read more details about OpenCover in Code coverage of manual or automated tests with OpenCover for .NET applications post or you can visit their OpenCover Wiki page.

Run OpenCover

In order to make this examples work you need to check out SampleDotNetCore2RestStub repository to C:\ and run all commands from project root folder C:\SampleDotNetCore2RestStub. OpenCover and ReportGenerator should be installed in C:\ as well. If you have different paths, just adjust them in commands shown below.

C:\OpenCover\OpenCover.Console.exe `
	-target:"c:\Program Files\dotnet\dotnet.exe" `
	-targetargs:"test" `
	-output:coverage.xml `
	-oldStyle `
	-filter:"+[SampleDotNetCore2RestStub*]* -[SampleDotNetCore2RestStub*Test*]*" `
	-register:user

Enable .NET Core to debug output

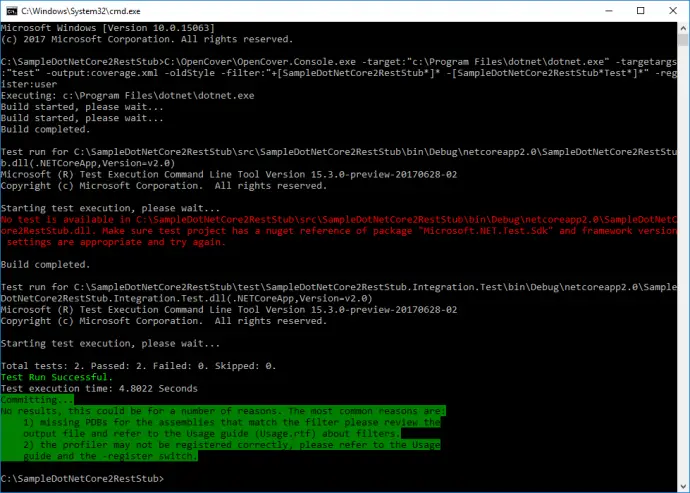
If you run the command above you will get the following message:

Committing…
No results, this could be for a number of reasons. The most common reasons are:
1) missing PDBs for the assemblies that match the filter please review the
output file and refer to the Usage guide (Usage.rtf) about filters.
2) the profiler may not be registered correctly, please refer to the Usage
guide and the -register switch.

Note: error with red text shown on image above is because with -targetargs:”test” dotnet.exe tries to run tests inside all projects, but src\SampleDotNetCore2RestStub simply does not have tests. You can refine which test project to get run by changing to: -targetargs:”test test\SampleDotNetCore2RestStub.Integration.Test\SampleDotNetCore2RestStub.Integration.Test.csproj”.

Message for no results is because debug output is not enabled on .NET Core project and OpenCover does not have needed data to work on. Change src\SampleDotNetCore2RestStub\SampleDotNetCore2RestStub.csproj file by adding <DebugType>full</DebugType>:

<PropertyGroup>
	<OutputType>Exe</OutputType>
	<TargetFramework>netcoreapp2.0</TargetFramework>
	<DebugType>full</DebugType>
</PropertyGroup>

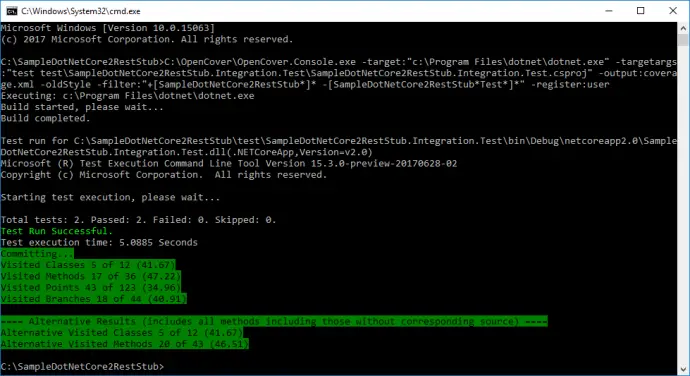
Now running the command gives proper output:

Committing…
Visited Classes 5 of 12 (41.67)
Visited Methods 17 of 36 (47.22)
Visited Points 43 of 123 (34.96)
Visited Branches 18 of 44 (40.91)

==== Alternative Results (includes all methods including those without corresponding source) ====
Alternative Visited Classes 5 of 12 (41.67)
Alternative Visited Methods 20 of 43 (46.51)

Generate report

ReportGenerator is used to convert XML reports generated by OpenCoverPartCoverVisual Studio or NCover into human-readable reports in various formats. To generate report use following command:

C:\ReportGenerator\ReportGenerator.exe `
	-reports:coverage.xml `
	-targetdir:coverage

Inspect report

The report can be found in my examples: OpenCover .Net Core report. You can see what code is being covered during testing and what not.

Conclusion

In this post, I have shown how to run code coverage with OpenCover on .NET Core unit tests.

Related Posts

Read more...

Useful .NET Core SDK CLI commands

Last Updated on by

Post summary: Some useful .NET Core SDK CLI commands.

Commands in the current post are extraction from Build a REST API with .NET Core 2 and run it on Docker Linux container and .NET Core integration testing and mock dependencies posts where I have used them in a real project.

All commands

All available commands are accessed with: dotnet –help.

Initialise .NET projects

Creating new projects is done with: dotnet new [options]. I have used following commands:

  • Create new console application project: dotnet new console -o <ProjectName>
  • Create new MS Test project: dotnet new mstest -o <ProjectName>
  • Create new solution file: dotnet new sln –name <SolutionName>

To list all available project types use: dotnet new –help.

Custom templates

.NET SDK allows you to create custom project template and then install it to SDK with the command: dotnet new -i <TEMPLATE_FOLDER>. Once installed can create a new project out of your custom template. This is valuable in big organizations where cohesion is needed between similar project types. See more for templates in Custom templates for dotnet new article.

Manage dependencies

Two types of dependencies are available, in a NuGet package or to another .NET project.

  • Add reference to a NuGet package: dotnet add package <NuGetPackageName>
  • Add reference to another .NET project: dotnet add reference <PathToProjectFile>

Similar commands are available for removing dependencies with: dotnet remove.

Project dependencies can be shown with: dotnet list reference <PathToProjectFile>.

Actions on a project

  • Build a project: dotnet build
  • Run a project: dotnet run
  • Run tests of a project: dotnet test
  • Publish project artefacts: dotnet publish

All commands have a bunch of configuration options to be provided. More details on each command can be obtained by adding –help at the end.

Manage solution file

  • Create new solution file: dotnet new sln –name <SolutionName>
  • Add project to solution: dotnet sln <SolutionFileName> add <PathToProjectFile>
  • Remove project from solution: dotnet sln <SolutionFileName> remove <PathToProjectFile>
  • List projects in a solution: dotnet sln <SolutionFileName> list

Conclusion

This post is showing some useful .NET SDK CLI commands that make management of .NET project easy without Visual Studio 2017. More practical examples can be found in post where those commands are actually used: Build a REST API with .NET Core 2 and run it on Docker Linux container and .NET Core integration testing and mock.

Related Posts

Read more...

.NET Core integration testing and mock dependencies

Last Updated on by

Post summary: How to do integration testing on .NET Core application and stub or mock some inconvenient dependencies.

Code below can be found in GitHub SampleDotNetCore2RestStub repository. In Build a REST API with .NET Core 2 and run it on Docker Linux container post I have shown how to create .NET Core application. In the current post, I will show how to do integration testing on the same application. The post is for REST API, but principles here apply for web UI as well, the difference is that the response will be HTML, which is slightly harder to process compared to JSON.

Refactor project structure

Currently, there is only one project created which contains .NET Core application. Since this is going to grow it has to be refactored and structured properly.

  • SampleDotNetCore2RestStub folder which contains the API is moved to src folder.
  • Solution file is created with dotnet new sln –name SampleDotNetCore2RestStub. Note that .sln extension is omitted as it is added automatically. Although everything in the example is done with open source tools, it is good to have solution file to keep compatibility with Visual Studio 2017.
  • API project file is added to solution file with:
    dotnet sln SampleDotNetCore2RestStub.sln add src/SampleDotNetCore2RestStub/SampleDotNetCore2RestStub.csproj.
  • In order to test that moving of files did not affected the functionality, API can be run with: dotnet run –project src/SampleDotNetCore2RestStub/SampleDotNetCore2RestStub.csproj.
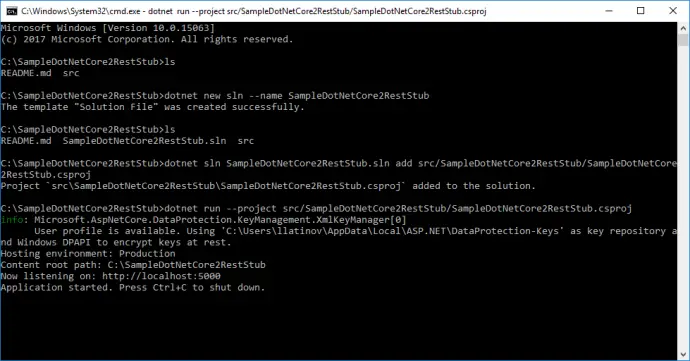
Add test project

It is time to create integration tests project. We speak for integration tests, but they will be run with unit testing framework MSTest. I do not have some particular favor of it, it comes by default with .NET Core, along with xUnit, and I do not want to change it.

  • Create test folder: mkdir test.
  • Navigate to it: cd test.
  • MSTest project is created with: dotnet new mstest -o SampleDotNetCore2RestStub.Integration.Test.
  • Navigate to test project: cd SampleDotNetCore2RestStub.Integration.Test.
  • Run the unit tests: dotnet test. By default, there is one dummy test that passes.
  • Go to root folder: cd .. and cd ..
  • Add test project to solution file: dotnet sln SampleDotNetCore2RestStub.sln add test/SampleDotNetCore2RestStub.Integration.Test/SampleDotNetCore2RestStub.Integration.Test.csproj.
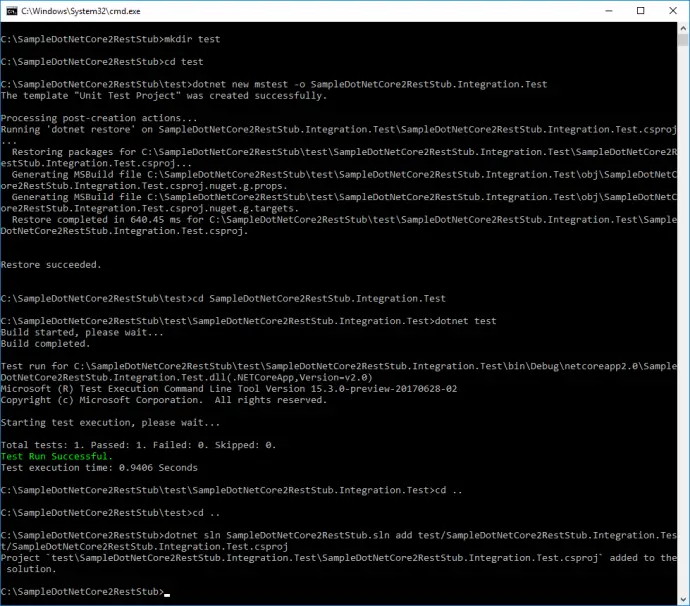
Open with Visual Studio Code

Once refactored and opened in Visual Studio Code project has following structure:
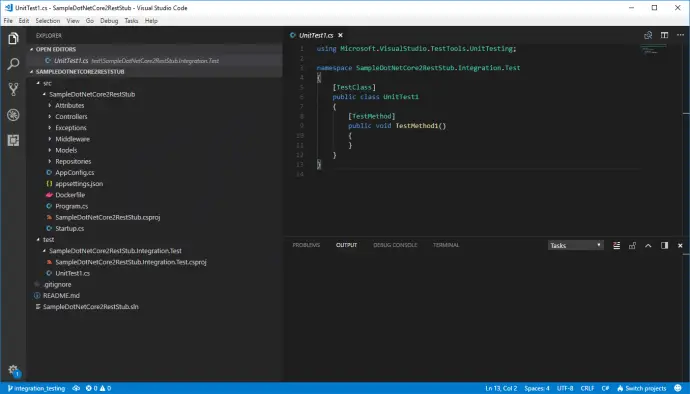
Unit vs Integration testing

I would not like to focus on theory and terminology as this post is not intended to, but I have to do some theoretical setup before proceeding with the code. Generally speaking, term integration testing is used in two cases. One is when different systems are interconnected together and tested, other is when different components of one system are grouped together and tested. In the current post with term integration testing, I will refer the latter. In unit testing, each separate class is tested in isolation. In order to do so all external dependencies, like a database, file system, web requests, and response, etc., are mocked. This makes tests run very fast but has a very high risk of false positives because of mocking. When mocking a dependency there is always an assumption how it works and is being used. The mocked behavior might be significantly different than actual one, then the unit test is compromised. On the other hand, integration testing verifies that different parts of the application work correctly when grouped together. It is much slower than unit testing because more and real resources are being used. Some parts of the application still can be mocked which can increase execution time. In the current post, I will show how to run a full application with only the database being mocked.

The Test Host

One way to run the fully assembled application is by building and deploying it. Then, the application will use real resources to work. Functional testing should also be done during testing but is not part of the current post. A more interesting scenario is to run fully assembled or partially mocked application in memory, without deployment and run tests against it. This approach has benefits, e.g. since the application is run locally its response time is very low, which speeds up tests; some parts, like database connection, can be mocked and thus speed up tests. .NET Core Test Host is a tool that can host web or API .NET Core applications serving requests and responses. It eliminates the need for having a testing environment.

Add dependencies

In order to use test host dependency to its NuGet package should be added. Navigate to test/SampleDotNetCore2RestStub.Integration.Test and add a dependency:

dotnet add package Microsoft.AspNetCore.TestHost

SampleDotNetCore2RestStub.Integration.Test project should depend on SampleDotNetCore2RestStub in order to use its code. This is done with:

dotnet add reference ../../src/SampleDotNetCore2RestStub/SampleDotNetCore2RestStub.csproj

Create the first test

Existing UnitTest1 class will be changed to start application inside test host and make a request.

using System.Net.Http;
using System.Threading.Tasks;
using Microsoft.AspNetCore.Hosting;
using Microsoft.AspNetCore.TestHost;
using Microsoft.VisualStudio.TestTools.UnitTesting;
using Newtonsoft.Json;
using SampleDotNetCore2RestStub.Models;

namespace SampleDotNetCore2RestStub.Integration.Test
{
	[TestClass]
	public class PersonsTest
	{
		private TestServer _server;
		private HttpClient _client;

		[TestInitialize]
		public void TestInitialize()
		{
			_server = new TestServer(new WebHostBuilder()
				.UseStartup<Startup>());
			_client = _server.CreateClient();
		}

		[TestMethod]
		public async Task GetPerson()
		{
			var response = await _client.GetAsync("/person/get/1");
			response.EnsureSuccessStatusCode();

			var result = await response.Content.ReadAsStringAsync();
			var person = JsonConvert.DeserializeObject<Person>(result);

			Assert.AreEqual("LN1", person.LastName);
		}
	}
}

TestServer uses an instance of IWebHostBuilder. Startup from UseStartup<Startup> is same class that is used to run the application, but here it is run inside TestServer instance. CreateClient() method returns instance of standard HttpClient, with which request to /person/get/1 endpoint is made. EnsureSuccessStatusCode() throws exception if response code is not inside 200-299 range. The response is then taken as a string and deserialized to Person object with Newtonsoft.Json, which is now part of .NET Core.

Test can be run from test\SampleDotNetCore2RestStub.Integration.Test folder with the command: dotnet test. If you type dotnet test from root folder it will search for tests inside all projects.

Debug tests in Visual Studio Code

Before proceeding any further with the code it should be possible to debug unit tests inside VS Code. It is not as easy as with VS 2017, but still manageable. First, you need to run your test from the command prompt in debug mode:

set VSTEST_HOST_DEBUG=1
dotnet test

Once this is done there is a message with specific process ID:

Starting test execution, please wait...
Host debugging is enabled. Please attach debugger to testhost process to continue.
Process Id: 16032, Name: dotnet
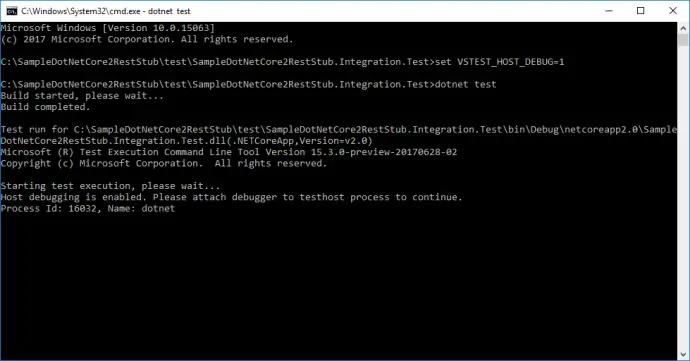
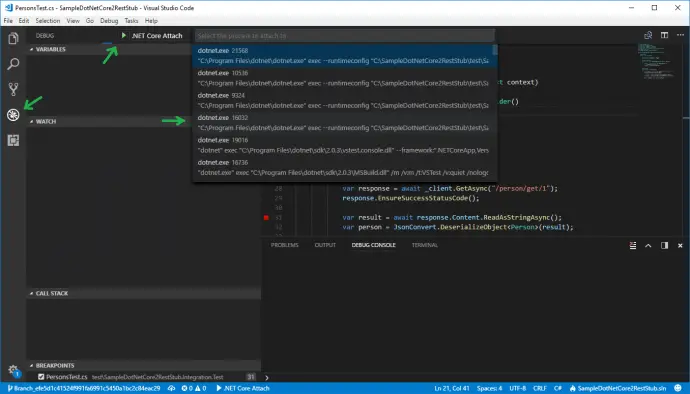
Now from Visual Studio Code, you have to attach to given process, 16032 in the current example. This is done from Debug View, then select .Net Core Attach launch configuration. If such is not existing, add it. Running this configuration shows a list of all processes with name dotnet. Select the proper one, 16032 in the current example.
Create PersonServiceClient and BaseTest

Tests should be easy to write, read and maintain, thus PersonServiceClient class is created. It exposes methods that hit the endpoints and return the result. Since testing is not only happy path, it should be possible to have some negative scenarios. You may want to hit the API with invalid data and verify it returns BadRequest (400) HTTP response code, or Unauthorized (401) HTTP response code, etc. In order to fulfill this test requirement, a separate class ApiResponse<T> is created. It stores response code along with response content as a string. In case that response string can be deserialized to an object of given generic type T it is also stored in ApiResponse object.

Client is instantiated as a protected variable in BaseTest constructor. PersonsTest extends BaseTest and has access to PersonServiceClient.

ApiResponse

using System.Net;

namespace SampleDotNetCore2RestStub.Integration.Test.Client
{
	public class ApiResponse<T>
	{
		public HttpStatusCode StatusCode { get; set; }
		public T Result { get; set; }
		public string ResultAsString { get; set; }
	}
}

PersonServiceClient

using System;
using System.Collections.Generic;
using System.Net.Http;
using System.Threading.Tasks;
using Newtonsoft.Json;
using SampleDotNetCore2RestStub.Models;

namespace SampleDotNetCore2RestStub.Integration.Test.Client
{
	public class PersonServiceClient
	{
		private readonly HttpClient _httpClient;

		public PersonServiceClient(HttpClient httpClient)
		{
			_httpClient = httpClient;
		}

		public async Task<ApiResponse<Person>> GetPerson(string id)
		{
			var person = await GetAsync<Person>($"/person/get/{id}");
			return person;
		}

		public async Task<ApiResponse<List<Person>>> GetPersons()
		{
			var persons = await GetAsync<List<Person>>("/person/all");
			return persons;
		}

		public async Task<ApiResponse<string>> Version()
		{
			var version = await GetAsync<string>("api/version");
			return version;
		}

		private async Task<ApiResponse<T>> GetAsync<T>(string path)
		{
			var response = await _httpClient.GetAsync(path);
			var value = await response.Content.ReadAsStringAsync();
			var result = new ApiResponse<T>
			{
				StatusCode = response.StatusCode,
				ResultAsString = value
			};

			try
			{
				result.Result = JsonConvert.DeserializeObject<T>(value);
			}
			catch (Exception)
			{
				// Nothing to do
			}

			return result;
		}
	}
}

BaseTest

using System.Net.Http;
using Microsoft.AspNetCore.Hosting;
using Microsoft.AspNetCore.TestHost;
using Microsoft.VisualStudio.TestTools.UnitTesting;
using SampleDotNetCore2RestStub.Integration.Test.Client;

namespace SampleDotNetCore2RestStub.Integration.Test
{
	public abstract class BaseTest
	{
		protected PersonServiceClient PersonServiceClient;

		public BaseTest()
		{
			var server = new TestServer(new WebHostBuilder()
				.UseStartup<Startup>());
			var httpClient = server.CreateClient();
			PersonServiceClient = new PersonServiceClient(httpClient);
		}
	}
}

PersonsTest

using System.Net;
using System.Net.Http;
using System.Threading.Tasks;
using Microsoft.AspNetCore.Hosting;
using Microsoft.AspNetCore.TestHost;
using Microsoft.VisualStudio.TestTools.UnitTesting;
using Newtonsoft.Json;
using SampleDotNetCore2RestStub.Models;

namespace SampleDotNetCore2RestStub.Integration.Test
{
	[TestClass]
	public class PersonsTest : BaseTest
	{
		[TestMethod]
		public async Task GetPerson()
		{
			var response = await PersonServiceClient.GetPerson("1");

			Assert.AreEqual(HttpStatusCode.OK, response.StatusCode);
			Assert.AreEqual("LN1", response.Result.LastName);
		}

		[TestMethod]
		public async Task GetPersons()
		{
			var response = await PersonServiceClient.GetPersons();

			Assert.AreEqual(HttpStatusCode.OK, response.StatusCode);
			Assert.AreEqual(4, response.Result.Count);
			Assert.AreEqual("LN1", response.Result[0].LastName);
		}
    }
}

Stub the database

So far there is integration test that starts the application with its actual external dependencies and makes requests against it. Current API service does not connect to a real database, because this will make running the API harder. Instead, there is a fake PersonRepository which stores data in memory. In reality, the repository will connect to a database with a given connection string in appsettings.json, and will perform CRUD operations on it. Database operations might slow down the application response time, or test might not have full control over data in the database, which makes testing harder. In order to solve those two issues database can be stubbed to serve test data. Actually, anything that is not convenient can be stubbed with the examples given below.

In order to make stubbing possible and to keep application structure intact Startup has to be changed. Registering PersonRepository to .NET Core IoC container is extracted to separate virtual method that can be overridden later. All dependencies that are to be stubbed or mocked can be extracted to such methods. Then StartupStub overrides this method and registers stubbed repository PersonRepositoryStub. In it all database operations are substituted with an in-memory equivalence, hence skipping database calls. It might not be a full and accurate substitution, as long as it serves your testing purpose. After all this PersonRepositoryStub will be used only for testing. BaseTest should be changed to start the application with StartupStub instead of Statup. Finally, PersonsTest should be changed to assert on new data that is configured in PersonRepositoryStub.

Startup

public void ConfigureServices(IServiceCollection services)
{
	services.AddMvc();
	services.Configure<AppConfig>(Configuration);
	services.AddScoped<AuthenticationFilterAttribute>();

	ConfigureRepositories(services);
}

public virtual void ConfigureRepositories(IServiceCollection services)
{
	services.AddSingleton<IPersonRepository, PersonRepository>();
}

StartupStub

using Microsoft.Extensions.DependencyInjection;
using SampleDotNetCore2RestStub.Repositories;

namespace SampleDotNetCore2RestStub.Integration.Test.Mocks
{
	public class StartupStub : Startup
	{
		public override void ConfigureRepositories(IServiceCollection services)
		{
			services.AddSingleton<IPersonRepository, PersonRepositoryStub>();
		}
	}
}

PersonRepositoryStub

using System.Collections.Generic;
using System.Linq;
using SampleDotNetCore2RestStub.Models;
using SampleDotNetCore2RestStub.Repositories;

namespace SampleDotNetCore2RestStub.Integration.Test.Mocks
{
	public class PersonRepositoryStub : IPersonRepository
	{
		private Dictionary<int, Person> _persons 
					= new Dictionary<int, Person>();

		public PersonRepositoryStub()
		{
			_persons.Add(1, new Person
			{
				Id = 1,
				FirstName = "Stubed FN1",
				LastName = "Stubed LN1",
				Email = "stubed.email1@email.na"
			});
		}

		public Person GetById(int id)
		{
			return _persons[id];
		}

		public List<Person> GetAll()
		{
			return _persons.Values.ToList();
		}

		public int GetCount()
		{
			return _persons.Count();
		}

		public void Remove()
		{
			if (_persons.Keys.Any())
			{
				_persons.Remove(_persons.Keys.Last());
			}
		}

		public string Save(Person person)
		{
			if (_persons.ContainsKey(person.Id))
			{
				_persons[person.Id] = person;
				return "Updated Person with id=" + person.Id;
			}
			else
			{
				_persons.Add(person.Id, person);
				return "Added Person with id=" + person.Id;
			}
		}
	}
}

BaseTest

using System.Net.Http;
using Microsoft.AspNetCore.Hosting;
using Microsoft.AspNetCore.TestHost;
using Microsoft.VisualStudio.TestTools.UnitTesting;
using SampleDotNetCore2RestStub.Integration.Test.Client;
using SampleDotNetCore2RestStub.Integration.Test.Mocks;

namespace SampleDotNetCore2RestStub.Integration.Test
{
	public abstract class BaseTest
	{
		protected PersonServiceClient PersonServiceClient;

		public BaseTest()
		{
			var server = new TestServer(new WebHostBuilder()
				.UseStartup<StartupStub>());
			var httpClient = server.CreateClient();
			PersonServiceClient = new PersonServiceClient(httpClient);
		}
	}
}

PersonsTest

using System.Net;
using System.Net.Http;
using System.Threading.Tasks;
using Microsoft.AspNetCore.Hosting;
using Microsoft.AspNetCore.TestHost;
using Microsoft.VisualStudio.TestTools.UnitTesting;
using Newtonsoft.Json;
using SampleDotNetCore2RestStub.Models;

namespace SampleDotNetCore2RestStub.Integration.Test
{
	[TestClass]
	public class PersonsTest : BaseTest
	{
		[TestMethod]
		public async Task GetPerson()
		{
			var response = await PersonServiceClient.GetPerson("1");

			Assert.AreEqual(HttpStatusCode.OK, response.StatusCode);
			Assert.AreEqual("Stubed LN1", response.Result.LastName);
		}

		[TestMethod]
		public async Task GetPersons()
		{
			var response = await PersonServiceClient.GetPersons();

			Assert.AreEqual(HttpStatusCode.OK, response.StatusCode);
			Assert.AreEqual(1, response.Result.Count);
			Assert.AreEqual("Stubed LN1", response.Result[0].LastName);
		}
	}
}

Mock the database

Stubbing is an option, but mocking is much better as you have direct control over the mock itself. The most famous .NET mocking framework is Moq. It is added to the project with the command:

dotnet add package Moq

StartupMock extends Starup and overrides its ConfigureRepositories. It registers an instance of IPersonRepository which is injected by its constructor. BaseTest is changed to use StartupMock in UseStartup method. Repository mock is instantiated with PersonRepositoryMock = new Mock<IPersonRepository>(). It is injected into StartupMock constructor with ConfigureServices(services => services.AddSingleton(PersonRepositoryMock.Object)). This is how mock instance is registered into IoC container of .NET Core application that is being tested. Once the mock instance is registered it can be controlled. In BaseTest it is reset to defaults after each test with BaseTearDown method. It is run after each test because of [TestCleanup] MSTest attribute. Inside, the PersonRepositoryMock.Reset() resets mock state.

Test specific setup can be done for each test. For e.g. GetPerson_ReturnsCorrectResult has following setup: PersonRepositoryMock.Setup(x => x.GetById(It.IsAny<int>())).Returns(_person); That means when mock’s GetById method is called with whatever int value the _person object is returned. Another example is GetPerson_ThrowsException test. When mock’s GetById is called then InvalidOperationException is thrown. In this way, you can test exception handling, which in current demo application is missing. The exception is not that easy to reproduce if you are using repository stubbing.

StartupMock

using Microsoft.Extensions.DependencyInjection;
using SampleDotNetCore2RestStub.Repositories;

namespace SampleDotNetCore2RestStub.Integration.Test.Mocks
{
	public class StartupMock : Startup
	{
		private IPersonRepository _personRepository;
		
		public StartupMock(IPersonRepository personRepository)
		{
			_personRepository = personRepository;
		}

		public override void ConfigureRepositories(IServiceCollection services)
		{
			services.AddSingleton(_personRepository);
		}
	}
}

BaseTest

using System.Net.Http;
using Microsoft.AspNetCore.Hosting;
using Microsoft.AspNetCore.TestHost;
using Microsoft.VisualStudio.TestTools.UnitTesting;
using Microsoft.Extensions.DependencyInjection;
using Moq;
using SampleDotNetCore2RestStub.Integration.Test.Client;
using SampleDotNetCore2RestStub.Integration.Test.Mocks;
using SampleDotNetCore2RestStub.Repositories;

namespace SampleDotNetCore2RestStub.Integration.Test
{
	public abstract class BaseTest
	{
		protected PersonServiceClient PersonServiceClient;
		protected Mock<IPersonRepository> PersonRepositoryMock;

		public BaseTest()
		{
			PersonRepositoryMock = new Mock<IPersonRepository>();

			var server = new TestServer(new WebHostBuilder()
				.UseStartup<StartupMock>()
				.ConfigureServices(services =>
				{
					services.AddSingleton(PersonRepositoryMock.Object);
				}));

			var httpClient = server.CreateClient();
			PersonServiceClient = new PersonServiceClient(httpClient);
		}

		[TestCleanup]
		public void BaseTearDown()
		{
			PersonRepositoryMock.Reset();
		}
	}
}

PersonsTest

using System;
using System.Collections.Generic;
using System.Net;
using System.Net.Http;
using System.Threading.Tasks;
using Microsoft.AspNetCore.Hosting;
using Microsoft.AspNetCore.TestHost;
using Microsoft.VisualStudio.TestTools.UnitTesting;
using Moq;
using Newtonsoft.Json;
using SampleDotNetCore2RestStub.Models;

namespace SampleDotNetCore2RestStub.Integration.Test
{
	[TestClass]
	public class PersonsTest : BaseTest
	{
		private readonly Person _person = new Person
		{
			Id = 1,
			FirstName = "Mocked FN1",
			LastName = "Mocked LN1",
			Email = "mocked.email1@email.na"
		};

		[TestMethod]
		public async Task GetPerson_ReturnsCorrectResult()
		{
			PersonRepositoryMock.Setup(x => x.GetById(It.IsAny<int>()))
				.Returns(_person);

			var response = await PersonServiceClient.GetPerson("1");

			Assert.AreEqual(HttpStatusCode.OK, response.StatusCode);
			Assert.AreEqual("Mocked LN1", response.Result.LastName);
		}

		[TestMethod]
		[ExpectedException(typeof(InvalidOperationException))]
		public async Task GetPerson_ThrowsException()
		{
			PersonRepositoryMock.Setup(x => x.GetById(It.IsAny<int>()))
				.Throws(new InvalidOperationException());

			var result = await PersonServiceClient.GetPerson("1");
		}

		[TestMethod]
		public async Task GetPersons()
		{
			PersonRepositoryMock.Setup(x => x.GetAll())
				.Returns(new List<Person> { _person });

			var response = await PersonServiceClient.GetPersons();

			Assert.AreEqual(HttpStatusCode.OK, response.StatusCode);
			Assert.AreEqual(1, response.Result.Count);
			Assert.AreEqual("Mocked LN1", response.Result[0].LastName);
		}
	}
}

Nicer database mock

As of version 2.1.0 of Microsoft.AspNetCore.TestHost, which is currently in pre-release, there is a method called ConfigureTestServices, which saves us from having separate StartupMock class. You can directly inject your mocks with following code:

var server = new TestServer(new WebHostBuilder()
	.UseStartup<Startup>()
	.ConfigureTestServices(services =>
	{
		services.AddSingleton(PersonRepositoryMock.Object);
	}));

Conclusion

In the current post, I have shown how to do integration testing on .NET Core applications. This is a very convenient approach which eliminates some of the disadvantages of stubbing or mocking all dependencies in unit testing. Because of using all dependencies, integration testing can be much slower. This can be improved by mocking some of them. Integration testing is not a substitute for unit testing, nor for functional testing, but it is a good approach in you testing portfolio that should be considered.

Related Posts
Read more...

Build a REST API with .NET Core 2 and run it on Docker Linux container

Last Updated on by

Post summary: Code examples how to create RESTful API with .NET Core 2.0 and then run it on Docker Linux container.

Code below can be found in GitHub SampleDotNetCore2RestStub repository. In the current post is shown a sample application that can be a very good foundation for a real production application. This project can be easily used as a template for real API service.

Microsoft and open source

I was doing Java for about 2 years and got back to .NET six months ago. Recently we had to do a project in .NET Core 2.0, a technology I haven’t heard of before. I was truly amazed how much open source Microsoft had begun. .NET now can be developed and even run on Linux. This definitely makes it really competitive to Java which advantage was multi-platform ability. Another benefit is that documentation is very extensive and there is a huge community out there that makes solving issues really fast and easy.

.NET Core

In short .NET Core is a cross-platform development platform supporting Windows, macOS, and Linux, and can be used in device, cloud, and embedded/IoT scenarios. It is maintained by Microsoft and the .NET community on GitHub. More can be read on .NET Core Guide.

.NET Core 2.0

The special thing about .NET Core 2.0 is the implementation of .NET Standard 2.0. This makes it possible to use almost 70% of already existing NuGet packages, which is a big step forward and eases development of .NET applications because of reusability.

Create simple .NET Core project

Making default .NET Core console application is really simple:

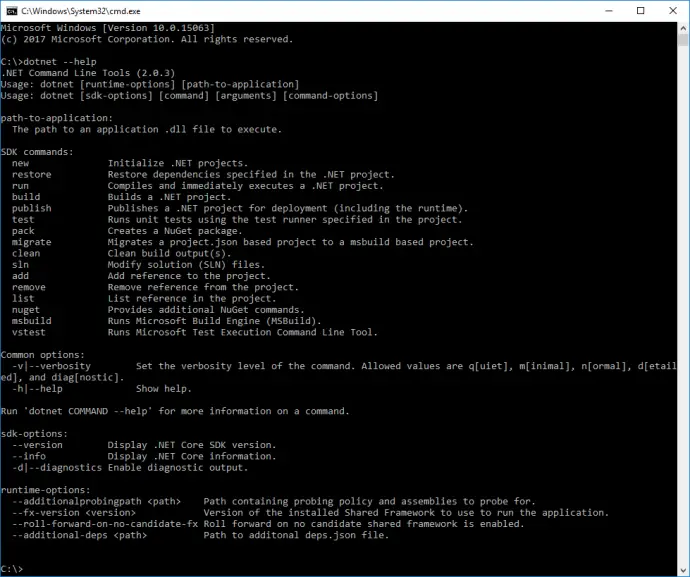
  1. Download and install .NET Core SDK. For Windows and MacOS there are installers available. For Linux it depends on distribution used, see more at .NET Core Linux installation guide.
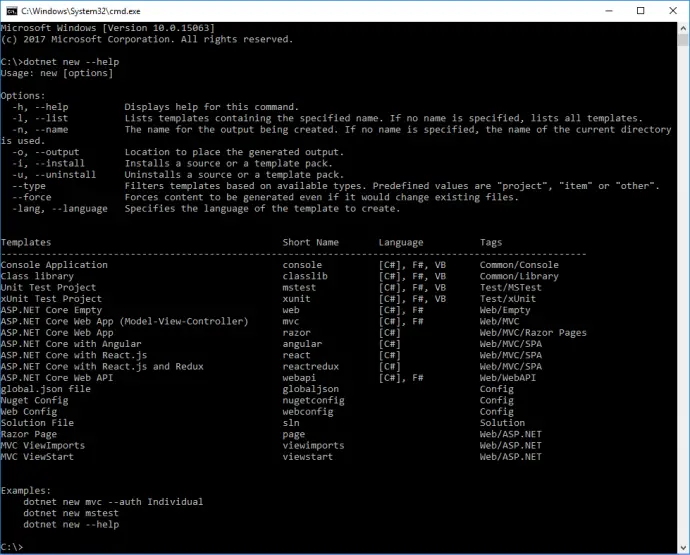
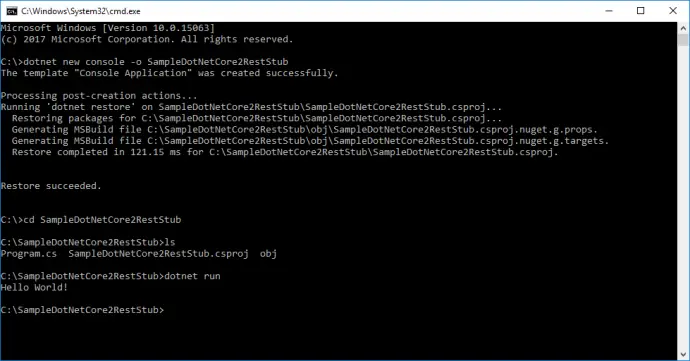
  2. Create an application with following command: dotnet new console -o ProjectName. Option -o specifies the output folder to be created which also becomes the project name. If -o is omitted then the project will be created in the current folder with current folder’s name.
  3. Run the newly created application with: dotnet run.

Using Visual Studio Code

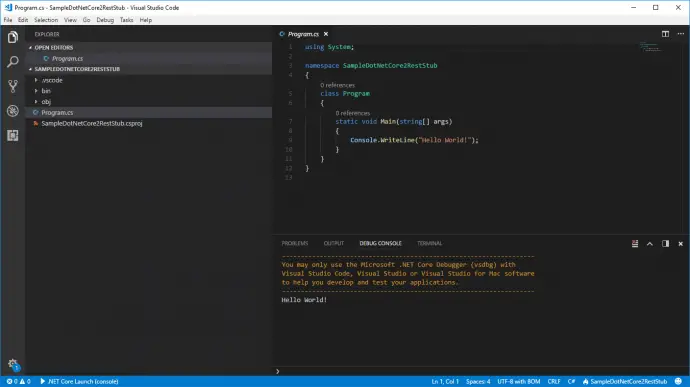
Once the project is created it can be developed in any text editor. Most convenient is Visual Studio 2017 because it provides lots of tools that make development very fast and efficient. In this tutorial, I will be using Visual Studio Code – open-source multi-platform editor maintained by Microsoft. I admit it is much harder that Visual Studio 2017 but is free and multi-platform. Once project folder is imported, hitting Ctrl+F5 runs the project.

ASP.NET Core MVC

ASP.NET Core MVC provides features to build web APIs or web UIs. It has to be used in order to continue with the current example. Dependency to its NuGet package is added with the following command:

dotnet add package Microsoft.AspNetCore
dotnet add package Microsoft.AspNetCore.All

Create REST API

After project structure is done it is time to add classes needed to make the REST API. Functionality is very similar to one described in Build a RESTful stub server with Dropwizard post. There is a Person API which can retrieve, save or delete persons. They are kept in an in-memory data structure which mimics DB layer. Following classes are needed:

  • PersonController – a controller that exposes the API endpoints. By extending Controller class the runtime makes all endpoints available as long as they have proper routing. In current example routing is done inside action attributes [HttpGet(“person/get/{id}”)]. There are different routing options described in this extensive documentation Routing to Controller Actions. Adding of person is done with POST: [HttpPost(“person/save”)]. The important bit here is [FromBody] attribute which takes HTTP body and deserializes it to a Person object.
  • Person – this is data model class with properties.
  • PersonRepository – in-memory DB abstraction that keeps the data in a Dictionary. In reality, there will be DB layer responsible for managing data.
  • Startup – class with services configuration. Both ConfigureServices and Configure methods are called behind the scenes from the runtime. Any configurations needed goes to those two methods. Current configuration adds MVC to services and instructs the application to use it. This is not really Model View Controller pattern, but this is what is needed to enable controllers and get API running.
  • Program – main program entry point where web host is built and started. It uses Startup.cs to run the configurations. More details on WebHost can be found in Hosting in ASP.NET Core. This article also shows how the external configuration is managed, something that will be presented later in the current post.

PersonController

using System.Collections.Generic;
using System.Linq;
using Microsoft.AspNetCore.Mvc;
using SampleDotNetCore2RestStub.Models;
using SampleDotNetCore2RestStub.Repositories;

namespace SampleDotNetCore2RestStub.Controllers
{
	public class PersonController : Controller
	{
		[HttpGet("person/get/{id}")]
		public Person GetPerson(int id)
		{
			return PersonRepository.GetById(id);
		}

		[HttpGet("person/remove")]
		public string RemovePerson()
		{
			PersonRepository.Remove();
			return "Last person remove. Total count: " 
						+ PersonRepository.GetCount();
		}

		[HttpGet("person/all")]
		public List<Person> GetPersons()
		{
			return PersonRepository.GetAll();
		}

		[HttpPost("person/save")]
		public string AddPerson([FromBody]Person person)
		{
			return PersonRepository.Save(person);
		}
	}
}

Person

namespace SampleDotNetCore2RestStub.Models
{
	public class Person
	{
		public int Id { get; set; }
		public string FirstName { get; set; }
		public string LastName { get; set; }
		public string Email { get; set; }
	}
}

PersonRepository

using System.Collections.Generic;
using System.Linq;
using SampleDotNetCore2RestStub.Models;

namespace SampleDotNetCore2RestStub.Repositories
{
	public class PersonRepository
	{
		private static Dictionary<int, Person> PERSONS 
								= new Dictionary<int, Person>();

		static PersonRepository()
		{
			PERSONS.Add(1, new Person
			{
				Id = 1,
				FirstName = "FN1",
				LastName = "LN1",
				Email = "email1@email.na"
			});
			PERSONS.Add(2, new Person
			{
				Id = 2,
				FirstName = "FN2",
				LastName = "LN2",
				Email = "email2@email.na"
			});
		}

		public static Person GetById(int id)
		{
			return PERSONS[id];
		}

		public static List<Person> GetAll()
		{
			return PERSONS.Values.ToList();
		}

		public static int GetCount()
		{
			return PERSONS.Count();
		}

		public static void Remove()
		{
			if (PERSONS.Keys.Any())
			{
				PERSONS.Remove(PERSONS.Keys.Last());
			}
		}

		public static string Save(Person person)
		{
			var result = "";
			if (PERSONS.ContainsKey(person.Id))
			{
				result = "Updated Person with id=" + person.Id;
			}
			else
			{
				result = "Added Person with id=" + person.Id;
			}
			PERSONS.Add(person.Id, person);
			return result;
		}
	}
}

Startup

using Microsoft.Extensions.Configuration;
using Microsoft.Extensions.DependencyInjection;
using Microsoft.AspNetCore.Hosting;
using Microsoft.AspNetCore.Builder;

namespace SampleDotNetCore2RestStub
{
	public class Startup
	{
		public Startup(IConfiguration configuration)
		{
			Configuration = configuration;
		}

		public IConfiguration Configuration { get; }

		public void ConfigureServices(IServiceCollection services)
		{
			services.AddMvc();
		}

		public void Configure(IApplicationBuilder app,
					IHostingEnvironment env)
		{
			app.UseMvc();
		}
	}
}

Program

using System;
using Microsoft.AspNetCore;
using Microsoft.AspNetCore.Hosting;

namespace SampleDotNetCore2RestStub
{
	public class Program
	{
		public static void Main(string[] args)
		{
			BuildWebHost(args).Run();
		}

		public static IWebHost BuildWebHost(string[] args) =>
			WebHost.CreateDefaultBuilder(args)
				.UseStartup<Startup>()
				.Build();
	}
}

External configuration

Service so far is pretty much useless as it does not give an opportunity for external configurations. Adding external configuration consist of adding and changing following files:

    • VersionController – controller to actually show full working configuration. Routing in this controller is handled by [Route(“api/[controller]”)]. This exposes /api/version endpoint because [controller] is a template that stands for controller name. Controller constructor takes IOptions object and extracts Value out of it. Actual object value is injected in Startup.cs.
    • appsettings.json – JSON file with application configurations.
    • AppConfig – data model class that represents JSON configuration as an object.
    • Startup – change is needed to read file appsettings.json and bind it to AppConfig object. Configuration is read with: var configurationBuilder = new ConfigurationBuilder().AddJsonFile(“appsettings.json”, false, true) then it is saved internally with Configuration = configurationBuilder.Build(). JSON configuration is bound to a AppConfig object with following line: services.Configure<AppConfig>(Configuration).
    • SampleDotNetCore2RestStub.csproj – change is needed in the project file to instruct build process to copy appsettings.json to the output folder. This is where VS 2017 makes it much easier as it exposes property config to change, with VS Code you have to edit the csproj XML.

VersionController

using Microsoft.AspNetCore.Mvc;
using Microsoft.Extensions.Options;

namespace SampleDotNetCore2RestStub.Controllers
{
	[Route("api/[controller]")]
	public class VersionController : Controller
	{
		private readonly AppConfig _config;

		public VersionController(IOptions<AppConfig> options)
		{
			_config = options.Value;
		}

		[HttpGet]
		public string Version()
		{
			return _config.Version;
		}
	}
}

appsettings.json

{
	"Version": "1.0"
}

AppConfig

namespace SampleDotNetCore2RestStub
{
	public class AppConfig
	{
		public string Version { get; set; }
	}
}

Startup

using Microsoft.Extensions.Configuration;
using Microsoft.Extensions.DependencyInjection;
using Microsoft.AspNetCore.Hosting;
using Microsoft.AspNetCore.Builder;

namespace SampleDotNetCore2RestStub
{
	public class Startup
	{
		public Startup()
		{
			var configurationBuilder = new ConfigurationBuilder()
				.AddJsonFile("appsettings.json", false, true);

			Configuration = configurationBuilder.Build();
		}

		public IConfiguration Configuration { get; }

		public void ConfigureServices(IServiceCollection services)
		{
			services.AddMvc();
			services.Configure<AppConfig>(Configuration);
		}

		public void Configure(IApplicationBuilder app, 
					IHostingEnvironment env)
		{
			app.UseMvc();
		}
	}
}

csproj

<ItemGroup>
	<None Include="appsettings.json" CopyToOutputDirectory="Always" />
</ItemGroup>

Request filtering

An almost mandatory feature is to have some kind of filtering on the request. The current example will provide a very basic implementation of authentication filter achieved with an attribute. Following files are needed:

  • SecurePersonController – controller that demonstrates filtering. The controller is no more different than other discussed above. Important bit is [ServiceFilter(typeof(AuthenticationFilterAttribute))] which assigns AuthenticationFilterAttribute to current controller.
  • AuthenticationFilterAttribute – very basic implementation to illustrate how it works. Request headers are extracted from HttpContext and are checked for the existence of Authorization. If not found Exception is thrown. In next section, I will show how to handle this exception more gracefully.
  • StartupAuthenticationFilterAttribute is registered to runtime with: services.AddScoped<AuthenticationFilterAttribute>(). .NET Core dependency injection mechanism is used here, which I have described it in more details in separate section below.

SecurePersonController

using System.Collections.Generic;
using Microsoft.AspNetCore.Mvc;
using SampleDotNetCore2RestStub.Attributes;
using SampleDotNetCore2RestStub.Models;
using SampleDotNetCore2RestStub.Repositories;

namespace SampleDotNetCore2RestStub.Controllers
{
	[ServiceFilter(typeof(AuthenticationFilterAttribute))]
	public class SecurePersonController : Controller
	{
		[HttpGet("secure/person/all")]
		public List<Person> GetPersons()
		{
			return PersonRepository.GetAll();
		}
	}
}

AuthenticationFilterAttribute

using System;
using System.Linq;
using Microsoft.AspNetCore.Mvc.Filters;

namespace SampleDotNetCore2RestStub.Attributes
{
	public class AuthenticationFilterAttribute : ActionFilterAttribute
	{
		public override void OnActionExecuting(ActionExecutingContext ctx)
		{
			string authKey = ctx.HttpContext.Request
					.Headers["Authorization"].SingleOrDefault();

			if (string.IsNullOrWhiteSpace(authKey))
				throw new Exception();
		}
	}
}

Startup

public void ConfigureServices(IServiceCollection services)
{
	services.AddMvc();
	services.Configure<AppConfig>(Configuration);
	services.AddScoped<AuthenticationFilterAttribute>();
}

If endpoint /secure/person/all is queried without Authorization header there is 500 Internal Server Error response from the application. If Authorization header is present with any value all persons are retrieved.

Middleware

Middleware is a software that is assembled into an application pipeline to handle requests and responses. Each component chooses whether to pass the request to the next component in the pipeline or perform work before that. More on middleware can be found in ASP.NET Core Middleware Fundamentals. In current example middleware is used to handle better exceptions. In the previous point, AuthenticationFilterAttribute was throwing an exception which was transformed to 500 Internal Server Error which is not pretty. In case of not authorized application should return 401 Unauthorized. In order to do this following files are needed:

  • HttpException – a custom exception which then will be caught and processed in HttpExceptionMiddleware.
  • HttpExceptionMiddleware – this is where handling happens. Code checks for custom HttpException and if such is thrown pipeline changes HttpContext.Response object with proper values.
  • AuthenticationFilterAttribute – instead of Exception filter attribute throws new
    HttpException(HttpStatusCode.Unauthorized). This way middleware will get invoked.
  • Startup – middleware get registered here with app.UseMiddleware<HttpExceptionMiddleware>(). It is extremely important that this stands before app.UseMvc() otherwise it will not work.

HttpException

using System;
using System.Net;

namespace SampleDotNetCore2RestStub.Exceptions
{
	public class HttpException : Exception
	{
		public int StatusCode { get; }

		public HttpException(HttpStatusCode httpStatusCode)
			: base(httpStatusCode.ToString())
		{
			this.StatusCode = (int)httpStatusCode;
		}
	}
}

HttpExceptionMiddleware

using System.Threading.Tasks;
using Microsoft.AspNetCore.Http;
using Microsoft.AspNetCore.Http.Features;
using SampleDotNetCore2RestStub.Exceptions;

namespace SampleDotNetCore2RestStub.Middleware
{
	public class HttpExceptionMiddleware
	{
		private readonly RequestDelegate _next;

		public HttpExceptionMiddleware(RequestDelegate next)
		{
			_next = next;
		}

		public async Task Invoke(HttpContext context)
		{
			try
			{
				await _next.Invoke(context);
			}
			catch (HttpException httpException)
			{
				context.Response.StatusCode = httpException.StatusCode;
				var feature = context.Features.Get<IHttpResponseFeature>();
				feature.ReasonPhrase = httpException.Message;
			}
		}
	}
}

AuthenticationFilterAttribute

public override void OnActionExecuting(ActionExecutingContext context)
{
	string authKey = context.HttpContext.Request
			.Headers["Authorization"].SingleOrDefault();

	if (string.IsNullOrWhiteSpace(authKey))
		throw new HttpException(HttpStatusCode.Unauthorized);
}

Startup

public void Configure(IApplicationBuilder app, IHostingEnvironment env)
{
	app.UseMiddleware<HttpExceptionMiddleware>();
	app.UseMvc();
}

Dependency Injection

So far there is running service with basic functionality. It is missing very important bit though, something that should have been considered and added earlier. Actually, it was added but only when registering AuthenticationFilterAttribute, but here I will go into more details. Dependency injection (DI) is a technique for achieving loose coupling between objects and their dependencies. Rather than directly instantiating an object or using static references, the objects a class needs are provided to the class in some fashion. ASP.NET Core provides its own dependency injection mechanisms, read more on Introduction to Dependency Injection in ASP.NET Core. The code will now get refactored to match this pattern.

  • IPersonRepository – all database operations are declared in this interface.
  • PersonRepository – implements all methods of IPersonRepository interface. It still does not have real interaction with the database, data is kept in a dictionary. Refactor is that all static methods are removed. In order to use this class, you need an instance of it. Sample data is populated on object creation in its constructor.
  • SecurePersonController – an instance of an implementation of IPersonRepository is passed through the constructor and is used internally. By using interfaces a level of abstraction is achieved, where multiple implementations may be used for the same interface.
  • PersonController – same as SecurePersonController.
  • Startup – this is where DI is used to register that PersonRepository is the implementation of IPersonRepositoryservices.AddSingleton<IPersonRepository, PersonRepository>().

Three different object life scopes are available in .NET Core DI. It is important to know the difference in order to use them properly. If object creation is expensive operation misuse of proper DI lifetime scope might be crucial for performance:

  • AddSingleton – only one instance is created for the whole application. In the example above PersonRepository needed to have one instance because sample data is initialized in the constructor.
  • AddScoped – one instance is created per HTTP request scope. 
  • AddTransient – instance is created every time it is needed. Let us say there are 3 places where an object is needed and an HTTP request is coming to the application. AddTransient will create 3 different objects, while AddScoped will create just one that will be used for current HTTP request scope.

IPersonRepository

using System.Collections.Generic;
using SampleDotNetCore2RestStub.Models;

namespace SampleDotNetCore2RestStub.Repositories
{
	public interface IPersonRepository
	{
		Person GetById(int id);
		List<Person> GetAll();
		int GetCount();
		void Remove();
		string Save(Person person);
	}
}

PersonRepository

using System.Collections.Generic;
using System.Linq;
using SampleDotNetCore2RestStub.Models;

namespace SampleDotNetCore2RestStub.Repositories
{
	public class PersonRepository : IPersonRepository
	{
		private Dictionary<int, Person> _persons 
						= new Dictionary<int, Person>();

		public PersonRepository()
		{
			_persons .Add(1, new Person
			{
				Id = 1,
				FirstName = "FN1",
				LastName = "LN1",
				Email = "email1@email.na"
			});
			_persons .Add(2, new Person
			{
				Id = 2,
				FirstName = "FN2",
				LastName = "LN2",
				Email = "email2@email.na"
			});
		}

		public Person GetById(int id)
		{
			return _persons[id];
		}

		public List<Person> GetAll()
		{
			return _persons.Values.ToList();
		}

		public int GetCount()
		{
			return _persons.Count();
		}

		public void Remove()
		{
			if (_persons.Keys.Any())
			{
				_persons.Remove(_persons.Keys.Last());
			}
		}

		public string Save(Person person)
		{
			if (_persons.ContainsKey(person.Id))
			{
				_persons[person.Id] = person;
				return "Updated Person with id=" + person.Id;
			}
			else
			{
				_persons.Add(person.Id, person);
				return "Added Person with id=" + person.Id;
			}
		}
	}
}

SecurePersonController

using System.Collections.Generic;
using Microsoft.AspNetCore.Mvc;
using SampleDotNetCore2RestStub.Attributes;
using SampleDotNetCore2RestStub.Models;
using SampleDotNetCore2RestStub.Repositories;

namespace SampleDotNetCore2RestStub.Controllers
{
	[ServiceFilter(typeof(AuthenticationFilterAttribute))]
	public class SecurePersonController : Controller
	{
		private readonly IPersonRepository _personRepository;

		public SecurePersonController(IPersonRepository personRepository)
		{
			_personRepository = personRepository;
		}

		[HttpGet("secure/person/all")]
		public List<Person> GetPersons()
		{
			return _personRepository.GetAll();
		}
	}
}

Startup

public void ConfigureServices(IServiceCollection services)
{
	services.AddMvc();
	services.Configure<AppConfig>(Configuration);
	services.AddScoped<AuthenticationFilterAttribute>();
	services.AddSingleton<IPersonRepository, PersonRepository>();
}

Docker file

Docker file that packs application is shown below:

FROM microsoft/dotnet:2.0-sdk
COPY pub/ /root/
WORKDIR /root/
ENV ASPNETCORE_URLS="http://*:80"
EXPOSE 80/tcp
ENTRYPOINT ["dotnet", "SampleDotNetCore2RestStub.dll"]

Docker container that is used is microsoft/dotnet:2.0-sdk. Everything from pub folder is copied to container root folder. ASPNETCORE_URLS is used to set the URLs that the server listens on by default. Current config runs and exposes application at port 80 in the container. With ENTRYPOINT is configured the command that is run when the container is started.

Build, package and run Docker

The application is built and published in Release mode into pub folder with the following command:

dotnet publish --configuration=Release -o pub

Docker container is packaged with tag netcore-rest with the following command:

docker build . -t netcore-rest

Docker container is run with exposing port 80 from the container to port 9000 on the host with the following command:

docker run -e Version=1.1 -p 9000:80 netcore-rest

Notice the -e Version=1.1 which sets an environment variable to be used inside the container. The intention is to use this variable in application. This can be enabled by modifying Startup.cs file by adding AddEnvironmentVariables():

public Startup()
{
	var configurationBuilder = new ConfigurationBuilder()
		.AddJsonFile("appsettings.json", optional: false, reloadOnChange: true)
		.AddEnvironmentVariables();

	Configuration = configurationBuilder.Build();
}

If invoked now /api/version returns 1.1.

Docker optimisation

When the container with microsoft/dotnet:2.0-sdk is packed it gets to a size of 1.7GB which is quite a lot. There is much leaner container image: microsoft/dotnet:2.0-runtime, but it requires all runtime assemblies to be present in pub folder. This can be done by changing the csproj file by adding PublishWithAspNetCoreTargetManifest = false:

<PropertyGroup>
	<OutputType>Exe</OutputType>
	<TargetFramework>netcoreapp2.0</TargetFramework>
	<PublishWithAspNetCoreTargetManifest>false</PublishWithAspNetCoreTargetManifest> 
</PropertyGroup>

This makes pub folder about 37MB, but container size is 258MB. Problem with this proposal is that it might not be very reliable as some assemblies might not be copied or might not be the correct version.

Since Docker is keeping layers in the repository, proposed optimization might turn out not to be actual optimization. It will consume much more space in the repository since layer that changes and is always saved is 258MB. Layers with OS might not change often if it changes at all.

Testing

How to given application can be integration tested is described in .NET Core integration testing and mock dependencies post.

Conclusion

In the current tutorial, I have shown how to create API from scratch with .NET Core 2.0 SDK on any platform. It is very easy to run .NET Core app and even run it Docker with Linux container.

Related Posts

Read more...