Post summary: Explanation of how to install and use the solution in AWS examples in C# blog post series.
This post is part of AWS examples in C# – working with SQS, DynamoDB, Lambda, ECS series. The code used for this series of blog posts is located in aws.examples.csharp GitHub repository. In the current post, I give information on how to install and run the project.
Disclaimer
The solution has commands to deploy to the cloud as well as to clean resources. Note not all resources are cleaned, read more in the Cleanup section. In order to be run in AWS valid account is needed. I am not going to describe how to create an account. If an account is present, then there is also knowledge and awareness of how to use it.
Important: current examples generate costs on AWS account. Use cautiously at your own risk!
Restrictions
The project was tested to be working on Linux and Windows. For Windows, it is working only with Git Bash. The project requires a valid AWS account.
Required installations
In order to fully run and enjoy the project following needs to be installed:
- Docker – see more in Docker Engine overview page.
- Git Bash – see more in Download Git page.
- AWS CLI – see more in Installing the AWS CLI page.
- jq – see more in Download jq page, for Windows it comes by default with Git Bash.
- .NET Core SDK 2.1 and 3.1 – see more in Install the .NET Core SDK page.
- .NET Core Lambda plugin – run: dotnet tool install -g Amazon.Lambda.Tools.
- Node Package Manager (npm) – see more in Get npm! page.
- Serverless – see more in Serverless AWS Installation page.
- Postman – see more in Download Postman page, this is an optional step.
Configurations
AWS CLI has to be configured in order to run properly. It happens with aws configure. If there is no AWS account, this is not an issue, put some values for access and secret key and put a correct region, like us-east-1.
Import Postman collection, in order to be able to try the examples. Postman collection is in aws.examples.csharp.postman_collection.json file in the code. This is an optional step, below there are cURL examples also.
Run the project in AWS
Running on AWS requires the setting of environment variables:
export AwsAccessKey=KIA57FV4.....
export AwsSecretKey=mSgsxOWVh...
export AwsRegion=us-east-1
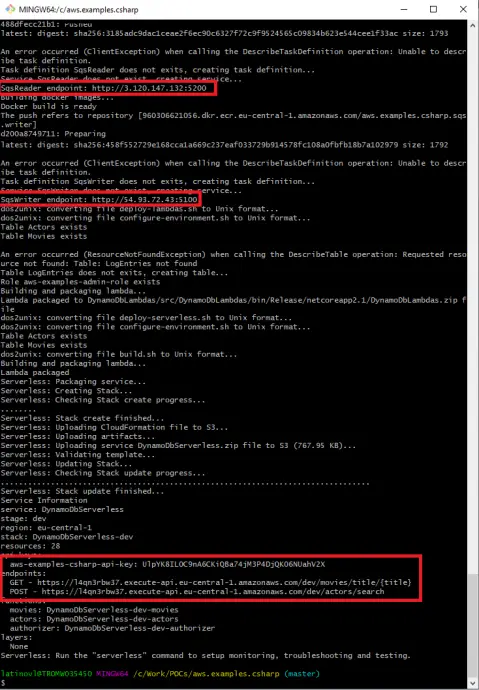
Then the solution is deployed to AWS with ./solution-deploy.sh script. Note that the output of the command gives the API Gateway URL and API key, as well as the SqsWriter and SqsReader endpoints. See image below:
Run the project partly in AWS
The most expensive part of the current setup is the running of the docker containers in EC2 (Elastic Compute Cloud). I have prepared a script called ./solution-deploy-hybrid.sh, which runs the containers locally and all other things are in AWS. Still, environment variables from the previous section are mandatory to be set. I believe this is the optimal variant if you want to test and run the code in a “production-like” environment.
Run the project in LocalStack
LocalStack provides an easy-to-use test/mocking framework for developing Cloud applications. It spins up a testing environment on local machines that provide the same functionality and APIs as the real AWS cloud environment. I have experimented with LocalStack, there is a localstack branch in GitHub. The solution can be run with solution-deploy-localstack.sh command. I cannot really estimate if this is a good alternative, because I am running the free tier in AWS and the most expensive part is ECS, which I skip by running the containers locally, instead of AWS. See the previous section on how to run a hybrid.
Usage
There is a Postman collection which allows easy firing of the requests. Another option is to use cURL, examples of all requests with their Postman names are available below.
SqsWriter
SqsWriter is a .NET Core 3.0 application, that is dockerized and run in AWS ECS (Elastic Container Service). It exposes an API that can be used to publish Actor or Movie objects. There is also a health check request. After AWS deployment proper endpoint is needed. The endpoint can be found as an output of deployment scripts. See the image above.
PublishActor
curl --location --request POST 'http://localhost:5100/api/publish/actor' \
--header 'Content-Type: application/json' \
--data-raw '{
	"FirstName": "Bruce",
	"LastName": "Willis"
}'
PublishMovie
curl --location --request POST 'http://localhost:5100/api/publish/movie' \
--header 'Content-Type: application/json' \
--data-raw '{
	"Title": "Die Hard",
	"Genre": "Action Movie"
}'
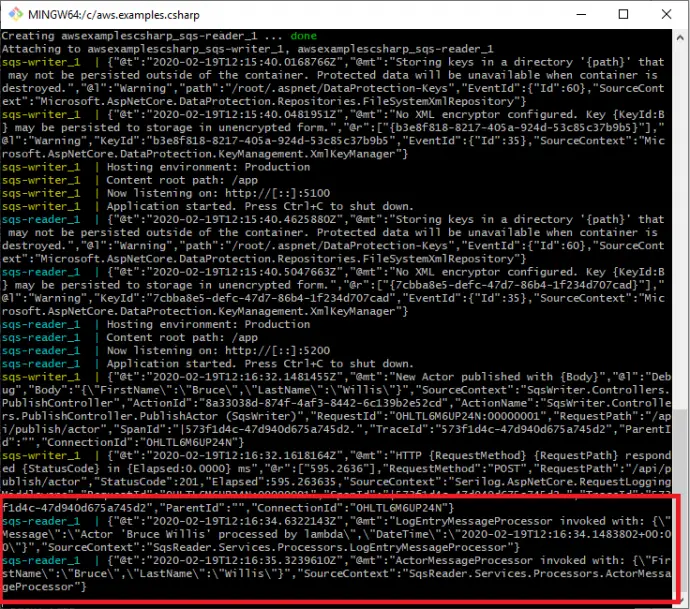
When Actor or Movie is published, it goes to the SQS queue, SqsReader picks it up from there and processes it. What is visible in the logs is that both LogEntryMessageProcessor and ActorMessageProcessor are invoked. See the screenshot:
SqsWriterHealthCheck
curl --location --request GET 'http://localhost:5100/health'
SqsReader
SqsReader is a .NET Core 3.0 application, that is dockerized and run in AWS ECS. It has a consumer that listens to the SQS queue and processes the messages by writing them into appropriate AQS DynamoDB tables. It also exposes API to stop or start processing, as long as reprocess the dead-letter queue or simply get the queue status. After AWS deployment proper endpoint is needed. The endpoint can be found as an output of deployment scripts. See the image above.
ConsumerStart
curl --location --request POST 'http://localhost:5200/api/consumer/start' \
--header 'Content-Type: application/json' \
--data-raw ''
ConsumerStop
curl --location --request POST 'http://localhost:5200/api/consumer/stop' \
--header 'Content-Type: application/json' \
--data-raw ''
ConsumerStatus
curl --location --request GET 'http://localhost:5200/api/consumer/status'
ConsumerReprocess
If this one is invoked with no messages in the dead-letter queue then it takes 20 seconds to finish, because it actually waits for long polling timeout.
curl --location --request POST 'http://localhost:5200/api/consumer/reprocess' \
--header 'Content-Type: application/json' \
--data-raw ''
SqsReaderHealthCheck
curl --location --request GET 'http://localhost:5200/health'
ActorsServerlessLambda
This lambda is managed by the Serverless framework. It is exposed as REST API via AWS API Gateway. It also has a custom authorizer as well as API Key attached. Those are described in a further post.
ServerlessActors
In the case of AWS, the API Key and URL are needed, those can be obtained from deployment command logs. See the screenshot above. Put correct values to CHANGE_ME and REGION placeholders. Request is:
curl --location --request POST 'https://CHANGE_ME.execute-api.REGION.amazonaws.com/dev/actors/search' \
--header 'Content-Type: application/json' \
--header 'x-api-key: CHANGE_ME' \
--header 'Authorization: Bearer validToken' \
--data-raw '{
    "FirstName": "Bruce",
    "LastName": "Willis"
}'
MoviesServerlessLambda
ServerlessMovies
Put correct values to CHANGE_ME and REGION placeholders. Request is:
curl --location --request GET 'https://CHANGE_ME.execute-api.REGION.amazonaws.com/dev/movies/title/Die Hard'
Cleanup
Nota bene: This is a very important step, as leaving the solution running in AWS will accumulate costs.
In order to stop and clean up all AWS resources run ./solution-delete.sh script.
Nota bene: There a resource that is not automatically deleted by the scripts. This is a Route53 resource created by AWS Cloud Map. It has to be deleted with the following commands. Note that the id in the delete command comes from the result of list-namespaces command.
aws servicediscovery list-namespaces
aws servicediscovery delete-namespace --id ns-kneie4niu6pwwela
Verify cleanup
In order to be sure there are no leftovers from the examples, following AWS services has to be checked:
- SQS
- DynamoDB
- IAM -> Roles
- EC2 -> Security Groups
- ECS -> Clusters
- ECS -> Task Definitions
- ECR -> Repositories
- Lambda -> Functions
- Lambda -> Applications
- CloudFormation -> Stacks
- S3
- CloudWatch -> Log Groups
- Route 53
- AWS Cloud Map
On top of it, Billing should be regularly monitored to ensure no costs are applied.
Conclusion
This post describes how to run and they the solution described in AWS examples in C# – working with SQS, DynamoDB, Lambda, ECS series
