Post summary: How to make a RESTful server that can be used for stub during testing.
It might happen that you are testing a REST client against a server that is not under your control. It might happen that server is not in your network, the server is not very stable, has sensitive data, changing, and unstable data, etc. In such cases, it might be hard to do proper automation testing. Solution to such situation is a server stub that responds to REST request in a predictable manner. This is tutorial how to do it.
Dropwizard
Dropwizard is Java framework for building a RESTful web server in very yshort time. It has incorporated proven libraries like Jetty, Jersey, Jackson and many more to reliably do the job in shortest possible time. They have very good getting started tutorial how to make a project from scratch. I’ve used it to create a project on my own. Steps are described below.
How to do it
- Create Maven project
- Add Dropwizard dependency
- Build with Maven
- Add configuration file
- Add configuration class
- Add data classes
- Add service classes
- Add health check
- Add Dropwizard application
- Build everything into a single JAR file
- Run it
- Test and enjoy
Create Maven project
Maven is central build repository for JARs. It makes it very easy to manage dependencies between libraries. Before getting started with Maven it should be installed. Once you do this path to Maven bin folder should be added to your Path environment variable (Windows). Once you do this open command prompt and type mvn –version to test if everything is configured correctly. If OK then make the project with the command below. Important in command is groupId this is Java package and artifactId this is project name:
mvn -B archetype:generate \
	-DarchetypeGroupId=org.apache.maven.archetypes \
	-DgroupId=com.automationrhapsody.reststub \
	-DartifactId=sample-dropwizard-rest-stub
The project can be created directly from IntelliJ, but I would recommend to create it with Maven to get acknowledged to it.
Build with Gradle
How to build the same project with Gradle instead of Maven can be found in Build a Dropwizard project with Gradle post.
Add Dropwizard dependency
Run your favorite IDE and import already created Maven project. In this tutorial, I’ll use IntelliJ. From project structure open pom.xml file. If the project was created with Maven there should be <dependencies> section with junit in it. You can remove junit and add the following XML instead.
<dependency>
	<groupId>io.dropwizard</groupId>
	<artifactId>dropwizard-core</artifactId>
	<version>0.8.0</version>
</dependency>
Build with Maven
Since you have created project with Maven you have it configured and know how to use it. Navigate to projects folder and run mvn package command. When run first time it takes a while since all dependencies are being loaded to the local Maven repository.
Once build is done go to IntelliJ and refresh Maven JARs. Right click on project -> Maven (in the bottom) -> Reimport.
Add configuration file
Configurations in Dropwizard are managed with YAML. In short key-value pairs are separated with a colon. Child elements are indented with two spaces from their parent. Repeating items are shown with a dash in front. The configuration file is with *.yml extension. Add config.yml file in the project. Below is sample use of configuration we are about to use in this tutorial. version is our custom property to illustrate working with configurations. server is standard Dropwizard property. With these configurations, we set the application to listen port to 9000 and administration port to 9001. With -type is shown repetitive sequence. In the current situation, it is HTTP, but there may be several protocols provided. port is its child key/value pair.
version: 0.0.1

# Change default server ports
server:
  applicationConnectors:
  - type: http
    port: 9000
  adminConnectors:
  - type: http
    port: 9001
Add configuration class
Once we have configuration file we need a class that will handle it. As I said version is our custom configuration property. In order to handle it, our class should extend Configuration. Define field with getter and setter. Annotate getter and setter with @JsonProperty and you are ready to go. If more properties are needed more fields with getters and setters should be defined in the class.
package com.automationrhapsody.reststub;

import com.fasterxml.jackson.annotation.JsonProperty;
import io.dropwizard.Configuration;
import org.hibernate.validator.constraints.NotEmpty;

public class RestStubConfig extends Configuration {
	@NotEmpty
	private String version;

	@JsonProperty
	public String getVersion() {
		return version;
	}

	@JsonProperty
	public void setVersion(String version) {
		this.version = version;
	}
}
Create data classes
The term in Dropwizard for those POJOs is Representation Class but in general they are objects to exchange data. In our example, we have Person class which has very basic attributes. It has only getters in order to be immutable. Getters are annotated with @JsonProperty which allows Jackson to serialize and deserialize from JSON. Note that there is empty constructor which is needed for Jackson’s deserialization.
package com.automationrhapsody.reststub.data;

import com.fasterxml.jackson.annotation.JsonProperty;

public class Person {
	private int id;
	private String firstName;
	private String lastName;
	private String email;

	public Person() {
		// Needed by Jackson deserialization
	}

	public Person(int id, String firstName, String lastName, String email) {
		this.id = id;
		this.firstName = firstName;
		this.lastName = lastName;
		this.email = email;
	}

	@JsonProperty
	public int getId() {
		return id;
	}

	@JsonProperty
	public String getFirstName() {
		return firstName;
	}

	@JsonProperty
	public String getLastName() {
		return lastName;
	}

	@JsonProperty
	public String getEmail() {
		return email;
	}
}
If data to be exchanged gets too much data classes will become enormous. One solution to reduce their size is to use Lombok. See how it is done in Get rid of Getters and Setters post.
Create service
The term in Dropwizard is Resource Class but this actually is the RESTful service with its endpoints. @Path provides where the endpoint is. In the current example, I have /person for the whole class and different paths for different operations. The result is that paths are concatenated. @GET and @POST indicate the type of the request. @Timed is put for analytics purposes. @Produces and @Consumes provide the type of data that is being exchanged. @PathParam indicates that id is part of the URL.
package com.automationrhapsody.reststub.resources;

import com.automationrhapsody.reststub.data.Person;
import com.automationrhapsody.reststub.persistence.PersonDB;
import com.codahale.metrics.annotation.Timed;

import javax.ws.rs.*;
import javax.ws.rs.core.MediaType;
import java.util.List;

@Path("/person")
public class PersonService {

	public PersonService() {
	}

	@GET
	@Timed
	@Path("/get/{id}")
	@Produces(MediaType.APPLICATION_JSON)
	public Person getPerson(@PathParam("id") int id) {
		return PersonDB.getById(id);
	}

	@GET
	@Timed
	@Path("/remove")
	@Produces(MediaType.TEXT_PLAIN)
	public String removePerson() {
		PersonDB.remove();
		return "Last person remove. Total count: " + PersonDB.getCount();
	}

	@GET
	@Timed
	@Path("/all")
	@Produces(MediaType.APPLICATION_JSON)
	public List<Person> getPersons() {
		return PersonDB.getAll();
	}

	@POST
	@Timed
	@Path("/save")
	@Produces(MediaType.TEXT_PLAIN)
	@Consumes({MediaType.APPLICATION_JSON})
	public String addPerson(Person person) {
		return PersonDB.save(person);
	}
}
Service operations
Example above is about RESTful service dealing with person data. There are 4 operations exposed on following URLs:
- /person/get/{id} – by provided person unique “id” it returns JSON with person data
- /person/remove – removes one person on random basis
- /person/all – returns JSON with all person data
- /person/save – receives JSON with the person data and saves it to persons if “id” is unique, if not updating person by its id.
Business logic
It is little overrated to call it business logic but this is how we manage persons. If this was a production application you might have lots of business logic and some DB (SQL or no-SQL). Since this is just a test stub it is enough to have some data structure where to keep persons. In our case, HashMap is selected. There are static methods manipulating data.
package com.automationrhapsody.reststub.persistence;

import com.automationrhapsody.reststub.data.Person;

import java.util.ArrayList;
import java.util.HashMap;
import java.util.List;
import java.util.Map;

public class PersonDB {
	private static Map<Integer, Person> persons = new HashMap<Integer, Person>();

	static {
		persons.put(1, new Person(1, "FN1", "LN1", "email1@email.com"));
		persons.put(2, new Person(2, "FN2", "LN2", "email2@email.com"));
		persons.put(3, new Person(3, "FN3", "LN3", "email3@email.com"));
		persons.put(4, new Person(4, "FN4", "LN4", "email4@email.com"));
	}

	public static Person getById(int id) {
		return persons.get(id);
	}

	public static List<Person> getAll() {
		List<Person> result = new ArrayList<Person>();
		for (Integer key : persons.keySet()) {
			result.add(persons.get(key));
		}
		return result;
	}

	public static int getCount() {
		return persons.size();
	}

	public static void remove() {
		if (!persons.keySet().isEmpty()) {
			persons.remove(persons.keySet().toArray()[0]);
		}
	}

	public static String save(Person person) {
		String result = "";
		if (persons.get(person.getId()) != null) {
			result = "Updated Person with id=" + person.getId();
		} else {
			result = "Added Person with id=" + person.getId();
		}
		persons.put(person.getId(), person);
		return result;
	}
}
Create health check
The health check is a smoke test that can be called from admin panel to give you information about the status of the system. In production systems, you might do things like checking DB connection, checking file system or network, checking important functionality. In the example here just to illustrate the functionality my health check is the count of persons in memory. If it goes to 0 then something is wrong and the system is not healthy. Also to illustrate how properties are used version is passed from configuration file to health check via its constructor.
package com.automationrhapsody.reststub;

import com.automationrhapsody.reststub.persistence.PersonDB;
import com.codahale.metrics.health.HealthCheck;

public class RestStubCheck extends HealthCheck {
	private final String version;

	public RestStubCheck(String version) {
		this.version = version;
	}

	@Override
	protected Result check() throws Exception {
		if (PersonDB.getCount() == 0) {
			return Result.unhealthy("No persons in DB! Version: " +
					this.version);
		}
		return Result.healthy("OK with version: " + this.version +
				". Persons count: " + PersonDB.getCount());
	}
}
Create application
This is the final piece. Once we have all (data, service, health check) then the application is the binding piece that brings them together. This is execution entry point. In main method new application is created and its run() method is called. This is it. In order to actually work service and health check should be registered. This is done in the run method. You create an instance of both service and health check. Configuration is passed in health check’s constructor.
package com.automationrhapsody.reststub;

import com.automationrhapsody.reststub.resources.BookService;
import com.automationrhapsody.reststub.resources.PersonService;
import io.dropwizard.Application;
import io.dropwizard.setup.Environment;

public class RestStubApp extends Application<RestStubConfig> {

	public static void main(String[] args) throws Exception {
		new RestStubApp().run(args);
	}

	@Override
	public void run(RestStubConfig config, Environment env) {
		final PersonService personService = new PersonService();
		env.jersey().register(personService);

		env.healthChecks().register("template",
			new RestStubCheck(config.getVersion()));
	}
}
Build a single JAR
This was it now all have to be packed into a JAR. The strategy is to build everything into one JAR and just run it. It could not be more simple. Open pom.xml file. Add <build><plugins> … </plugins></build> in the end. Add XML below into this snippet. Only <mainClass> is customizable and should be changed according to your project structure.
<plugin>
	<groupId>org.apache.maven.plugins</groupId>
	<artifactId>maven-shade-plugin</artifactId>
	<version>1.6</version>
	<configuration>
		<createDependencyReducedPom>true</createDependencyReducedPom>
		<filters>
			<filter>
				<artifact>*:*</artifact>
				<excludes>
					<exclude>META-INF/*.SF</exclude>
					<exclude>META-INF/*.DSA</exclude>
					<exclude>META-INF/*.RSA</exclude>
				</excludes>
			</filter>
		</filters>
	</configuration>
	<executions>
		<execution>
			<phase>package</phase>
			<goals>
				<goal>shade</goal>
			</goals>
			<configuration>
				<transformers>
					<transformer implementation="org.apache.maven.plugins.shade.resource.ServicesResourceTransformer"/>
					<transformer implementation="org.apache.maven.plugins.shade.resource.ManifestResourceTransformer">
						<mainClass>com.automationrhapsody.reststub.RestStubApp</mainClass>
					</transformer>
				</transformers>
			</configuration>
		</execution>
	</executions>
</plugin>
Build and run
Once this is done use mvn package to make the JAR. Navigate to target folder in your project and run the JAR. Two arguments are needed in order to run the JAR. First is server which instructs Dropwizard to run as a server. Second is the path to *.yml configuration file.
java -jar sample-dropwizard-rest-stub-1.0-SNAPSHOT.jar server ../config.yml
If everything is fine you should see something like the code below which will mean the server is ready.
GET     /person/all (...)
GET     /person/get/{id} (...)
GET     /person/remove (...)
POST    /person/save (...)
Test and enjoy
Once all this hard work has been done it is time to enjoy our RESTful server. List of all persons can be found at this URL: http://localhost:9000/person/all. You can get a person by id: http://localhost:9000/person/get/1.
Health checks are found in admin panel: http://localhost:9001. Try removing all persons by invoking several times this URL: http://localhost:9000/person/remove
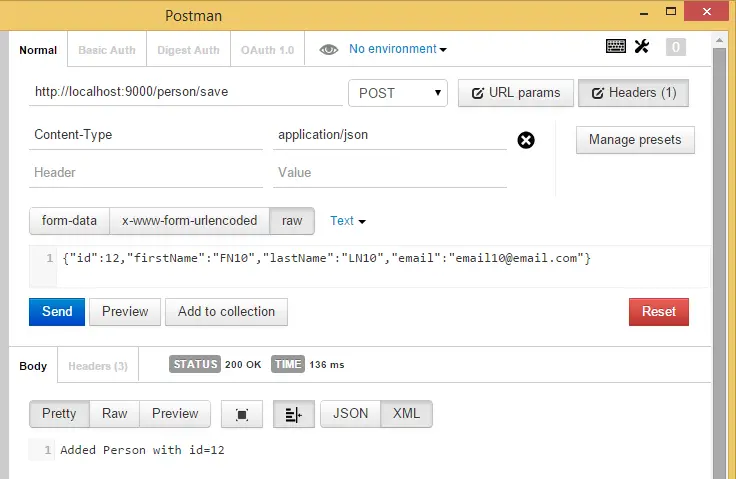
And the hardest part is to save a person. I’m using Postman plugin but you can use any REST client you want. You have to put POST data against http://localhost:9000/person/save URL.
{
	"id": 10,
	"firstName": "FN10",
	"lastName": "LN10",
	"email": "email10@email.com"
}
And most important DO not forget to put Content-Type: application/json in the request header. If you do not put you will get Error 415 Unsupported Media Type error.
The sample application can be found in GitHub sample-dropwizard-rest-stub repository. Postman requests can be downloaded from Dropwizard Postman requests link and directly imported into Postman.
Another way to test the stub is by building a client as described in Create simple REST API client using Jersey post.
Run with Docker
In Run Dropwizard application in Docker with templated configuration using environment variables post, I have described how to make Dropwizard application configuration be changed with environment variables which makes it very easy to build and run inside Docker container.
Conclusion
It could not be easier. If you really need to stub a RESTful server this is the proper way to do it.