.NET Core code coverage on Linux with MiniCover

Last Updated on by

Post summary: How to run code coverage of your unit tests as part of your build on Linux build agents.

Code below can be found in GitHub SampleDotNetCore2RestStub repository. In Code coverage of .NET Core unit tests with OpenCover post, I have shown how to do code coverage with OpenCover. Commands shown in that post can be made part of your CI or CD build. There is a but though, this works only for windows. If you are having build machines on Linux you need another alternative. In this post, I’m going to show this alternative.

MiniCover

MiniCover is a lightweight code coverage tool for .NET Core on Linux. It is in an early stage yet and there is no big community, but I really hope this is going to change soon as it looks a very promising tool.

Include in project

In order to use MiniCover it has to be installed as .NET CLI Tool. This is done with following code:

<ItemGroup>
	<DotNetCliToolReference Include="MiniCover" Version="2.0.0-ci-*" />
</ItemGroup>

In order to keep your original projects intact, the best approach is to create tools project and add it to its tools.csproj file, which will look:

<Project Sdk="Microsoft.NET.Sdk">

  <PropertyGroup>
    <TargetFramework>netcoreapp2.0</TargetFramework>
  </PropertyGroup>

  <ItemGroup>
    <DotNetCliToolReference Include="MiniCover" Version="2.0.0-ci-*" />
  </ItemGroup>

</Project>

Commands

At this stage following command line options are available:

  • instrument – Instrument assemblies
  • uninstrument – Uninstrument assemblies
  • reset – Reset hits count
  • report – Outputs coverage report
  • htmlreport -Write HTML report to a folder
  • xmlreport – Write an NCover-formatted XML report to folder

Run coverage

In case of a project structure where you have your code in src folder and your tests in test folder following bash script can be used directly. It accepts as parameter threshold coverage percentage, if not provided it uses 80% by default. Script restores NuGet packages and builds the projects. It navigates to tools folder and restores NuGet packages again. This is very important as it is the only way to get MiniCover NuGet package. Inside tools folder, it instruments assemblies and resets previous statistics. Script navigates to root folder and runs all tests inside every project in test folder. Afterward, script navigates again to tools folder and uninstruments all assemblies so far. No matter this operation is safe I would recommend to run one more build or publish before assemblies go into production. In the end, the script generates reports.

if [ ! -z $1 ]; then
  if [ $1 -lt 0 ] || [ $1 -gt 100 ]; then
    echo "Threshold should be between 0 and 100"
    threshold=80
  fi
  threshold=$1
else
  threshold=80
fi

dotnet restore
dotnet build

cd tools
dotnet restore

# Instrument assemblies inside 'test' folder to detect hits for source files inside 'src' folder
dotnet minicover instrument --workdir ../ --assemblies test/**/bin/**/*.dll --sources src/**/*.cs 

# Reset hits count in case minicover was run for this project
dotnet minicover reset

cd ..

for project in test/**/*.csproj; do dotnet test --no-build $project; done

cd tools

# Uninstrument assemblies, it's important if you're going to publish or deploy build outputs
dotnet minicover uninstrument --workdir ../

# Create HTML reports inside folder coverage-html
# This command returns failure if the coverage is lower than the threshold
dotnet minicover htmlreport --workdir ../ --threshold $threshold

# Print console report
# This command returns failure if the coverage is lower than the threshold
dotnet minicover report --workdir ../ --threshold $threshold

# Create NCover report
dotnet minicover xmlreport --workdir ../ --threshold $threshold

cd ..

Reports

There are 3 types of reports: Console, HTML and NCover XML.

Console report

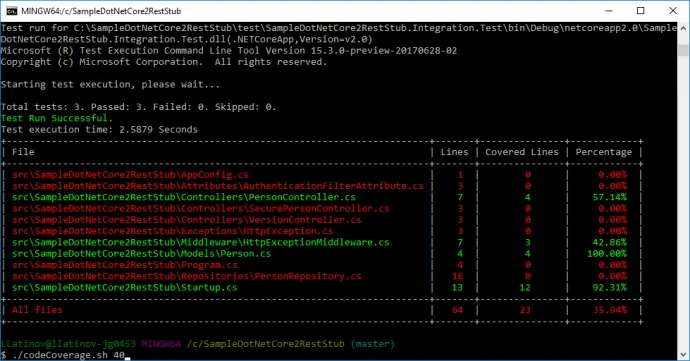
Console report is dumping results to the console and returns 1 if given threshold is not met, which basically fails the CI/CD build. In the example below, codeCoverage.sh was called with argument 40, which means threshold is 40%.

HTML report

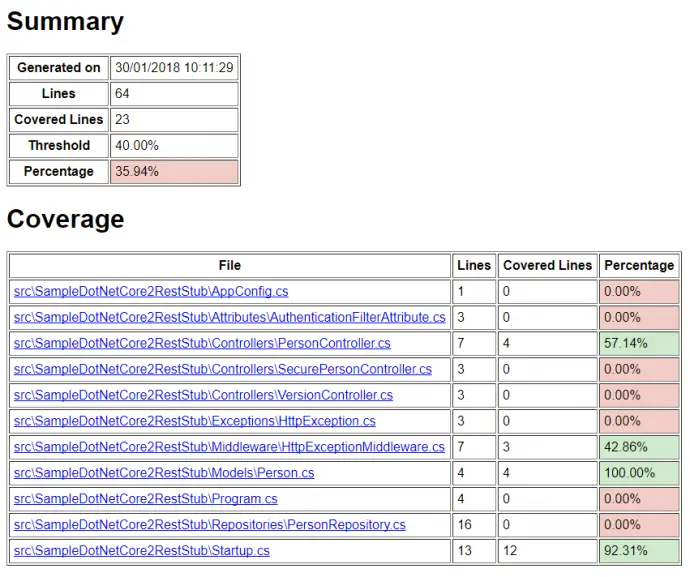
HTML report is also failing the build and gives similar summary information as console report, but also give detailed information for each class coverage. An example report can be found in MiniCover HTML report. I have to praise myself, as the summary file that is shown below was something I contributed, because I like the project very much.

NCover report

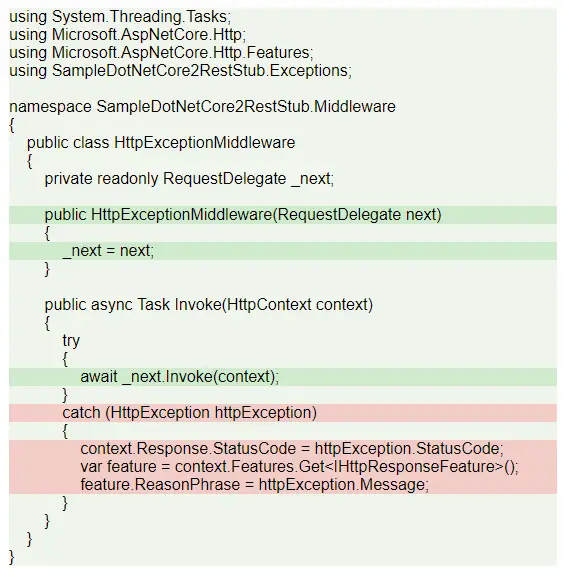
NCover report creates XML file in its format. The beauty of it is that you can additionally use ReportGenerator on Windows machine and convert XML to nice HTML report. Assuming ReportGenerator is extracted on your C:\ then the command is shown below. The report can be found in MiniCover ReportGenerator report.

C:\ReportGenerator\ReportGenerator.exe -reports:coverage.xml -targetdir:coverage

Compare with OpenCover

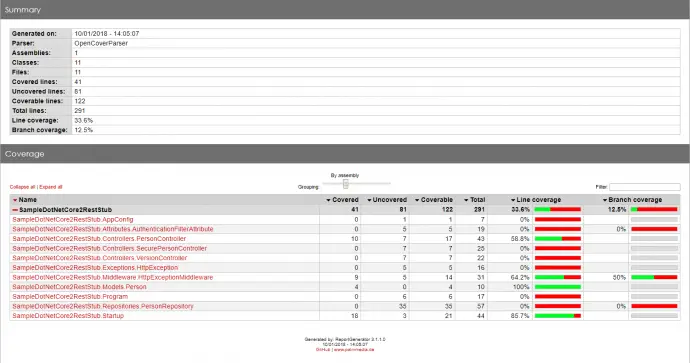
If you check both OpenCover .Net Core report and MiniCover ReportGenerator report you can notice some difference in metrics. First is that MiniCover does not support branch coverage. This is not that bad after all if you have your code nicely indented, line coverage is sufficient. For e.g., if your ternary operator is not on one line, but on three and you have missed testing one of the conditions, then line coverage will state that there is a not tested line. If the ternary operator is on one line though then line coverage will miss this test problem. Another difference is Coverable lines and Covered lines. OpenCover counts opening and closing brackets as such, so its numbers are bigger. Because of this conceptual difference Line coverage percentage has a small difference. MiniCover (35%) is more generous and give more percentage than OpenCover (33.6%).

Conclusion

MiniCover is very nice and compact tool that can be put in place during your continuous integration or continuous delivery to measure code coverage on each build. The most important advantage is that it is designed and works on Linux.

Related Posts

Read more...

Code coverage of .NET Core unit tests with OpenCover

Last Updated on by

Post summary: Examples how to measure code coverage of .NET Core unit tests with OpenCover.

Examples below are based on GitHub SampleDotNetCore2RestStub repository. Examples use code from .NET Core integration testing and mock dependencies post. Those are integration tests because they test more than one application module at a time, but they are run with a unit testing framework, this is why current post title is such.

Code coverage

This topic is how to do the code coverage on .NET Core unit tests with OpenCover. Theory on what is code coverage, why it is needed can be found in What about code coverage post.

OpenCover

OpenCover is open source tool for code coverage for .NET 2.0 and above applications for Windows only. You can read more details about OpenCover in Code coverage of manual or automated tests with OpenCover for .NET applications post or you can visit their OpenCover Wiki page.

Run OpenCover

In order to make this examples work you need to check out SampleDotNetCore2RestStub repository to C:\ and run all commands from project root folder C:\SampleDotNetCore2RestStub. OpenCover and ReportGenerator should be installed in C:\ as well. If you have different paths, just adjust them in commands shown below.

C:\OpenCover\OpenCover.Console.exe `
	-target:"c:\Program Files\dotnet\dotnet.exe" `
	-targetargs:"test" `
	-output:coverage.xml `
	-oldStyle `
	-filter:"+[SampleDotNetCore2RestStub*]* -[SampleDotNetCore2RestStub*Test*]*" `
	-register:user

Enable .NET Core to debug output

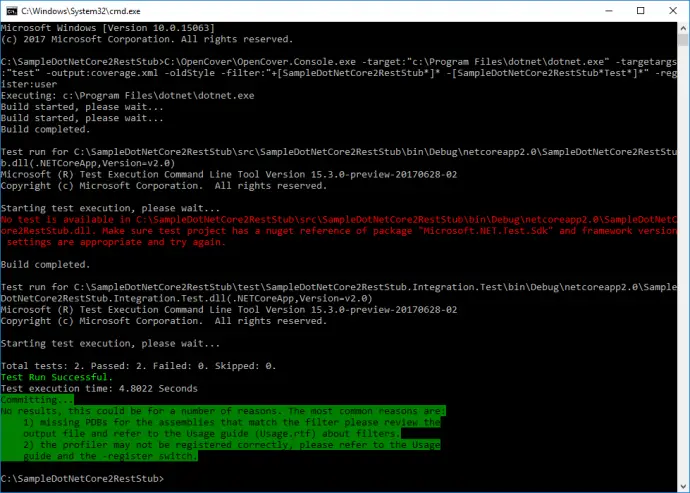
If you run the command above you will get the following message:

Committing…
No results, this could be for a number of reasons. The most common reasons are:
1) missing PDBs for the assemblies that match the filter please review the
output file and refer to the Usage guide (Usage.rtf) about filters.
2) the profiler may not be registered correctly, please refer to the Usage
guide and the -register switch.

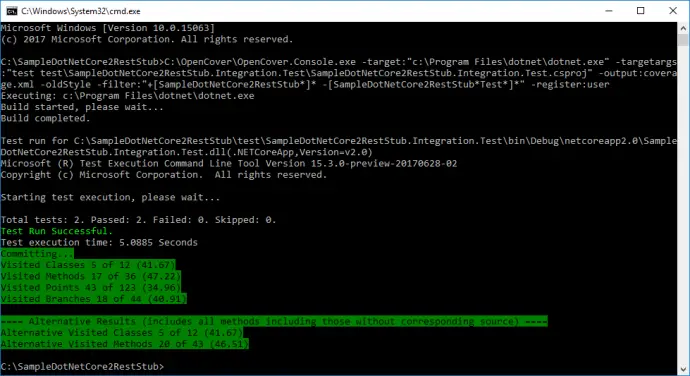
Note: error with red text shown on image above is because with -targetargs:”test” dotnet.exe tries to run tests inside all projects, but src\SampleDotNetCore2RestStub simply does not have tests. You can refine which test project to get run by changing to: -targetargs:”test test\SampleDotNetCore2RestStub.Integration.Test\SampleDotNetCore2RestStub.Integration.Test.csproj”.

Message for no results is because debug output is not enabled on .NET Core project and OpenCover does not have needed data to work on. Change src\SampleDotNetCore2RestStub\SampleDotNetCore2RestStub.csproj file by adding <DebugType>full</DebugType>:

<PropertyGroup>
	<OutputType>Exe</OutputType>
	<TargetFramework>netcoreapp2.0</TargetFramework>
	<DebugType>full</DebugType>
</PropertyGroup>

Now running the command gives proper output:

Committing…
Visited Classes 5 of 12 (41.67)
Visited Methods 17 of 36 (47.22)
Visited Points 43 of 123 (34.96)
Visited Branches 18 of 44 (40.91)

==== Alternative Results (includes all methods including those without corresponding source) ====
Alternative Visited Classes 5 of 12 (41.67)
Alternative Visited Methods 20 of 43 (46.51)

Generate report

ReportGenerator is used to convert XML reports generated by OpenCoverPartCoverVisual Studio or NCover into human-readable reports in various formats. To generate report use following command:

C:\ReportGenerator\ReportGenerator.exe `
	-reports:coverage.xml `
	-targetdir:coverage

Inspect report

The report can be found in my examples: OpenCover .Net Core report. You can see what code is being covered during testing and what not.

Conclusion

In this post, I have shown how to run code coverage with OpenCover on .NET Core unit tests.

Related Posts

Read more...

.NET Core integration testing and mock dependencies

Last Updated on by

Post summary: How to do integration testing on .NET Core application and stub or mock some inconvenient dependencies.

Code below can be found in GitHub SampleDotNetCore2RestStub repository. In Build a REST API with .NET Core 2 and run it on Docker Linux container post I have shown how to create .NET Core application. In the current post, I will show how to do integration testing on the same application. The post is for REST API, but principles here apply for web UI as well, the difference is that the response will be HTML, which is slightly harder to process compared to JSON.

Refactor project structure

Currently, there is only one project created which contains .NET Core application. Since this is going to grow it has to be refactored and structured properly.

  • SampleDotNetCore2RestStub folder which contains the API is moved to src folder.
  • Solution file is created with dotnet new sln –name SampleDotNetCore2RestStub. Note that .sln extension is omitted as it is added automatically. Although everything in the example is done with open source tools, it is good to have solution file to keep compatibility with Visual Studio 2017.
  • API project file is added to solution file with:
    dotnet sln SampleDotNetCore2RestStub.sln add src/SampleDotNetCore2RestStub/SampleDotNetCore2RestStub.csproj.
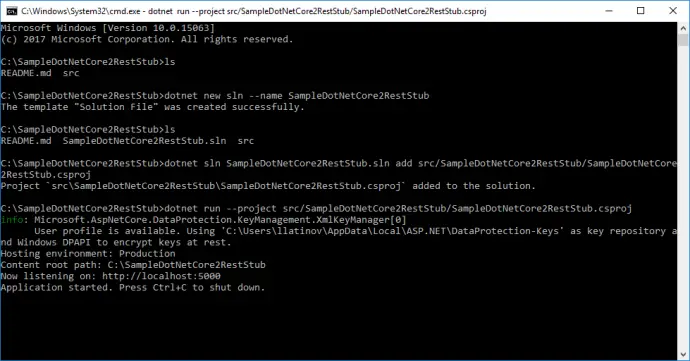
  • In order to test that moving of files did not affected the functionality, API can be run with: dotnet run –project src/SampleDotNetCore2RestStub/SampleDotNetCore2RestStub.csproj.
Add test project

It is time to create integration tests project. We speak for integration tests, but they will be run with unit testing framework MSTest. I do not have some particular favor of it, it comes by default with .NET Core, along with xUnit, and I do not want to change it.

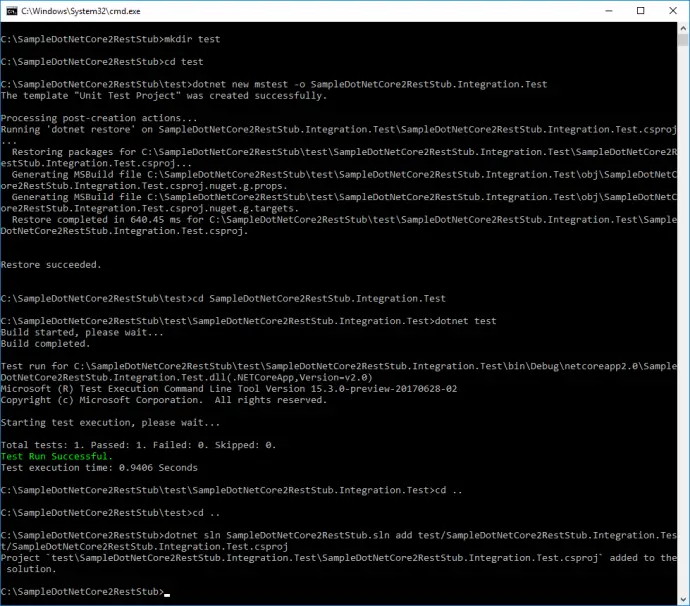
  • Create test folder: mkdir test.
  • Navigate to it: cd test.
  • MSTest project is created with: dotnet new mstest -o SampleDotNetCore2RestStub.Integration.Test.
  • Navigate to test project: cd SampleDotNetCore2RestStub.Integration.Test.
  • Run the unit tests: dotnet test. By default, there is one dummy test that passes.
  • Go to root folder: cd .. and cd ..
  • Add test project to solution file: dotnet sln SampleDotNetCore2RestStub.sln add test/SampleDotNetCore2RestStub.Integration.Test/SampleDotNetCore2RestStub.Integration.Test.csproj.
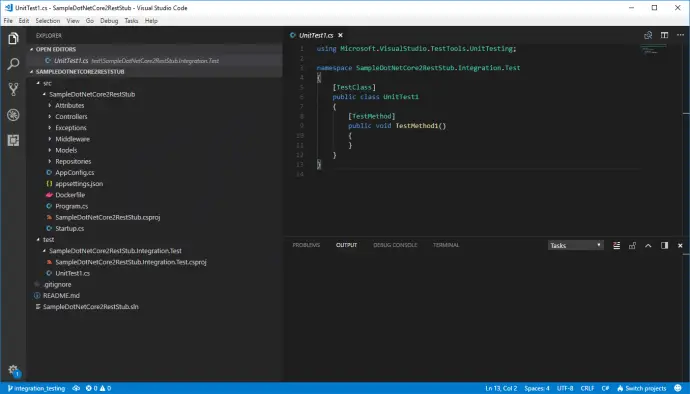
Open with Visual Studio Code

Once refactored and opened in Visual Studio Code project has following structure:
Unit vs Integration testing

I would not like to focus on theory and terminology as this post is not intended to, but I have to do some theoretical setup before proceeding with the code. Generally speaking, term integration testing is used in two cases. One is when different systems are interconnected together and tested, other is when different components of one system are grouped together and tested. In the current post with term integration testing, I will refer the latter. In unit testing, each separate class is tested in isolation. In order to do so all external dependencies, like a database, file system, web requests, and response, etc., are mocked. This makes tests run very fast but has a very high risk of false positives because of mocking. When mocking a dependency there is always an assumption how it works and is being used. The mocked behavior might be significantly different than actual one, then the unit test is compromised. On the other hand, integration testing verifies that different parts of the application work correctly when grouped together. It is much slower than unit testing because more and real resources are being used. Some parts of the application still can be mocked which can increase execution time. In the current post, I will show how to run a full application with only the database being mocked.

The Test Host

One way to run the fully assembled application is by building and deploying it. Then, the application will use real resources to work. Functional testing should also be done during testing but is not part of the current post. A more interesting scenario is to run fully assembled or partially mocked application in memory, without deployment and run tests against it. This approach has benefits, e.g. since the application is run locally its response time is very low, which speeds up tests; some parts, like database connection, can be mocked and thus speed up tests. .NET Core Test Host is a tool that can host web or API .NET Core applications serving requests and responses. It eliminates the need for having a testing environment.

Add dependencies

In order to use test host dependency to its NuGet package should be added. Navigate to test/SampleDotNetCore2RestStub.Integration.Test and add a dependency:

dotnet add package Microsoft.AspNetCore.TestHost

SampleDotNetCore2RestStub.Integration.Test project should depend on SampleDotNetCore2RestStub in order to use its code. This is done with:

dotnet add reference ../../src/SampleDotNetCore2RestStub/SampleDotNetCore2RestStub.csproj

Create the first test

Existing UnitTest1 class will be changed to start application inside test host and make a request.

using System.Net.Http;
using System.Threading.Tasks;
using Microsoft.AspNetCore.Hosting;
using Microsoft.AspNetCore.TestHost;
using Microsoft.VisualStudio.TestTools.UnitTesting;
using Newtonsoft.Json;
using SampleDotNetCore2RestStub.Models;

namespace SampleDotNetCore2RestStub.Integration.Test
{
	[TestClass]
	public class PersonsTest
	{
		private TestServer _server;
		private HttpClient _client;

		[TestInitialize]
		public void TestInitialize()
		{
			_server = new TestServer(new WebHostBuilder()
				.UseStartup<Startup>());
			_client = _server.CreateClient();
		}

		[TestMethod]
		public async Task GetPerson()
		{
			var response = await _client.GetAsync("/person/get/1");
			response.EnsureSuccessStatusCode();

			var result = await response.Content.ReadAsStringAsync();
			var person = JsonConvert.DeserializeObject<Person>(result);

			Assert.AreEqual("LN1", person.LastName);
		}
	}
}

TestServer uses an instance of IWebHostBuilder. Startup from UseStartup<Startup> is same class that is used to run the application, but here it is run inside TestServer instance. CreateClient() method returns instance of standard HttpClient, with which request to /person/get/1 endpoint is made. EnsureSuccessStatusCode() throws exception if response code is not inside 200-299 range. The response is then taken as a string and deserialized to Person object with Newtonsoft.Json, which is now part of .NET Core.

Test can be run from test\SampleDotNetCore2RestStub.Integration.Test folder with the command: dotnet test. If you type dotnet test from root folder it will search for tests inside all projects.

Debug tests in Visual Studio Code

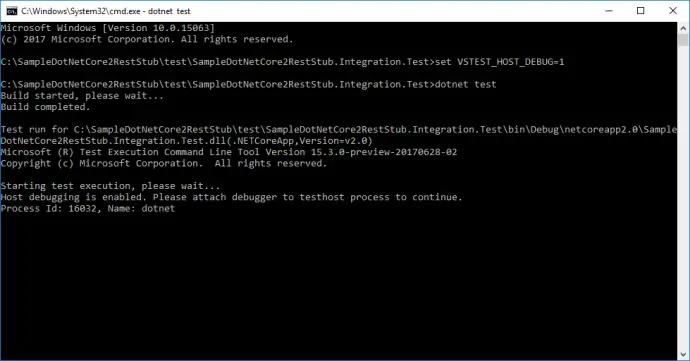
Before proceeding any further with the code it should be possible to debug unit tests inside VS Code. It is not as easy as with VS 2017, but still manageable. First, you need to run your test from the command prompt in debug mode:

set VSTEST_HOST_DEBUG=1
dotnet test

Once this is done there is a message with specific process ID:

Starting test execution, please wait...
Host debugging is enabled. Please attach debugger to testhost process to continue.
Process Id: 16032, Name: dotnet
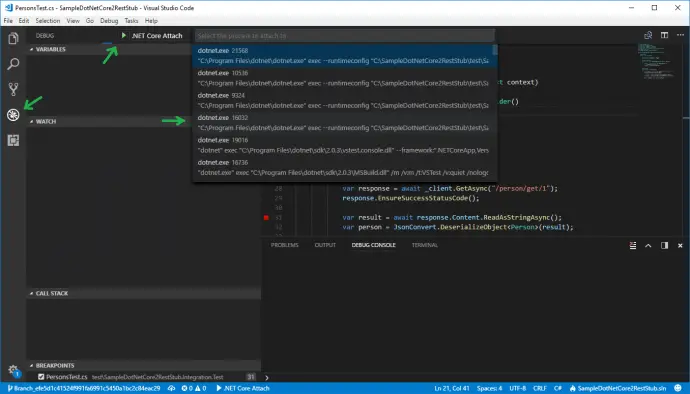
Now from Visual Studio Code, you have to attach to given process, 16032 in the current example. This is done from Debug View, then select .Net Core Attach launch configuration. If such is not existing, add it. Running this configuration shows a list of all processes with name dotnet. Select the proper one, 16032 in the current example.
Create PersonServiceClient and BaseTest

Tests should be easy to write, read and maintain, thus PersonServiceClient class is created. It exposes methods that hit the endpoints and return the result. Since testing is not only happy path, it should be possible to have some negative scenarios. You may want to hit the API with invalid data and verify it returns BadRequest (400) HTTP response code, or Unauthorized (401) HTTP response code, etc. In order to fulfill this test requirement, a separate class ApiResponse<T> is created. It stores response code along with response content as a string. In case that response string can be deserialized to an object of given generic type T it is also stored in ApiResponse object.

Client is instantiated as a protected variable in BaseTest constructor. PersonsTest extends BaseTest and has access to PersonServiceClient.

ApiResponse

using System.Net;

namespace SampleDotNetCore2RestStub.Integration.Test.Client
{
	public class ApiResponse<T>
	{
		public HttpStatusCode StatusCode { get; set; }
		public T Result { get; set; }
		public string ResultAsString { get; set; }
	}
}

PersonServiceClient

using System;
using System.Collections.Generic;
using System.Net.Http;
using System.Threading.Tasks;
using Newtonsoft.Json;
using SampleDotNetCore2RestStub.Models;

namespace SampleDotNetCore2RestStub.Integration.Test.Client
{
	public class PersonServiceClient
	{
		private readonly HttpClient _httpClient;

		public PersonServiceClient(HttpClient httpClient)
		{
			_httpClient = httpClient;
		}

		public async Task<ApiResponse<Person>> GetPerson(string id)
		{
			var person = await GetAsync<Person>($"/person/get/{id}");
			return person;
		}

		public async Task<ApiResponse<List<Person>>> GetPersons()
		{
			var persons = await GetAsync<List<Person>>("/person/all");
			return persons;
		}

		public async Task<ApiResponse<string>> Version()
		{
			var version = await GetAsync<string>("api/version");
			return version;
		}

		private async Task<ApiResponse<T>> GetAsync<T>(string path)
		{
			var response = await _httpClient.GetAsync(path);
			var value = await response.Content.ReadAsStringAsync();
			var result = new ApiResponse<T>
			{
				StatusCode = response.StatusCode,
				ResultAsString = value
			};

			try
			{
				result.Result = JsonConvert.DeserializeObject<T>(value);
			}
			catch (Exception)
			{
				// Nothing to do
			}

			return result;
		}
	}
}

BaseTest

using System.Net.Http;
using Microsoft.AspNetCore.Hosting;
using Microsoft.AspNetCore.TestHost;
using Microsoft.VisualStudio.TestTools.UnitTesting;
using SampleDotNetCore2RestStub.Integration.Test.Client;

namespace SampleDotNetCore2RestStub.Integration.Test
{
	public abstract class BaseTest
	{
		protected PersonServiceClient PersonServiceClient;

		public BaseTest()
		{
			var server = new TestServer(new WebHostBuilder()
				.UseStartup<Startup>());
			var httpClient = server.CreateClient();
			PersonServiceClient = new PersonServiceClient(httpClient);
		}
	}
}

PersonsTest

using System.Net;
using System.Net.Http;
using System.Threading.Tasks;
using Microsoft.AspNetCore.Hosting;
using Microsoft.AspNetCore.TestHost;
using Microsoft.VisualStudio.TestTools.UnitTesting;
using Newtonsoft.Json;
using SampleDotNetCore2RestStub.Models;

namespace SampleDotNetCore2RestStub.Integration.Test
{
	[TestClass]
	public class PersonsTest : BaseTest
	{
		[TestMethod]
		public async Task GetPerson()
		{
			var response = await PersonServiceClient.GetPerson("1");

			Assert.AreEqual(HttpStatusCode.OK, response.StatusCode);
			Assert.AreEqual("LN1", response.Result.LastName);
		}

		[TestMethod]
		public async Task GetPersons()
		{
			var response = await PersonServiceClient.GetPersons();

			Assert.AreEqual(HttpStatusCode.OK, response.StatusCode);
			Assert.AreEqual(4, response.Result.Count);
			Assert.AreEqual("LN1", response.Result[0].LastName);
		}
    }
}

Stub the database

So far there is integration test that starts the application with its actual external dependencies and makes requests against it. Current API service does not connect to a real database, because this will make running the API harder. Instead, there is a fake PersonRepository which stores data in memory. In reality, the repository will connect to a database with a given connection string in appsettings.json, and will perform CRUD operations on it. Database operations might slow down the application response time, or test might not have full control over data in the database, which makes testing harder. In order to solve those two issues database can be stubbed to serve test data. Actually, anything that is not convenient can be stubbed with the examples given below.

In order to make stubbing possible and to keep application structure intact Startup has to be changed. Registering PersonRepository to .NET Core IoC container is extracted to separate virtual method that can be overridden later. All dependencies that are to be stubbed or mocked can be extracted to such methods. Then StartupStub overrides this method and registers stubbed repository PersonRepositoryStub. In it all database operations are substituted with an in-memory equivalence, hence skipping database calls. It might not be a full and accurate substitution, as long as it serves your testing purpose. After all this PersonRepositoryStub will be used only for testing. BaseTest should be changed to start the application with StartupStub instead of Statup. Finally, PersonsTest should be changed to assert on new data that is configured in PersonRepositoryStub.

Startup

public void ConfigureServices(IServiceCollection services)
{
	services.AddMvc();
	services.Configure<AppConfig>(Configuration);
	services.AddScoped<AuthenticationFilterAttribute>();

	ConfigureRepositories(services);
}

public virtual void ConfigureRepositories(IServiceCollection services)
{
	services.AddSingleton<IPersonRepository, PersonRepository>();
}

StartupStub

using Microsoft.Extensions.DependencyInjection;
using SampleDotNetCore2RestStub.Repositories;

namespace SampleDotNetCore2RestStub.Integration.Test.Mocks
{
	public class StartupStub : Startup
	{
		public override void ConfigureRepositories(IServiceCollection services)
		{
			services.AddSingleton<IPersonRepository, PersonRepositoryStub>();
		}
	}
}

PersonRepositoryStub

using System.Collections.Generic;
using System.Linq;
using SampleDotNetCore2RestStub.Models;
using SampleDotNetCore2RestStub.Repositories;

namespace SampleDotNetCore2RestStub.Integration.Test.Mocks
{
	public class PersonRepositoryStub : IPersonRepository
	{
		private Dictionary<int, Person> _persons 
					= new Dictionary<int, Person>();

		public PersonRepositoryStub()
		{
			_persons.Add(1, new Person
			{
				Id = 1,
				FirstName = "Stubed FN1",
				LastName = "Stubed LN1",
				Email = "stubed.email1@email.na"
			});
		}

		public Person GetById(int id)
		{
			return _persons[id];
		}

		public List<Person> GetAll()
		{
			return _persons.Values.ToList();
		}

		public int GetCount()
		{
			return _persons.Count();
		}

		public void Remove()
		{
			if (_persons.Keys.Any())
			{
				_persons.Remove(_persons.Keys.Last());
			}
		}

		public string Save(Person person)
		{
			if (_persons.ContainsKey(person.Id))
			{
				_persons[person.Id] = person;
				return "Updated Person with id=" + person.Id;
			}
			else
			{
				_persons.Add(person.Id, person);
				return "Added Person with id=" + person.Id;
			}
		}
	}
}

BaseTest

using System.Net.Http;
using Microsoft.AspNetCore.Hosting;
using Microsoft.AspNetCore.TestHost;
using Microsoft.VisualStudio.TestTools.UnitTesting;
using SampleDotNetCore2RestStub.Integration.Test.Client;
using SampleDotNetCore2RestStub.Integration.Test.Mocks;

namespace SampleDotNetCore2RestStub.Integration.Test
{
	public abstract class BaseTest
	{
		protected PersonServiceClient PersonServiceClient;

		public BaseTest()
		{
			var server = new TestServer(new WebHostBuilder()
				.UseStartup<StartupStub>());
			var httpClient = server.CreateClient();
			PersonServiceClient = new PersonServiceClient(httpClient);
		}
	}
}

PersonsTest

using System.Net;
using System.Net.Http;
using System.Threading.Tasks;
using Microsoft.AspNetCore.Hosting;
using Microsoft.AspNetCore.TestHost;
using Microsoft.VisualStudio.TestTools.UnitTesting;
using Newtonsoft.Json;
using SampleDotNetCore2RestStub.Models;

namespace SampleDotNetCore2RestStub.Integration.Test
{
	[TestClass]
	public class PersonsTest : BaseTest
	{
		[TestMethod]
		public async Task GetPerson()
		{
			var response = await PersonServiceClient.GetPerson("1");

			Assert.AreEqual(HttpStatusCode.OK, response.StatusCode);
			Assert.AreEqual("Stubed LN1", response.Result.LastName);
		}

		[TestMethod]
		public async Task GetPersons()
		{
			var response = await PersonServiceClient.GetPersons();

			Assert.AreEqual(HttpStatusCode.OK, response.StatusCode);
			Assert.AreEqual(1, response.Result.Count);
			Assert.AreEqual("Stubed LN1", response.Result[0].LastName);
		}
	}
}

Mock the database

Stubbing is an option, but mocking is much better as you have direct control over the mock itself. The most famous .NET mocking framework is Moq. It is added to the project with the command:

dotnet add package Moq

StartupMock extends Starup and overrides its ConfigureRepositories. It registers an instance of IPersonRepository which is injected by its constructor. BaseTest is changed to use StartupMock in UseStartup method. Repository mock is instantiated with PersonRepositoryMock = new Mock<IPersonRepository>(). It is injected into StartupMock constructor with ConfigureServices(services => services.AddSingleton(PersonRepositoryMock.Object)). This is how mock instance is registered into IoC container of .NET Core application that is being tested. Once the mock instance is registered it can be controlled. In BaseTest it is reset to defaults after each test with BaseTearDown method. It is run after each test because of [TestCleanup] MSTest attribute. Inside, the PersonRepositoryMock.Reset() resets mock state.

Test specific setup can be done for each test. For e.g. GetPerson_ReturnsCorrectResult has following setup: PersonRepositoryMock.Setup(x => x.GetById(It.IsAny<int>())).Returns(_person); That means when mock’s GetById method is called with whatever int value the _person object is returned. Another example is GetPerson_ThrowsException test. When mock’s GetById is called then InvalidOperationException is thrown. In this way, you can test exception handling, which in current demo application is missing. The exception is not that easy to reproduce if you are using repository stubbing.

StartupMock

using Microsoft.Extensions.DependencyInjection;
using SampleDotNetCore2RestStub.Repositories;

namespace SampleDotNetCore2RestStub.Integration.Test.Mocks
{
	public class StartupMock : Startup
	{
		private IPersonRepository _personRepository;
		
		public StartupMock(IPersonRepository personRepository)
		{
			_personRepository = personRepository;
		}

		public override void ConfigureRepositories(IServiceCollection services)
		{
			services.AddSingleton(_personRepository);
		}
	}
}

BaseTest

using System.Net.Http;
using Microsoft.AspNetCore.Hosting;
using Microsoft.AspNetCore.TestHost;
using Microsoft.VisualStudio.TestTools.UnitTesting;
using Microsoft.Extensions.DependencyInjection;
using Moq;
using SampleDotNetCore2RestStub.Integration.Test.Client;
using SampleDotNetCore2RestStub.Integration.Test.Mocks;
using SampleDotNetCore2RestStub.Repositories;

namespace SampleDotNetCore2RestStub.Integration.Test
{
	public abstract class BaseTest
	{
		protected PersonServiceClient PersonServiceClient;
		protected Mock<IPersonRepository> PersonRepositoryMock;

		public BaseTest()
		{
			PersonRepositoryMock = new Mock<IPersonRepository>();

			var server = new TestServer(new WebHostBuilder()
				.UseStartup<StartupMock>()
				.ConfigureServices(services =>
				{
					services.AddSingleton(PersonRepositoryMock.Object);
				}));

			var httpClient = server.CreateClient();
			PersonServiceClient = new PersonServiceClient(httpClient);
		}

		[TestCleanup]
		public void BaseTearDown()
		{
			PersonRepositoryMock.Reset();
		}
	}
}

PersonsTest

using System;
using System.Collections.Generic;
using System.Net;
using System.Net.Http;
using System.Threading.Tasks;
using Microsoft.AspNetCore.Hosting;
using Microsoft.AspNetCore.TestHost;
using Microsoft.VisualStudio.TestTools.UnitTesting;
using Moq;
using Newtonsoft.Json;
using SampleDotNetCore2RestStub.Models;

namespace SampleDotNetCore2RestStub.Integration.Test
{
	[TestClass]
	public class PersonsTest : BaseTest
	{
		private readonly Person _person = new Person
		{
			Id = 1,
			FirstName = "Mocked FN1",
			LastName = "Mocked LN1",
			Email = "mocked.email1@email.na"
		};

		[TestMethod]
		public async Task GetPerson_ReturnsCorrectResult()
		{
			PersonRepositoryMock.Setup(x => x.GetById(It.IsAny<int>()))
				.Returns(_person);

			var response = await PersonServiceClient.GetPerson("1");

			Assert.AreEqual(HttpStatusCode.OK, response.StatusCode);
			Assert.AreEqual("Mocked LN1", response.Result.LastName);
		}

		[TestMethod]
		[ExpectedException(typeof(InvalidOperationException))]
		public async Task GetPerson_ThrowsException()
		{
			PersonRepositoryMock.Setup(x => x.GetById(It.IsAny<int>()))
				.Throws(new InvalidOperationException());

			var result = await PersonServiceClient.GetPerson("1");
		}

		[TestMethod]
		public async Task GetPersons()
		{
			PersonRepositoryMock.Setup(x => x.GetAll())
				.Returns(new List<Person> { _person });

			var response = await PersonServiceClient.GetPersons();

			Assert.AreEqual(HttpStatusCode.OK, response.StatusCode);
			Assert.AreEqual(1, response.Result.Count);
			Assert.AreEqual("Mocked LN1", response.Result[0].LastName);
		}
	}
}

Nicer database mock

As of version 2.1.0 of Microsoft.AspNetCore.TestHost, which is currently in pre-release, there is a method called ConfigureTestServices, which saves us from having separate StartupMock class. You can directly inject your mocks with following code:

var server = new TestServer(new WebHostBuilder()
	.UseStartup<Startup>()
	.ConfigureTestServices(services =>
	{
		services.AddSingleton(PersonRepositoryMock.Object);
	}));

Conclusion

In the current post, I have shown how to do integration testing on .NET Core applications. This is a very convenient approach which eliminates some of the disadvantages of stubbing or mocking all dependencies in unit testing. Because of using all dependencies, integration testing can be much slower. This can be improved by mocking some of them. Integration testing is not a substitute for unit testing, nor for functional testing, but it is a good approach in you testing portfolio that should be considered.

Related Posts

Read more...

Convert NUnit 3 to NUnit 2 results XML file

Last Updated on by

Post summary: Examples how to convert NUnit 3 result XML file into NUnit 2 result XML file.

Although NUnit 3 was officially released in November 2015 still there are CI tools that do not provide support for parsing NUnit 3 result XML files. In this post, I will show how to convert between formats so CI tools can read NUnit 2 format.

NUnit 3 console runner

The easiest way is if you are using NUnit 3 console runner. It can be provided with an option: –result=TestResult.xml;format=nunit2.

Nota bene: Mandatory for this to work is to have nunit-v2-result-writer in NuGet packages directory otherwise an error will be shown: Unknown result format: nunit2.

Convert NUnit 3 to NUnit 2

If tests are being run in some other way other than NUnit 3 console runner then solution below is needed. There is no program or tool that can do this conversion, so custom one is needed. This is a Powershell script that uses nunit-v2-result-writer assemblies and with their functionality converts the XML files:

$assemblyNunitEngine = 'nunit.engine.api.dll';
$assemblyNunitWriter = 'nunit-v2-result-writer.dll';
$inputV3Xml = 'TestResult.xml';
$outputV2Xml = 'TestResultV2.xml';

Add-Type -Path $assemblyNunitEngine;
Add-Type -Path $assemblyNunitWriter;
$xmldoc = New-Object -TypeName System.Xml.XmlDataDocument;
$fs = New-Object -TypeName System.IO.FileStream -ArgumentList $inputV3Xml,'Open','Read';
$xmldoc.Load($fs);
$xmlnode = $xmldoc.GetElementsByTagName('test-run').Item(0);
$writer = New-Object -TypeName NUnit.Engine.Addins.NUnit2XmlResultWriter;
$writer.WriteResultFile($xmlnode, $outputV2Xml);

Important here is to give a proper path to nunit.engine.api.dll, nunit-v2-result-writer.dll and NUnit 3 TestResult.xml files. Powershell script above is equivalent to following C# code:

using System.IO;
using System.Xml;
using NUnit.Engine.Addins;

public class NUnit3ToNUnit2Converter
{
	public static void Main(string[] args)
	{
		var xmldoc = new XmlDataDocument();
		var fileStream 
			= new FileStream("TestResult.xml", FileMode.Open, FileAccess.Read);
		xmldoc.Load(fileStream);
		var xmlnode = xmldoc.GetElementsByTagName("test-run").Item(0);

		var writer = new NUnit2XmlResultWriter();
		writer.WriteResultFile(xmlnode, "TestResultV2.xml");
	}
}

File samples

Here NUnitFileSamples.zip is a collection of several NUnit result files. there with V3 are NUnit 3 format, those with V2_NUnit are generated with –result=TestResult.xml;format=nunit2 option and those with V2_Converted are converted with the code above.

Conclusion

Although little inconvenient it is possible to convert NUnit 3 to NUnit 2 result XML files using Powershell scripts and nunit-v2-result-writer assemblies.

Read more...

PowerMock examples and why better not to use them

Last Updated on by

Post summary: In this post, I have summarised all PowerMock examples I’ve given so far. More important I will try to give some justification why I think necessity to use PowerMock is considered an indicator for a bad code design.

All code examples are available in GitHub java-samples/junit repository.

PowerMock

PowerMock is a framework that extends other mock libraries giving them more powerful capabilities. PowerMock uses a custom classloader and bytecode manipulation to enable mocking of static methods, constructors, final classes and methods, private methods, removal of static initializers and more.

PowerMock series

So far in my blog, I have written a lot for PowerMock. Even more than I have written for Mockito which actually deserves better attention. Post from PowerMock series are:

Why avoid PowerMock

I have worked on a project where PowerMock was not needed at all. We had 91.6% code coverage only with Mockito. Initially, it was 85% but when we utilized PITest we increased the code coverage. See more on PITest in Mutation testing for Java with PITest post. I also have worked on an old product where without PowerMock you cannot do decent unit testing. PowerMock was a must in order to achieve our goal of 80% code coverage. I can easily compare those two projects. The old one had large classes with lots of private methods and used lots of static methods. It was really hard to maintain that code. In this post, I’m not going to talk about SOLID because I do not consider myself a total expert on the subject. There are lots of discussions over the internet about pros and cons of static methods so everyone can decide personally. For me, I’ve come to a conclusion that necessity of using PowerMock in a project is an indicator for bad code design. In later projects, PowerMock is not used at all. If something cannot be unit tested with Mockito then the class is refactored.

How to avoid PowerMock

PowerMock features described here are related to static methods, public methods and creating new objects.

Mock or verify static methods

I’m not saying don’t use static methods, but they should be deterministic and not very complex. Not being able to verify static method was called is a little pain but most important is input and output of your method under test, what internal call it is doing is not that important.

Mock or call private methods

Private methods are not supposed to be tested at all. It is like they do not exist. If a class is complex enough so you have to call private methods or to test individually private methods then this class might be good to be split up.

Mock new object creation

Instead of creating the object in the class use dependency injection to provide it to the class from outside either via a constructor or via a setter. This was you can very easily test this class by injecting a mock.

Conclusion

This is a very controversial post. On one hand, I describe how to use PowerMock and what features it has, on the other hand, I state that you’d better not use it. PowerMock is extremely powerful and can do almost anything you need in your testing, but for me, the necessity of using PowerMock is an indicator of bad code design.

Related Posts

Read more...

Mock new object creation with PowerMock

Last Updated on by

Post summary: How to control what objects are being instantiated when using PowerMock.

This post is part of PowerMock series examples. The code shown in examples below is available in GitHub java-samples/junit repository.

Mock new object creation

You might have a method which instantiates some object and works with it. This case could be very tricky to automate because you do not have any control over this newly created object. This is where PowerMock comes to help to allow you to control what object is being created by replacing it with an object you can control.

Code to test

Below is a simple method where a new object is being created inside a method that has to be unit tested.

public class PowerMockDemo {

	public Point publicMethod() {
		return new Point(11, 11);
	}
}

Unit test

What we want to achieve in the unit test is to control instantiation of new Point object so that it is replaced with an object we have control over. The first thing to do is to annotate unit test with @RunWith(PowerMockRunner.class) telling JUnit to use PowerMock runner and with @PrepareForTest(PowerMockDemo.class) telling PowerMock to get inside PowerMockDemo class and prepare it for mocking. Mocking is done with PowerMockito.whenNew(Point.class).withAnyArguments().thenReturn(mockPoint). It tells PowerMock when a new object from class Point is instantiated with whatever arguments to return mockPoint instead. It is possible to return different objects based on different arguments Point is created with withArguments() method. Full code is below:

import org.junit.Before;
import org.junit.Test;
import org.junit.runner.RunWith;
import org.powermock.api.mockito.PowerMockito;
import org.powermock.core.classloader.annotations.PrepareForTest;
import org.powermock.modules.junit4.PowerMockRunner;

import static org.hamcrest.CoreMatchers.is;
import static org.hamcrest.MatcherAssert.assertThat;
import static org.mockito.Mockito.mock;

@RunWith(PowerMockRunner.class)
@PrepareForTest(PowerMockDemo.class)
public class PowerMockDemoTest {

	private PowerMockDemo powerMockDemo;

	@Before
	public void setUp() {
		powerMockDemo = new PowerMockDemo();
	}

	@Test
	public void testMockNew() throws Exception {
		Point mockPoint = mock(Point.class);

		PowerMockito.whenNew(Point.class)
			.withAnyArguments().thenReturn(mockPoint);

		Point actualMockPoint = powerMockDemo.publicMethod();

		assertThat(actualMockPoint, is(mockPoint));
	}
}

Conclusion

PowerMock allows you to control want new objects are being created and replacing them with an object you have control over.

Related Posts

Read more...

Mock private method call with PowerMock

Last Updated on by

Post summary: How to mock private method with PowerMock by using spy object.

This post is part of PowerMock series examples. The code shown in examples below is available in GitHub java-samples/junit repository.

Mock private method

In some cases, you may need to alter the behavior of private method inside the class you are unit testing. You will need to mock this private method and make it return what needed for the particular case. Since this private method is inside your class under test then mocking it is little more specific. You have to use spy object.

Spy object

A spy is a real object which mocking framework has access to. Spied objects are partially mocked objects. Some their methods are real some mocked. I would say use spy object with great caution because you do not really know what is happening underneath and whether are you actually testing your class or mocked version of it.

Code to be tested

Below is a simple code that has a private method which created new Point object based on given as argument one. This private method is used to demonstrate how private methods can be called in Call private method with PowerMock post. In the current example, there is also a public method which calls this private method with a Point object.

public class PowerMockDemo {

	public Point callPrivateMethod() {
		return privateMethod(new Point(1, 1));
	}

	private Point privateMethod(Point point) {
		return new Point(point.getX() + 1, point.getY() + 1);
	}
}

Unit test

What we want to achieve in the unit test is to mock private method so that each call to it returns an object we have control over. The first thing to do is to annotate unit test with @RunWith(PowerMockRunner.class) telling JUnit to use PowerMock runner and with @PrepareForTest(PowerMockDemo.class) telling PowerMock to get inside PowerMockDemo class and prepare it for mocking. Then a spy object has to be created with PowerMockito.spy(new PowerMockDemo()). Actually, this is real PowerMockDemo object, but PowerMock is spying on it. The mocking of the private method is done with following code: PowerMockito.doReturn(mockPoint).when(powerMockDemoSpy, “privateMethod”, anyObject()). When “privateMethod” is called with whatever object then return mockPoint which is actually a mocked object. The full code example is shown below:

import org.junit.Before;
import org.junit.Test;
import org.junit.runner.RunWith;
import org.powermock.api.mockito.PowerMockito;
import org.powermock.core.classloader.annotations.PrepareForTest;
import org.powermock.modules.junit4.PowerMockRunner;

import static org.hamcrest.CoreMatchers.is;
import static org.hamcrest.MatcherAssert.assertThat;
import static org.mockito.Matchers.anyObject;
import static org.mockito.Mockito.mock;

@RunWith(PowerMockRunner.class)
@PrepareForTest(PowerMockDemo.class)
public class PowerMockDemoTest {

	private PowerMockDemo powerMockDemoSpy;

	@Before
	public void setUp() {
		powerMockDemoSpy = PowerMockito.spy(new PowerMockDemo());
	}

	@Test
	public void testMockPrivateMethod() throws Exception {
		Point mockPoint = mock(Point.class);

		PowerMockito.doReturn(mockPoint)
			.when(powerMockDemoSpy, "privateMethod", anyObject());

		Point actualMockPoint = powerMockDemoSpy.callPrivateMethod();

		assertThat(actualMockPoint, is(mockPoint));
	}
}

Conclusion

PowerMock provides a way to mock private methods by using spy objects. Mockito also has spy objects, but they are not so powerful as PowerMock’s. One example is that PowerMock can spy on final objects.

Related Posts

Read more...

Call private method with PowerMock

Last Updated on by

Post summary: How to invoke a private method with PowerMock.

This post is part of PowerMock series examples. The code shown in examples below is available in GitHub java-samples/junit repository.

Unit test private method

Mainly public methods are being tested, so it is a very rare case where you want to unit test a private method. PowerMock provides utilities that can invoke private methods via a reflection and get output which can be tested.

Code to be tested

Below is a sample code that shows a class with a private method in it. It does nothing else but increases the X and Y coordinates of given as argument Point.

public class PowerMockDemo {

	private Point privateMethod(Point point) {
		return new Point(point.getX() + 1, point.getY() + 1);
	}
}

Unit test

Assume that this private method has to be unit tested for some reason. In order to do so, you have to use PowerMock’s Whitebox.invokeMethod(). You give an instance of the object, method name as a String and arguments to call the method with. In the example below argument is new Point(11, 11).

import org.junit.Before;
import org.junit.Test;
import org.powermock.reflect.Whitebox;

import static org.hamcrest.CoreMatchers.is;
import static org.hamcrest.MatcherAssert.assertThat;

public class PowerMockDemoTest {

	private PowerMockDemo powerMockDemo;

	@Before
	public void setUp() {
		powerMockDemo = new PowerMockDemo();
	}

	@Test
	public void testCallPrivateMethod() throws Exception {
		Point actual = Whitebox.invokeMethod(powerMockDemo, 
			"privateMethod", new Point(11, 11));

		assertThat(actual.getX(), is(12));
		assertThat(actual.getY(), is(12));
	}
}

Conclusion

PowerMock provides utilities which uses reflection to do certain things, as shown in the example above to invoke a private method.

Related Posts

Read more...

Verify static method was called with PowerMock

Last Updated on by

Post summary: How to verify that static method was called during a unit test with PowerMock.

This post is part of PowerMock series examples. The code shown in examples below is available in GitHub java-samples/junit repository.

In Mock static methods in JUnit with PowerMock example post, I have given information about PowerMock and how to mock a static method. In the current post, I will demonstrate how to verify given static method was called during execution of a unit test.

Example class for unit test

We are going to unit test a class called LocatorService that internally uses a static method from utility class Utils. Method randomDistance(int distance) in Utils is returning random variable, hence it has no predictable behavior and the only way to test it is by mocking it:

public class LocatorService {

	public Point generatePointWithinDistance(Point point, int distance) {
		return new Point(point.getX() + Utils.randomDistance(distance), 
			point.getY() + Utils.randomDistance(distance));
	}
}

And Utils class is:

import java.util.Random;

public final class Utils {

	private static final Random RAND = new Random();

	private Utils() {
		// Utilities class
	}

	public static int randomDistance(int distance) {
		return RAND.nextInt(distance + distance) - distance;
	}
}

Nota bene: it is good code design practice to make utility classes final and with a private constructor.

Verify static method call

This is the full code. Additional details are shown below it.

package com.automationrhapsody.junit;

import org.junit.Before;
import org.junit.Test;
import org.junit.runner.RunWith;
import org.mockito.internal.verification.VerificationModeFactory;
import org.powermock.api.mockito.PowerMockito;
import org.powermock.core.classloader.annotations.PrepareForTest;
import org.powermock.modules.junit4.PowerMockRunner;

@RunWith(PowerMockRunner.class)
@PrepareForTest(Utils.class)
public class LocatorServiceTest {

	private LocatorService locatorServiceUnderTest;

	@Before
	public void setUp() {
		PowerMockito.mockStatic(Utils.class);

		locatorServiceUnderTest = new LocatorService();
	}

	@Test
	public void testStaticMethodCall() {
		locatorServiceUnderTest
			.generatePointWithinDistance(new Point(11, 11), 1);
		locatorServiceUnderTest
			.generatePointWithinDistance(new Point(11, 11), 234);

		PowerMockito.verifyStatic(VerificationModeFactory.times(2));
		Utils.randomDistance(1);

		PowerMockito.verifyStatic(VerificationModeFactory.times(2));
		Utils.randomDistance(234);

		PowerMockito.verifyNoMoreInteractions(Utils.class);
	}
}

Explanation

Class containing static method should be prepared for mocking with PowerMockito.mockStatic(Utils.class) code. Then call to static method is done inside locatorServiceUnderTest .generatePointWithinDistance() method. In this test, it is intentionally called 2 times with different distance (1 and 234) in order to show the verification which consists of two parts. First part is PowerMockito.verifyStatic(VerificationModeFactory.times(2)) which tells PowerMock to verify static method was called 2 times. The second part is Utils.randomDistance(1) which tells exactly which static method should be verified. Instead of 1 in the brackets you can use anyInt() or anyObject(). 1 is used to make verification explicit. As you can see there is second verification that randomDistance() method was called with 234 as well: PowerMockito.verifyStatic(VerificationModeFactory.times(2)); Utils.randomDistance(234);.

Conclusion

PowerMock provides additional power to Mockito mocking library which is described in Mock JUnit tests with Mockito example post. In the current post, I have shown how to verify static method was called. It is very specific as verification actually consists of two steps.

Related Posts

Read more...

Data driven testing with JUnit and Gradle

Last Updated on by

Post summary: How to do data-driven testing with JUnit and Gradle.

In Data driven testing with JUnit parameterized tests post, I’ve shown how to create data-driven JUnit test. It should be annotated with @RunWith(Parameterized.class).

Older Gradle and Parameterized.class

Gradle cannot run JUnit tests annotated with @RunWith(Parameterized.class). There is official Gradle bug which states issue is resolved in Gradle 2.12, so if you are using older Gradle then the current post is suitable for you.

Data-Driven JUnit tests

There is a library called junit-dataprovider which is easy to use. What you have to do to use it is:

  1. Annotate the test class
  2. Define test data
  3. Create test and use test data

Annotate the test class

The class needs to be run with a specialized runner in order to be treated as data-driven one. Runner is: com.tngtech.java.junit.dataprovider.DataProviderRunner. The class looks like:

import com.tngtech.java.junit.dataprovider.DataProviderRunner;
import org.junit.runner.RunWith;

@RunWith(DataProviderRunner.class)
public class LocatorDataProviderTest {
}

Define test data

Test data is seeded from static method: public static Object[] dataProvider(). This method returns an array of Object arrays where each array is one row with input and expected output test data. This method is annotated with @DataProvider. Here is how test data is defined:

@DataProvider
public static Object[] dataProvider() {
	return new Object[][] {
		{-1, -1, new Point(1, 1)},
		{-1, 0, new Point(1, 0)},
		{-1, 1, new Point(1, 1)},

		{0, -1, new Point(0, 1)},
		{0, 0, MOCKED_POINT},
		{0, 1, MOCKED_POINT},

		{1, -1, new Point(1, 1)},
		{1, 0, MOCKED_POINT},
		{1, 1, MOCKED_POINT}
	};
}

Create test and use test data

In order to use the test data in some test method, it should be annotated with @UseDataProvider(“dataProvider”) where “dataProvider” is the name of the static method which generates the test data. Another mandatory is test method should have same number and type of arguments as each line of the test data array. Here is how test method looks like:

@Test
@UseDataProvider("dataProvider")
public void testLocateResults(int x, int y, Point expected) {
	assertTrue(PointUtils.arePointsEqual(expected, 
				locatorUnderTest.locate(x, y)));
}

Putting it all together

Combining all steps into one class leads to the code below:

import com.automationrhapsody.junit.utils.PointUtils;
import com.tngtech.java.junit.dataprovider.DataProvider;
import com.tngtech.java.junit.dataprovider.DataProviderRunner;
import com.tngtech.java.junit.dataprovider.UseDataProvider;

import org.junit.Before;
import org.junit.Test;
import org.junit.runner.RunWith;

import static org.junit.Assert.assertTrue;
import static org.mockito.Matchers.any;
import static org.mockito.Mockito.mock;
import static org.mockito.Mockito.when;

@RunWith(DataProviderRunner.class)
public class LocatorDataProviderTest {

	private static final Point MOCKED_POINT = new Point(11, 11);

	private LocatorService locatorServiceMock = mock(LocatorService.class);

	private Locator locatorUnderTest;

	@DataProvider
	public static Object[] dataProvider() {
		return new Object[][] {
			{-1, -1, new Point(1, 1)},
			{-1, 0, new Point(1, 0)},
			{-1, 1, new Point(1, 1)},

			{0, -1, new Point(0, 1)},
			{0, 0, MOCKED_POINT},
			{0, 1, MOCKED_POINT},

			{1, -1, new Point(1, 1)},
			{1, 0, MOCKED_POINT},
			{1, 1, MOCKED_POINT}
		};
	}

	@Before
	public void setUp() {
		when(locatorServiceMock.geoLocate(any(Point.class)))
				.thenReturn(MOCKED_POINT);

		locatorUnderTest = new Locator(locatorServiceMock);
	}

	@Test
	@UseDataProvider("dataProvider")
	public void testLocateResults(int x, int y, Point expected) {
		assertTrue(PointUtils.arePointsEqual(expected, 
				locatorUnderTest.locate(x, y)));
	}
}

Benefits

Using junit-dataprovider has one huge benefit over JUnit’s Parameterized runner. Test data provider is used only for the method annotated with its name. JUnit’s Parameterized runner runs each and every test method with given data provider. In one test class, you can define several data providers as different static methods and use them in different test methods. This is not possible with JUnit’s Parameterized runner.

Conclusion

JUnit-dataprovider is a very nice library which makes JUnit 4 data-driven testing very nice and easy. Even if you do not have issues with Gradle I still would recommend it to use it instead of a standard Parameterized runner because it gives you the flexibility to bind data provider method with the specific unit test method.

Related Posts

Read more...

Mutation testing for Java with PITest

Last Updated on by

Post summary: Introduction to mutation testing and examples with PITest tool for Java.

Mutation testing

Mutation testing is a form of white-box testing. It is used to design new unit tests and evaluate the quality of the existing ones. Mutation testing involves modifying a program code in small ways, based on well-defined mutation operators that either mimic typical programming errors (such as using the wrong operator or variable name) or force the creation of valuable tests (such as dividing each expression by zero). Each mutated version is called a mutant. Existing unit tests are run against this mutant. If some unit test fails then mutant is killed. If no unit test fails then mutant survived. Test suites are measured by the percentage of mutants that they kill. New tests can be designed to kill additional mutants. The purpose of mutation testing is to help the tester develop effective tests or locate weaknesses in the test data used in the existing tests.

It is not very often when I get surprised by discovering new testing technique I’ve never heard about, so I must give credits to Alexander Todorov since I learned this one from his presentation.

PITest

Mutation testing can be done manually by changing program code and running the tests, but this is not really effective and can lead to serious problems where you commit mutated code by mistake. Most effective and recommended way of doing mutation testing is by using tools. PITest is a tool for mutation testing in Java. It seems to be fast growing and has a big community.

Integrate PITest

Examples given in current post can be found in GitHub sample-dropwizard-rest-stub repository. It is very easy to use PITest. The first step is to add it to pom.xml file:

<plugin>
	<groupId>org.pitest</groupId>
	<artifactId>pitest-maven</artifactId>
	<version>1.1.10</version>
	<configuration>
		<targetClasses>
			<param>com.automationrhapsody.reststub.persistence*</param>
		</targetClasses>
		<targetTests>
			<param>com.automationrhapsody.reststub.persistence*</param>
		</targetTests>
	</configuration>
</plugin>

The example given above is the most simple one. PITest provides various configurations very well described into PITest Maven Quick Start page.

Run PITest

Once configured it can be run with: mvn org.pitest:pitest-maven:mutationCoverage or if you want to ensure clean build every time: mvn clean test org.pitest:pitest-maven:mutationCoverage

PITest results

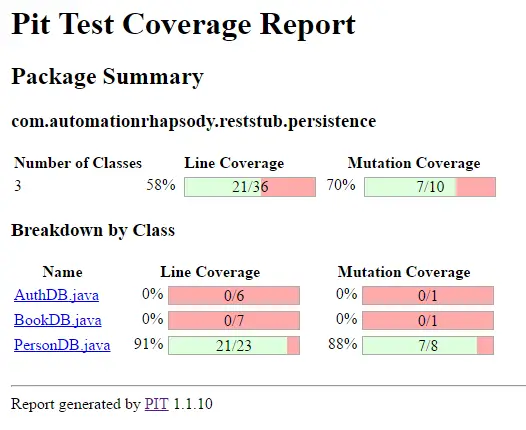
PITest provides very understandable reports. Along with the line code coverage, it measures the mutation coverage. There are statistics on package level.

pitest-package

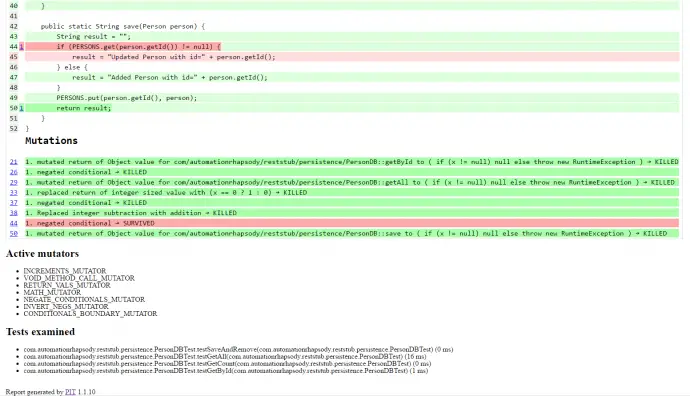
PersonDB is the only class that has been uni tested. It has 91% line coverage and 1 not killed mutation. Opening the PersonDB class gives more details what is not covered by tests and what the mutation is:

pitest-class

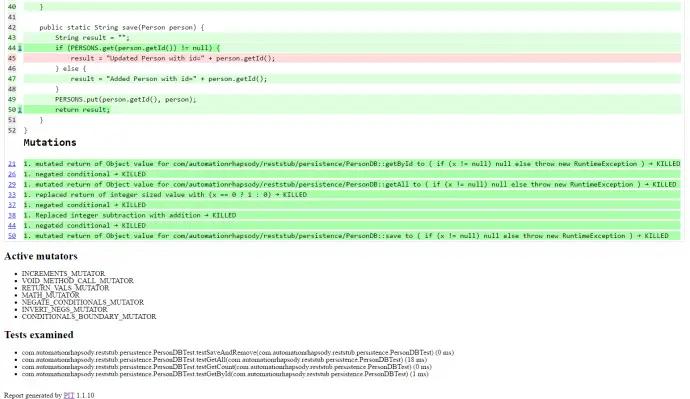
PITest has negated the condition on line 44, making the mutated code to be: PERSONS.get(person.getId()) == null. Unit tests had passed although this mutation. Full reports can be found in PITest report example.

Action PITest results

Current results indicate that unit tests are not good enough because of the survived mutation. They are also insufficient as one line of code is not tested at all. The first improvement is to kill the mutation by change line 37 of PersonDBTest.java from PersonDB.save(person); to assertEquals(“Added Person with id=11”, PersonDB.save(person)); and PITest is run again then results show all mutations are killed.

pitest-class-no-mutations

Still, there is one line of code not covered. This will require adding a new unit test to cover the update person functionality.

PITest performance

Doing a mutation testing requires significant resources to run a large amount of unit tests. Examples given above work very fast, but they are far away from the reality. I was curious how this works on a real project so I run it on one which is relatively small one. It has very good unit tests though with 95% line coverage – 2291 out of 2402 lines. Still, PITest found only 90% mutation coverage (849/940). 51 out of 940 mutations that survived and 40 with no unit test coverage which gives a room for improvement. The total run took 3 mins 11 secs. See results below:

PIT >> INFO : Found  464 tests
PIT >> INFO : Calculated coverage in 22 seconds.
PIT >> INFO : Created  132 mutation test units

- Timings
==================================================================
> scan classpath : < 1 second
> coverage and dependency analysis : 22 seconds
> build mutation tests : < 1 second
> run mutation analysis : 2 minutes and 48 seconds
--------------------------------------------------------------------------------
> Total : 3 minutes and 11 seconds
--------------------------------------------------------------------------------
==================================================================
- Statistics
==================================================================
>> Generated 940 mutations Killed 849 (90%)
>> Ran 2992 tests (3.18 tests per mutation)
==================================================================
- Mutators
==================================================================
> org.pitest.mutationtest.engine.gregor.mutators.ConditionalsBoundaryMutator
>> Generated 18 Killed 9 (50%)
> KILLED 7 SURVIVED 7 TIMED_OUT 2 NON_VIABLE 0
> MEMORY_ERROR 0 NOT_STARTED 0 STARTED 0 RUN_ERROR 0
> NO_COVERAGE 2
--------------------------------------------------------------------------------
> org.pitest.mutationtest.engine.gregor.mutators.VoidMethodCallMutator
>> Generated 115 Killed 96 (83%)
> KILLED 81 SURVIVED 12 TIMED_OUT 15 NON_VIABLE 0
> MEMORY_ERROR 0 NOT_STARTED 0 STARTED 0 RUN_ERROR 0
> NO_COVERAGE 7
--------------------------------------------------------------------------------
> org.pitest.mutationtest.engine.gregor.mutators.ReturnValsMutator
>> Generated 503 Killed 465 (92%)
> KILLED 432 SURVIVED 16 TIMED_OUT 33 NON_VIABLE 0
> MEMORY_ERROR 0 NOT_STARTED 0 STARTED 0 RUN_ERROR 0
> NO_COVERAGE 22
--------------------------------------------------------------------------------
> org.pitest.mutationtest.engine.gregor.mutators.MathMutator
>> Generated 10 Killed 9 (90%)
> KILLED 8 SURVIVED 0 TIMED_OUT 1 NON_VIABLE 0
> MEMORY_ERROR 0 NOT_STARTED 0 STARTED 0 RUN_ERROR 0
> NO_COVERAGE 1
--------------------------------------------------------------------------------
> org.pitest.mutationtest.engine.gregor.mutators.NegateConditionalsMutator
>> Generated 294 Killed 270 (92%)
> KILLED 254 SURVIVED 16 TIMED_OUT 15 NON_VIABLE 0
> MEMORY_ERROR 0 NOT_STARTED 0 STARTED 0 RUN_ERROR 1
> NO_COVERAGE 8
--------------------------------------------------------------------------------

Case study

I used PITest on production project written on Java 8 extensively using Stream APIs and Lambda expressions. The initial run of 606 existing test cases gave 90% mutation coverage (846/940) and 95% line coverage (2291/2402).

Note that PITest calculates in statistic given above that existing tests are 464. This is because some of them are data driven tests and JUnit calculates the total number of 606 because every data row is counted as a test. Understand how to make JUnit data-driven tests in Data driven testing with JUnit parameterized tests post.

After analysis and adding new tests total test cases number was increased to 654 which is almost 8% increase. PITest run shows 97% mutation coverage (911/939) and 97% line coverage (2332/2403). During the analysis, no bugs in code were found.

Conclusion

Mutation testing is a good additional technique to make your unit tests better. It should not be the primary technique though as tests will be written just to kill the mutations instead of actually testing the functionality. In projects with well-written unit tests mutation testing does not bring much of a value, but still, it is a very good addition to your testing arsenal. PITest is a very good tool to do mutation testing in Java I would say to give it a try.

Related Posts

Read more...

Mock static methods in JUnit with PowerMock example

Last Updated on by

Post summary: Examples how to mock static methods in JUnit tests with PowerMock.

This post is part of PowerMock series examples. The code shown in examples below is available in GitHub java-samples/junit repository.

In Mock JUnit tests with Mockito example post, I have shown how and why to use Mockito java mocking framework to create good unit tests. There are several things that Mockito is not supporting, but one of them is mocking of static methods. It is not that common to encounter such situation is real life, but the moment you encounter it Mockito is not able to solve the task. This is where PowerMock comes to the rescue.

PowerMock

PowerMock is a framework that extends other mock libraries giving them more powerful capabilities. PowerMock uses a custom classloader and bytecode manipulation to enable mocking of static methods, constructors, final classes and methods, private methods, removal of static initializers and more.

Example class for unit test

We are going to unit test a class called LocatorService that internally uses a static method from utility class Utils. Method randomDistance(int distance) in Utils is returning random variable, hence it has no predictable behavior and the only way to test it is by mocking it:

public class LocatorService {

	public Point generatePointWithinDistance(Point point, int distance) {
		return new Point(point.getX() + Utils.randomDistance(distance), 
			point.getY() + Utils.randomDistance(distance));
	}
}

And Utils class is:

import java.util.Random;

public final class Utils {

	private static final Random RAND = new Random();

	private Utils() {
		// Utilities class
	}

	public static int randomDistance(int distance) {
		return RAND.nextInt(distance + distance) - distance;
	}
}

Nota bene: it is good code design practice to make utility classes final and with a private constructor.

Using PowerMock

In order to use PowerMock two things has to be done:

  1. Import PowerMock into the project
  2. Annotate unit test class
  3. Mock the static class

Import PowerMock into the project

In case of using Maven import statement is:

<dependency>
	<groupId>org.powermock</groupId>
	<artifactId>powermock-module-junit4</artifactId>
	<version>1.6.5</version>
	<scope>test</scope>
</dependency>
<dependency>
	<groupId>org.powermock</groupId>
	<artifactId>powermock-api-mockito</artifactId>
	<version>1.6.5</version>
	<scope>test</scope>
</dependency>

Nota bene: there is a possibility of version mismatch between PowerMock and Mockito. I’ve received: java.lang.NoSuchMethodError: org.mockito.mock.MockCreationSettings.isUsingConstructor()Z exception when using PowerMock 1.6.5 with Mockito 1.9.5, so I had to upgrade to Mockito 1.10.19.

Annotate JUnit test class

Two annotations are needed. One is to run unit test with PowerMockRunner: @RunWith(PowerMockRunner.class). Other is to prepare Utils class for testing: @PrepareForTest({Utils.class}). The final code is:

import org.junit.runner.RunWith;
import org.powermock.core.classloader.annotations.PrepareForTest;
import org.powermock.modules.junit4.PowerMockRunner;

@RunWith(PowerMockRunner.class)
@PrepareForTest({Utils.class})
public class LocatorServiceTest {
}

Mock static class

Explicit mocking to static class should be made in order to be able to use standard Mockito when().thenReturn() construction:

int distance = 111;
PowerMockito.mockStatic(Utils.class);
when(Utils.randomDistance(anyInt())).thenReturn(distance);

Putting it all together

Final JUnit test class is shown below. The code in tests verifies logic in LocatorService, if a point is given then new point is returned by adding random to its X and Y coordinates. By removing the random element with mocking code can be tested with specific values.

package com.automationrhapsody.junit;

import org.junit.Before;
import org.junit.Test;
import org.junit.runner.RunWith;
import org.powermock.api.mockito.PowerMockito;
import org.powermock.core.classloader.annotations.PrepareForTest;
import org.powermock.modules.junit4.PowerMockRunner;

import static org.junit.Assert.assertTrue;
import static org.mockito.Matchers.anyInt;
import static org.mockito.Mockito.when;

@RunWith(PowerMockRunner.class)
@PrepareForTest({Utils.class})
public class LocatorServiceTest {

	private LocatorService locatorServiceUnderTest;

	@Before
	public void setUp() {
		PowerMockito.mockStatic(Utils.class);

		locatorServiceUnderTest = new LocatorService();
	}

	@Test
	public void testGeneratePointWithinDistance() {
		int distance = 111;

		when(Utils.randomDistance(anyInt())).thenReturn(distance);

		Point input = new Point(11, 11);
		Point expected = new Point(input.getX() + distance, 
				input.getY() + distance);

		assertTrue(arePointsEqual(expected, 
			locatorServiceUnderTest.generatePointWithinDistance(input, 1)));
	}

	public static boolean arePointsEqual(Point p1, Point p2) {
		return p1.getX() == p2.getX()
			&& p1.getY() == p2.getY();
	}
}

Conclusion

PowerMock is a powerful addition to standard mocking libraries as Mockito. Using it has some specifics, but once you understand them it is easy and fun to use it. Keep in mind that if you encounter a need to use PowerMock that can mean that code under test is not well designed. In my experience, it is possible to have very good unit tests with more than 85% coverage without any PowerMock usage. Still, there are some exceptional cases where PowerMock can be put in operation.

Related Posts

Read more...

Data driven testing with JUnit parameterized tests

Last Updated on by

Post summary: How to do data-driven testing with JUnit parameterized tests.

In Mock JUnit tests with Mockito example post, I have introduced Mockito and showed how to use for proper unit testing. In current post I will show how to improve test coverage by adding more scenarios. One solution is to copy and then paste single unit test and change input and expected output values, but this is a failure-prone approach. A smarter approach is needed – data-driven testing.

Data Driven Testing

The term from Wikipedia is: Data-driven testing (DDT) is a term used in the testing of computer software to describe testing done using a table of conditions directly as test inputs and verifiable outputs as well as the process where test environment settings and control are not hard-coded.

This exactly what is needed to improve test coverage – test with different scenarios and different input data without hard-coding the scenario itself, but just feeding different input and expected output data to it.

Parameterized JUnit tests

JUnit supports running test or several tests with given data table. Several things have to be done in order to do this:

  1. Annotate the test class
  2. Define test data
  3. Define variables to store the test data and read it
  4. Use tests data in tests

Nota bene: Every JUnit test (class annotated with @Test) is be executed with each row of the test data set. If you have 3 tests and 12 data rows this will result in 36 tests.

Annotate the class

The class needs to be run with a specialized runner in order to be treated as data-driven one. Runner is: org.junit.runners.Parameterized. The class looks like:

import org.junit.runner.RunWith;
import org.junit.runners.Parameterized;

@RunWith(Parameterized.class)
public class LocatorParameterizedTest {
}

Define test data

Test data is seeded from static method: public static Iterable<Object[]> data(). This method returns a collection of Object arrays where each array is one row with input and expected output test data. This method is annotated with @Parameterized.Parameters. The annotation may accept name argument which can display data from each row by its index: name = “{index}: Test with X={0}, Y={1}, result is: {2}”, where {index} is current test sequence, {0} is the first element from Object array. Here is how test data is defined:

@Parameterized.Parameters(name = "{index}: Test with X={0}, Y={1}, result: {2}")
public static Iterable<Object[]> data() {
	return Arrays.asList(new Object[][] {
		{-1, -1, new Point(1, 1)},
		{-1, 0, new Point(1, 0)},
		{-1, 1, new Point(1, 1)},
	});
}

Define variables to store the test data and read it

Private fields are needed to store every index from Object array representing test data row. In the constructor of the class, those variables are stored. Not that constructor must have the same number of parameters. If there is difference running the test fails with: java.lang.IllegalArgumentException: wrong number of arguments exception. Code is:

private final int x;
private final int y;
private final Point expected;

public LocatorParameterizedTest(int x, int y, Point expected, int a) {
	this.x = x;
	this.y = y;
	this.expected = expected;
}

Use tests data in tests

Once read test data is accessed in tests by using the private fields that were read through the constructor:

@Test
public void testLocateLocalResult() {
	assertTrue(arePointsEqual(expected, locatorUnderTest.locate(x, y)));
}

private boolean arePointsEqual(Point p1, Point p2) {
	return p1.getX() == p2.getX()
		&& p1.getY() == p2.getY();
}

Putting it all together

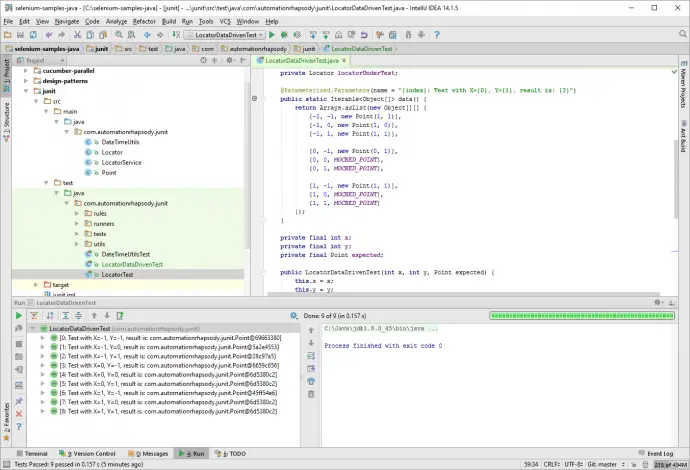
Combining all steps into one class leads to unit test shown below. If you switch the tabs you can see original test class with just two tests as described Mock JUnit tests with Mockito example post:

Data-driven test with 12 cases

import java.util.Arrays;

import org.junit.Before;
import org.junit.Test;
import org.junit.runner.RunWith;
import org.junit.runners.Parameterized;

import static org.junit.Assert.assertTrue;
import static org.mockito.Matchers.any;
import static org.mockito.Mockito.mock;
import static org.mockito.Mockito.when;

@RunWith(Parameterized.class)
public class LocatorParameterizedTest {

	private static final Point MOCKED_POINT = new Point(11, 11);

	private LocatorService locatorServiceMock = mock(LocatorService.class);

	private Locator locatorUnderTest;

	@Parameterized.Parameters(name 
		= "{index}: Test with X={0}, Y={1}, result: {2}")
	public static Iterable<Object[]> data() {
		return Arrays.asList(new Object[][] {
			{-1, -1, new Point(1, 1)},
			{-1, 0, new Point(1, 0)},
			{-1, 1, new Point(1, 1)},

			{0, -1, new Point(0, 1)},
			{0, 0, MOCKED_POINT},
			{0, 1, MOCKED_POINT},

			{1, -1, new Point(1, 1)},
			{1, 0, MOCKED_POINT},
			{1, 1, MOCKED_POINT}
		});
	}

	private final int x;
	private final int y;
	private final Point expected;

	public LocatorParameterizedTest(int x, int y, Point expected) {
		this.x = x;
		this.y = y;
		this.expected = expected;
	}

	@Before
	public void setUp() {
		when(locatorServiceMock.geoLocate(any(Point.class)))
			.thenReturn(MOCKED_POINT);

		locatorUnderTest = new Locator(locatorServiceMock);
	}

	@Test
	public void testLocateResults() {
		assertTrue(arePointsEqual(expected, 
			locatorUnderTest.locate(x, y)));
	}

	private boolean arePointsEqual(Point p1, Point p2) {
		return p1.getX() == p2.getX()
			&& p1.getY() == p2.getY();
	}
}

Simple test with 2 cases

import org.junit.Before;
import org.junit.Test;
import org.junit.runner.RunWith;
import org.mockito.Mock;
import org.mockito.runners.MockitoJUnitRunner;

import static org.junit.Assert.assertEquals;
import static org.junit.Assert.assertTrue;
import static org.mockito.Matchers.any;
import static org.mockito.Mockito.when;

@RunWith(MockitoJUnitRunner.class)
public class LocatorTest {

	private static final Point TEST_POINT = new Point(11, 11);

	@Mock
	private LocatorService locatorServiceMock;

	private Locator locatorUnderTest;

	@Before
	public void setUp() {
		when(locatorServiceMock.geoLocate(any(Point.class)))
			.thenReturn(TEST_POINT);

		locatorUnderTest = new Locator(locatorServiceMock);
	}

	@Test
	public void testLocateWithServiceResult() {
		assertEquals(TEST_POINT, locatorUnderTest.locate(1, 1));
	}

	@Test
	public void testLocateLocalResult() {
		Point expected = new Point(1, 1);
		assertTrue(arePointsEqual(expected, 
			locatorUnderTest.locate(-1, -1)));
	}

	private boolean arePointsEqual(Point p1, Point p2) {
		return p1.getX() == p2.getX()
			&& p1.getY() == p2.getY();
	}
}

The full example can be found in LocatorParameterizedTest.java class.

data-driven-junit

Better alternatives

Standard JUnit data provider is not very flexible. Define the data set is used for the whole test class, thus every test method in this class will be run with each of dataset rows. If you have 4 rows and 3 test methods then this will result in 12 tests being run. TestNG provides much better data provider where a dataset is defined and can be applied to individual test method only. More details can be found in TestNG data provider page. This data provider is available for JUnit by external Java library called junit-dataprovider. More details how to use this data provider can be found in Data driven testing with JUnit and Gradle post.

Conclusion

Data-driven testing is very powerful instrument. With current post, I showed how easy it is to do it with JUnit as well as what alternatives are available.

Related Posts

Read more...

Assert Mockito mock method arguments if no equals() method implemented

Last Updated on by

Post summary: How to assert mock method is called with the specific object as an argument in case no equals() method is implemented on argument object.

Mock JUnit tests with Mockito example post introduces Mockito as Java mocking framework. The code shown in examples below is available in GitHub java-samples/junit repository. Mockito makes it possible to verify whether a mock method has been called and with what specific object:

verify(locatorServiceMock, times(1)).geoLocate(new Point(1, 1));

The code above verifies that mock’s geoLocate() method was called with argument object with coordinates (1, 1).

Missing equals() method

Internally Mockito uses Point class’s equals() method to compare object that has been passed to the method as an argument with object configured as expected in verify() method. If equals() is not overridden then java.lang.Object’s equals() is used which compares only the references, i.e. if both variables point to one and the same object in heap. In the current example, Point class has no equals() method implemented. When providing expected a new object is created, references are not one and the same, so Mockito will fail the verification.

Override equals()

In order to make verification works simplest solution is to implement equals() method in Point class. Personally, I’m not a big fan of changing production code for sake of testing. Maybe there is a valid reason for a developer to have designed current class in such manner. A more realistic scenario is that Point class comes from some external library which there is no control over, so overriding equals() method is not possible at all.

Use Mockito argThat matcher

Mockito provides a method called argThat() in org.mockito.Matchers class. It accepts an object from the class that implements org.hamcrest.Matcher<T> interface. Actual equals implementation is done in its matches() method:

private class PointMatcher extends ArgumentMatcher<Point> {
	private final Point expected;

	public PointMatcher(Point expected) {
		this.expected = expected;
	}

	@Override
	public boolean matches(Object obj) {
		if (!(obj instanceof Point)) {
			return false;
		}
		Point actual = (Point) obj;

		return actual.getX() == expected.getX()
			&& actual.getY() == expected.getY();
	}
}

Once implemented this class can be used in tests:

verify(locatorServiceMock, times(1))
	.geoLocate(argThat(new PointMatcher(new Point(1, 1))));

Conclusion

In examples above is shown how to implement or change equals() method behavior for a specific class in unit tests so that Mockito can verify object from this class is provided as an argument for mock’s method call.

Related Posts

Read more...

Mock JUnit tests with Mockito example

Last Updated on by

Post summary: Why mocking is needed in unit testing and how to do it with Mockito.

Unit testing

By definition, unit testing is a process in which the smallest testable parts of an application, called units, are individually and independently tested for proper operation. Smallest testable unit in Java is a method. Public methods are the only one exposed to outside world, so only they are subject to unit testing.

Mocking

Unit tests focus on a particular piece of code that needs to be exercised. In most of the cases, this code relies on external dependencies. Those dependencies have to be controlled, so only code under test is exercised. Removing dependencies is done with a test double. Test doubles are objects that look and behave like their release-intended counterparts but are actually simplified versions of them which reduce the complexity and facilitate testing. Test doubles are fakes, stubs, and mocks.

Mockito

Mockito is the most famous mocking framework for Java. It provides all mocking features needed for proper unit testing, except mocking of static methods. Static methods can be mocked with PowerMock. It is a Mockito’s wrapper that provides same API plus static method mocking and other features. In PowerMock examples and why better not to use them post, I have shown how to use PowerMock and its features.

Example class for unit test

Code shown in examples below is available in GitHub java-samples/junit repository. We are going to unit test a class called Locator that internally uses another class LocatorService:

public class Locator {

	private final LocatorService locatorService;

	public Locator(LocatorService locatorService) {
		this.locatorService = locatorService;
	}

	public Point locate(int x, int y) {
		if (x < 0 || y < 0) {
			return new Point(Math.abs(x), Math.abs(y));
		} else {
			return locatorService.geoLocate(new Point(x, y));
		}
	}
}

The example above is pretty simple. If we pass point with some negative coordinates method locate() returns point with positive coordinates. If coordinates are positive then search via LocatorService is done. This class represents some external API that our code is calling. Since there is no control over this API and internal structure is not know it should be mocked in the unit tests. As stated above unit tests are focused on a specific piece of code, a unit.

Initialising a mock

As described in Mockito’s documentation a way to mock some object is: List mockedList = mock(List.class); Another way, that is used in current examples is to annotate the filed that is going to be mocked with @Mock and annotate JUnit test class with @RunWith(MockitoJUnitRunner.class). In this way Mockito runner does the initialization behind the scenes:

@RunWith(MockitoJUnitRunner.class)
public class LocatorTest {

	@Mock
	private LocatorService locatorServiceMock;
}

Control mock’s behavior

The whole idea of having a mock is to be able to control its behavior. If mock is called it should respond in a predictable manner. This is done with when() method:

when(locatorServiceMock.geoLocate(any(Point.class)))
	.thenReturn(new Point(11, 11)); 

When mock’s geoLocate() method is being called with any given point object it always returns new Point with coordinates X=11 and Y=11. If this is not enough, more elaborate scenarios can be used:

when(locatorServiceMock.geoLocate(new Point(5, 5))).thenReturn(new Point(50, 50));
when(locatorServiceMock.geoLocate(new Point(1, 1))).thenReturn(new Point(11, 11));

If locator class is called with a point with coordinates (5, 5) then new point with coordinates (50, 50) is returned. If mock is called with a point with coordinates (1, 1) then point with (11, 11) is returned. In any other cases, null is returned by default.

Nota bene: in order to work properly object used to call the mocked method (Point is the current example) should have properly implemented equals() method otherwise java.lang.Object‘s equals() method is used, which just compared the references. Examples above will not work, as Point doesn’t have equals() method properly overridden.

Depending on tests that have to be conducted more precise control over mock’s response could be needed. This is done with thenAnswer() mock’s method:

when(locatorServiceMock.geoLocate(any(Point.class)))
	.thenAnswer(new Answer<Point>() {
		@Override
		public Point answer(InvocationOnMock invocationOnMock) throws Throwable {
			Object[] args = invocationOnMock.getArguments();
			Point caller = (Point) args[0];
			
			if (caller.getX() == 5 && caller.getY() == 5) {
				return new Point(50, 50);
			} else if (caller.getX() == 1 && caller.getY() == 1) {
				return new Point(11, 11);
			} else {
				return null;
			}
		}
	});

Call to invocationOnMock.getArguments() returns array with arguments that mock’s geoLocate() method was called with. In the current example, it is only one argument from type Point, so it is cast and saved to new Point object inside caller variable. If coordinates are (5, 5) then new point with coordinates (50, 50) are returned. If coordinates on input are (1, 1) then new point (11, 11) is returned. In all other cases, null is returned.

Verify mock was interacted with

In order to verify execution path is correct, Mockito provides a way to check if a certain method on the mock has been called and how many times. This is done with verify() method. To confirm no more methods are called on this specific mock instance then verifyNoMoreInteractions() is used:

verify(locatorServiceMock, times(1)).geoLocate(new Point(1, 1));

verifyNoMoreInteractions(locatorServiceMock);

The example above verifies that mock’s geoLocate() method was called with a specific point with coordinates (1, 1). If it is not important which object is passed to the method then any(Point.class) can be used.

Nota bene: the example above will not work as there is no equals() method implemented on point class, so Mockito is using java.lang.Object’s equals() method by default that compares only the references. Point class is intentionally left without equals method to demonstrate how such situations can be solved. How to solve this obstacle is shown in Assert Mockito mock method arguments if no equals() method implemented post.

Putting it all together

All snippets above are put together is one simple unit test that covers all the possible paths for Locator’s locate() method, but obviously not all the test conditions:

import org.junit.Before;
import org.junit.Test;
import org.junit.runner.RunWith;
import org.mockito.Mock;
import org.mockito.runners.MockitoJUnitRunner;

import static org.junit.Assert.assertEquals;
import static org.junit.Assert.assertTrue;
import static org.mockito.Matchers.any;
import static org.mockito.Mockito.when;

@RunWith(MockitoJUnitRunner.class)
public class LocatorTest {

	private static final Point TEST_POINT = new Point(11, 11);

	@Mock
	private LocatorService locatorServiceMock;

	private Locator locatorUnderTest;

	@Before
	public void setUp() {
		when(locatorServiceMock.geoLocate(any(Point.class)))
			.thenReturn(TEST_POINT);

		locatorUnderTest = new Locator(locatorServiceMock);
	}

	@Test
	public void testLocateWithServiceResult() {
		assertEquals(TEST_POINT, locatorUnderTest.locate(1, 1));
	}

	@Test
	public void testLocateLocalResult() {
		Point expected = new Point(1, 1);
		assertTrue(arePointsEqual(expected, locatorUnderTest.locate(-1, -1)));
	}

	private boolean arePointsEqual(Point p1, Point p2) {
		return p1.getX() == p2.getX()
			&& p1.getY() == p2.getY();
	}
}

When locatorServiceMock is called with any then TEST_POINT is returned. No matter that Point has no equals() method defined, assertEquals() in testLocateWithServiceResult() passes because code refers one and the same object. Helper method arePointsEqual() is needed in testLocateLocalResult() though. Code coverage report in IntelliJ IDEA is:

Mockito-JUnit-results

Optimise

Next step is to improve test coverage by adding more unit tests. Copy/paste is not an option, so in post Data driven testing with JUnit parameterized tests I have described how to make data-driven tests in JUnit.

Conclusion

Mocking is mandatory when developing unit tests. Mockito is a convenient mocking library for Java. It is possible to control what mock returns if called with whatever value or if called with a specific value. Mockito allows verification on which of mock’s methods has been called and how many times.

Related Posts

Read more...

JUnit methods execution sequence

Last Updated on by

Post summary: Details with code samples on JUnit methods execution sequence.

In order to be effective in your unit tests, you need to know in details how JUnit works. In this post, I’ll show what is the execution sequence in one JUnit test. The code shown in the current post is available on GitHub java-samples/junit repository.

JUnit execution sequence

Methods that are used in a JUnit test:

  • Methods annotated with @Before and @After – those are public void methods that do some specific setup/teardown before and after a test method. Generally, it is good to have just one @Before and @After method, but JUnit allows as much as you have. Execution sequence with the same annotation is in order of appearance in the file.
  • Methods annotated with @BeforeClass and @AfterClass – those public static void methods which do some setup/teardown just once before and after all tests have started/passed. An also good idea to have just one of each, but in case of more with the same annotation, they are executed in order of appearance.
  • Methods annotated with @Test – those are public void methods with actual tests logic and asserts. Generally, there should be many test methods in a class. Default JUnit execution order is by name ascending. Still, this is not always guaranteed. Although bad practice to have a sequence of unit tests this can be done by annotating your test class with @FixMethodOrder(MethodSorters.NAME_ASCENDING).
  • Test class constructor – each and every test method is run in its own object instance, so constructor is run on instantiation. It is not very good practice to do something in test class constructor. Setup should be done in a @Before method.

Order of differently annotated methods does not depend on where they are put in the file but depends on types of annotations. Order of methods with one and the same annotations is described above. Here is the output of ExecutionSequenceTest:

@BeforeClass

	TestClass constructor
	@Before
	test1 body
	@After

	TestClass constructor
	@Before
	test2 body
	@After

	TestClass constructor
	@Before
	test3 body
	@After

@AfterClass

JUnit execution sequence with rules

In Use JUnit rules to debug failed API tests post, I have described rules and how they work. TestWatcher gives access to tests results when the test starts and finishes. The example here is with @Rule and @ClassRule annotated objects from a custom PrintSequenceRule class extending TestWatcher class. Along with methods described in the previous section, there are several that come into play when rules are involved:

  • starting() and finished() – methods come from TestWatcher class and are run on start/finish of class/method.
  • succeeded(), failed() or skipped() – one of this is executed based on class method result.
  • Rule constructor – it is not recommended to use something in rule constructor.

Output of ExecutionSequenceRulesTest class is:

RuleClass constructor
starting() of TestClass
@BeforeClass

	RuleClass constructor
	TestClass constructor
	starting() of TestMethod test1()
	@Before
	test1 body
	@After
	succeeded() of TestMethod test1()
	finished() of TestMethod test1()

	RuleClass constructor
	TestClass constructor
	starting() of TestMethod test2()
	@Before
	test2 body
	@After
	succeeded() of TestMethod test2()
	finished() of TestMethod test2()

	RuleClass constructor
	TestClass constructor
	starting() of TestMethod test3()
	@Before
	test3 body
	@After
	succeeded() of TestMethod test3()
	finished() of TestMethod test3()

@AfterClass
succeeded() of TestClass
finished() of TestClass

Conclusion

In order to design your tests correctly, it is good to know what is JUnit methods execution order. @Before/@After methods are executed before/after each test method. @BeforeClass/@AfterClass are executed just once per test class on its start and end. Rules provide a capability of extending the standard functionality. It is possible to use @Rule for each test method or @ClassRule for the whole test class.

Read more...

Retry JUnit failed tests immediately

Last Updated on by

Post summary: How to retry failed JUnit tests immediately and if a retry is OK then report test as passed.

Approaches

There are mainly three approaches to make JUnit retry failed tests.

  • Maven Surefire or Failsafe plugins – follow plugin name links for more details how to use and configure plugins
  • JUnit rules – code listed in the current post can be used as a rule. See more for rules in Use JUnit rules to debug failed API tests post. Problem is @Rule annotation works for test methods only. In order to have retry logic in @BeforeClass then the @ClassRule object should be instantiated.
  • JUnit custom runner – this post is dedicated to creating own JUnit retry runner and run tests with it.

Custom JUnit retry runner

A custom runner can be created by extending org.junit.runners.BlockJUnit4ClassRunner class and override public void run(final RunNotifier notifier) and protected void runChild(final FrameworkMethod method, RunNotifier notifier) methods. run() is accessed when test class is instantiated, runChild() is accessed when test method is run. Below is the code for custom JUnit retry runner class:

package com.automationrhapsody.junit.runners;

import org.junit.Ignore;
import org.junit.internal.AssumptionViolatedException;
import org.junit.internal.runners.model.EachTestNotifier;
import org.junit.runner.Description;
import org.junit.runner.notification.RunNotifier;
import org.junit.runner.notification.StoppedByUserException;
import org.junit.runners.BlockJUnit4ClassRunner;
import org.junit.runners.model.FrameworkMethod;
import org.junit.runners.model.InitializationError;
import org.junit.runners.model.Statement;

public class RetryRunner extends BlockJUnit4ClassRunner {

	private static final int RETRY_COUNT = 2;

	public RetryRunner(Class<?> clazz) throws InitializationError {
		super(clazz);
	}

	@Override
	public void run(final RunNotifier notifier) {
		EachTestNotifier testNotifier = new EachTestNotifier(notifier, getDescription());
		Statement statement = classBlock(notifier);
		try {
			statement.evaluate();
		} catch (AssumptionViolatedException ave) {
			testNotifier.fireTestIgnored();
		} catch (StoppedByUserException sbue) {
			throw sbue;
		} catch (Throwable t) {
			System.out.println("Retry class: " + getDescription().getDisplayName());
			retry(testNotifier, statement, t, getDescription());
		}
	}

	@Override
	protected void runChild(final FrameworkMethod method, RunNotifier notifier) {
		Description description = describeChild(method);
		if (method.getAnnotation(Ignore.class) != null) {
			notifier.fireTestIgnored(description);
		} else {
			runTest(methodBlock(method), description, notifier);
		}
	}

	private void runTest(Statement statement, Description description, RunNotifier notifier) {
		EachTestNotifier eachNotifier = new EachTestNotifier(notifier, description);
		eachNotifier.fireTestStarted();
		try {
			statement.evaluate();
		} catch (AssumptionViolatedException e) {
			eachNotifier.addFailedAssumption(e);
		} catch (Throwable e) {
			System.out.println("Retry test: " + description.getDisplayName());
			retry(eachNotifier, statement, e, description);
		} finally {
			eachNotifier.fireTestFinished();
		}
	}

	private void retry(EachTestNotifier notifier, Statement statement, Throwable currentThrowable, Description info) {
		int failedAttempts = 0;
		Throwable caughtThrowable = currentThrowable;
		while (RETRY_COUNT > failedAttempts) {
			try {
				System.out.println("Retry attempt " + (failedAttempts + 1) + " for " + info.getDisplayName());
				statement.evaluate();
				return;
			} catch (Throwable t) {
				failedAttempts++;
				caughtThrowable = t;
			}
		}
		notifier.addFailure(caughtThrowable);
	}
}

The code shown above is available in GitHub java-samples/junit repository.

Using JUnit RetryRunner

In order to configure JUnit test to use the runner, class holding tests should be annotated with @RunWith:

@RunWith(RetryRunner.class)
public class RetryRunnerTests {
	@Test
	public void testRetrySuccessFirstTime() {
		assertTrue(true);
	}
}

Conclusion

Making JUnit to rerun is easy, the harder thing to do is to fix your tests so they pass from the first time. Generally, it is not good to have tests that are flaky.

Read more...

Use JUnit rules to debug failed API tests

Last Updated on by

Post summary: What are JUnit rules and how to use them to improve debugging of failed API tests.

What are JUnit rules

Rules are an easy way to separate tests from non-tests code. In many cases, some kind of setup is required before starting the tests. Rules provide a way to define this setup code externally and just access it from your tests.

How to use JUnit rules

Instantiate a public variable with rule class you want to use. Depending on the specific rule you can invoke methods on this public variable. The example below is the simplest that gives you the name of current test method being executed.

@Rule
public TestName name = new TestName();

@Test
public void testPrintMethodName() {
	assertEquals("testPrintMethodName", name.getMethodName());
}

Types of JUnit rules

Below are shown rules that JUnit provides:

  • TemporaryFolder – allows the creation of files and folders that gets deleted when test method finishes.
  • ExternalResource – sets up external resources (file, socket, database connection) and then releases them. Same can be accomplished in @Before and @After methods.
  • ErrorCollector – execution of test continues after the first error and successive errors are collected and reported after test finishes.
  • Verifier – additional asserting on test conditions.
  • TestWatcher – has access to tests output – when test starts, finishes, and the test result.
  • TestName – gives current executing test method name.
  • Timeout – sets a timeout for all the test methods in the class. If some test takes longer it is terminated and failed.
  • ExpectedException – very handy way to test whether method throws correct exception. It is possible to use @Test(expected = NullPointerException.class), but it does not allow you to check what is the exception message.

ClassRule

@Rule annotation creates a new instance of the rule class before each and every test method is run. In some cases, rule object is needed into test class initialization method (annotated with @BeforeClass). In order to have it into initialization method, a @ClassRule annotation has to be used instead. Then the rule object is instantiated only once before @BeforeClass method has run, so the rule is available in it. @ClassRule is good to be used in situations where there are expensive resources to be created – better to create them on test class initialization rather before each test method. More details about execution sequence can be found in JUnit methods execution sequence post.

Debug API tests

API tests generally are a sequence of requests. One request depends on previous as it takes some data out of it. If some of the requests in the chain fail you will need the whole chain to be able to debug and trace why exactly the whole scenario failed.

Store API calls in a Queue

It is a good idea to have one class that is sending API requests and returning responses. Below is a simple example of such class. In real life, makeRequest methods will accept some parameters or request object and result will be some response object, not String.

public class RequestUtils {

	private static final Queue<String> MESSAGES_QUEUE = new LinkedList<>();

	public static String makeSomeRequest(String request) {
		getMessages().add(request);
		String response = "makeSomeRequestResponse";
		getMessages().add(response);
		return response;
	}

	public static String makeAnotherRequest(String request) {
		getMessages().add(request);
		String response = "makeAnotherRequestResponse";
		getMessages().add(response);
		return response;
	}

	public static void printMessages() {
		for (String message : getMessages()) {
			System.out.println(message);
		}
		clearMessages();
	}

	public static void clearMessages() {
		getMessages().clear();
	}

	private static Queue<String> getMessages() {
		return MESSAGES_QUEUE;
	}
}

Class collects all requests and responses in a queue of Strings. It has printMessages() and clearMessages() methods. It also has a getMessages() method which just returns the queue. This method is not bringing real value to code but rather used to easily switch to different types of queues.

Extend TestWatcher to have access to test results

As stated above TestWatcher provides access to tests output without the ability to modify it. Extending TestWatcher gives you access to those methods:

public class MessagesQueueRule extends TestWatcher {

	protected void succeeded(Description description) {
		RequestUtils.clearMessages();
	}

	protected void failed(Throwable e, Description description) {
		RequestUtils.printMessages();
	}

	protected void skipped(AssumptionViolatedException e, 
			Description description) {
		RequestUtils.printMessages();
	}
}

On success, messages queue get cleared, on skipped or failed it gets printed to enable you to debug.

Tests are a sequence of requests and responses

Test below is just an example to show how an API test generally looks like. It is possible to do some method chaining, but this is out of the scope of the current post.

@Test
public void test1() {
	String result1 = RequestUtils.makeSomeRequest("test1request1");
	String result2 = RequestUtils.makeAnotherRequest(result1);
	String actualResult = RequestUtils.makeAnotherRequest(result2);
	assertEquals("makeAnotherRequestResponse", actualResult);
}

If assertEquals() fails all requests/response in the test method will get printed into the logs.

Multithreading

You might have noticed that current solution is not thread-safe as Queue is one and the same and can be accessed from many threads which will lead to ConcurrentModification exception. In Avoid multithreading problems in Java using ThreadLocal post, there is a solution using ThreadLocal.

Conclusion

Rules provide flexibility make whatever is needed for your tests. They are an easy way to extract code which is not a test logic to external classes. All the details about rules are available at JUnit Rules page. In the current post, I showed you an easy way to store and output requests in case of API testing. The code shown above is available in GitHub java-samples/junit repository.

Related Posts

Read more...