Monthly Archives: October 2021

Distributed system observability: Instrument Selenium tests with OpenTelemetry

Last Updated on by

Post summary: Instrument Selenium tests with OpenTelemetry and be able to custom trace the tests themselves.

This post is part of Distributed system observability: complete end-to-end example series. The code used for this series of blog posts is located in selenium-observability-java GitHub repository.

Selenium

Selenium is browser automation software. It’s been around for many years and is de-facto the tool for web automation testing. It has bindings in all popular programming languages, which means people can write web automation tests in those languages.

Selenium observability

Selenium 4 comes with a pack of features. One of those features is the Selenium observability feature. It uses OpenTracing to keep track of the request’s lifecycle. This feature was the main driving factor for me to start to research the current examples. I pictured in my head end-to-end observability, from the test action down to the database call. I have to come up with a custom tracing solution, that is described in this post.

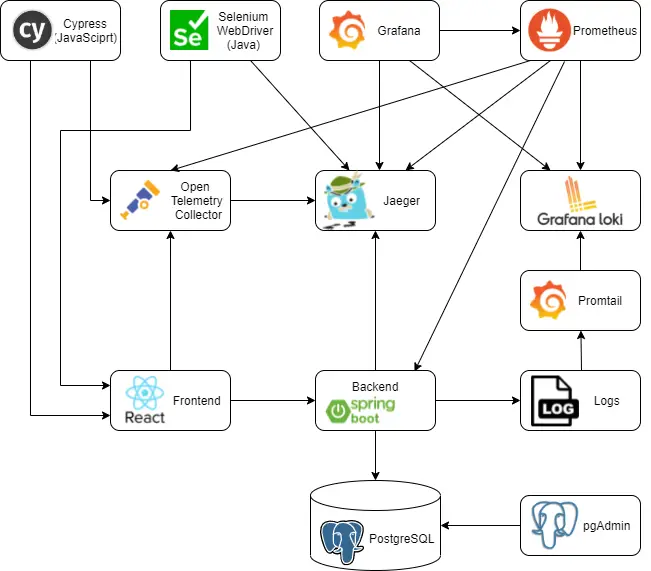
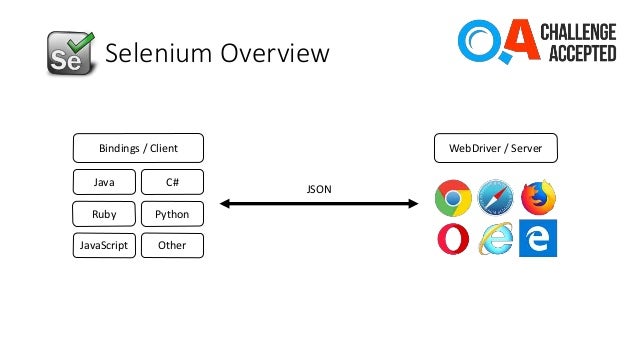
Selenium WebDriver architecture

Selenium consist of a client, those are the bindings and server, these are the executables that control the given browser. Both communicate via HTTP calls with JSON payload. This is described in detail in the W3C Selenium specification. I attach a small diagram, I used in a presentation I did a long time ago.

Selenium client instrumentation

Enabling the default selenium observability is very easy. A Jar dependency has to be added in pom.xml, environment variables to be set, and of course running Jaeger instance to collect the traces. Note that this works only for the RemoteWebDriver. It is described in detail in Remote WebDriver.

<dependency>
    <groupId>io.opentelemetry</groupId>
    <artifactId>opentelemetry-exporter-jaeger</artifactId>
    <version>1.6.0</version>
</dependency>
<dependency>
    <groupId>io.grpc</groupId>
    <artifactId>grpc-netty</artifactId>
    <version>1.41.0</version>
</dependency>

This goes along with the WebDriver instantiation code.

System.setProperty("otel.traces.exporter", "jaeger");
System.setProperty("otel.exporter.jaeger.endpoint", "http://localhost:14250");
System.setProperty("otel.resource.attributes", "service.name=selenium-java-client");
System.setProperty("otel.metrics.exporter", "none");
WebDriver driver = new RemoteWebDriver(
                new URL("http://localhost:4444"),
                new ImmutableCapabilities("browserName", "chrome"));

Selenium server instrumentation

Server instrumentation examples are shown in manoj9788/tracing-selenium-grid. Both the standalone server and Selenium grid can be instrumented. In the current examples, I am working only with the standalone server. Unlike the examples, I used Docker to do the instrumentation. I take the default selenium/standalone-chrome:4.0.0 image and install Coursier, a dependency resolver tool, on top of it. Then I run the dependency fetch, so this build sted gets cached for a faster rebuild. Selenium provides –ext flag, which can be set after the standalone command option. I could not make this work only by changing the SE_OPTS environment variable, so I made this rewrite of the startup command in /opt/bin/start-selenium-standalone.sh file. What I did was to change from java -jar to java -cp command, as -cp flag is ignored in case -jar flag is used.

FROM selenium/standalone-chrome:4.0.0

# Install coursier in order to fetch the dependencies
RUN cd /tmp && curl -k -fLo cs https://git.io/coursier-cli-"$(uname | tr LD ld)" && chmod +x cs && ./cs install cs && rm cs

# Download dependencies, so they are availble during run
RUN /home/seluser/.local/share/coursier/bin/cs fetch -p io.opentelemetry:opentelemetry-exporter-jaeger:1.6.0 io.grpc:grpc-netty:1.41.0

# Modify the run command to include dependent JARs in it
RUN sudo sed -i 's~-jar /opt/selenium/selenium-server.jar~-cp "/opt/selenium/selenium-server.jar:$(/home/seluser/.local/share/coursier/bin/cs fetch -p io.opentelemetry:opentelemetry-exporter-jaeger:1.6.0 io.grpc:grpc-netty:1.41.0)" org.openqa.selenium.grid.Main~g' /opt/bin/start-selenium-standalone.sh

# Enable OpenTelemetry
ENV JAVA_OPTS "$JAVA_OPTS \
  -Dotel.traces.exporter=jaeger \
  -Dotel.exporter.jaeger.endpoint=http://jaeger:14250 \
  -Dotel.resource.attributes=service.name=selenium-java-server"

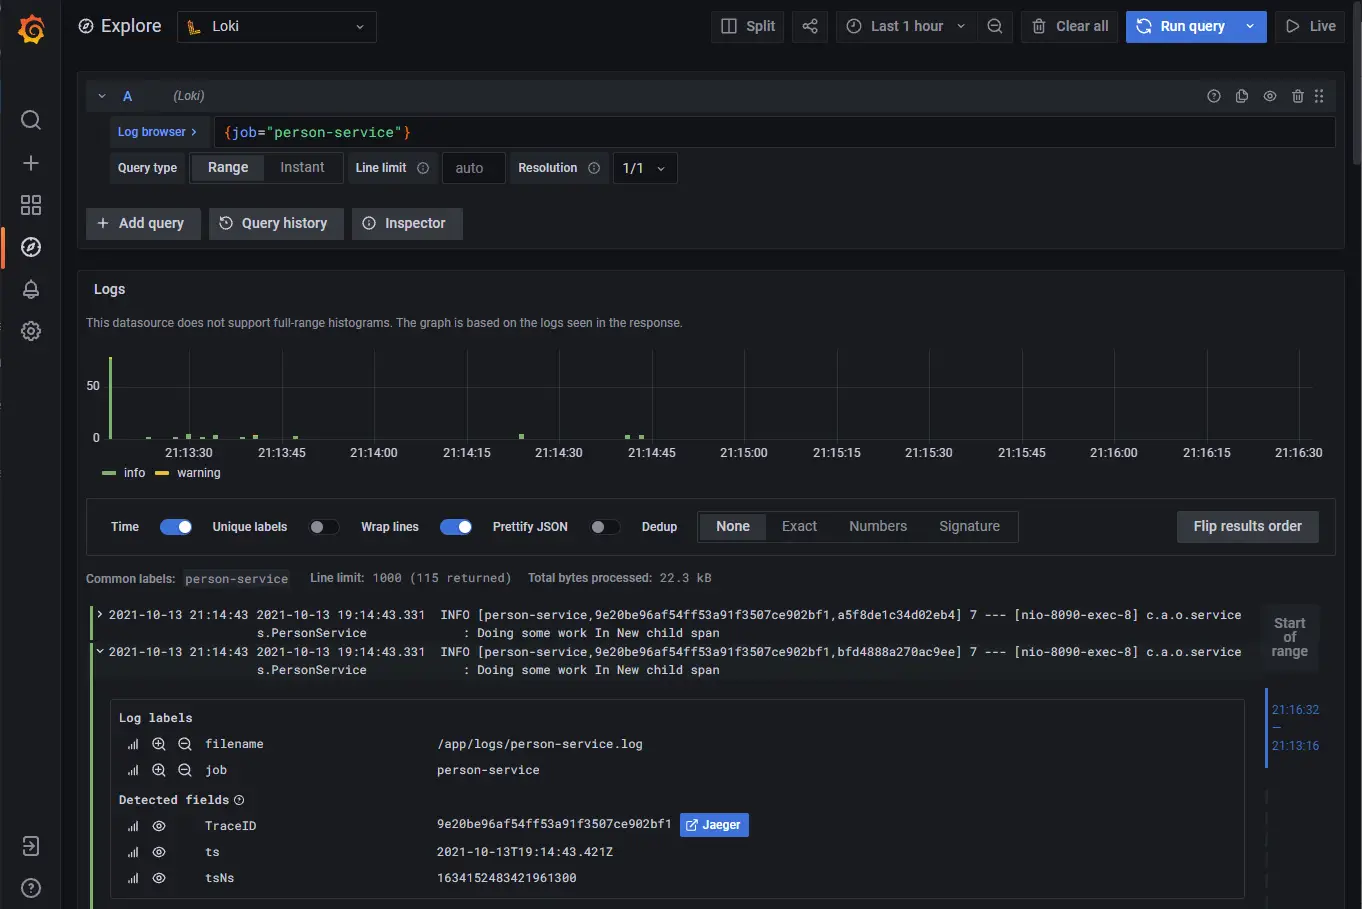
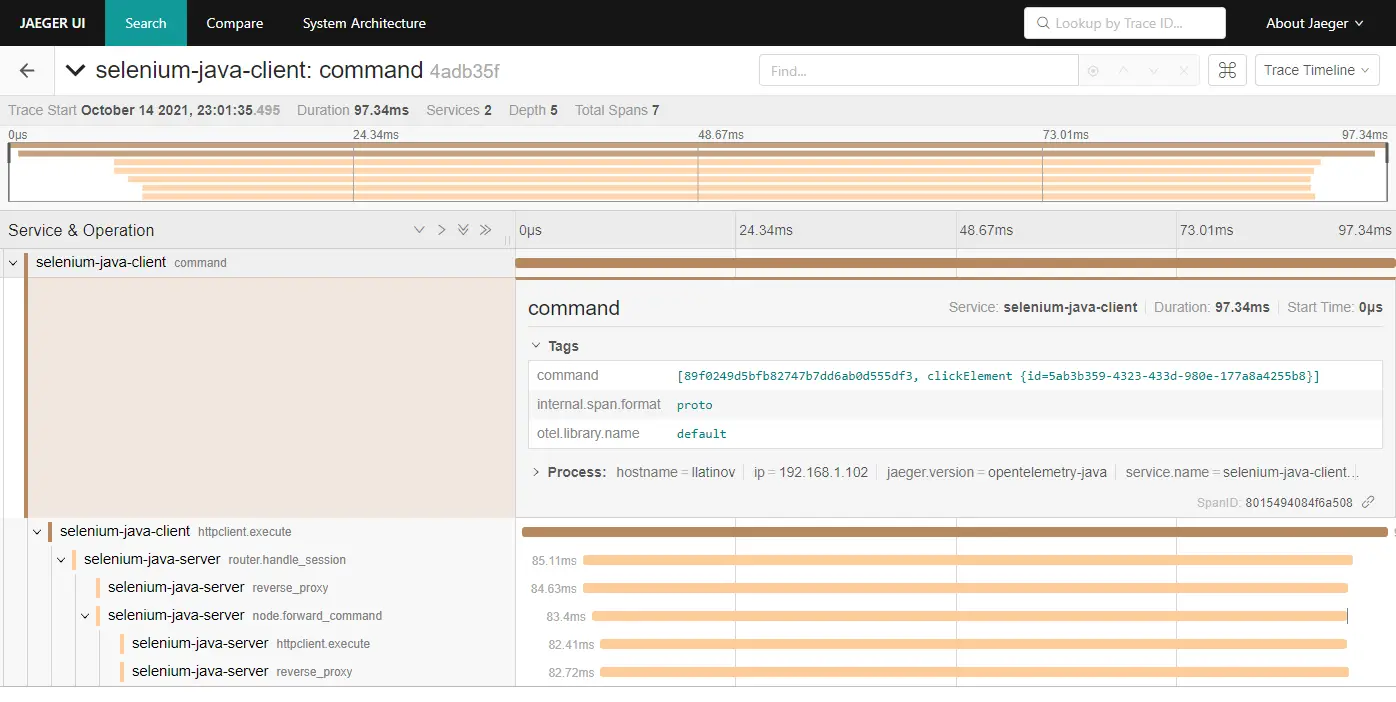
Selenium default traces in Jaeger

RemoteWebDriver client is passing down the traceparent header when making the request to the server, this is why both client and server traces are connected.

Selenium tests custom observability

As stated before, in the case of HTTP calls, the OpenTelemetry binding between both parties is the traceparent header. I want to bind the Selenium tests with the frontend, so it comes naturally to mind – open the URL in the browser and provide this HTTP header. After research, I could not find a way to achieve this. I implemented a custom solution, which is WebDriver independent and can be customized as needed. Moreover, it is a web automation framework independent, this approach can be used with any web automation tool. An example of how tracing can be done with Cypress is shown in Distributed system observability: Instrument Cypress tests with OpenTelemetry post.

Instrument the frontend

In order to achieve linking, a JavaScript function is exposed in the frontend, which creates a parent Span. Then this JS function is called from the tests when needed. This function is named startBindingSpan() and is registered with the window global object. It creates a binding span with the same attributes (traceId, spanId, traceFlags) as the span used in the Selenium tests. This span never ends, so is not recorded in the traces. In order to enable this span, the traceSpan() function has to be manually used in the frontend code, because it links the current frontend context with the binding span. I have added another function, called flushTraces(). It forces the OpenTelemetry library to report the traces to Jaeger. Reporting is done with an HTTP call and the browser should not exit before all reporting requests are sent.

Note: some people consider exposing such a window-bound function in the frontend to modify React state as an anti-pattern. Frontend code is in src/helpers/tracing/index.ts:

declare const window: any
var bindingSpan: Span | undefined

window.startBindingSpan = (traceId: string, spanId: string, traceFlags: number) => {
  bindingSpan = webTracerWithZone.startSpan('')
  bindingSpan.spanContext().traceId = traceId
  bindingSpan.spanContext().spanId = spanId
  bindingSpan.spanContext().traceFlags = traceFlags
}

window.flushTraces = () => {
  provider.activeSpanProcessor.forceFlush().then(() => console.log('flushed'))
}

export function traceSpan<F extends (...args: any)
    => ReturnType<F>>(name: string, func: F): ReturnType<F> {
  var singleSpan: Span
  if (bindingSpan) {
    const ctx = trace.setSpan(context.active(), bindingSpan)
    singleSpan = webTracerWithZone.startSpan(name, undefined, ctx)
    bindingSpan = undefined
  } else {
    singleSpan = webTracerWithZone.startSpan(name)
  }
  return context.with(trace.setSpan(context.active(), singleSpan), () => {
    try {
      const result = func()
      singleSpan.end()
      return result
    } catch (error) {
      singleSpan.setStatus({ code: SpanStatusCode.ERROR })
      singleSpan.end()
      throw error
    }
  })
}

Instrument the Selenium tests

I have created a custom TracingWebDriver wrapper over the WebDriver. It instantiates the OpenTracing client with initializeTracer() method. It has a built-in custom logic when to generate a tracking span, which is the parent of this span, and when to link the tests’ span with the frontend span. Finding an element is done with the custom findElement() method. It creates a child span, linking it to the previously defined currentSpan. Then the window.startBindingSpan() function is being called in the browser in order to create the binding span in the frontend. This is the way to link tests and the frontend. In case of error, Span is recorded as an error and this can be tracked in Jaeger. On driver quit, or on URL change, or maybe on page change via a button, or whenever needed, window.flushTraces() function can be called by invoking forceFlushTraces() method in the tests. This has 1 second of Thread.sleep(), which waits for the tracing request to be fired from the frontend to the Jaeger. Sleeping like this is an anti-pattern for test automation, but I could not find a better way to wait for the traces. If the browser is prematurely closed or the page is navigated, then tracing is incorrect.

package com.automationrhapsody.observability;

import io.opentelemetry.api.trace.Span;
import io.opentelemetry.api.trace.StatusCode;
import io.opentelemetry.api.trace.Tracer;
import io.opentelemetry.context.Context;
import io.opentelemetry.exporter.jaeger.JaegerGrpcSpanExporter;
import io.opentelemetry.sdk.OpenTelemetrySdk;
import io.opentelemetry.sdk.resources.Resource;
import io.opentelemetry.sdk.trace.SdkTracerProvider;
import io.opentelemetry.sdk.trace.export.SimpleSpanProcessor;
import org.openqa.selenium.*;
import org.openqa.selenium.remote.tracing.opentelemetry.OpenTelemetryTracer;
import org.openqa.selenium.support.ui.ExpectedConditions;
import org.openqa.selenium.support.ui.WebDriverWait;

import java.io.File;
import java.time.Duration;
import java.util.List;

public class TracingWebDriver {

    private static final Duration WAIT_SECONDS = Duration.ofSeconds(5);
    private static final String JAEGER_GRPC_URL = "http://localhost:14250";

    private WebDriver driver;
    private Tracer tracer;
    private Span mainSpan;
    private Span currentSpan;

    public TracingWebDriver(boolean isRemote, String className, String methodName) {
        System.setProperty("otel.traces.exporter", "jaeger");
        System.setProperty("otel.exporter.jaeger.endpoint", JAEGER_GRPC_URL);
        System.setProperty("otel.resource.attributes", "service.name=selenium-java-client");
        System.setProperty("otel.metrics.exporter", "none");

        initializeTracer();

        mainSpan = tracer.spanBuilder("webdriver-create").startSpan();
        mainSpan.setAttribute("test.class.name", className);
        mainSpan.setAttribute("test.method.name", methodName);
        setCurrentSpan(mainSpan);
        driver = WebDriverFactory.createDriver(isRemote);
        mainSpan.end();
    }

    public void get(String url) {
        waitToLoad();
        setCurrentSpan(mainSpan);
        Span span = createChildSpan("get: " + url);
        try {
            forceFlushTraces();
            driver.get(url);
            createBrowserBindingSpan(span);
        } catch (Exception ex) {
            span.setStatus(StatusCode.ERROR, ex.getMessage());
            captureScreenshot();
        } finally {
            span.end();
        }
    }

    public WebElement findElement(By by) {
        waitToLoad();
        Span span = createChildSpan("findElement: " + by.toString());
        try {
            createBrowserBindingSpan(span);
            WebDriverWait wait = new WebDriverWait(driver, WAIT_SECONDS);
            return wait.until(ExpectedConditions.visibilityOfElementLocated(by));
        } catch (Exception ex) {
            span.setStatus(StatusCode.ERROR, ex.getMessage());
            captureScreenshot();
            return null;
        } finally {
            span.end();
        }
    }

    public void quit() {
        waitToLoad();
        forceFlushTraces();
        setCurrentSpan(mainSpan);
        Span span = createChildSpan("quit");
        driver.quit();
        span.end();
    }

    public Object executeJavaScript(String script) {
        return ((JavascriptExecutor) driver).executeScript(script);
    }

    public String captureScreenshot() {
        File screenshotFile = ((TakesScreenshot) driver).getScreenshotAs(OutputType.FILE);
        String output = screenshotFile.getAbsolutePath();
        System.out.println(output);
        return output;
    }

    private void waitToLoad() {
        WebDriverWait wait = new WebDriverWait(driver, WAIT_SECONDS);
        wait.until(ExpectedConditions.invisibilityOfElementLocated(By.id("test-progress-indicator")));
    }

    private void initializeTracer() {
        JaegerGrpcSpanExporter exporter = JaegerGrpcSpanExporter.builder().setEndpoint(JAEGER_GRPC_URL).build();
        Resource resource = Resource.builder()
                .put("service.name", "selenium-tests")
                .build();
        SdkTracerProvider provider = SdkTracerProvider.builder()
                .addSpanProcessor(SimpleSpanProcessor.create(exporter))
                .setResource(resource)
                .build();
        OpenTelemetrySdk openTelemetrySdk = OpenTelemetrySdk.builder()
                .setTracerProvider(provider)
                .build();
        tracer = openTelemetrySdk.getTracer("io.opentelemetry.jaeger.exporter");
    }

    private Span createChildSpan(String name) {
        Span span = tracer.spanBuilder(name)
                .setParent(Context.current().with(currentSpan))
                .startSpan();
        setCurrentSpan(span);
        return span;
    }

    private void setCurrentSpan(Span span) {
        currentSpan = span;
        OpenTelemetryTracer.getInstance().setOpenTelemetryContext(Context.current().with(span));
    }

    private void createBrowserBindingSpan(Span span) {
        executeJavaScript("window.startBindingSpan('"
                + span.getSpanContext().getTraceId() + "', '"
                + span.getSpanContext().getSpanId() + "', '"
                + span.getSpanContext().getTraceFlags().asHex() + "')");
    }

    private void forceFlushTraces() {
        executeJavaScript("if (window.flushTraces) window.flushTraces()");
        try {
            Thread.sleep(1000);
        } catch (InterruptedException e) {
            // Do nothing
        }
    }
}

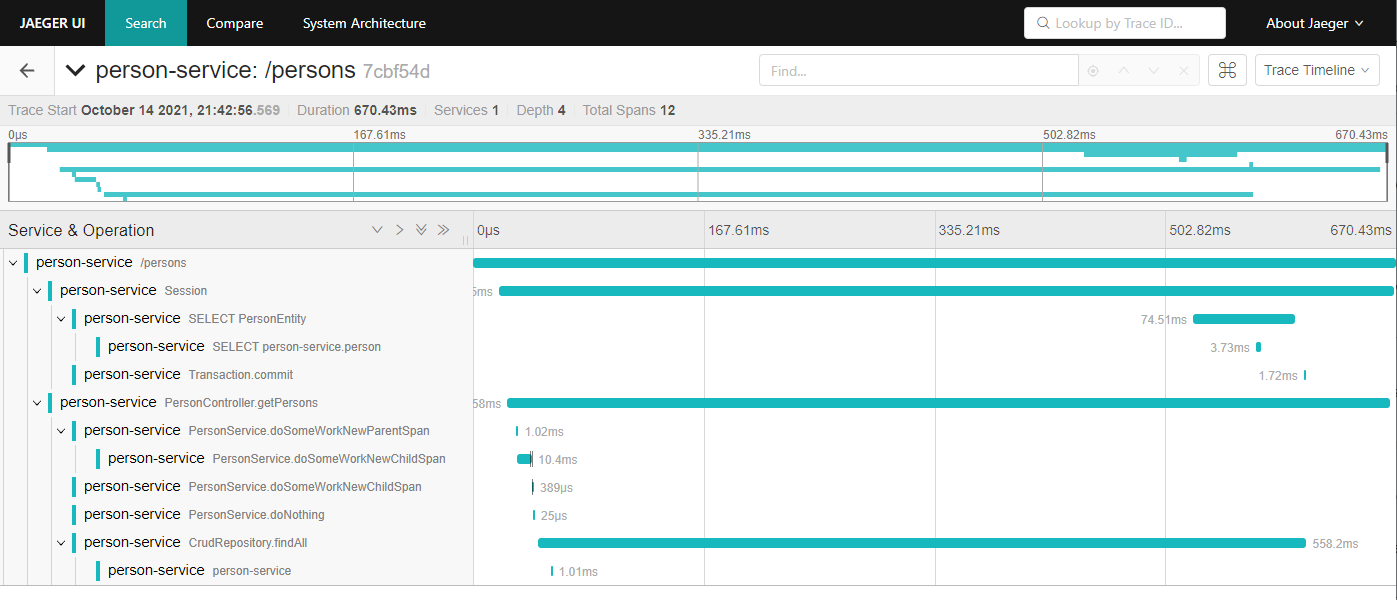
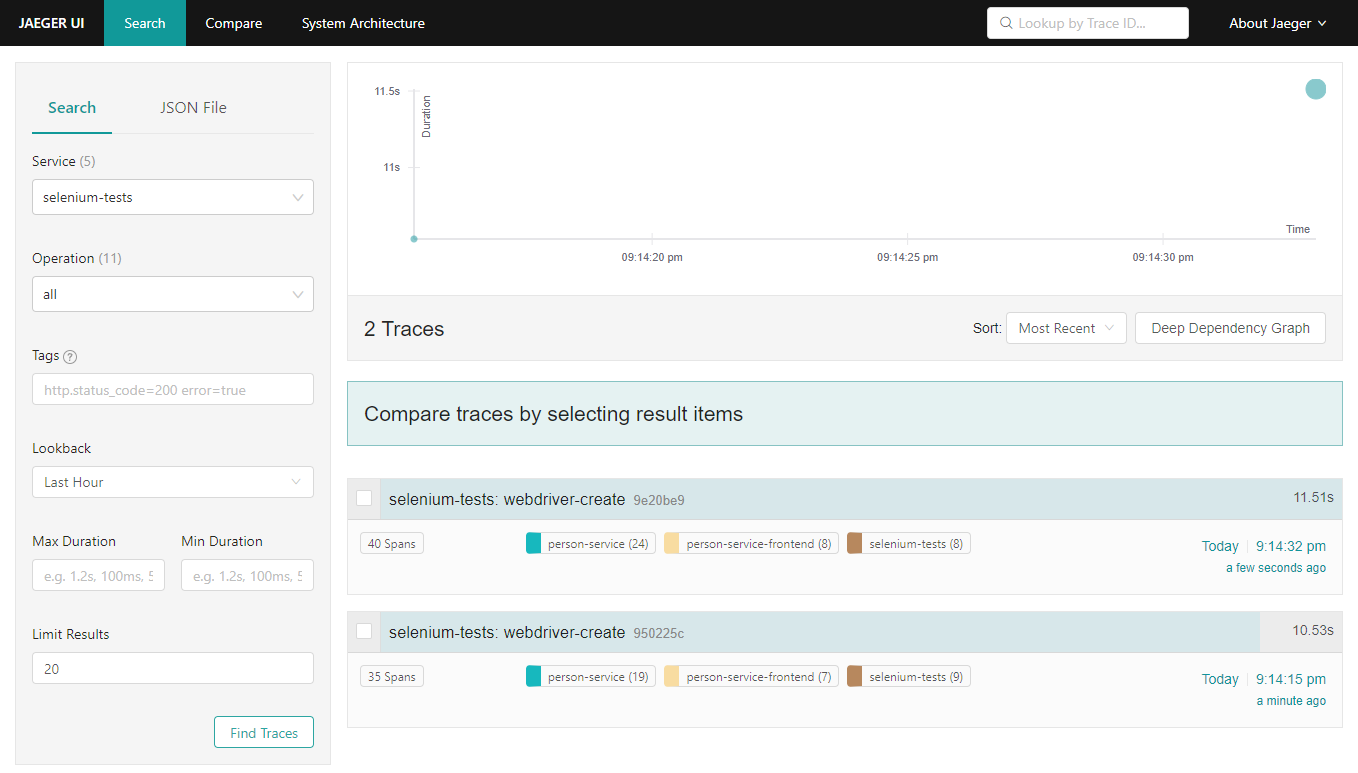
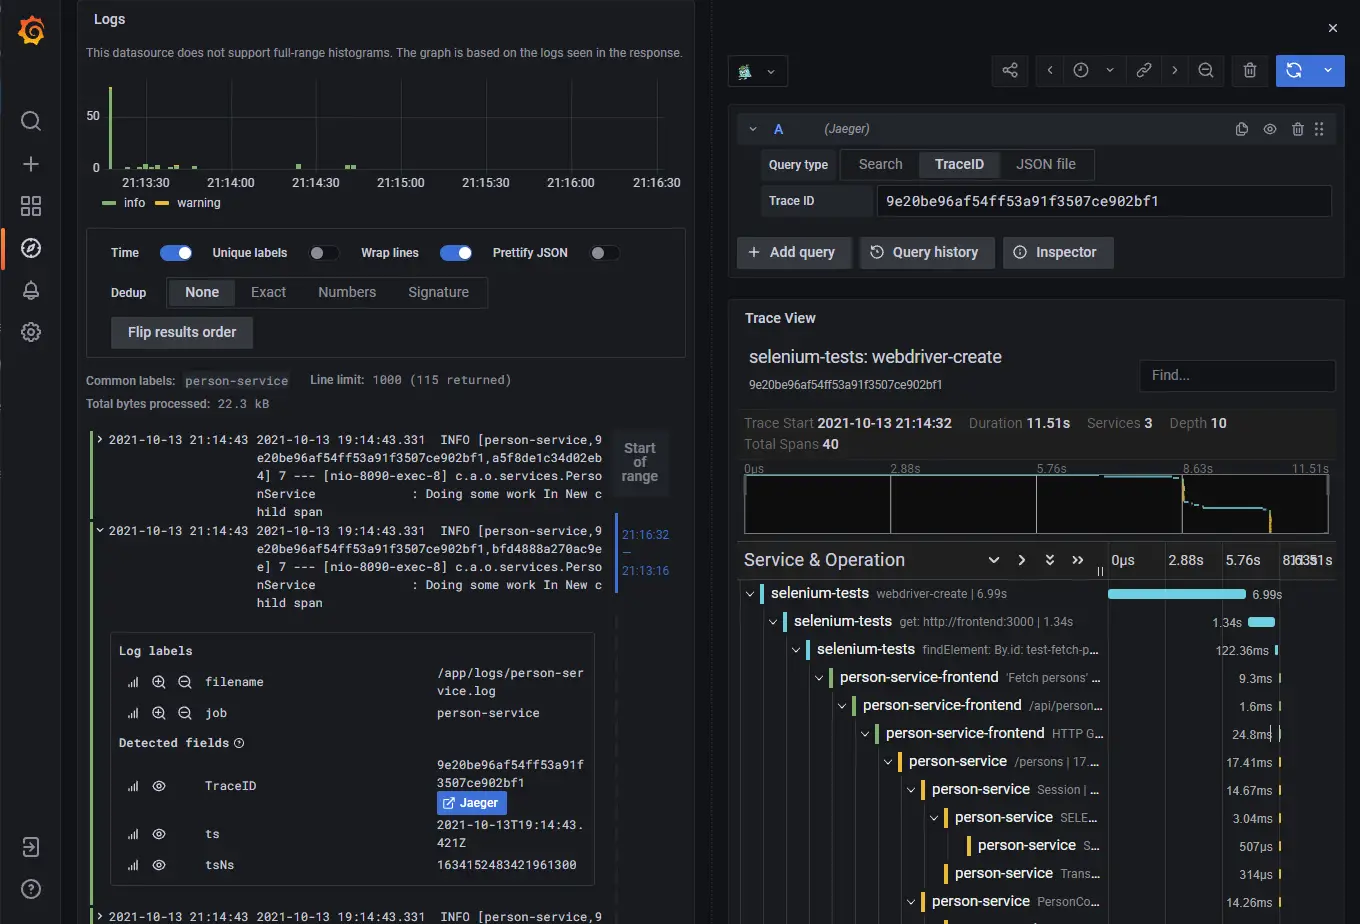
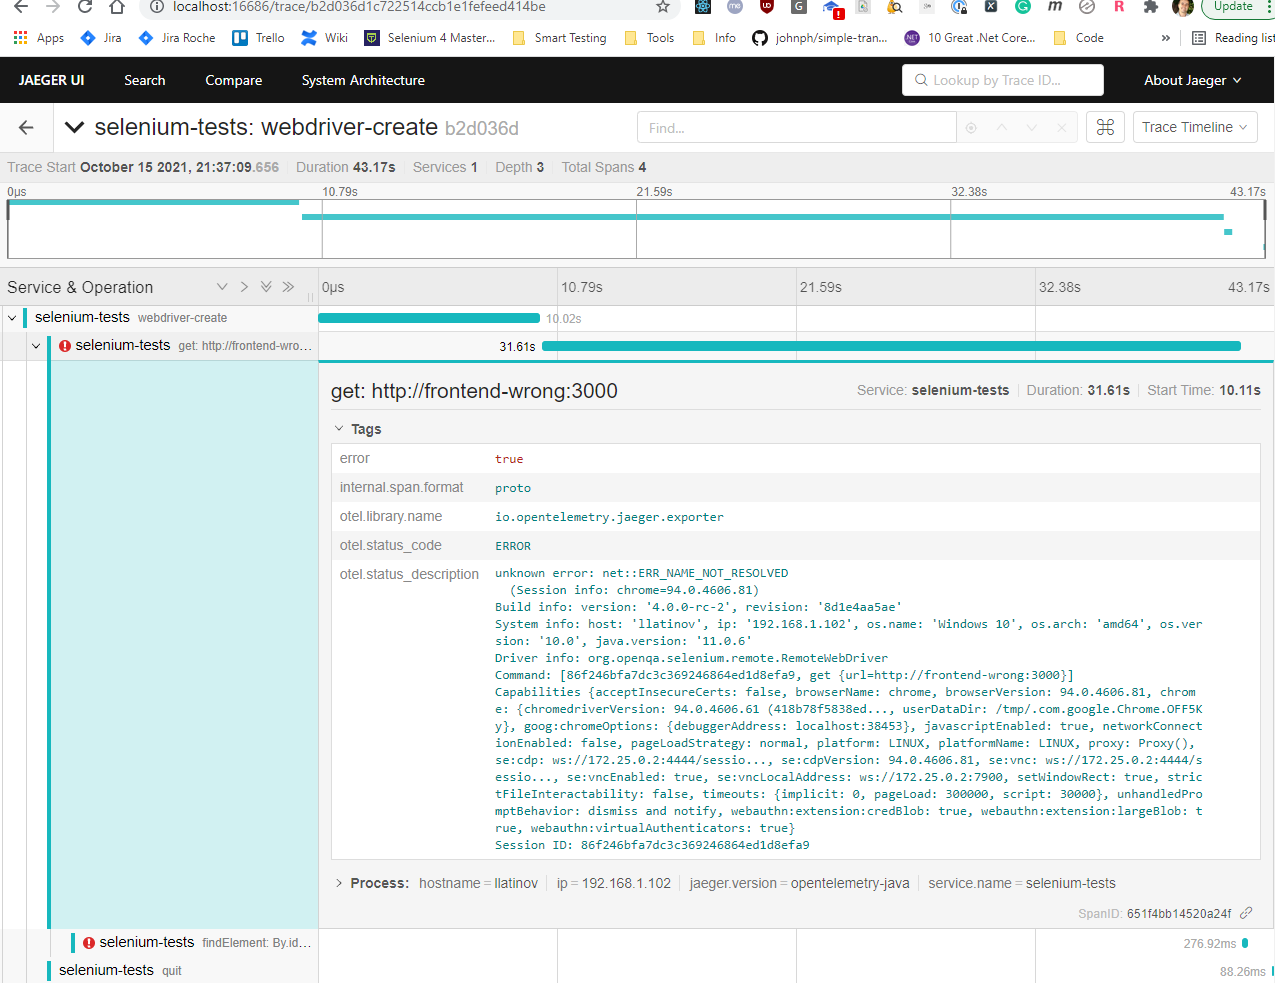
End-to-end traces in Jaeger

In case of error, this is also recorded.

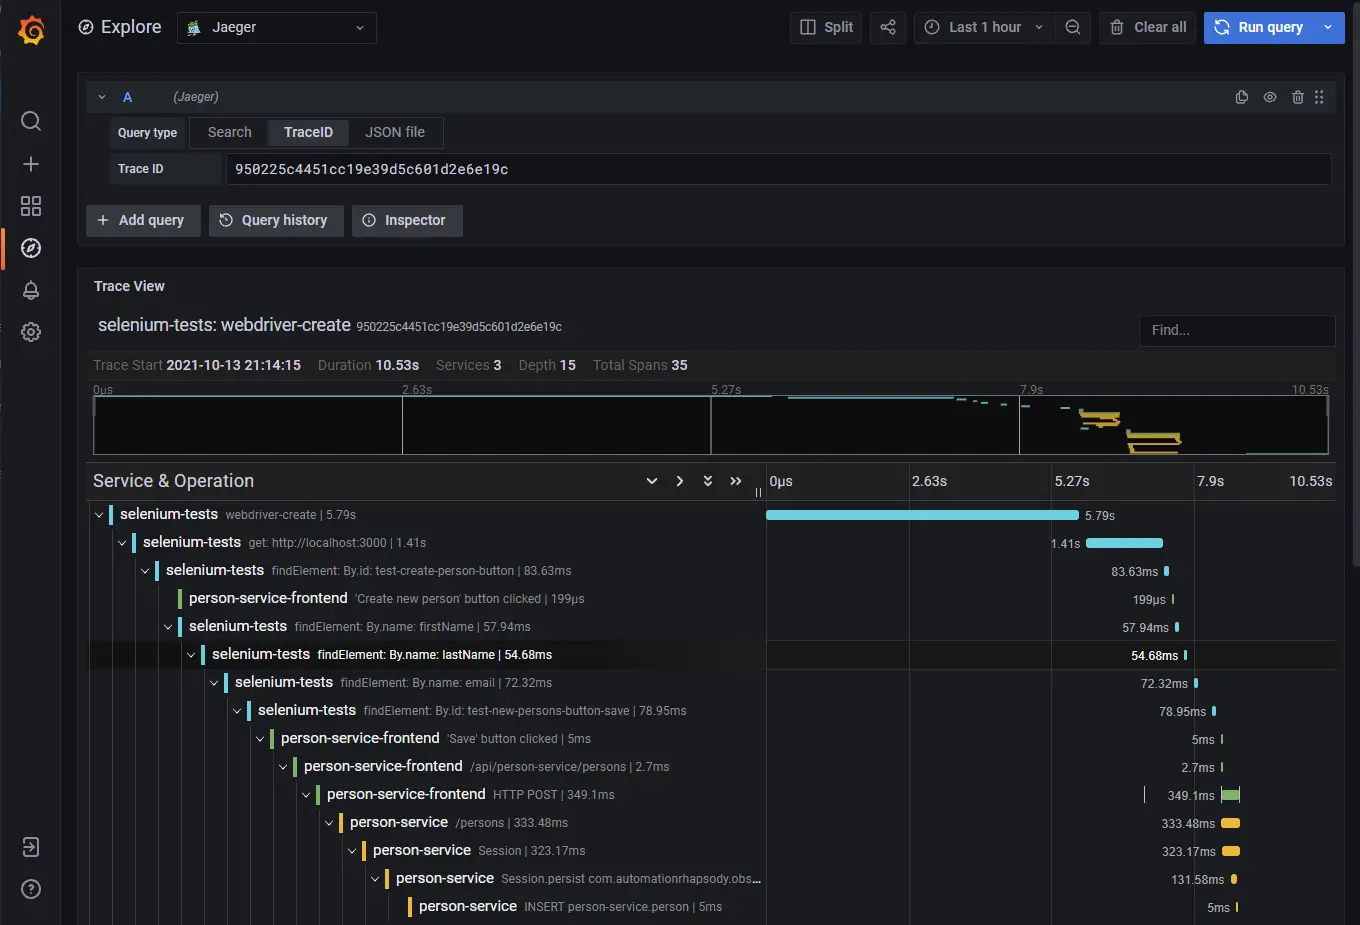
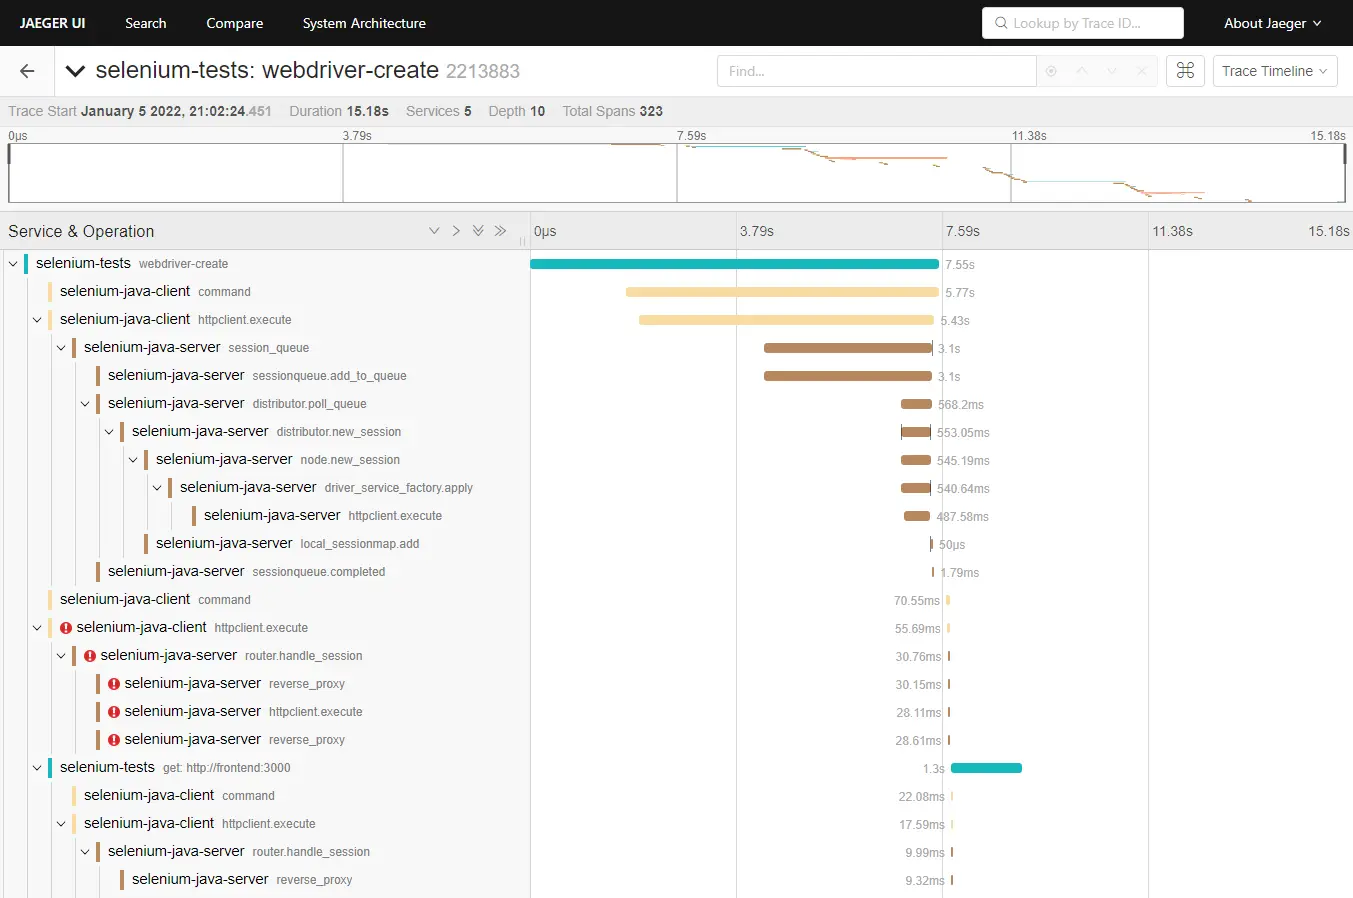
Linking default and custom traces

In an ideal world, I would like to make my custom Span parent of the default Selenium tracing spans, so I can attach the debug information to the custom tracing information. I was not able to do this. I have raised an issue with Selenium, OpenTelementry tracing: be able to link the default tracing with a custom tracing. I contributed to Selenium by adding this possibility to link Selenium traces to the custom traces. This is done with the following code OpenTelemetryTracer.getInstance().setOpenTelemetryContext(Context.current().with(span)). Finally, the full tracing looks as shown on the image:

Conclusion

The out-of-the-box Selenium observability is useful to trace what is happening in a complex grid. It does not give the possibility to trace tests performance and how test steps are affecting the application itself. In the current post, I have described a way to create a custom tracing, which provides end-to-end traceability from the tests down to the database calls. This approach gives the flexibility to be customized for different needs. It involves changes in the application’s frontend code though, which involves the application architecture topic in the discussions.

Related Posts

Read more...

Distributed system observability: Instrument React application with OpenTelemetry

Last Updated on by

Post summary: Create a React web application using the Material UI design system and instrument the application with OpenTelemetry.

This post is part of Distributed system observability: complete end-to-end example series. The code used for this series of blog posts is located in selenium-observability-java GitHub repository.

React

React is a JavaScript library for building user interfaces.

Create React App

Create React App provides a simple way to create React applications from scratch. It also creates and abstracts the whole toolchain needed to develop JavaScript applications, such as WebPack and Babel, so the user does not need to bother with configuring those. Application is created with the following command: create-react-app my-app –template typescript.

Project structure

With the projects I have worked on professionally I am used to a specific folder structure of the project.

  • src/components – re-usable components, building blocks, used across the application
  • src/containers – components used to build the application, e.g. pages
  • src/helpers – functionality not related to the presentation logic
  • src/stylesheets – CSS files, which hold common and re-usable functionality
  • src/types – TypeScript data models, e.g. models used with API communication

Material UI

Material UI is a React design system that provides ready-to-use components. An official example is shown in create-react-app-with-typescript.

TypeScript

TypeScript is a programming language developed and maintained by Microsoft. It is a strict syntactical superset of JavaScript and adds optional static typing to the language. TypeScript is designed for the development of large applications and transcompiles to JavaScript. TypeScript brings some overhead, but for me, this is justified. Because of the static typing, errors are shown on compile-time, not in runtime. Also, IntelliSense, the intelligent code completion, kicks in and is of great help.

Code examples

Main file is src/index.tsx. It loads the App component, which uses React Router to define different path handling, it loads different components based on the path. In the current example, /about path is covered just by a very simple page, and all other paths are loading PersonsPage.

index.tsx

import ReactDOM from 'react-dom'

import App from 'containers/App'
import reportWebVitals from './reportWebVitals'
import './stylesheets/base.scss'

ReactDOM.render(<App />, document.querySelector('#root'))

// If you want to start measuring performance in your app, pass a function
// to log results (for example: reportWebVitals(console.log))
// or send to an analytics endpoint. Learn more: https://bit.ly/CRA-vitals
reportWebVitals()

App

import { Router, Route, Switch } from 'react-router-dom'
import { createBrowserHistory } from 'history'
import { ThemeProvider } from '@mui/material/styles'
import { CssBaseline } from '@mui/material'

import PersonsPage from 'containers/PersonsPage'

import theme from 'stylesheets/theme'

export default () => (
  <ThemeProvider theme={theme}>
    <CssBaseline />
    <Router history={createBrowserHistory()}>
      <Switch>
        <Route exact path={'/about'}>
          <div>About Page</div>
        </Route>
        <Route>
          <PersonsPage />
        </Route>
      </Switch>
    </Router>
  </ThemeProvider>
)

PersonsPage


import React from 'react'

import { apiFetch } from 'helpers/api'
import { personServiceUrl } from 'helpers/config'
import { IPerson } from 'types/types'

import PersonsList from './PersonsList'

import TracingButton from 'components/TracingButton'
import CreateNewPersonModal from 'containers/CreateNewPersonModal'

import styles from './styles.module.scss'

export default () => {
  const [isModalOpen, setIsModalOpen] = React.useState<boolean>(false)
  const [persons, setPersons] = React.useState<IPerson[]>([])

  const fetchPersons = async () => {
    const persons = await apiFetch<IPerson[]>(`${personServiceUrl}/persons`)
    setPersons(persons)
  }

  return (
    <div className={styles.app}>
      <CreateNewPersonModal open={isModalOpen} onClose={() => setIsModalOpen(false)} />

      <header className={styles.appHeader}>
        <p>Sample Patient Service Frontend</p>
      </header>

      <TracingButton id="test-create-person-button" label={'Create new person'} onClick={() => setIsModalOpen(true)} />

      <TracingButton id="test-fetch-persons-button" label={'Fetch persons'} onClick={fetchPersons} />
      {persons.length > 0 && (
        <React.Fragment>
          <div id="test-persons-count-text">Found {persons.length} persons</div>
          <PersonsList persons={persons} />
        </React.Fragment>
      )}
    </div>
  )
}

Proxy

Cross-Origin Resource Sharing (CORS) is an HTTP-header-based mechanism that allows a server to indicate any origins (domain, scheme, or port) other than its own from which a browser should permit loading resources. In order to allow the frontend to connect to the backend, CORS should be allowed. One option is to instruct the backend to produce CORS headers that allow the frontend URL. Another option is to use React Create App’s mechanism to handle the CORS by defining a proxy. The file that is used is setupProxy.js. In the current examples, the proxy handles both connections to the backend and OpenTelementry connector.

const { createProxyMiddleware } = require('http-proxy-middleware')

const configureProxy = (path, target) =>
  createProxyMiddleware(path, {
    target: target,
    secure: false,
    pathRewrite: { [`^${path}`]: '' }
  })

module.exports = function (app) {
  app.use(configureProxy('/api/person-service', 'http://localhost:8090'))
  app.use(configureProxy('/api/tracing', 'http://localhost:4318'))
}

WebVitals

The default application has built-in support for WebVitals. If those need to be put into operation, a reporter just needs to be registered in src/index.tsx file by passing a method reference to reportWebVitals(). Easiest is to log to console: reportWebVitals(console.log). This can be enhanced further by creating a reporter which sends the data to Prometheus. Actually, pushing data to Prometheus is not possible. Prometheus Pushgateway can be used as metrics cache, from which Prometheus can pull.

Docker

The application is Dockerized with Nginx in exactly the same way as described in Dockerize React application with a Docker multi-staged build post.

Instrumentation

Instrumentation is done with OpenTracing JavaScript libraries. The API calls to the backend use the fetch() method. OpenTracing has a library that instruments all the calls going through fetch() – @opentelemetry/instrumentation-fetch. A WebTracerProvider is instantiated with a Resource that has the service.name. Several SimpleSpanProcessor are registered with addSpanProcessor() method. The important processor is the CollectorTraceExporter, which sends the traces to the OpenTelemetry collector. The actual tracer is returned by getTracer() method from the provider, it is used to do the custom tracing. registerInstrumentations() registers an instance of FetchInstrumentation, which actually traces the API calls. In case the API responds with a status code greater than 299, then this is considered an error, and the span is marked as ERROR. This is done in the applyCustomAttributesOnSpan function. Another custom change for fetch tracking is that the span name is overwritten in order to have a unique name for each API. This will allow separate tracing of each individual API. Custom traceSpan() method is defined in order to manually trace individual events in the application, such as a button click for e.g. In case of an error in the wrapped function func then span is also marked as an error.

import { context, trace, Span, SpanStatusCode } from '@opentelemetry/api'
import { WebTracerProvider } from '@opentelemetry/sdk-trace-web'
import { Resource } from '@opentelemetry/resources'
import { SimpleSpanProcessor } from '@opentelemetry/sdk-trace-base'
import { CollectorTraceExporter } from '@opentelemetry/exporter-collector'
import { ZoneContextManager } from '@opentelemetry/context-zone'
import { FetchInstrumentation } from '@opentelemetry/instrumentation-fetch'
import { FetchError } from '@opentelemetry/instrumentation-fetch/build/src/types'
import { registerInstrumentations } from '@opentelemetry/instrumentation'

import { tracingUrl } from 'helpers/config'

const resource = new Resource({ 'service.name': 'person-service-frontend' })
const provider = new WebTracerProvider({ resource })

const collector = new CollectorTraceExporter({ url: tracingUrl })
provider.addSpanProcessor(new SimpleSpanProcessor(collector))
provider.register({ contextManager: new ZoneContextManager() })

const webTracerWithZone = provider.getTracer('person-service-frontend')

registerInstrumentations({
  instrumentations: [
    new FetchInstrumentation({
      propagateTraceHeaderCorsUrls: ['/.*/g'],
      clearTimingResources: true,
      applyCustomAttributesOnSpan:
      (span: Span, request: Request | RequestInit, result: Response | FetchError) => {
        const attributes = (span as any).attributes
        if (attributes.component === 'fetch') {
          span.updateName(`${attributes['http.method']} ${attributes['http.url']}`)
        }
        if (result.status && result.status > 299) {
          span.setStatus({ code: SpanStatusCode.ERROR })
        }
      }
    })
  ]
})

export function traceSpan<F extends (...args: any)
    => ReturnType<F>>(name: string, func: F): ReturnType<F> {
  var singleSpan = webTracerWithZone.startSpan(name)
  return context.with(trace.setSpan(context.active(), singleSpan), () => {
    try {
      const result = func()
      singleSpan.end()
      return result
    } catch (error) {
      singleSpan.setStatus({ code: SpanStatusCode.ERROR })
      singleSpan.end()
      throw error
    }
  })
}

Custom instrumentation

import { Button } from '@mui/material'

import { traceSpan } from 'helpers/tracing'

import styles from './styles.module.scss'

interface Props {
  label: string
  id?: string
  secondary?: boolean
  onClick: () => void
}

export default (props: Props) => {
  const onClick = async () => traceSpan(`'${props.label}' button clicked`, props.onClick)

  return (
    <div className={styles.button}>
      <Button id={props.id} variant={'contained'} color={props.secondary ? 'secondary' : 'primary'} onClick={onClick}>
        {props.label}
      </Button>
    </div>
  )
}

Traceability

Traceability between the frontend and the backend is described in the Trace Context W3C standard. In a nutshell, this is done by adding a traceparent header in the HTTP request to the backend. This is done automatically by @opentelemetry/instrumentation-fetch.

React component instrumentation

OpenTelemetry provides a library that can instrument React components and monitor their performance, such as load time for e.g. This library is called @opentelemetry/plugin-react-load. I tried it, it is working properly, but it is not in the current examples for two reasons. The first is that I am not really interested in React component lifecycle events. The more important reason is that this plugin works for React class components only. I started my React journey after version 16.8, which was released on 6 Feb 2019. Prior to this version functional components were stateless, they were just for data visualization purposes. In version 16.8 hooks have been introduced, which allows state management inside a functional component. I write all my components to be functional with hooks for state management. I do not have justification whether this is good or bad, I like it that way. There is a serious drawback because functions in the functional component reinitialize every time the component is re-rendered, in some cases I had to use useCallback() hook to remember some function state.

Traces output

In order to monitor a trace, run the examples as described in Distributed system observability: complete end-to-end example with OpenTracing, Jaeger, Prometheus, Grafana, Spring Boot, React and Selenium. Accessing http://localhost:3000/ and clicking “Fetch persons” button generates a trace in Jaeger:

Conclusion

OpenTelemetry provides libraries to instrument JavaScript applications and to report the traces to an OpenTelemetry collector. Creating an application with React and instrumenting it to collect OpenTelemetry traces is easy. Behind the scenes, the fetch() method is modified to pass traceparent header in the HTTP request to the backend. This is how tracing between different systems can happen.

Related Posts

Read more...

Distributed system observability: Instrument Spring Boot application with OpenTelemetry

Last Updated on by

Post summary: Instrumenting a Spring Boot Java application with OpenTelemetry.

This post is part of Distributed system observability: complete end-to-end example series. The code used for this series of blog posts is located in selenium-observability-java GitHub repository.

Spring Boot

Spring Boot makes it easy to create stand-alone, production-grade Spring-based Applications that you can “just run”. Most Spring Boot applications need minimal Spring configuration. Creating a basic Spring Boot application takes a few steps.

Application

The application class is the entry point. It should have @SpringBootApplication annotation. I have added additional @ServletComponentScan annotation in order to register a custom response filter. I want to output the TraceId as a response header.

Application

import org.springframework.boot.SpringApplication;
import org.springframework.boot.autoconfigure.SpringBootApplication;
import org.springframework.boot.web.servlet.ServletComponentScan;

@ServletComponentScan
@SpringBootApplication
public class PersonServiceApplication {

    public static void main(String[] args) {
        SpringApplication.run(PersonServiceApplication.class, args);
    }
}

Filter

import io.opentelemetry.api.trace.Span;

import javax.servlet.*;
import javax.servlet.annotation.WebFilter;
import javax.servlet.http.HttpServletResponse;
import java.io.IOException;

@WebFilter("*")
public class AddResponseHeaderFilter implements Filter {

    @Override
    public void doFilter(ServletRequest request, ServletResponse response, FilterChain chain) throws IOException, ServletException {
        HttpServletResponse httpServletResponse = (HttpServletResponse) response;
        httpServletResponse.setHeader("x-trace-id", Span.current().getSpanContext().getTraceId());
        chain.doFilter(request, response);
    }
}

Controller

In the current example, there is only one controller with two APIs, a POST and GET endpoints with the same path. The class has to be annotated with @RestController. Each API endpoint is annotated with @RequestMapping, with more details about the path and the method. I have used Spring’s constructor-based dependency injection. I have omitted the @Autowired annotation because there is just one constructor.

import com.automationrhapsody.observability.services.PersonService;
import org.slf4j.Logger;
import org.slf4j.LoggerFactory;
import org.springframework.web.bind.annotation.RequestBody;
import org.springframework.web.bind.annotation.RequestMapping;
import org.springframework.web.bind.annotation.RequestMethod;
import org.springframework.web.bind.annotation.RestController;

import java.util.List;

@RestController
public class PersonController {

    private static final Logger LOGGER 
            = LoggerFactory.getLogger(PersonController.class);

    private PersonService personService;

    public PersonController(PersonService personService) {
        this.personService = personService;
    }

    @RequestMapping(value = "/persons", method = RequestMethod.GET)
    public List<PersonDto> getPersons() {
        LOGGER.info("Processing GET /persons request.");

        List<PersonDto> persons = personService.getPersons();
        return persons;
    }

    @RequestMapping(value = "/persons", method = RequestMethod.POST)
    public Long savePersons(@RequestBody PersonDto person) {
        LOGGER.info("Processing POST /persons request with {}", person);

        Long resultId = personService.savePerson(person);
        return resultId;
    }
}

Repository

Defining a very basic repository can be really easy with Spring, all needed is to extend the CrudRepository interface. If fine-tuning and custom methods are needed then it is needed to create an interface that extends the Spring’s Repository interface and defines custom repository methods inside. Read more in Working with Spring Data Repositories.

import org.springframework.data.repository.CrudRepository;
import org.springframework.stereotype.Repository;

@Repository
public interface FlightRepository extends CrudRepository<PersonEntity, Long> {
}

Service

A service layer is a good idea to handle the business logic between the controller and the repository. In this case, dependency is injected with @Autowired annotation. findAll() is a method that comes from CrudRepository interface. It gets the data from the database. @WithSpan annotation creates a new span in the OpenTelemetry traces. This will be explained in more detail.

import com.automationrhapsody.observability.controllers.PersonDto;
import com.automationrhapsody.observability.repositories.person.FlightRepository;
import com.automationrhapsody.observability.repositories.person.PersonEntity;
import io.opentelemetry.api.common.AttributeKey;
import io.opentelemetry.api.common.Attributes;
import io.opentelemetry.api.trace.Span;
import io.opentelemetry.extension.annotations.WithSpan;
import org.slf4j.Logger;
import org.slf4j.LoggerFactory;
import org.springframework.beans.factory.annotation.Autowired;
import org.springframework.stereotype.Service;

import java.util.List;
import java.util.stream.Collectors;
import java.util.stream.StreamSupport;

@Service
public class PersonService {

    private static final Logger LOGGER =
            LoggerFactory.getLogger(PersonService.class);

    @Autowired
    private FlightRepository flightRepository;

    public List<PersonDto> getPersons() {
        doSomeWorkNewChildSpan();
        Iterable<PersonEntity> persons = flightRepository.findAll();
        return StreamSupport.stream(persons.spliterator(), false)
                .map(this::toPersonDto)
                .collect(Collectors.toList());
    }

    @WithSpan
    public void doSomeWorkNewChildSpan() {
        LOGGER.info("Doing some work In New child span");
        Span span = Span.current();
        span.setAttribute("template.a2", "some value");
        span.addEvent("template.processing2.start", attributes("321"));
        span.addEvent("template.processing2.end", attributes("321"));
    }

    private Attributes attributes(String id) {
        return Attributes.of(AttributeKey.stringKey("app.id"), id);
    }

    private PersonDto toPersonDto(PersonEntity person) {
        PersonDto personDto = new PersonDto();
        personDto.setFirstName(person.getFirstName());
        personDto.setLastName(person.getLastName());
        personDto.setEmail(person.getEmail());
        return personDto;
    }
}

Instrumentation

OpenTelemetry provides a way for manual instrumentation, which will be covered in the subsequent Selenium-based post. OpenTelemetry also provides a Java agent JAR, that can be attached to any Java 8+ application and dynamically injects bytecode to capture telemetry from a number of popular libraries and frameworks. This JAR agent is attached to the Spring Boot application described above. This is done in the Docker file. Jaeger exporter and Jaeger backend endpoint are configured with otel.traces.exporter and otel.exporter.jaeger.endpoint environment variables.


# ========= BUILD =========
FROM maven:3-openjdk-11 as builder
WORKDIR /build

COPY pom.xml pom.xml
RUN mvn dependency:resolve

COPY . .
RUN mvn install

# ========= RUN =========
FROM openjdk:11
ENV APP_NAME person-service
# https://github.com/open-telemetry/opentelemetry-java-instrumentation
ENV JAVA_OPTS "$JAVA_OPTS \
  -Dotel.traces.exporter=jaeger \
  -Dotel.exporter.jaeger.endpoint=http://jaeger:14250 \
  -Dotel.metrics.exporter=none \
  -Dotel.resource.attributes="service.name=${APP_NAME}" \
  -Dotel.javaagent.debug=false \
  -javaagent:/app/opentelemetry-javaagent-all.jar"

ADD https://github.com/open-telemetry/opentelemetry-java-instrumentation/releases/download/v1.6.2/opentelemetry-javaagent-all.jar /app/opentelemetry-javaagent-all.jar
COPY --from=builder /build/target/$APP_NAME-*.jar /app/$APP_NAME.jar

CMD java $JAVA_OPTS -jar /app/$APP_NAME.jar

This is it. Just by attaching the Java agent application is instrumented and OpenTelemetry is ready to report traces. OpenTelemetry supports a large number of libraries and frameworks, the full list can be found in Supported libraries, frameworks, application servers, and JVMs.

Custom tracking

In many cases, apart from the standard tracing, the application has to report additional traces. This can be very easily done with the @WithSpan annotation. This annotation marks that the execution of this method or constructor should result in a new Span. It can be used to signal OpenTelemetry auto-instrumentation that a new span should be created whenever a marked method is executed. In the example above, a custom attribute has been added to the new Span. This is not mandatory though, just adding the annotation will record the method invocation as a new span in the trace output.

Traces output

In order to monitor a trace, run the examples as described in Distributed system observability: complete end-to-end example with OpenTracing, Jaeger, Prometheus, Grafana, Spring Boot, React and Selenium. Accessing http://localhost:8090/persons generates a trace in Jaeger:

Conclusion

With the steps described above, create a basic Spring Boot application is fairly easy. It is even easier instrumenting the application with OpenTelemetry tracing, just by adding the Java agent JAR. Custom tracing is also made easy with @WithSpan annotation. Traces give very valuable information about the performance of the different parts of the application.

Related Posts

Read more...

Distributed system observability: complete end-to-end example with OpenTracing, Jaeger, Prometheus, Grafana, Spring Boot, React and Selenium

Last Updated on by

Post summary: Code examples and explanations on an end-to-end example showcasing a distributed system observability from the Selenium tests through React front end, all the way to the database calls of a Spring Boot application. Examples are implemented with the OpenTracing toolset and traces are saved in Jaeger. This example also shows a complete observability setup including tools like Grafana, Prometheus, Loki, and Promtail.

This post is part of Distributed system observability: complete end-to-end example series. The code used for this series of blog posts is located in selenium-observability-java GitHub repository.

Introduction

Nowadays, the MIcroservices architecture is very popular. It certainly has its benefits, allowing the companies to deliver faster products to the market. It is much easier to manage several small applications, each one of them with isolated responsibilities, rather than one big fat monolithic application. Microservices architecture has its challenges as well. One of those challenges is traceability. What happens in case of error, where did it occur, what microservices were involved, what were the requests flow through the system, where is the stack trace? In a monolithic application, the stack trace is shown into the logs, giving the exact location of the error. In a microservices landscape, errors are in many cases meaningless, unless there is full traceability of the request flow.

Observability and distributed tracing

Distributed tracing, also called distributed request tracing, is a method used to profile and monitor applications, especially those built using a microservices architecture. Distributed tracing helps pinpoint where failures occur and what causes poor performance. Logs, metrics, and traces are often known as the three pillars of observability. Further reading on observability can be done in The Three Pillars of Observability article.

OpenTracing

OpenTracing is an API specification and libraries, that enables the instrumentation of distributed applications. It is not locked to any particular vendors and allows flexibility just by changing the configuration of already instrumented applications. More details can be found in Instrumenting your application and What is Distributed Tracing?. Current examples are based on OpenTracing libraries and tools.

End-to-end traceability and observability

In the current examples, I am going to give an end-to-end solution, how observability can be achieved in a distributed system. I have used mnadeem/boot-opentelemetry-tempo project as a basis and have extended it with React Frontend and Selenium tests, to provide a complete end-to-end example. Below is a diagram of the full setup. All applications involved will be explained on a higher level.

PostgreSQL and pgAdmin

The basic examples used PostgreSQL, I thought of changing it to MySQL, but when I did short research, I found that PostgreSQL has some advantages. PostgreSQL is an object-relational database, while MySQL is a purely relational database. This means that Postgres includes features like table inheritance and function overloading, which can be important to certain applications. Postgres also adheres more closely to SQL standards. See more in MySQL vs PostgreSQL — Choose the Right Database for Your Project.

pgAdmin is the default user interface to manage a PostgreSQL database, so it is present in the architecture as well.

Spring Boot backend

Spring Boot is used as a backend. I did want to get some exposure to the technology, so I created a very basic application in Spring Boot. It uses the PostgreSQL database for reading and writing data. Spring Boot application is instrumented with OpenTelemetry Java library and exports the traces in Jaeger format directly to the Jaeger backend. It also writes application log files on a file system. Backend exposes APIs, which are consumed by the frontend. More details on the backend can be found in Distributed system observability: Instrument Spring Boot application with OpenTelemetry post.

React frontend

I am very experienced with React, so this was the natural choice for the frontend technology. The frontend uses fetch() to consume the backend APIs. It is instrumented with OpenTelementry JavaScript libraries to trace all communication happening through fetch() and to exports the traces in OpenTelemetry format to the OpenTelemetry collector. The frontend also has manual instrumentation which traces the actions done by end-users on it. More details on the frontend can be found in Distributed system observability: Instrument React application with OpenTelemetry post.

OpenTelemetry collector

OpenTelemetry collector converts the data received from the frontend in OpenTelemetry format into Jaeger format and exports it to the Jaeger backend. The collector is also extracting the span metrics, which are read by Prometheus, read more in Distributed system observability: extract and visualize metrics from OpenTelemetry spans post. Configurations are described in the collector configuration. Local configurations are in otel-config.yaml.

Selenium tests

Selenium was chosen for the web testing framework because of its observability feature. Actually, this was the reason for which I created the current examples. After getting to know the tracing features of Selenium better, I find them not much useful. Selenium does not provide traceability of the tests, but rather on its internal operations and performance. Having started with the tracing and the whole project, I could not ditch it in the middle, so I have to create a custom way to make Selenium trace the tests. Selenium tests export tracing information in Jaeger format directly into the Jaeger backend. More details on the tests can be found in Distributed system observability: Instrument Selenium tests with OpenTelemetry post.

Cypress tests

Cypress is a front-end testing tool built for the modern web. It is most often compared to Selenium. The initial driver of the current post series was Selenium observability. After I got a better understanding of the observability topic, I’ve decided to add examples on Cypress tests observability for more completeness of the examples. Cypress interacts with the Frontend and exports its traces to OpenTelemetry Collector, which then forwards the traces into Jaeger. More details on the tests can be found in Distributed system observability: Instrument Cypress tests with OpenTelemetry post.

Jaeger

Jaeger, inspired by Dapper and OpenZipkin, is an open-source distributed tracing system. It is used for monitoring and troubleshooting microservices-based distributed systems. Jaeger collects all the traces and provides a search and visualization of the traces. In the original examples, Grafana Tempo was used as a backend and Jaeger UI via the jaeger-query module to open the traces. I initially started with it, but Tempo does not provide a possibility to search the traces. I find this rather inconvenient, so I switched completely to Jaeger.

Promtail

Promtail is an agent which ships the contents of the Spring Boot backend logs to a Loki instance. It is usually deployed to every machine that has applications needed to be monitored. Local configurations are in promtail-local.yaml.

Loki

Grafana Loki is a log aggregation system inspired by Prometheus. It does not index the contents of the logs, but rather a set of labels for each log stream. Log data itself is then compressed and stored in chunks. In the current example, logs are being pushed to Loki by Promtrail. Local configurations are in loki-local.yaml.

Prometheus

Prometheus is an open-source monitoring and alerting toolkit. Prometheus collects and stores its metrics as time-series data, i.e. metrics information is stored with the timestamp at which it was recorded, alongside optional key-value pairs called labels. In the current example, Prometheus is monitoring the Sprint Boot backend, Loki, Jaeger, and OpenTelemetry Collector. It pulls the metrics data from those applications at a regular interval and stores them in its database. Alerts can be configured based on the metrics. Local configurations are in prometheus.yaml.

Grafana

Grafana is an open-source solution for running data analytics, pulling up metrics from different data sources, and monitoring applications with the help of customizable dashboards. The tool helps to study, analyze and monitor data over a period of time, technically called time-series analytics. In the current example, Grafana pulls data from Prometheus, Jaeger, and Loki. Local configurations are in grafana-dashboards.yaml and grafana-datasource.yml.

Explore the example

Running the example is very easy. What is needed is Docker compose and IDE that can run JUnit tests, I prefer IntelliJ IDEA. Run the examples:

  1. Check out the source code from https://github.com/llatinov/selenium-observability-java
  2. Run: docker-compose build
  3. Run: docker-compose up
  4. Open selenium-tests Maven project and run all the unit tests

Explore the example artifacts:

pgAdmin

pgAdmin is accessible at http://localhost:8005/. In order to log in, use the following credentials: pgadmin4@pgadmin.org / admin. This is needed only if the database records have to be read or modified.

Jaeger

Jaeger is accessible at http://localhost:16686. The home page shows rich search functionality. There is a dropdown with all available services, then operations performed by the selected service can be also filtered.

A trace can be opened from the search results. It shows all the actions for this trace that have been recorded.

Grafana

Grafana is accessible at http://localhost:3001. Different data sources can be accessed from the left-hand side menu, there is a small compass, the Explore menu. From the top, there is a dropdown with the available data sources.

Grafana -> Loki

From Grafana select Loki as datasource. Search for {job=”person-service”}, this shows all logs for the Spring Boot backend.

Grafana -> Jaeger

Jaeger data source can open a trace by its id. This data source can be used in conjunction with Loki. Search logs in Loki, then open a log, this exposes a Jaeger button.

Jaeger data source can be opened directly from the dropdown, then type the TraceID.

Grafana -> Prometheus

From Grafana select Prometheus as a data source. Search for {job=”person-service”}, this shows all metrics for the Spring Boot backend.

Prometheus

Prometheus is accessible at http://localhost:9090/. Search for {job=”person-service”}, this shows all metrics for the Spring Boot backend.

Furter posts with details

This is an introductory post, more details, explanations, and code examples on actual implementation can be found in the following posts:

Conclusion

Microservices architecture is used more often. Alongside its advantages, it comes with specific challenges. Observability is one of those challenges and is a very important topic in a distributed software system. In the current example, I have shown end-to-end observability achieved with popular open-source tools. The main objective of my experiments was to be able to trace Selenium test execution through all the systems involved in the distributed architecture.

Related Posts

Read more...