Monthly Archives: January 2018

.NET Core code coverage on Linux with MiniCover

Last Updated on by

Post summary: How to run code coverage of your unit tests as part of your build on Linux build agents.

Code below can be found in GitHub SampleDotNetCore2RestStub repository. In Code coverage of .NET Core unit tests with OpenCover post, I have shown how to do code coverage with OpenCover. Commands shown in that post can be made part of your CI or CD build. There is a but though, this works only for windows. If you are having build machines on Linux you need another alternative. In this post, I’m going to show this alternative.

MiniCover

MiniCover is a lightweight code coverage tool for .NET Core on Linux. It is in an early stage yet and there is no big community, but I really hope this is going to change soon as it looks a very promising tool.

Include in project

In order to use MiniCover it has to be installed as .NET CLI Tool. This is done with following code:

<ItemGroup>
	<DotNetCliToolReference Include="MiniCover" Version="2.0.0-ci-*" />
</ItemGroup>

In order to keep your original projects intact, the best approach is to create tools project and add it to its tools.csproj file, which will look:

<Project Sdk="Microsoft.NET.Sdk">

  <PropertyGroup>
    <TargetFramework>netcoreapp2.0</TargetFramework>
  </PropertyGroup>

  <ItemGroup>
    <DotNetCliToolReference Include="MiniCover" Version="2.0.0-ci-*" />
  </ItemGroup>

</Project>

Commands

At this stage following command line options are available:

  • instrument – Instrument assemblies
  • uninstrument – Uninstrument assemblies
  • reset – Reset hits count
  • report – Outputs coverage report
  • htmlreport -Write HTML report to a folder
  • xmlreport – Write an NCover-formatted XML report to folder

Run coverage

In case of a project structure where you have your code in src folder and your tests in test folder following bash script can be used directly. It accepts as parameter threshold coverage percentage, if not provided it uses 80% by default. Script restores NuGet packages and builds the projects. It navigates to tools folder and restores NuGet packages again. This is very important as it is the only way to get MiniCover NuGet package. Inside tools folder, it instruments assemblies and resets previous statistics. Script navigates to root folder and runs all tests inside every project in test folder. Afterward, script navigates again to tools folder and uninstruments all assemblies so far. No matter this operation is safe I would recommend to run one more build or publish before assemblies go into production. In the end, the script generates reports.

if [ ! -z $1 ]; then
  if [ $1 -lt 0 ] || [ $1 -gt 100 ]; then
    echo "Threshold should be between 0 and 100"
    threshold=80
  fi
  threshold=$1
else
  threshold=80
fi

dotnet restore
dotnet build

cd tools
dotnet restore

# Instrument assemblies inside 'test' folder to detect hits for source files inside 'src' folder
dotnet minicover instrument --workdir ../ --assemblies test/**/bin/**/*.dll --sources src/**/*.cs 

# Reset hits count in case minicover was run for this project
dotnet minicover reset

cd ..

for project in test/**/*.csproj; do dotnet test --no-build $project; done

cd tools

# Uninstrument assemblies, it's important if you're going to publish or deploy build outputs
dotnet minicover uninstrument --workdir ../

# Create HTML reports inside folder coverage-html
# This command returns failure if the coverage is lower than the threshold
dotnet minicover htmlreport --workdir ../ --threshold $threshold

# Print console report
# This command returns failure if the coverage is lower than the threshold
dotnet minicover report --workdir ../ --threshold $threshold

# Create NCover report
dotnet minicover xmlreport --workdir ../ --threshold $threshold

cd ..

Reports

There are 3 types of reports: Console, HTML and NCover XML.

Console report

Console report is dumping results to the console and returns 1 if given threshold is not met, which basically fails the CI/CD build. In the example below, codeCoverage.sh was called with argument 40, which means threshold is 40%.

HTML report

HTML report is also failing the build and gives similar summary information as console report, but also give detailed information for each class coverage. An example report can be found in MiniCover HTML report. I have to praise myself, as the summary file that is shown below was something I contributed, because I like the project very much.

NCover report

NCover report creates XML file in its format. The beauty of it is that you can additionally use ReportGenerator on Windows machine and convert XML to nice HTML report. Assuming ReportGenerator is extracted on your C:\ then the command is shown below. The report can be found in MiniCover ReportGenerator report.

C:\ReportGenerator\ReportGenerator.exe -reports:coverage.xml -targetdir:coverage

Compare with OpenCover

If you check both OpenCover .Net Core report and MiniCover ReportGenerator report you can notice some difference in metrics. First is that MiniCover does not support branch coverage. This is not that bad after all if you have your code nicely indented, line coverage is sufficient. For e.g., if your ternary operator is not on one line, but on three and you have missed testing one of the conditions, then line coverage will state that there is a not tested line. If the ternary operator is on one line though then line coverage will miss this test problem. Another difference is Coverable lines and Covered lines. OpenCover counts opening and closing brackets as such, so its numbers are bigger. Because of this conceptual difference Line coverage percentage has a small difference. MiniCover (35%) is more generous and give more percentage than OpenCover (33.6%).

Conclusion

MiniCover is very nice and compact tool that can be put in place during your continuous integration or continuous delivery to measure code coverage on each build. The most important advantage is that it is designed and works on Linux.

Related Posts

Read more...

Build a REST API with Express on Node.js and run it on Docker

Last Updated on by

Post summary: Code examples how to create RESTful API with Node.js using Express web framework and then run it on Docker.

Code below can be found in GitHub sample-nodejs-rest-stub repository. This is my first JavaScript post, so bare with me if something is not as perfect as it should be.

Node.js

Node.js is a JavaScript runtime built on Chrome’s V8 JavaScript engine. Node.js uses an event-driven, non-blocking I/O model that makes it lightweight and efficient. Node.js’ package ecosystem, npm, is the largest ecosystem of open source libraries in the world.

Create Node.js project

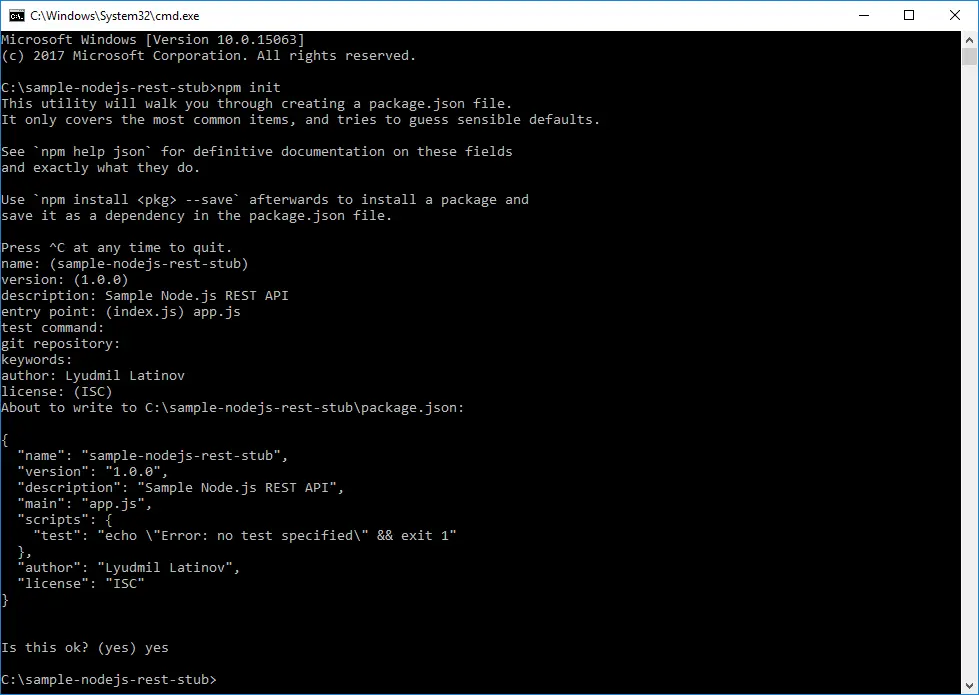
Node.js project is created with npm init, which guides you through a wizard with several questions.

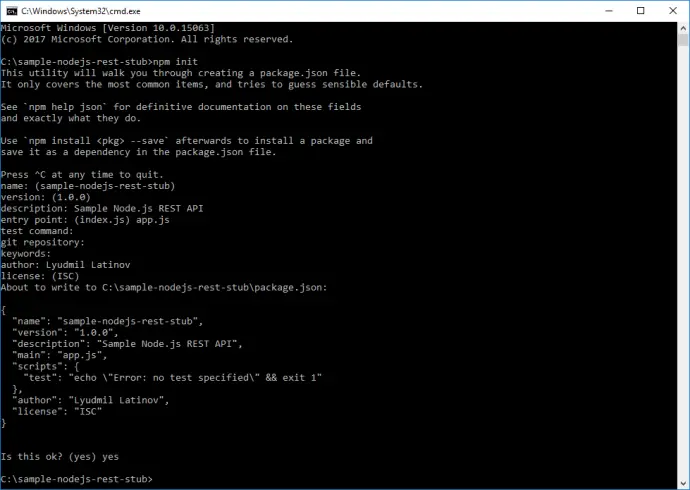
In the end package.json file is created. This is the file with all your project’s configuration.

{
  "name": "sample-nodejs-rest-stub",
  "version": "1.0.0",
  "description": "Sample Node.js REST API",
  "main": "app.js",
  "scripts": {
    "test": "echo \"Error: no test specified\" && exit 1"
  },
  "author": "Lyudmil Latinov",
  "license": "ISC"
}

Once created it is good to add some JavaScript code to test that project is working. I called the file app.js and it will be later extended. It does nothing, but writing Hello world! to the console.

'use strict';

console.log('Hello world!');

File with JavaScript code can be run with node app.js command. You can change package.json file by adding start script and then run the application with npm start:

"scripts": {
  "start": "node app.js",
  "test": "echo \"Error: no test specified\" && exit 1"
}

Express

Express is a web framework for Node.js. It is the most used one. In order to use express it has to be added as a dependency and saved to package.json file.

npm install express --save

Change app.js in order to verify Express is working correctly. The ‘use strict’ literal is used for enabling ECMAScript 5 strict mode, which has several restrictions, like warnings are thrown as errors, usage of undeclared variables is prohibited, etc. I would prefer using constants declared with const whenever possible. Express module is assigned to express variable with require(‘express’) directive. Then new express object is created and assigned to app variable. HTTP GET endpoint that listens to ‘/’ is configured with app.get(path, callback) function. Callback is a function that is called inside another function, in our case inside get() function. In the current example, callback has arguments req and res which gives you access to Express’ Request and Response objects. What is done below is that send([body]) function on the response is called, which returns the result. Socket that listens for incoming connections is started with app.listen(path, [callback]) function. More details can be found in Express API reference documentation.

'use strict';

const express = require('express');
const app = new express();

app.get('/', (req, res) => {
    res.send('Hello World!');
});

app.listen(3000, () => {
    console.log('Server up!');
});

If you run with npm start you should see Server is up! text. Firing GET request to http://localhost:3000 should return Hello World! response.

Add REST API

Functionality is a sample Person service that is used also in Build a RESTful stub server with Dropwizard and Build a REST API with .NET Core 2 and run it on Docker Linux container posts.

The first step is to include body-parser, an Express middleware which parses request body and makes it available as an object in req.body property.

npm install body-parser --save

Express middleware is series of function calls that have access to req and res objects. Middleware is used in our application. I will explain as much as possible, if you are interested in more details you can read in Express using middleware documentation.

Person class

A standard model class or POJO is needed in order to transfer and process JSON data. It is standard ECMAScript 6 Person class with constructor which is then exported as a module with module.exports = Person.

Person repository

Again there will be no real database layer, but a functionality that acts as such. In the constructor, a Map with several Person objects is created. There are getByIdgetAllremove and save functions which simulate different CRUD operations on data. Inside them, various Map functions are used. I’m not going to explain those in details, you can read more about maps in JavaScript Map object documentation. In the end, PersonRepository is instantiated to a personRepository variable which is exported as a module. Later, when require is used, this instance will be accessible only, not the PersonRepository class itself.

Person routes

In initial example routes and their handling was done with app.get(), here express.Router is used. It is complete middleware routing system. See more in Express routing documentation. Router class is imported const Router = require(‘express’) and new instance is created const router = new Router(). Registering path handlers is same as in application. There are get(), post(), etc., functions resp. for GET and POST requests. Specific when using the router is that it should be registered as application middleware with app.use(‘/person’, router). This makes router handle all defined in it paths which are now under /person base path. Current route configuration is defined as a function with name getPersonRoutes which takes app as an argument. This function is exported as a module.

Application

Important bit here is require(‘./routes/personRoutes’)(app) which uses getPersonRoutes function and registers person routes.

person.js

'use strict';

class Person {
    constructor(id, firstName, lastName, email) {
        this.id = id;
        this.firstName = firstName;
        this.lastName = lastName;
        this.email = email;
    }
}

module.exports = Person;

personRepository.js

'use strict';

const Person = require('../json/person');

class PersonRepository {
    constructor() {
        this.persons = new Map([
            [1, new Person(1, 'FN1', 'LN1', 'email1@email.na')],
            [2, new Person(2, 'FN2', 'LN2', 'email2@email.na')],
            [3, new Person(3, 'FN3', 'LN3', 'email3@email.na')],
            [4, new Person(4, 'FN4', 'LN4', 'email4@email.na')]
        ]);
    }

    getById(id) {
        return this.persons.get(id);
    }

    getAll() {
        return Array.from(this.persons.values());
    }

    remove() {
        const keys = Array.from(this.persons.keys());
        this.persons.delete(keys[keys.length - 1]);
    }

    save(person) {
        if (this.getById(person.id) !== undefined) {
            this.persons[person.id] = person;
            return "Updated Person with id=" + person.id;
        }
        else {
            this.persons.set(person.id, person);
            return "Added Person with id=" + person.id;
        }
    }
}

const personRepository = new PersonRepository();

module.exports = personRepository;

personRoutes.js

'use strict';

const Router = require('express');
const personRepo = require('../repo/personRepository');

const getPersonRoutes = (app) => {
    const router = new Router();

    router
        .get('/get/:id', (req, res) => {
            const id = parseInt(req.params.id);
            const result = personRepo.getById(id);
            res.send(result);
        })
        .get('/all', (req, res) => {
            const result = personRepo.getAll();
            res.send(result);
        })
        .get('/remove', (req, res) => {
            personRepo.remove();
            const result = 'Last person remove. Total count: '
                + personRepo.persons.size;
            res.send(result);
        })
        .post('/save', (req, res) => {
            const person = req.body;
            const result = personRepo.save(person);
            res.send(result);
        });

    app.use('/person', router);
};

module.exports = getPersonRoutes;

app.js

'use strict';

const express = require('express');
const app = new express();
const bodyParser = require('body-parser');

// register JSON parser middlewear
app.use(bodyParser.json());

require('./routes/personRoutes')(app);

app.listen(3000, () => {
    console.log("Server is up!");
});

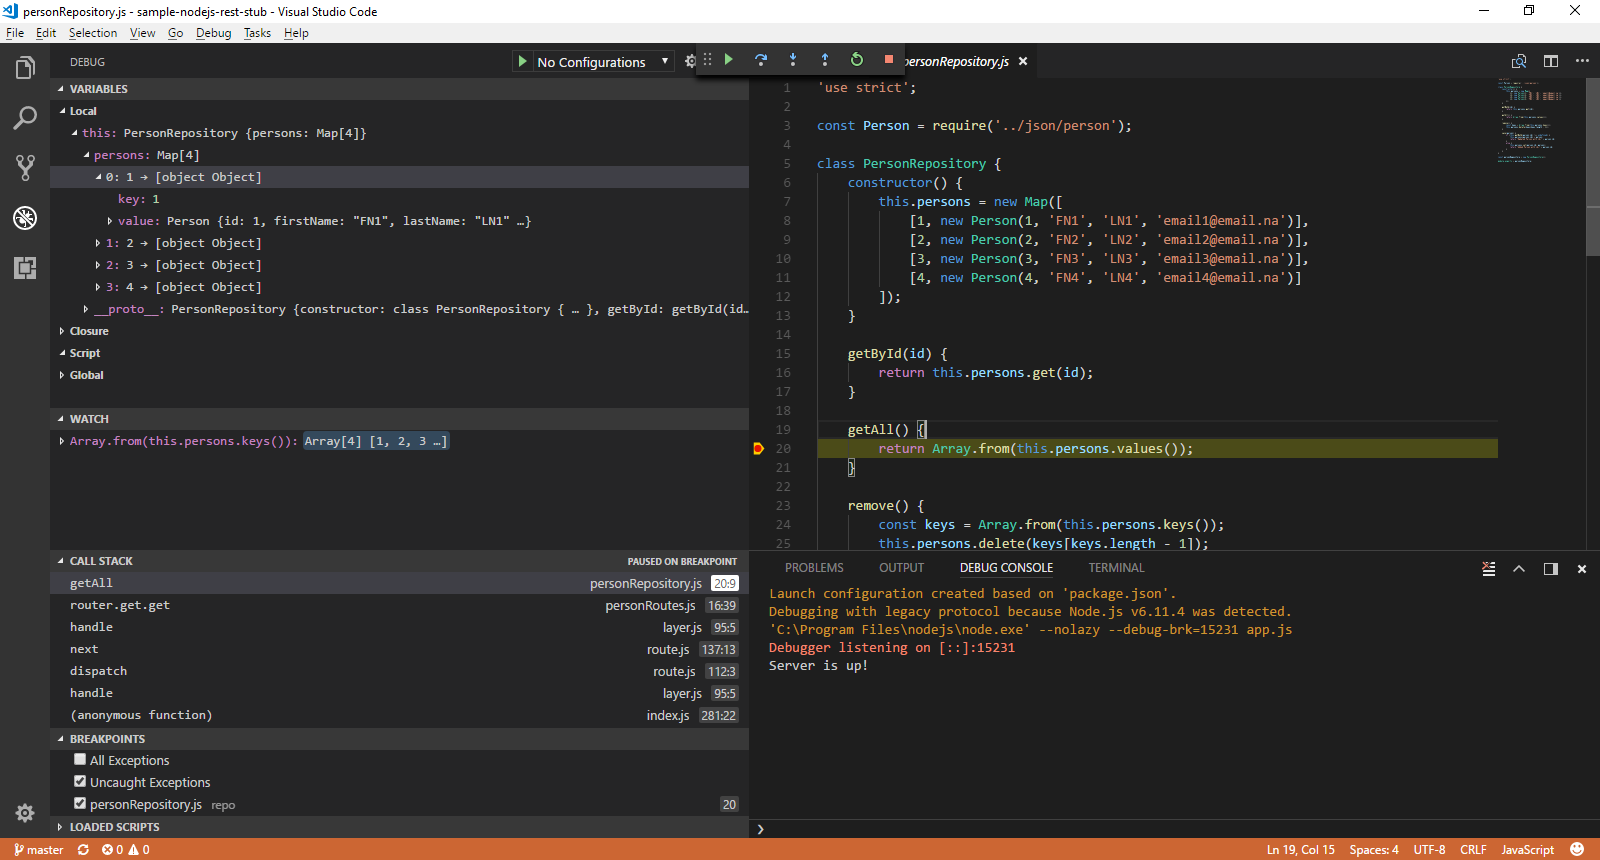
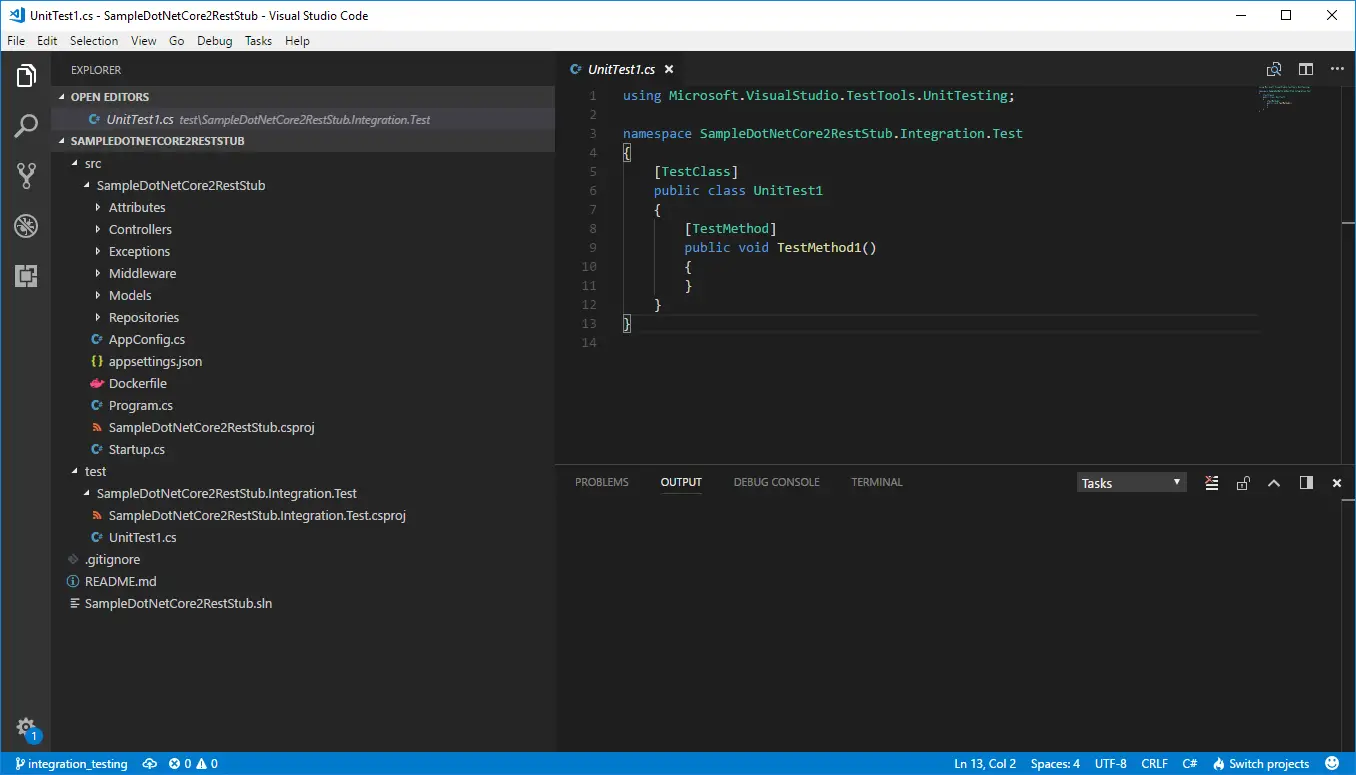
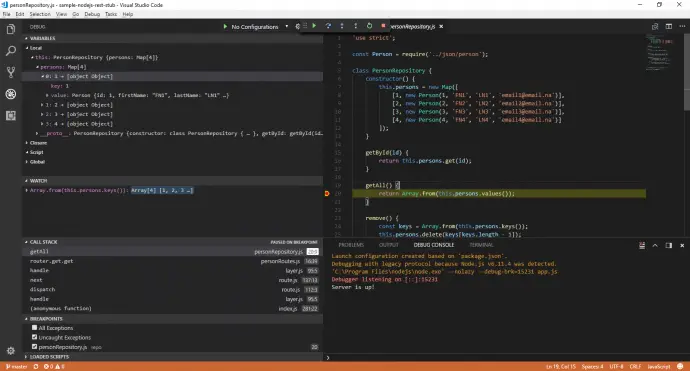
Debug with Visual Studio Code

I started to like Visual Studio Code – an open source multi-platform editor maintained by Microsoft. Once project folder is imported, hitting F5 starts to debug on the project.

External configuration

External configuration from a file is a must for every serious application, so this also has to be handled. A separate config.js file is keeping the configuration and exposing it as a module. There is versionRoutes.js file added which is reading configuration value and exposing it to the API. It follows the same pattern as personRoutes.js, but it has config as function argument as well. Also, app.js has to be changed, import config and pass it to getVersionRoutes function.

config.js

'use strict';

const config = {
    version: '1.0'
};

module.exports = config;

versionRoutes.js

'use strict';

const getVersionRoutes = (app, config) => {
    app.get('/api/version', (req, res) => {
        res.send(config.version);
    });
};

module.exports = getVersionRoutes;

app.js

'use strict';

const express = require('express');
const bodyParser = require('body-parser');
const config = require('./config/config');
const app = new express();

// register JSON parser middlewear
app.use(bodyParser.json());

require('./routes/personRoutes')(app);
require('./routes/versionRoutes')(app, config);

app.listen(3000, () => {
    console.log("Server is up!");
});

Code style checker

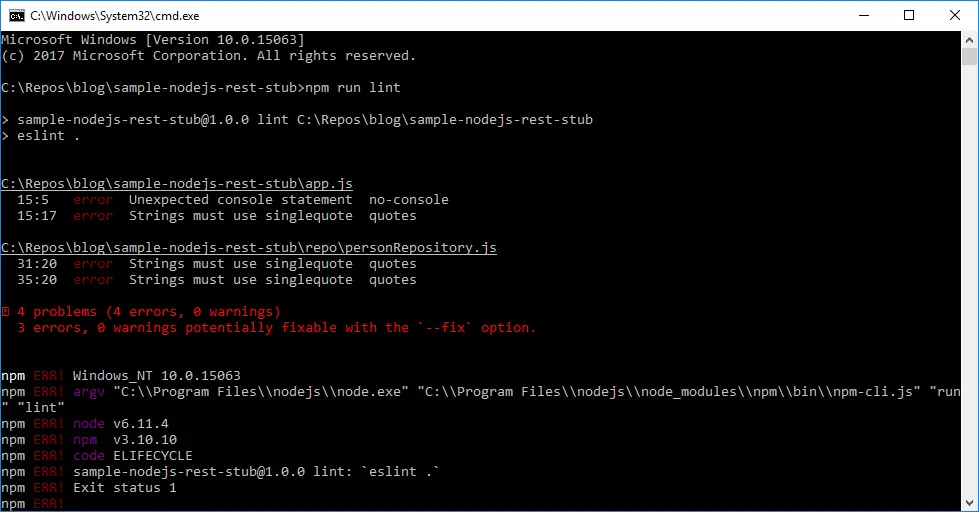
It is very good practice to have consistency over projects code. The more important benefit of using it is that it can catch bugs that otherwise will be caught later in when the application is run. This is why using a code style checker is recommended. Most popular for JavaScript is ESLint. In order to have it has to be added as a dependency to the project:

npm install eslint --save-dev

Notice the –save-dev option, this creates a new devDependencies node in package.json. This means that project needs this packages, but just for development. Those dependencies will not be available if someone is importing your project. Entry in scripts node in package.json file can be added: “lint”: “eslint .”. This will allow you to run ESLint with npm run lint. ESLint configuration is present in .eslintrc file. In .eslintignore are listed folders to be skipped during the check.

.eslintrc

{
  "extends": "eslint:recommended",
  "parserOptions": {
    "ecmaVersion": 6
  },
  "env": {
    "es6": true,
    "node": true
  },
  "globals": {
  },
  "rules": {
    "quotes": [2, "single"]
  }
}

.eslintignore

node_modules

package.json

"scripts": {
  "start": "node app.js",
  "test": "echo \"Error: no test specified\" && exit 1",
  "lint": "eslint ."
},
...
"devDependencies": {
  "eslint": "^4.15.0"
}

app.js

'use strict';

const express = require('express');
const bodyParser = require('body-parser');
const config = require('./config/config');
const app = new express();

// register JSON parser middlewear
app.use(bodyParser.json());

require('./routes/personRoutes')(app);
require('./routes/versionRoutes')(app, config);

app.listen(3000, () => {
    /* eslint-disable */
    console.log('Server is up!');
});

During the check, some issues were found. One of the issues is that console.log() is not allowed. This is a pretty good rule as all logging should be done to some specific logger, but in our case, we need app.js to have text showing that server is up. In order to ignore this error /* eslint-disable */ comment can be used, see app.js above.

Dockerfile

Dockerfile that packs application is shown below:

FROM node:8.6-alpine

RUN mkdir -p /usr/src/app
WORKDIR /usr/src/app

COPY package.json ./
RUN npm install

COPY . .

EXPOSE 3000
CMD ["npm", "start"]

Docker container that is used is node:8.6-alpine. Folder /usr/src/app and is made current working directory. Then package.json file is copied into container and npm install is run, this will download all dependencies. All files from the current folder are copied on docker image with: COPY . .. Port 3000 is exposed so it is, later on, available from the container. With CMD is configured the command that is run when the container is started.

Build and run Docker container

Docker container is packaged with tag nodejs-rest with the following command:

docker build . -t nodejs-rest

Docker container is run with exposing port 3000 from the container to port 9000 on the host with the following command:

docker run -e VERSION=1.1 -p 9000:3000 nodejs-rest

Notice the -e VERSION=1.1 which sets an environment variable to be used inside the container. The intention is to use this variable in the application. This can be enabled with modifying config.js file by changing to: version: process.env.VERSION || ‘1.0’. If environment variable VERSION is available then save it in version, if not use 1.0.

'use strict';

const config = {
    version: process.env.VERSION || '1.0'
};

module.exports = config;

If invoked now /api/version returns 1.1.

Conclusion

In the current post, I have shown how to make very basic REST API with Node.js and Express. It can be very easily run into a Docker container.

Related Posts

Read more...

Code coverage of .NET Core unit tests with OpenCover

Last Updated on by

Post summary: Examples how to measure code coverage of .NET Core unit tests with OpenCover.

Examples below are based on GitHub SampleDotNetCore2RestStub repository. Examples use code from .NET Core integration testing and mock dependencies post. Those are integration tests because they test more than one application module at a time, but they are run with a unit testing framework, this is why current post title is such.

Code coverage

This topic is how to do the code coverage on .NET Core unit tests with OpenCover. Theory on what is code coverage, why it is needed can be found in What about code coverage post.

OpenCover

OpenCover is open source tool for code coverage for .NET 2.0 and above applications for Windows only. You can read more details about OpenCover in Code coverage of manual or automated tests with OpenCover for .NET applications post or you can visit their OpenCover Wiki page.

Run OpenCover

In order to make this examples work you need to check out SampleDotNetCore2RestStub repository to C:\ and run all commands from project root folder C:\SampleDotNetCore2RestStub. OpenCover and ReportGenerator should be installed in C:\ as well. If you have different paths, just adjust them in commands shown below.

C:\OpenCover\OpenCover.Console.exe `
	-target:"c:\Program Files\dotnet\dotnet.exe" `
	-targetargs:"test" `
	-output:coverage.xml `
	-oldStyle `
	-filter:"+[SampleDotNetCore2RestStub*]* -[SampleDotNetCore2RestStub*Test*]*" `
	-register:user

Enable .NET Core to debug output

If you run the command above you will get the following message:

Committing…
No results, this could be for a number of reasons. The most common reasons are:
1) missing PDBs for the assemblies that match the filter please review the
output file and refer to the Usage guide (Usage.rtf) about filters.
2) the profiler may not be registered correctly, please refer to the Usage
guide and the -register switch.

Note: error with red text shown on image above is because with -targetargs:”test” dotnet.exe tries to run tests inside all projects, but src\SampleDotNetCore2RestStub simply does not have tests. You can refine which test project to get run by changing to: -targetargs:”test test\SampleDotNetCore2RestStub.Integration.Test\SampleDotNetCore2RestStub.Integration.Test.csproj”.

Message for no results is because debug output is not enabled on .NET Core project and OpenCover does not have needed data to work on. Change src\SampleDotNetCore2RestStub\SampleDotNetCore2RestStub.csproj file by adding <DebugType>full</DebugType>:

<PropertyGroup>
	<OutputType>Exe</OutputType>
	<TargetFramework>netcoreapp2.0</TargetFramework>
	<DebugType>full</DebugType>
</PropertyGroup>

Now running the command gives proper output:

Committing…
Visited Classes 5 of 12 (41.67)
Visited Methods 17 of 36 (47.22)
Visited Points 43 of 123 (34.96)
Visited Branches 18 of 44 (40.91)

==== Alternative Results (includes all methods including those without corresponding source) ====
Alternative Visited Classes 5 of 12 (41.67)
Alternative Visited Methods 20 of 43 (46.51)

Generate report

ReportGenerator is used to convert XML reports generated by OpenCoverPartCoverVisual Studio or NCover into human-readable reports in various formats. To generate report use following command:

C:\ReportGenerator\ReportGenerator.exe `
	-reports:coverage.xml `
	-targetdir:coverage

Inspect report

The report can be found in my examples: OpenCover .Net Core report. You can see what code is being covered during testing and what not.

Conclusion

In this post, I have shown how to run code coverage with OpenCover on .NET Core unit tests.

Related Posts

Read more...

Useful .NET Core SDK CLI commands

Last Updated on by

Post summary: Some useful .NET Core SDK CLI commands.

Commands in the current post are extraction from Build a REST API with .NET Core 2 and run it on Docker Linux container and .NET Core integration testing and mock dependencies posts where I have used them in a real project.

All commands

All available commands are accessed with: dotnet –help.

Initialise .NET projects

Creating new projects is done with: dotnet new [options]. I have used following commands:

  • Create new console application project: dotnet new console -o <ProjectName>
  • Create new MS Test project: dotnet new mstest -o <ProjectName>
  • Create new solution file: dotnet new sln –name <SolutionName>

To list all available project types use: dotnet new –help.

Custom templates

.NET SDK allows you to create custom project template and then install it to SDK with the command: dotnet new -i <TEMPLATE_FOLDER>. Once installed can create a new project out of your custom template. This is valuable in big organizations where cohesion is needed between similar project types. See more for templates in Custom templates for dotnet new article.

Manage dependencies

Two types of dependencies are available, in a NuGet package or to another .NET project.

  • Add reference to a NuGet package: dotnet add package <NuGetPackageName>
  • Add reference to another .NET project: dotnet add reference <PathToProjectFile>

Similar commands are available for removing dependencies with: dotnet remove.

Project dependencies can be shown with: dotnet list reference <PathToProjectFile>.

Actions on a project

  • Build a project: dotnet build
  • Run a project: dotnet run
  • Run tests of a project: dotnet test
  • Publish project artefacts: dotnet publish

All commands have a bunch of configuration options to be provided. More details on each command can be obtained by adding –help at the end.

Manage solution file

  • Create new solution file: dotnet new sln –name <SolutionName>
  • Add project to solution: dotnet sln <SolutionFileName> add <PathToProjectFile>
  • Remove project from solution: dotnet sln <SolutionFileName> remove <PathToProjectFile>
  • List projects in a solution: dotnet sln <SolutionFileName> list

Conclusion

This post is showing some useful .NET SDK CLI commands that make management of .NET project easy without Visual Studio 2017. More practical examples can be found in post where those commands are actually used: Build a REST API with .NET Core 2 and run it on Docker Linux container and .NET Core integration testing and mock.

Related Posts

Read more...

.NET Core integration testing and mock dependencies

Last Updated on by

Post summary: How to do integration testing on .NET Core application and stub or mock some inconvenient dependencies.

Code below can be found in GitHub SampleDotNetCore2RestStub repository. In Build a REST API with .NET Core 2 and run it on Docker Linux container post I have shown how to create .NET Core application. In the current post, I will show how to do integration testing on the same application. The post is for REST API, but principles here apply for web UI as well, the difference is that the response will be HTML, which is slightly harder to process compared to JSON.

Refactor project structure

Currently, there is only one project created which contains .NET Core application. Since this is going to grow it has to be refactored and structured properly.

  • SampleDotNetCore2RestStub folder which contains the API is moved to src folder.
  • Solution file is created with dotnet new sln –name SampleDotNetCore2RestStub. Note that .sln extension is omitted as it is added automatically. Although everything in the example is done with open source tools, it is good to have solution file to keep compatibility with Visual Studio 2017.
  • API project file is added to solution file with:
    dotnet sln SampleDotNetCore2RestStub.sln add src/SampleDotNetCore2RestStub/SampleDotNetCore2RestStub.csproj.
  • In order to test that moving of files did not affected the functionality, API can be run with: dotnet run –project src/SampleDotNetCore2RestStub/SampleDotNetCore2RestStub.csproj.

Add test project

It is time to create integration tests project. We speak for integration tests, but they will be run with unit testing framework MSTest. I do not have some particular favor of it, it comes by default with .NET Core, along with xUnit, and I do not want to change it.

  • Create test folder: mkdir test.
  • Navigate to it: cd test.
  • MSTest project is created with: dotnet new mstest -o SampleDotNetCore2RestStub.Integration.Test.
  • Navigate to test project: cd SampleDotNetCore2RestStub.Integration.Test.
  • Run the unit tests: dotnet test. By default, there is one dummy test that passes.
  • Go to root folder: cd .. and cd ..
  • Add test project to solution file: dotnet sln SampleDotNetCore2RestStub.sln add test/SampleDotNetCore2RestStub.Integration.Test/SampleDotNetCore2RestStub.Integration.Test.csproj.

Open with Visual Studio Code

Once refactored and opened in Visual Studio Code project has following structure:

Unit vs Integration testing

I would not like to focus on theory and terminology as this post is not intended to, but I have to do some theoretical setup before proceeding with the code. Generally speaking, term integration testing is used in two cases. One is when different systems are interconnected together and tested, other is when different components of one system are grouped together and tested. In the current post with term integration testing, I will refer the latter. In unit testing, each separate class is tested in isolation. In order to do so all external dependencies, like a database, file system, web requests, and response, etc., are mocked. This makes tests run very fast but has a very high risk of false positives because of mocking. When mocking a dependency there is always an assumption how it works and is being used. The mocked behavior might be significantly different than actual one, then the unit test is compromised. On the other hand, integration testing verifies that different parts of the application work correctly when grouped together. It is much slower than unit testing because more and real resources are being used. Some parts of the application still can be mocked which can increase execution time. In the current post, I will show how to run a full application with only the database being mocked.

The Test Host

One way to run the fully assembled application is by building and deploying it. Then, the application will use real resources to work. Functional testing should also be done during testing but is not part of the current post. A more interesting scenario is to run fully assembled or partially mocked application in memory, without deployment and run tests against it. This approach has benefits, e.g. since the application is run locally its response time is very low, which speeds up tests; some parts, like database connection, can be mocked and thus speed up tests. .NET Core Test Host is a tool that can host web or API .NET Core applications serving requests and responses. It eliminates the need for having a testing environment.

Add dependencies

In order to use test host dependency to its NuGet package should be added. Navigate to test/SampleDotNetCore2RestStub.Integration.Test and add a dependency:

dotnet add package Microsoft.AspNetCore.TestHost

SampleDotNetCore2RestStub.Integration.Test project should depend on SampleDotNetCore2RestStub in order to use its code. This is done with:

dotnet add reference ../../src/SampleDotNetCore2RestStub/SampleDotNetCore2RestStub.csproj

Create the first test

Existing UnitTest1 class will be changed to start application inside test host and make a request.

using System.Net.Http;
using System.Threading.Tasks;
using Microsoft.AspNetCore.Hosting;
using Microsoft.AspNetCore.TestHost;
using Microsoft.VisualStudio.TestTools.UnitTesting;
using Newtonsoft.Json;
using SampleDotNetCore2RestStub.Models;

namespace SampleDotNetCore2RestStub.Integration.Test
{
	[TestClass]
	public class PersonsTest
	{
		private TestServer _server;
		private HttpClient _client;

		[TestInitialize]
		public void TestInitialize()
		{
			_server = new TestServer(new WebHostBuilder()
				.UseStartup<Startup>());
			_client = _server.CreateClient();
		}

		[TestMethod]
		public async Task GetPerson()
		{
			var response = await _client.GetAsync("/person/get/1");
			response.EnsureSuccessStatusCode();

			var result = await response.Content.ReadAsStringAsync();
			var person = JsonConvert.DeserializeObject<Person>(result);

			Assert.AreEqual("LN1", person.LastName);
		}
	}
}

TestServer uses an instance of IWebHostBuilder. Startup from UseStartup<Startup> is same class that is used to run the application, but here it is run inside TestServer instance. CreateClient() method returns instance of standard HttpClient, with which request to /person/get/1 endpoint is made. EnsureSuccessStatusCode() throws exception if response code is not inside 200-299 range. The response is then taken as a string and deserialized to Person object with Newtonsoft.Json, which is now part of .NET Core.

Test can be run from test\SampleDotNetCore2RestStub.Integration.Test folder with the command: dotnet test. If you type dotnet test from root folder it will search for tests inside all projects.

Debug tests in Visual Studio Code

Before proceeding any further with the code it should be possible to debug unit tests inside VS Code. It is not as easy as with VS 2017, but still manageable. First, you need to run your test from the command prompt in debug mode:

set VSTEST_HOST_DEBUG=1
dotnet test

Once this is done there is a message with specific process ID:

Starting test execution, please wait...
Host debugging is enabled. Please attach debugger to testhost process to continue.
Process Id: 16032, Name: dotnet

Now from Visual Studio Code, you have to attach to given process, 16032 in the current example. This is done from Debug View, then select .Net Core Attach launch configuration. If such is not existing, add it. Running this configuration shows a list of all processes with name dotnet. Select the proper one, 16032 in the current example.

Create PersonServiceClient and BaseTest

Tests should be easy to write, read and maintain, thus PersonServiceClient class is created. It exposes methods that hit the endpoints and return the result. Since testing is not only happy path, it should be possible to have some negative scenarios. You may want to hit the API with invalid data and verify it returns BadRequest (400) HTTP response code, or Unauthorized (401) HTTP response code, etc. In order to fulfill this test requirement, a separate class ApiResponse<T> is created. It stores response code along with response content as a string. In case that response string can be deserialized to an object of given generic type T it is also stored in ApiResponse object.

Client is instantiated as a protected variable in BaseTest constructor. PersonsTest extends BaseTest and has access to PersonServiceClient.

ApiResponse

using System.Net;

namespace SampleDotNetCore2RestStub.Integration.Test.Client
{
	public class ApiResponse<T>
	{
		public HttpStatusCode StatusCode { get; set; }
		public T Result { get; set; }
		public string ResultAsString { get; set; }
	}
}

PersonServiceClient

using System;
using System.Collections.Generic;
using System.Net.Http;
using System.Threading.Tasks;
using Newtonsoft.Json;
using SampleDotNetCore2RestStub.Models;

namespace SampleDotNetCore2RestStub.Integration.Test.Client
{
	public class PersonServiceClient
	{
		private readonly HttpClient _httpClient;

		public PersonServiceClient(HttpClient httpClient)
		{
			_httpClient = httpClient;
		}

		public async Task<ApiResponse<Person>> GetPerson(string id)
		{
			var person = await GetAsync<Person>($"/person/get/{id}");
			return person;
		}

		public async Task<ApiResponse<List<Person>>> GetPersons()
		{
			var persons = await GetAsync<List<Person>>("/person/all");
			return persons;
		}

		public async Task<ApiResponse<string>> Version()
		{
			var version = await GetAsync<string>("api/version");
			return version;
		}

		private async Task<ApiResponse<T>> GetAsync<T>(string path)
		{
			var response = await _httpClient.GetAsync(path);
			var value = await response.Content.ReadAsStringAsync();
			var result = new ApiResponse<T>
			{
				StatusCode = response.StatusCode,
				ResultAsString = value
			};

			try
			{
				result.Result = JsonConvert.DeserializeObject<T>(value);
			}
			catch (Exception)
			{
				// Nothing to do
			}

			return result;
		}
	}
}

BaseTest

using System.Net.Http;
using Microsoft.AspNetCore.Hosting;
using Microsoft.AspNetCore.TestHost;
using Microsoft.VisualStudio.TestTools.UnitTesting;
using SampleDotNetCore2RestStub.Integration.Test.Client;

namespace SampleDotNetCore2RestStub.Integration.Test
{
	public abstract class BaseTest
	{
		protected PersonServiceClient PersonServiceClient;

		public BaseTest()
		{
			var server = new TestServer(new WebHostBuilder()
				.UseStartup<Startup>());
			var httpClient = server.CreateClient();
			PersonServiceClient = new PersonServiceClient(httpClient);
		}
	}
}

PersonsTest

using System.Net;
using System.Net.Http;
using System.Threading.Tasks;
using Microsoft.AspNetCore.Hosting;
using Microsoft.AspNetCore.TestHost;
using Microsoft.VisualStudio.TestTools.UnitTesting;
using Newtonsoft.Json;
using SampleDotNetCore2RestStub.Models;

namespace SampleDotNetCore2RestStub.Integration.Test
{
	[TestClass]
	public class PersonsTest : BaseTest
	{
		[TestMethod]
		public async Task GetPerson()
		{
			var response = await PersonServiceClient.GetPerson("1");

			Assert.AreEqual(HttpStatusCode.OK, response.StatusCode);
			Assert.AreEqual("LN1", response.Result.LastName);
		}

		[TestMethod]
		public async Task GetPersons()
		{
			var response = await PersonServiceClient.GetPersons();

			Assert.AreEqual(HttpStatusCode.OK, response.StatusCode);
			Assert.AreEqual(4, response.Result.Count);
			Assert.AreEqual("LN1", response.Result[0].LastName);
		}
    }
}

Stub the database

So far there is integration test that starts the application with its actual external dependencies and makes requests against it. Current API service does not connect to a real database, because this will make running the API harder. Instead, there is a fake PersonRepository which stores data in memory. In reality, the repository will connect to a database with a given connection string in appsettings.json, and will perform CRUD operations on it. Database operations might slow down the application response time, or test might not have full control over data in the database, which makes testing harder. In order to solve those two issues database can be stubbed to serve test data. Actually, anything that is not convenient can be stubbed with the examples given below.

In order to make stubbing possible and to keep application structure intact Startup has to be changed. Registering PersonRepository to .NET Core IoC container is extracted to separate virtual method that can be overridden later. All dependencies that are to be stubbed or mocked can be extracted to such methods. Then StartupStub overrides this method and registers stubbed repository PersonRepositoryStub. In it all database operations are substituted with an in-memory equivalence, hence skipping database calls. It might not be a full and accurate substitution, as long as it serves your testing purpose. After all this PersonRepositoryStub will be used only for testing. BaseTest should be changed to start the application with StartupStub instead of Statup. Finally, PersonsTest should be changed to assert on new data that is configured in PersonRepositoryStub.

Startup

public void ConfigureServices(IServiceCollection services)
{
	services.AddMvc();
	services.Configure<AppConfig>(Configuration);
	services.AddScoped<AuthenticationFilterAttribute>();

	ConfigureRepositories(services);
}

public virtual void ConfigureRepositories(IServiceCollection services)
{
	services.AddSingleton<IPersonRepository, PersonRepository>();
}

StartupStub

using Microsoft.Extensions.DependencyInjection;
using SampleDotNetCore2RestStub.Repositories;

namespace SampleDotNetCore2RestStub.Integration.Test.Mocks
{
	public class StartupStub : Startup
	{
		public override void ConfigureRepositories(IServiceCollection services)
		{
			services.AddSingleton<IPersonRepository, PersonRepositoryStub>();
		}
	}
}

PersonRepositoryStub

using System.Collections.Generic;
using System.Linq;
using SampleDotNetCore2RestStub.Models;
using SampleDotNetCore2RestStub.Repositories;

namespace SampleDotNetCore2RestStub.Integration.Test.Mocks
{
	public class PersonRepositoryStub : IPersonRepository
	{
		private Dictionary<int, Person> _persons 
					= new Dictionary<int, Person>();

		public PersonRepositoryStub()
		{
			_persons.Add(1, new Person
			{
				Id = 1,
				FirstName = "Stubed FN1",
				LastName = "Stubed LN1",
				Email = "stubed.email1@email.na"
			});
		}

		public Person GetById(int id)
		{
			return _persons[id];
		}

		public List<Person> GetAll()
		{
			return _persons.Values.ToList();
		}

		public int GetCount()
		{
			return _persons.Count();
		}

		public void Remove()
		{
			if (_persons.Keys.Any())
			{
				_persons.Remove(_persons.Keys.Last());
			}
		}

		public string Save(Person person)
		{
			if (_persons.ContainsKey(person.Id))
			{
				_persons[person.Id] = person;
				return "Updated Person with id=" + person.Id;
			}
			else
			{
				_persons.Add(person.Id, person);
				return "Added Person with id=" + person.Id;
			}
		}
	}
}

BaseTest

using System.Net.Http;
using Microsoft.AspNetCore.Hosting;
using Microsoft.AspNetCore.TestHost;
using Microsoft.VisualStudio.TestTools.UnitTesting;
using SampleDotNetCore2RestStub.Integration.Test.Client;
using SampleDotNetCore2RestStub.Integration.Test.Mocks;

namespace SampleDotNetCore2RestStub.Integration.Test
{
	public abstract class BaseTest
	{
		protected PersonServiceClient PersonServiceClient;

		public BaseTest()
		{
			var server = new TestServer(new WebHostBuilder()
				.UseStartup<StartupStub>());
			var httpClient = server.CreateClient();
			PersonServiceClient = new PersonServiceClient(httpClient);
		}
	}
}

PersonsTest

using System.Net;
using System.Net.Http;
using System.Threading.Tasks;
using Microsoft.AspNetCore.Hosting;
using Microsoft.AspNetCore.TestHost;
using Microsoft.VisualStudio.TestTools.UnitTesting;
using Newtonsoft.Json;
using SampleDotNetCore2RestStub.Models;

namespace SampleDotNetCore2RestStub.Integration.Test
{
	[TestClass]
	public class PersonsTest : BaseTest
	{
		[TestMethod]
		public async Task GetPerson()
		{
			var response = await PersonServiceClient.GetPerson("1");

			Assert.AreEqual(HttpStatusCode.OK, response.StatusCode);
			Assert.AreEqual("Stubed LN1", response.Result.LastName);
		}

		[TestMethod]
		public async Task GetPersons()
		{
			var response = await PersonServiceClient.GetPersons();

			Assert.AreEqual(HttpStatusCode.OK, response.StatusCode);
			Assert.AreEqual(1, response.Result.Count);
			Assert.AreEqual("Stubed LN1", response.Result[0].LastName);
		}
	}
}

Mock the database

Stubbing is an option, but mocking is much better as you have direct control over the mock itself. The most famous .NET mocking framework is Moq. It is added to the project with the command:

dotnet add package Moq

StartupMock extends Starup and overrides its ConfigureRepositories. It registers an instance of IPersonRepository which is injected by its constructor. BaseTest is changed to use StartupMock in UseStartup method. Repository mock is instantiated with PersonRepositoryMock = new Mock<IPersonRepository>(). It is injected into StartupMock constructor with ConfigureServices(services => services.AddSingleton(PersonRepositoryMock.Object)). This is how mock instance is registered into IoC container of .NET Core application that is being tested. Once the mock instance is registered it can be controlled. In BaseTest it is reset to defaults after each test with BaseTearDown method. It is run after each test because of [TestCleanup] MSTest attribute. Inside, the PersonRepositoryMock.Reset() resets mock state.

Test specific setup can be done for each test. For e.g. GetPerson_ReturnsCorrectResult has following setup: PersonRepositoryMock.Setup(x => x.GetById(It.IsAny<int>())).Returns(_person); That means when mock’s GetById method is called with whatever int value the _person object is returned. Another example is GetPerson_ThrowsException test. When mock’s GetById is called then InvalidOperationException is thrown. In this way, you can test exception handling, which in current demo application is missing. The exception is not that easy to reproduce if you are using repository stubbing.

StartupMock

using Microsoft.Extensions.DependencyInjection;
using SampleDotNetCore2RestStub.Repositories;

namespace SampleDotNetCore2RestStub.Integration.Test.Mocks
{
	public class StartupMock : Startup
	{
		private IPersonRepository _personRepository;
		
		public StartupMock(IPersonRepository personRepository)
		{
			_personRepository = personRepository;
		}

		public override void ConfigureRepositories(IServiceCollection services)
		{
			services.AddSingleton(_personRepository);
		}
	}
}

BaseTest

using System.Net.Http;
using Microsoft.AspNetCore.Hosting;
using Microsoft.AspNetCore.TestHost;
using Microsoft.VisualStudio.TestTools.UnitTesting;
using Microsoft.Extensions.DependencyInjection;
using Moq;
using SampleDotNetCore2RestStub.Integration.Test.Client;
using SampleDotNetCore2RestStub.Integration.Test.Mocks;
using SampleDotNetCore2RestStub.Repositories;

namespace SampleDotNetCore2RestStub.Integration.Test
{
	public abstract class BaseTest
	{
		protected PersonServiceClient PersonServiceClient;
		protected Mock<IPersonRepository> PersonRepositoryMock;

		public BaseTest()
		{
			PersonRepositoryMock = new Mock<IPersonRepository>();

			var server = new TestServer(new WebHostBuilder()
				.UseStartup<StartupMock>()
				.ConfigureServices(services =>
				{
					services.AddSingleton(PersonRepositoryMock.Object);
				}));

			var httpClient = server.CreateClient();
			PersonServiceClient = new PersonServiceClient(httpClient);
		}

		[TestCleanup]
		public void BaseTearDown()
		{
			PersonRepositoryMock.Reset();
		}
	}
}

PersonsTest

using System;
using System.Collections.Generic;
using System.Net;
using System.Net.Http;
using System.Threading.Tasks;
using Microsoft.AspNetCore.Hosting;
using Microsoft.AspNetCore.TestHost;
using Microsoft.VisualStudio.TestTools.UnitTesting;
using Moq;
using Newtonsoft.Json;
using SampleDotNetCore2RestStub.Models;

namespace SampleDotNetCore2RestStub.Integration.Test
{
	[TestClass]
	public class PersonsTest : BaseTest
	{
		private readonly Person _person = new Person
		{
			Id = 1,
			FirstName = "Mocked FN1",
			LastName = "Mocked LN1",
			Email = "mocked.email1@email.na"
		};

		[TestMethod]
		public async Task GetPerson_ReturnsCorrectResult()
		{
			PersonRepositoryMock.Setup(x => x.GetById(It.IsAny<int>()))
				.Returns(_person);

			var response = await PersonServiceClient.GetPerson("1");

			Assert.AreEqual(HttpStatusCode.OK, response.StatusCode);
			Assert.AreEqual("Mocked LN1", response.Result.LastName);
		}

		[TestMethod]
		[ExpectedException(typeof(InvalidOperationException))]
		public async Task GetPerson_ThrowsException()
		{
			PersonRepositoryMock.Setup(x => x.GetById(It.IsAny<int>()))
				.Throws(new InvalidOperationException());

			var result = await PersonServiceClient.GetPerson("1");
		}

		[TestMethod]
		public async Task GetPersons()
		{
			PersonRepositoryMock.Setup(x => x.GetAll())
				.Returns(new List<Person> { _person });

			var response = await PersonServiceClient.GetPersons();

			Assert.AreEqual(HttpStatusCode.OK, response.StatusCode);
			Assert.AreEqual(1, response.Result.Count);
			Assert.AreEqual("Mocked LN1", response.Result[0].LastName);
		}
	}
}

Nicer database mock

As of version 2.1.0 of Microsoft.AspNetCore.TestHost, which is currently in pre-release, there is a method called ConfigureTestServices, which saves us from having separate StartupMock class. You can directly inject your mocks with following code:

var server = new TestServer(new WebHostBuilder()
	.UseStartup<Startup>()
	.ConfigureTestServices(services =>
	{
		services.AddSingleton(PersonRepositoryMock.Object);
	}));

Conclusion

In the current post, I have shown how to do integration testing on .NET Core applications. This is a very convenient approach which eliminates some of the disadvantages of stubbing or mocking all dependencies in unit testing. Because of using all dependencies, integration testing can be much slower. This can be improved by mocking some of them. Integration testing is not a substitute for unit testing, nor for functional testing, but it is a good approach in you testing portfolio that should be considered.

Related Posts

Read more...