Post summary: Code examples how to create RESTful API with .NET Core 2.0 and then run it on Docker Linux container.
Code below can be found in GitHub SampleDotNetCore2RestStub repository. In the current post is shown a sample application that can be a very good foundation for a real production application. This project can be easily used as a template for real API service.
Microsoft and open source
I was doing Java for about 2 years and got back to .NET six months ago. Recently we had to do a project in .NET Core 2.0, a technology I haven’t heard of before. I was truly amazed how much open source Microsoft had begun. .NET now can be developed and even run on Linux. This definitely makes it really competitive to Java which advantage was multi-platform ability. Another benefit is that documentation is very extensive and there is a huge community out there that makes solving issues really fast and easy.
.NET Core
In short .NET Core is a cross-platform development platform supporting Windows, macOS, and Linux, and can be used in device, cloud, and embedded/IoT scenarios. It is maintained by Microsoft and the .NET community on GitHub. More can be read on .NET Core Guide.
.NET Core 2.0
The special thing about .NET Core 2.0 is the implementation of .NET Standard 2.0. This makes it possible to use almost 70% of already existing NuGet packages, which is a big step forward and eases development of .NET applications because of reusability.
Create simple .NET Core project
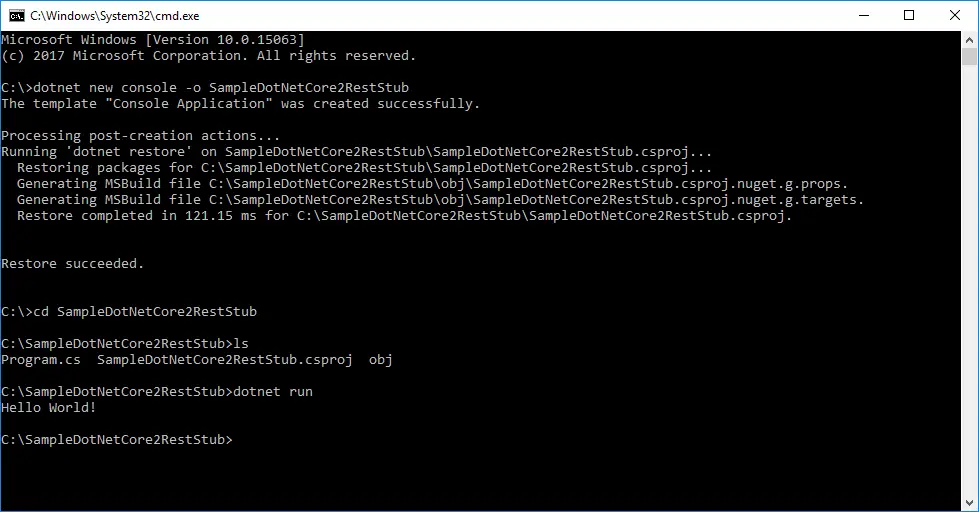
Making default .NET Core console application is really simple:
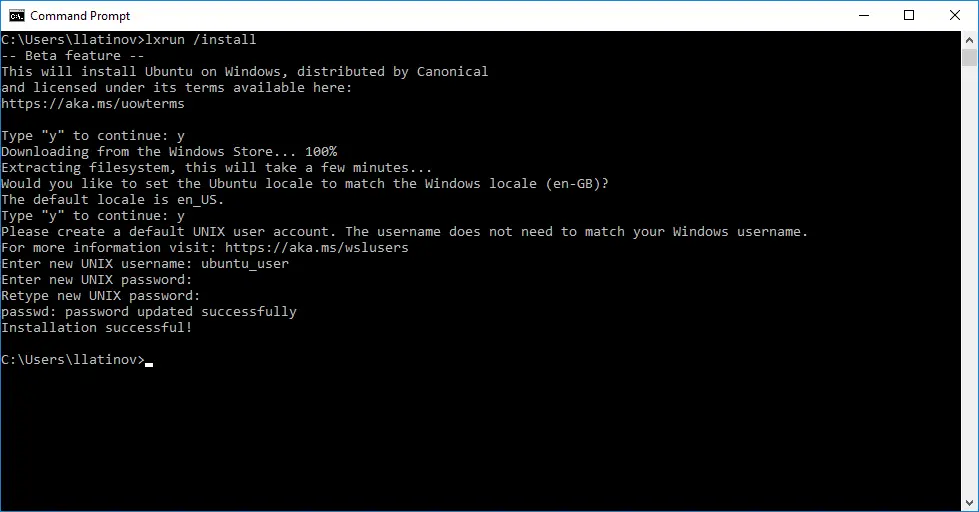
- Download and install .NET Core SDK. For Windows and MacOS there are installers available. For Linux it depends on distribution used, see more at .NET Core Linux installation guide.
- Create an application with following command: dotnet new console -o ProjectName. Option -o specifies the output folder to be created which also becomes the project name. If -o is omitted then the project will be created in the current folder with current folder’s name.
- Run the newly created application with: dotnet run.
Using Visual Studio Code
Once the project is created it can be developed in any text editor. Most convenient is Visual Studio 2017 because it provides lots of tools that make development very fast and efficient. In this tutorial, I will be using Visual Studio Code – open-source multi-platform editor maintained by Microsoft. I admit it is much harder that Visual Studio 2017 but is free and multi-platform. Once project folder is imported, hitting Ctrl+F5 runs the project.

ASP.NET Core MVC
ASP.NET Core MVC provides features to build web APIs or web UIs. It has to be used in order to continue with the current example. Dependency to its NuGet package is added with the following command:
dotnet add package Microsoft.AspNetCore
dotnet add package Microsoft.AspNetCore.All
Create REST API
After project structure is done it is time to add classes needed to make the REST API. Functionality is very similar to one described in Build a RESTful stub server with Dropwizard post. There is a Person API which can retrieve, save or delete persons. They are kept in an in-memory data structure which mimics DB layer. Following classes are needed:
- PersonController – a controller that exposes the API endpoints. By extending Controller class the runtime makes all endpoints available as long as they have proper routing. In current example routing is done inside action attributes [HttpGet(“person/get/{id}”)]. There are different routing options described in this extensive documentation Routing to Controller Actions. Adding of person is done with POST: [HttpPost(“person/save”)]. The important bit here is [FromBody] attribute which takes HTTP body and deserializes it to a Person object.
- Person – this is data model class with properties.
- PersonRepository – in-memory DB abstraction that keeps the data in a Dictionary. In reality, there will be DB layer responsible for managing data.
- Startup – class with services configuration. Both ConfigureServices and Configure methods are called behind the scenes from the runtime. Any configurations needed goes to those two methods. Current configuration adds MVC to services and instructs the application to use it. This is not really Model View Controller pattern, but this is what is needed to enable controllers and get API running.
- Program – main program entry point where web host is built and started. It uses Startup.cs to run the configurations. More details on WebHost can be found in Hosting in ASP.NET Core. This article also shows how the external configuration is managed, something that will be presented later in the current post.
PersonController
using System.Collections.Generic;
using System.Linq;
using Microsoft.AspNetCore.Mvc;
using SampleDotNetCore2RestStub.Models;
using SampleDotNetCore2RestStub.Repositories;

namespace SampleDotNetCore2RestStub.Controllers
{
	public class PersonController : Controller
	{
		[HttpGet("person/get/{id}")]
		public Person GetPerson(int id)
		{
			return PersonRepository.GetById(id);
		}

		[HttpGet("person/remove")]
		public string RemovePerson()
		{
			PersonRepository.Remove();
			return "Last person remove. Total count: "
						+ PersonRepository.GetCount();
		}

		[HttpGet("person/all")]
		public List<Person> GetPersons()
		{
			return PersonRepository.GetAll();
		}

		[HttpPost("person/save")]
		public string AddPerson([FromBody]Person person)
		{
			return PersonRepository.Save(person);
		}
	}
}
Person
namespace SampleDotNetCore2RestStub.Models
{
	public class Person
	{
		public int Id { get; set; }
		public string FirstName { get; set; }
		public string LastName { get; set; }
		public string Email { get; set; }
	}
}
PersonRepository
using System.Collections.Generic;
using System.Linq;
using SampleDotNetCore2RestStub.Models;

namespace SampleDotNetCore2RestStub.Repositories
{
	public class PersonRepository
	{
		private static Dictionary<int, Person> PERSONS
								= new Dictionary<int, Person>();

		static PersonRepository()
		{
			PERSONS.Add(1, new Person
			{
				Id = 1,
				FirstName = "FN1",
				LastName = "LN1",
				Email = "email1@email.na"
			});
			PERSONS.Add(2, new Person
			{
				Id = 2,
				FirstName = "FN2",
				LastName = "LN2",
				Email = "email2@email.na"
			});
		}

		public static Person GetById(int id)
		{
			return PERSONS[id];
		}

		public static List<Person> GetAll()
		{
			return PERSONS.Values.ToList();
		}

		public static int GetCount()
		{
			return PERSONS.Count();
		}

		public static void Remove()
		{
			if (PERSONS.Keys.Any())
			{
				PERSONS.Remove(PERSONS.Keys.Last());
			}
		}

		public static string Save(Person person)
		{
			var result = "";
			if (PERSONS.ContainsKey(person.Id))
			{
				result = "Updated Person with id=" + person.Id;
			}
			else
			{
				result = "Added Person with id=" + person.Id;
			}
			PERSONS.Add(person.Id, person);
			return result;
		}
	}
}
Startup
using Microsoft.Extensions.Configuration;
using Microsoft.Extensions.DependencyInjection;
using Microsoft.AspNetCore.Hosting;
using Microsoft.AspNetCore.Builder;

namespace SampleDotNetCore2RestStub
{
	public class Startup
	{
		public Startup(IConfiguration configuration)
		{
			Configuration = configuration;
		}

		public IConfiguration Configuration { get; }

		public void ConfigureServices(IServiceCollection services)
		{
			services.AddMvc();
		}

		public void Configure(IApplicationBuilder app,
					IHostingEnvironment env)
		{
			app.UseMvc();
		}
	}
}
Program
using System;
using Microsoft.AspNetCore;
using Microsoft.AspNetCore.Hosting;

namespace SampleDotNetCore2RestStub
{
	public class Program
	{
		public static void Main(string[] args)
		{
			BuildWebHost(args).Run();
		}

		public static IWebHost BuildWebHost(string[] args) =>
			WebHost.CreateDefaultBuilder(args)
				.UseStartup<Startup>()
				.Build();
	}
}
External configuration
Service so far is pretty much useless as it does not give an opportunity for external configurations. Adding external configuration consist of adding and changing following files:
-
- VersionController – controller to actually show full working configuration. Routing in this controller is handled by [Route(“api/[controller]”)]. This exposes /api/version endpoint because [controller] is a template that stands for controller name. Controller constructor takes IOptions object and extracts Value out of it. Actual object value is injected in Startup.cs.
- appsettings.json – JSON file with application configurations.
- AppConfig – data model class that represents JSON configuration as an object.
- Startup – change is needed to read file appsettings.json and bind it to AppConfig object. Configuration is read with: var configurationBuilder = new ConfigurationBuilder().AddJsonFile(“appsettings.json”, false, true) then it is saved internally with Configuration = configurationBuilder.Build(). JSON configuration is bound to a AppConfig object with following line: services.Configure<AppConfig>(Configuration).
- SampleDotNetCore2RestStub.csproj – change is needed in the project file to instruct build process to copy appsettings.json to the output folder. This is where VS 2017 makes it much easier as it exposes property config to change, with VS Code you have to edit the csproj XML.
VersionController
using Microsoft.AspNetCore.Mvc;
using Microsoft.Extensions.Options;

namespace SampleDotNetCore2RestStub.Controllers
{
	[Route("api/[controller]")]
	public class VersionController : Controller
	{
		private readonly AppConfig _config;

		public VersionController(IOptions<AppConfig> options)
		{
			_config = options.Value;
		}

		[HttpGet]
		public string Version()
		{
			return _config.Version;
		}
	}
}
appsettings.json
{
	"Version": "1.0"
}
AppConfig
namespace SampleDotNetCore2RestStub
{
	public class AppConfig
	{
		public string Version { get; set; }
	}
}
Startup
using Microsoft.Extensions.Configuration;
using Microsoft.Extensions.DependencyInjection;
using Microsoft.AspNetCore.Hosting;
using Microsoft.AspNetCore.Builder;

namespace SampleDotNetCore2RestStub
{
	public class Startup
	{
		public Startup()
		{
			var configurationBuilder = new ConfigurationBuilder()
				.AddJsonFile("appsettings.json", false, true);

			Configuration = configurationBuilder.Build();
		}

		public IConfiguration Configuration { get; }

		public void ConfigureServices(IServiceCollection services)
		{
			services.AddMvc();
			services.Configure<AppConfig>(Configuration);
		}

		public void Configure(IApplicationBuilder app,
					IHostingEnvironment env)
		{
			app.UseMvc();
		}
	}
}
csproj
<ItemGroup>
	<None Include="appsettings.json" CopyToOutputDirectory="Always" />
</ItemGroup>
Request filtering
An almost mandatory feature is to have some kind of filtering on the request. The current example will provide a very basic implementation of authentication filter achieved with an attribute. Following files are needed:
- SecurePersonController – controller that demonstrates filtering. The controller is no more different than other discussed above. Important bit is [ServiceFilter(typeof(AuthenticationFilterAttribute))] which assigns AuthenticationFilterAttribute to current controller.
- AuthenticationFilterAttribute – very basic implementation to illustrate how it works. Request headers are extracted from HttpContext and are checked for the existence of Authorization. If not found Exception is thrown. In next section, I will show how to handle this exception more gracefully.
- Startup – AuthenticationFilterAttribute is registered to runtime with: services.AddScoped<AuthenticationFilterAttribute>(). .NET Core dependency injection mechanism is used here, which I have described it in more details in separate section below.
SecurePersonController
using System.Collections.Generic;
using Microsoft.AspNetCore.Mvc;
using SampleDotNetCore2RestStub.Attributes;
using SampleDotNetCore2RestStub.Models;
using SampleDotNetCore2RestStub.Repositories;

namespace SampleDotNetCore2RestStub.Controllers
{
	[ServiceFilter(typeof(AuthenticationFilterAttribute))]
	public class SecurePersonController : Controller
	{
		[HttpGet("secure/person/all")]
		public List<Person> GetPersons()
		{
			return PersonRepository.GetAll();
		}
	}
}
AuthenticationFilterAttribute
using System;
using System.Linq;
using Microsoft.AspNetCore.Mvc.Filters;

namespace SampleDotNetCore2RestStub.Attributes
{
	public class AuthenticationFilterAttribute : ActionFilterAttribute
	{
		public override void OnActionExecuting(ActionExecutingContext ctx)
		{
			string authKey = ctx.HttpContext.Request
					.Headers["Authorization"].SingleOrDefault();

			if (string.IsNullOrWhiteSpace(authKey))
				throw new Exception();
		}
	}
}
Startup
public void ConfigureServices(IServiceCollection services)
{
	services.AddMvc();
	services.Configure<AppConfig>(Configuration);
	services.AddScoped<AuthenticationFilterAttribute>();
}
If endpoint /secure/person/all is queried without Authorization header there is 500 Internal Server Error response from the application. If Authorization header is present with any value all persons are retrieved.
Middleware
Middleware is a software that is assembled into an application pipeline to handle requests and responses. Each component chooses whether to pass the request to the next component in the pipeline or perform work before that. More on middleware can be found in ASP.NET Core Middleware Fundamentals. In current example middleware is used to handle better exceptions. In the previous point, AuthenticationFilterAttribute was throwing an exception which was transformed to 500 Internal Server Error which is not pretty. In case of not authorized application should return 401 Unauthorized. In order to do this following files are needed:
- HttpException – a custom exception which then will be caught and processed in HttpExceptionMiddleware.
- HttpExceptionMiddleware – this is where handling happens. Code checks for custom HttpException and if such is thrown pipeline changes HttpContext.Response object with proper values.
- AuthenticationFilterAttribute – instead of Exception filter attribute throws new
HttpException(HttpStatusCode.Unauthorized). This way middleware will get invoked.
- Startup – middleware get registered here with app.UseMiddleware<HttpExceptionMiddleware>(). It is extremely important that this stands before app.UseMvc() otherwise it will not work.
HttpException
using System;
using System.Net;

namespace SampleDotNetCore2RestStub.Exceptions
{
	public class HttpException : Exception
	{
		public int StatusCode { get; }

		public HttpException(HttpStatusCode httpStatusCode)
			: base(httpStatusCode.ToString())
		{
			this.StatusCode = (int)httpStatusCode;
		}
	}
}
HttpExceptionMiddleware
using System.Threading.Tasks;
using Microsoft.AspNetCore.Http;
using Microsoft.AspNetCore.Http.Features;
using SampleDotNetCore2RestStub.Exceptions;

namespace SampleDotNetCore2RestStub.Middleware
{
	public class HttpExceptionMiddleware
	{
		private readonly RequestDelegate _next;

		public HttpExceptionMiddleware(RequestDelegate next)
		{
			_next = next;
		}

		public async Task Invoke(HttpContext context)
		{
			try
			{
				await _next.Invoke(context);
			}
			catch (HttpException httpException)
			{
				context.Response.StatusCode = httpException.StatusCode;
				var feature = context.Features.Get<IHttpResponseFeature>();
				feature.ReasonPhrase = httpException.Message;
			}
		}
	}
}
AuthenticationFilterAttribute
public override void OnActionExecuting(ActionExecutingContext context)
{
	string authKey = context.HttpContext.Request
			.Headers["Authorization"].SingleOrDefault();

	if (string.IsNullOrWhiteSpace(authKey))
		throw new HttpException(HttpStatusCode.Unauthorized);
}
Startup
public void Configure(IApplicationBuilder app, IHostingEnvironment env)
{
	app.UseMiddleware<HttpExceptionMiddleware>();
	app.UseMvc();
}
Dependency Injection
So far there is running service with basic functionality. It is missing very important bit though, something that should have been considered and added earlier. Actually, it was added but only when registering AuthenticationFilterAttribute, but here I will go into more details. Dependency injection (DI) is a technique for achieving loose coupling between objects and their dependencies. Rather than directly instantiating an object or using static references, the objects a class needs are provided to the class in some fashion. ASP.NET Core provides its own dependency injection mechanisms, read more on Introduction to Dependency Injection in ASP.NET Core. The code will now get refactored to match this pattern.
- IPersonRepository – all database operations are declared in this interface.
- PersonRepository – implements all methods of IPersonRepository interface. It still does not have real interaction with the database, data is kept in a dictionary. Refactor is that all static methods are removed. In order to use this class, you need an instance of it. Sample data is populated on object creation in its constructor.
- SecurePersonController – an instance of an implementation of IPersonRepository is passed through the constructor and is used internally. By using interfaces a level of abstraction is achieved, where multiple implementations may be used for the same interface.
- PersonController – same as SecurePersonController.
- Startup – this is where DI is used to register that PersonRepository is the implementation of IPersonRepository: services.AddSingleton<IPersonRepository, PersonRepository>().
Three different object life scopes are available in .NET Core DI. It is important to know the difference in order to use them properly. If object creation is expensive operation misuse of proper DI lifetime scope might be crucial for performance:
- AddSingleton – only one instance is created for the whole application. In the example above PersonRepository needed to have one instance because sample data is initialized in the constructor.
- AddScoped – one instance is created per HTTP request scope.
- AddTransient – instance is created every time it is needed. Let us say there are 3 places where an object is needed and an HTTP request is coming to the application. AddTransient will create 3 different objects, while AddScoped will create just one that will be used for current HTTP request scope.
IPersonRepository
using System.Collections.Generic;
using SampleDotNetCore2RestStub.Models;

namespace SampleDotNetCore2RestStub.Repositories
{
	public interface IPersonRepository
	{
		Person GetById(int id);
		List<Person> GetAll();
		int GetCount();
		void Remove();
		string Save(Person person);
	}
}
PersonRepository
using System.Collections.Generic;
using System.Linq;
using SampleDotNetCore2RestStub.Models;

namespace SampleDotNetCore2RestStub.Repositories
{
	public class PersonRepository : IPersonRepository
	{
		private Dictionary<int, Person> _persons
						= new Dictionary<int, Person>();

		public PersonRepository()
		{
			_persons .Add(1, new Person
			{
				Id = 1,
				FirstName = "FN1",
				LastName = "LN1",
				Email = "email1@email.na"
			});
			_persons .Add(2, new Person
			{
				Id = 2,
				FirstName = "FN2",
				LastName = "LN2",
				Email = "email2@email.na"
			});
		}

		public Person GetById(int id)
		{
			return _persons[id];
		}

		public List<Person> GetAll()
		{
			return _persons.Values.ToList();
		}

		public int GetCount()
		{
			return _persons.Count();
		}

		public void Remove()
		{
			if (_persons.Keys.Any())
			{
				_persons.Remove(_persons.Keys.Last());
			}
		}

		public string Save(Person person)
		{
			if (_persons.ContainsKey(person.Id))
			{
				_persons[person.Id] = person;
				return "Updated Person with id=" + person.Id;
			}
			else
			{
				_persons.Add(person.Id, person);
				return "Added Person with id=" + person.Id;
			}
		}
	}
}
SecurePersonController
using System.Collections.Generic;
using Microsoft.AspNetCore.Mvc;
using SampleDotNetCore2RestStub.Attributes;
using SampleDotNetCore2RestStub.Models;
using SampleDotNetCore2RestStub.Repositories;

namespace SampleDotNetCore2RestStub.Controllers
{
	[ServiceFilter(typeof(AuthenticationFilterAttribute))]
	public class SecurePersonController : Controller
	{
		private readonly IPersonRepository _personRepository;

		public SecurePersonController(IPersonRepository personRepository)
		{
			_personRepository = personRepository;
		}

		[HttpGet("secure/person/all")]
		public List<Person> GetPersons()
		{
			return _personRepository.GetAll();
		}
	}
}
Startup
public void ConfigureServices(IServiceCollection services)
{
	services.AddMvc();
	services.Configure<AppConfig>(Configuration);
	services.AddScoped<AuthenticationFilterAttribute>();
	services.AddSingleton<IPersonRepository, PersonRepository>();
}
Docker file
Docker file that packs application is shown below:
FROM microsoft/dotnet:2.0-sdk
COPY pub/ /root/
WORKDIR /root/
ENV ASPNETCORE_URLS="http://*:80"
EXPOSE 80/tcp
ENTRYPOINT ["dotnet", "SampleDotNetCore2RestStub.dll"]
Docker container that is used is microsoft/dotnet:2.0-sdk. Everything from pub folder is copied to container root folder. ASPNETCORE_URLS is used to set the URLs that the server listens on by default. Current config runs and exposes application at port 80 in the container. With ENTRYPOINT is configured the command that is run when the container is started.
Build, package and run Docker
The application is built and published in Release mode into pub folder with the following command:
dotnet publish --configuration=Release -o pub
Docker container is packaged with tag netcore-rest with the following command:
docker build . -t netcore-rest
Docker container is run with exposing port 80 from the container to port 9000 on the host with the following command:
docker run -e Version=1.1 -p 9000:80 netcore-rest
Notice the -e Version=1.1 which sets an environment variable to be used inside the container. The intention is to use this variable in application. This can be enabled by modifying Startup.cs file by adding AddEnvironmentVariables():
public Startup()
{
	var configurationBuilder = new ConfigurationBuilder()
		.AddJsonFile("appsettings.json", optional: false, reloadOnChange: true)
		.AddEnvironmentVariables();

	Configuration = configurationBuilder.Build();
}
If invoked now /api/version returns 1.1.
Docker optimisation
When the container with microsoft/dotnet:2.0-sdk is packed it gets to a size of 1.7GB which is quite a lot. There is much leaner container image: microsoft/dotnet:2.0-runtime, but it requires all runtime assemblies to be present in pub folder. This can be done by changing the csproj file by adding PublishWithAspNetCoreTargetManifest = false:
<PropertyGroup>
	<OutputType>Exe</OutputType>
	<TargetFramework>netcoreapp2.0</TargetFramework>
	<PublishWithAspNetCoreTargetManifest>false</PublishWithAspNetCoreTargetManifest>
</PropertyGroup>
This makes pub folder about 37MB, but container size is 258MB. Problem with this proposal is that it might not be very reliable as some assemblies might not be copied or might not be the correct version.
Since Docker is keeping layers in the repository, proposed optimization might turn out not to be actual optimization. It will consume much more space in the repository since layer that changes and is always saved is 258MB. Layers with OS might not change often if it changes at all.
Testing
How to given application can be integration tested is described in .NET Core integration testing and mock dependencies post.
Conclusion
In the current tutorial, I have shown how to create API from scratch with .NET Core 2.0 SDK on any platform. It is very easy to run .NET Core app and even run it Docker with Linux container.