Monthly Archives: November 2016

Coloured log files in Linux

Last Updated on by

Post summary: How to colour your log files for better perception under Linux.

I’m far away from being a Linux guru and honestly, I like it that way. In order to be effective as a QA, you need to have minimal knowledge how to do certain things under Linux. This post is devoted to working with logs.

Chaining commands

Linux offers a possibility to combine several commands by chaining them. In the current post, I will just one of them, the PIPE (I) operator. By using it the output of one command is used as input for other.

I would strongly recommend reading following post if you are interested in chaining Linux commands: 10 Useful Chaining Operators in Linux with Practical Examples.

Useful commands

Commands below are one I use on a daily basis when working with logs. I will show basic usage, if you need more detail on certain command then you can type: man <command> e.g. man cat in Linux console and it will display you more information.

grep

It is used to search in text files or print lines matching some pattern. Usage is: grep text filename.log. If text contains spaces it should be wrapped around single quote (‘) or double quote (“). If text contains a single quote, then you have to wrap it around with double quote and vice versa.

cat

Prints file content to standard out put. Usage is: cat filename.log. You can concatenate several files: cat file1.log file2.log. Drawback using this command is when you have large files. It combines very well with grep to search output of the file: cat filename.log | grep text.

zcat

Prints content of a zipped file. Usage: zcat filename.gz. Combines with grep: zcat filename.gz | grep text.

tail

Prints last 10 lines from a file. Usage: tail filename.log. Most valuable tail usage is with -f option: tail -f filename.log. This monitor file in real time and outputs all new text appended to the file. You can also monitor several files: tail -f file1.log file2.log.

less

Used for paging through a file. It shows one page and with arrow key up and down you can scroll through the file. Usage: less filename.txt. In order to exit just type q. Valuable with this command is that you can type a search term /text and then with n go to next appearance and with N go to previous.

Colours

Commands above are nice, but using colours aid for a much better perception of information in the files. In order to use colours perl -pe command will be used as a chained command to colour the output of commands described above. Syntax is: perl -pe ‘s/^.*INFO.*$/\e[0;36;40m$&\e[0m/g’. It is quite a complex expression and I will try to explain it in details.

Match text to be highlighted

^.*INFO.*$ is a regular expression that matches a text to be highlighted. Character ^ means from the beginning of the string or line, character $ means to end of string or line. Group .* matches any character. So this regular expression means inspect every string or line and match those that contain INFO.

Text effects

\e[0;36;40m is the colouring part of the expression. 0 is value for ANSI escape code. Possible values for escape code are shown in the table below. Note that not all of them are supported by all OS.

Code Effect
0 Reset / Normal
1 Bold or increased intensity
2 Faint (decreased intensity)
3 Italic: on
4 Underline: Single
5 Blink: Slow
6 Blink: Rapid
7 Image: Negative
8 Conceal
9 Crossed-out

More codes can be found in ANSI escape code wiki.

Text colour

36 from \e[0;36;40m is colour code of text. Colour depends and is different based on escape code. Possible combinations of escape and colour codes are:

Code Colour Code Colour
0;30 Black 1;30 Dark Grey
0;31 Red 1;31 Light Red
0;32 Green 1;32 Lime
0;33 Dark Yellow 1;33 Yellow
0;34 Blue 1;34 Light Blue
0;35 Purple 1;35 Magenta
0;36 Dark Cyan 1;36 Cyan
0;37 Light Grey 1;37 White

Background colour

40m from \e[0;36;40m is colour code of background. Background colours are:

Code Colour
40m Black
41m Red
42m Green
43m Yellow
44m Blue
45m Purple
46m Cyan
47m Light Grey

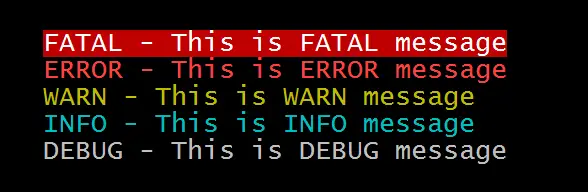
Sample colour scheme for logs

One possible colour scheme I like is: cat application.log | perl -pe ‘s/^.*FATAL.*$/\e[1;37;41m$&\e[0m/g; s/^.*ERROR.*$/\e[1;31;40m$&\e[0m/g; s/^.*WARN.*$/\e[0;33;40m$&\e[0m/g; s/^.*INFO.*$/\e[0;36;40m$&\e[0m/g; s/^.*DEBUG.*$/\e[0;37;40m$&\e[0m/g’ which will produce following output:

linux-logs-colour

Conclusion

Having coloured logs makes it much easier to investigate logs. Linux provides tooling for better visualisation so it is good to take advantage of those.

Related Posts

Read more...

Mutation testing for Java with PITest

Last Updated on by

Post summary: Introduction to mutation testing and examples with PITest tool for Java.

Mutation testing

Mutation testing is a form of white-box testing. It is used to design new unit tests and evaluate the quality of the existing ones. Mutation testing involves modifying a program code in small ways, based on well-defined mutation operators that either mimic typical programming errors (such as using the wrong operator or variable name) or force the creation of valuable tests (such as dividing each expression by zero). Each mutated version is called a mutant. Existing unit tests are run against this mutant. If some unit test fails then mutant is killed. If no unit test fails then mutant survived. Test suites are measured by the percentage of mutants that they kill. New tests can be designed to kill additional mutants. The purpose of mutation testing is to help the tester develop effective tests or locate weaknesses in the test data used in the existing tests.

It is not very often when I get surprised by discovering new testing technique I’ve never heard about, so I must give credits to Alexander Todorov since I learned this one from his presentation.

PITest

Mutation testing can be done manually by changing program code and running the tests, but this is not really effective and can lead to serious problems where you commit mutated code by mistake. Most effective and recommended way of doing mutation testing is by using tools. PITest is a tool for mutation testing in Java. It seems to be fast growing and has a big community.

Integrate PITest

Examples given in current post can be found in GitHub sample-dropwizard-rest-stub repository. It is very easy to use PITest. The first step is to add it to pom.xml file:

<plugin>
	<groupId>org.pitest</groupId>
	<artifactId>pitest-maven</artifactId>
	<version>1.1.10</version>
	<configuration>
		<targetClasses>
			<param>com.automationrhapsody.reststub.persistence*</param>
		</targetClasses>
		<targetTests>
			<param>com.automationrhapsody.reststub.persistence*</param>
		</targetTests>
	</configuration>
</plugin>

The example given above is the most simple one. PITest provides various configurations very well described into PITest Maven Quick Start page.

Run PITest

Once configured it can be run with: mvn org.pitest:pitest-maven:mutationCoverage or if you want to ensure clean build every time: mvn clean test org.pitest:pitest-maven:mutationCoverage

PITest results

PITest provides very understandable reports. Along with the line code coverage, it measures the mutation coverage. There are statistics on package level.

pitest-package

PersonDB is the only class that has been uni tested. It has 91% line coverage and 1 not killed mutation. Opening the PersonDB class gives more details what is not covered by tests and what the mutation is:

pitest-class

PITest has negated the condition on line 44, making the mutated code to be: PERSONS.get(person.getId()) == null. Unit tests had passed although this mutation. Full reports can be found in PITest report example.

Action PITest results

Current results indicate that unit tests are not good enough because of the survived mutation. They are also insufficient as one line of code is not tested at all. The first improvement is to kill the mutation by change line 37 of PersonDBTest.java from PersonDB.save(person); to assertEquals(“Added Person with id=11”, PersonDB.save(person)); and PITest is run again then results show all mutations are killed.

pitest-class-no-mutations

Still, there is one line of code not covered. This will require adding a new unit test to cover the update person functionality.

PITest performance

Doing a mutation testing requires significant resources to run a large amount of unit tests. Examples given above work very fast, but they are far away from the reality. I was curious how this works on a real project so I run it on one which is relatively small one. It has very good unit tests though with 95% line coverage – 2291 out of 2402 lines. Still, PITest found only 90% mutation coverage (849/940). 51 out of 940 mutations that survived and 40 with no unit test coverage which gives a room for improvement. The total run took 3 mins 11 secs. See results below:

PIT >> INFO : Found  464 tests
PIT >> INFO : Calculated coverage in 22 seconds.
PIT >> INFO : Created  132 mutation test units

- Timings
==================================================================
> scan classpath : < 1 second
> coverage and dependency analysis : 22 seconds
> build mutation tests : < 1 second
> run mutation analysis : 2 minutes and 48 seconds
--------------------------------------------------------------------------------
> Total : 3 minutes and 11 seconds
--------------------------------------------------------------------------------
==================================================================
- Statistics
==================================================================
>> Generated 940 mutations Killed 849 (90%)
>> Ran 2992 tests (3.18 tests per mutation)
==================================================================
- Mutators
==================================================================
> org.pitest.mutationtest.engine.gregor.mutators.ConditionalsBoundaryMutator
>> Generated 18 Killed 9 (50%)
> KILLED 7 SURVIVED 7 TIMED_OUT 2 NON_VIABLE 0
> MEMORY_ERROR 0 NOT_STARTED 0 STARTED 0 RUN_ERROR 0
> NO_COVERAGE 2
--------------------------------------------------------------------------------
> org.pitest.mutationtest.engine.gregor.mutators.VoidMethodCallMutator
>> Generated 115 Killed 96 (83%)
> KILLED 81 SURVIVED 12 TIMED_OUT 15 NON_VIABLE 0
> MEMORY_ERROR 0 NOT_STARTED 0 STARTED 0 RUN_ERROR 0
> NO_COVERAGE 7
--------------------------------------------------------------------------------
> org.pitest.mutationtest.engine.gregor.mutators.ReturnValsMutator
>> Generated 503 Killed 465 (92%)
> KILLED 432 SURVIVED 16 TIMED_OUT 33 NON_VIABLE 0
> MEMORY_ERROR 0 NOT_STARTED 0 STARTED 0 RUN_ERROR 0
> NO_COVERAGE 22
--------------------------------------------------------------------------------
> org.pitest.mutationtest.engine.gregor.mutators.MathMutator
>> Generated 10 Killed 9 (90%)
> KILLED 8 SURVIVED 0 TIMED_OUT 1 NON_VIABLE 0
> MEMORY_ERROR 0 NOT_STARTED 0 STARTED 0 RUN_ERROR 0
> NO_COVERAGE 1
--------------------------------------------------------------------------------
> org.pitest.mutationtest.engine.gregor.mutators.NegateConditionalsMutator
>> Generated 294 Killed 270 (92%)
> KILLED 254 SURVIVED 16 TIMED_OUT 15 NON_VIABLE 0
> MEMORY_ERROR 0 NOT_STARTED 0 STARTED 0 RUN_ERROR 1
> NO_COVERAGE 8
--------------------------------------------------------------------------------

Case study

I used PITest on production project written on Java 8 extensively using Stream APIs and Lambda expressions. The initial run of 606 existing test cases gave 90% mutation coverage (846/940) and 95% line coverage (2291/2402).

Note that PITest calculates in statistic given above that existing tests are 464. This is because some of them are data driven tests and JUnit calculates the total number of 606 because every data row is counted as a test. Understand how to make JUnit data-driven tests in Data driven testing with JUnit parameterized tests post.

After analysis and adding new tests total test cases number was increased to 654 which is almost 8% increase. PITest run shows 97% mutation coverage (911/939) and 97% line coverage (2332/2403). During the analysis, no bugs in code were found.

Conclusion

Mutation testing is a good additional technique to make your unit tests better. It should not be the primary technique though as tests will be written just to kill the mutations instead of actually testing the functionality. In projects with well-written unit tests mutation testing does not bring much of a value, but still, it is a very good addition to your testing arsenal. PITest is a very good tool to do mutation testing in Java I would say to give it a try.

Related Posts

Read more...

Mock/Stub REST API with WireMock for better unit testing

Last Updated on by

Post summary: Examples how to use WireMock to stub (mock also is possible as a term) REST API in order make better unit testing.

The code shown in examples below is available in GitHub java-samples/wiremock repository.

WireMock

WireMock is a simulator for HTTP-based APIs. Some might consider it a service virtualization tool or a mock server. It enables you to stay productive when an API you depend on doesn’t exist or isn’t complete. It supports testing of edge cases and failure modes that the real API won’t reliably produce. And because it’s fast it can reduce your build time from hours down to minutes.

When to use it

One case where WireMock is very helpful is when building a REST API client. Create simple REST API client using Jersey post describes a way to achieve this with Jersey. In most of the cases REST API might not be forced to fail with certain errors, so WireMock is an excellent addition to standard functional tests to verify that client is working correctly in corner cases. Also, it is mandatory for unit testing because it eliminates dependencies to external services. The mock server is extremely fast and under complete control. Another case where WireMock helps is if you need to create API tests, but API is not ready yet or not working. WireMock can be used to stub the service in order to make testing framework and structure. Once the real server is ready tests will just be elaborated and details cleared up.

How to use it

WireMock is used in JUnit as a rule. More info on JUnit rules can be found in Use JUnit rules to debug failed API tests post. There are WireMockClassRule and WireMockRule. The most appropriate is the class rule, there is no need to create a mock server for each and every test, also additional logic is needed for port collision avoidance. In case you use other unit testing framework there is WireMockServer which can be started before tests and stopped afterward. The code given below is used to REST API client from Create simple REST API client using Jersey post. First JUnit class rule is created.

public class JerseyPersonRestClientTest {

	private static final int WIREMOCK_PORT = 9999;

	@ClassRule
	public static final WireMockClassRule WIREMOCK_RULE
		= new WireMockClassRule(WIREMOCK_PORT);

	private JerseyPersonRestClient clientUnderTest;

	@Before
	public void setUp() throws Exception {
		clientUnderTest
			= new JerseyPersonRestClient("http://localhost:" + WIREMOCK_PORT);
	}
}

Port should be free, otherwise there is com.github.tomakehurst.wiremock.common.FatalStartupException: java.lang.RuntimeException: java.net.BindException: Address already in use: bind exception thrown.

Usage is very simple. There are several methods which are important. Method stubFor() is initializing the stub. Method get() notifies that stub is called with HTTP GET request. Method urlMatching() uses regular expression to match which API path is invoked, then willReturn() returns aResponse() withBody(). There are several with() methods which gives a variety of options for testing. Complete test is below:

@Test
public void testGet_WithBody_PersonJson() {
	String personString = "{\"firstName\":\"FN1\",\"lastName\":\"LN1\"}";
	stubFor(get(urlMatching(".*/person/get/.*"))
		.willReturn(aResponse().withBody(personString)));

	Person actual = clientUnderTest.get(1);

	assertEquals("FN1", actual.getFirstName());
	assertEquals("LN1", actual.getLastName());
}

This is the very straightforward case, where the client should work, but when you start to elaborate on with() scenarios you can sometimes catch an issue with the code being tested. See test below is working correctly in a case where API returns HTTP response code 500 – Internal Server Error. The client might need to add some verification on response codes as well:

@Test
public void testGet_WithStatus() {
	String personString = "{\"firstName\":\"FN1\",\"lastName\":\"LN1\"}";
	stubFor(get(GET_URL)
		.willReturn(aResponse()
		.withStatus(500)
		.withBody(personString)));

	Person actual = clientUnderTest.get(1);

	assertEquals("FN1", actual.getFirstName());
	assertEquals("LN1", actual.getLastName());
}

Wiremock stateful behavior

You can configure Wiremock to respond with series of different responses, hence keeping an internal state. This might happen when you want to perform tests with more steps or some end-to-end scenario. On the first request, Wiremock can respond with one response, on the second request it can respond with a totally different response. See more in Wiremock stateful behaviour.

Difference between stub and mock

In Mock JUnit tests with Mockito example post, I’ve shown how to use Mockito to mock given classes and control their behavior in order to control and eliminate dependencies. Mockito is not suitable for this particular case because if you mock JerseyPersonRestClient‘s get() method it will just return an object, there is no testing whatsoever. Stubbing with WireMock on other hand tests all code for invoking the service, getting a response (controlled by you) and deserializing this response from network stream to Java object. It is much more adequate and close to reality testing.

Conclusion

WireMock is a very powerful framework for API stubbing in order to make your test better and it is a must for unit testing some REST API client.

Related Posts

Read more...

Create simple REST API client using Jersey

Last Updated on by

Post summary: Code examples how to create REST API client using Jersey.

In the current post, I will give code examples how to build REST API client using Jersey. The code shown in examples below is available in GitHub java-samples/wiremock repository.

REST API client

REST API client is needed when you want to consume given REST API, either for production usage or for testing this API. In the latter case, the client does not need to be very sophisticated since it is used just for testing the API with Java code. In the current post, I will show how to create REST API client for Persons functionality of Dropwizard Rest Stub described in Build a RESTful stub server with Dropwizard post.

Jersey 2 and Jackson

Jersey is a framework which allows an easier building of RESTful services. It is one of the most used such frameworks nowadays. Jackson is JSON parser for Java. It is also one of the most used ones. The first step is to import libraries you are going to use:

<dependency>
	<groupId>org.glassfish.jersey.core</groupId>
	<artifactId>jersey-client</artifactId>
	<version>2.25.1</version>
</dependency>
<dependency>
	<groupId>org.glassfish.jersey.media</groupId>
	<artifactId>jersey-media-json-jackson</artifactId>
	<version>2.25.1</version>
</dependency>
<dependency>
	<groupId>com.fasterxml.jackson.core</groupId>
	<artifactId>jackson-databind</artifactId>
	<version>2.8.7</version>
</dependency>
<dependency>
	<groupId>com.fasterxml.jackson.core</groupId>
	<artifactId>jackson-annotations</artifactId>
	<version>2.8.7</version>
</dependency>

Not mandatory but it is good practice to create an interface for this client and then do implementations. The idea is you may have different implementations and switch between them.

import com.automationrhapsody.wiremock.model.Person;

import java.util.List;

public interface PersonRestClient {

	List<Person> getAll();

	Person get(int id);

	String save(Person person);

	String remove();
}

Now you can start with implementation. In given example constructor take the host which also includes port and scheme. Then it creates ClientConfig object with specific properties. The full list is shown in ClientProperties Javadoc. In the example, I set up timeouts only. Next is to create WebTarget object to query different API endpoints. It could not be simpler than that:

import javax.ws.rs.client.ClientBuilder;
import javax.ws.rs.client.WebTarget;

import org.glassfish.jersey.client.ClientConfig;
import org.glassfish.jersey.client.ClientProperties;
import org.glassfish.jersey.filter.LoggingFilter;

public class JerseyPersonRestClient implements PersonRestClient {

	private final WebTarget webTarget;

	public JerseyPersonRestClient(String host) {
		ClientConfig clientConfig = new ClientConfig()
				.property(ClientProperties.READ_TIMEOUT, 30000)
				.property(ClientProperties.CONNECT_TIMEOUT, 5000);

		webTarget = ClientBuilder
				.newClient(clientConfig)
				.register(new LoggingFilter())
				.target(host);
	}
}

Once WebTarget is instantiated it will be used to query all the endpoints. I will show an implementation of one GET and one POST endpoints consumption:

@Override
public List<Person> getAll() {
	Person[] persons = webTarget
		.path(ENDPOINT_GET_ALL)
		.request()
		.get()
		.readEntity(Person[].class);
	return Arrays.stream(persons).collect(Collectors.toList());
}

@Override
public String save(Person person) {
	if (person == null) {
		throw new RuntimeException("Person entity should not be null");
	}
	return webTarget
		.path(ENDPOINT_SAVE)
		.request()
		.post(Entity.json(person))
		.readEntity(String.class);
}

The full code can be seen in GitHub repo: JerseyPersonRestClient full code.

jersey-media-json-jackson

This is the bonding between Jersey and Jackson. It should be used otherwise Jersey’s readEntity(Class var1) method throws:

Exception in thread “main” org.glassfish.jersey.message.internal.MessageBodyProviderNotFoundException: MessageBodyReader not found for media type=application/json, type=class …

or

Exception in thread “main” org.glassfish.jersey.message.internal.MessageBodyProviderNotFoundException: MessageBodyWriter not found for media type=application/json, type=class …

Client builder

In the code, there is a class called PersonRestClientBuilder. In the current case it does not do many things, but in reality, it might turn out that a lot of configurations or input is provided to build a REST API client instance. This is where such builder becomes very useful:

public class PersonRestClientBuilder {

	private String host;

	public PersonRestClientBuilder setHost(String host) {
		this.host = host;
		return this;
	}

	public PersonRestClient build() {
		return new JerseyPersonRestClient(host);
	}
}

Unit testing

It is common and best practice that each piece of code is covered by unit tests. In Mock JUnit tests with Mockito example post, I’ve described how Mockito can be used. The problem in the current example is if we use Mockito we have to mock readEntity() method to return some response objects. This is way too much mocking and will not do adequate testing, actually, it does not test at all. We want to test that out REST API client successfully communicates over the wire. In order to do proper testing, we need to use a library called WireMock. In Mock/Stub REST API with WireMock for better unit testing post, I will add more details how to use it.

Conclusion

REST API consuming or testing requires building a client. Jersey is a perfect candidate to be used as an underlying framework. WireMock can be used for unit testing the REST API client you have created.

Related Posts

Read more...

Amazon S3 file upload with cURL and Java code

Last Updated on by

Post summary: Working Java code to upload a file to Amazon S3 bucket with cURL.

This post gives a solution to a very rare use case where you want to use cURL from Java code to upload a file to Amazon S3 bucket.

Amazon S3

Amazon Simple Storage Service is storage for the Internet. It is designed to make web-scale computing easier for developers. Amazon S3 has a simple web services interface that you can use to store and retrieve any amount of data, at any time, from anywhere on the web.

Upload to Amazon S3 with Java

Amazon S3 has very good documentation how to use their Java client in order to upload or retrieve files. Ways described in the manual are:

  • Upload in a single operation – few lines of code to instantiate AmazonS3Client object and to upload the file in one chunk.
  • Upload using multipart upload API – provides the ability to upload a file into several chinks. It is possible to use low and high-level operations on the upload.
  • Upload using pre-signed URLs – with this approach you can upload to some else’s bucket with having access key and shared key.

More on each of the approaches can be found in Amazon S3 upload object manual.

Upload with cURL

cURL is widely used and powerful tool for data transfer. It supports various protocols and functionalities. In Windows world, it is not widely used, but there are cURL implementations for Windows which can be used. Uploading to Amazon S3 bucket with cURL is pretty easy. There are bash scripts that can do it. One such is described in File Upload on Amazon S3 server using CURL request post. It is the basis I took to create the Java code for upload.

Upload with cURL and Java

Upload with Java and cURL is a pretty rare case. Benefits of using this approach are memory and CPU optimization. If an upload is done through Java code file to be uploaded is read and stored in heap. This reading is optimized and parts already uploaded part is removed from the heap. Anyway reading and removing the not needed file parts requires memory to keep it and CPU for garbage collection, especially when a huge amount of data is to be transferred. In some cases where resources and performance are absolutely important this memory and CPU usage can be critical. cURL also uses memory to upload the file, but this becomes no longer problem of the JVM, rather than a problem of the OS. Upload Java code is:

import java.io.IOException;
import java.io.UnsupportedEncodingException;
import java.nio.file.Path;
import java.security.InvalidKeyException;
import java.security.NoSuchAlgorithmException;
import java.time.ZonedDateTime;
import java.time.format.DateTimeFormatter;
import java.util.Base64;

import javax.crypto.Mac;
import javax.crypto.spec.SecretKeySpec;

import org.apache.commons.io.IOUtils;

public class AmazonS3CurlUploader {

	private static final String ALGORITHM = "HmacSHA1";
	private static final String CONTENT_TYPE = "application/octet-stream";
	private static final String ENCODING = "UTF8";

	public boolean upload(Path localFile, String s3Bucket, String s3FileName,
			String s3AccessKey, String s3SecretKey) {
		boolean result;
		try {
			Process cURL = createCurlProcess(localFile, s3Bucket,
					s3FileName, s3AccessKey, s3SecretKey);
			cURL.waitFor();
			String response = IOUtils.toString(cURL.getInputStream())
					+ IOUtils.toString(cURL.getErrorStream());
			result = response.contains("HTTP/1.1 200 OK");
		} catch (IOException | InterruptedException e) {
			// Exception handling goes here!
			result = false;
		}
		return result;
	}

	private Process createCurlProcess(Path file, String bucket, String fileName,
			String accessKey, String secretKey) throws IOException {
		String dateFormat = ZonedDateTime.now()
				.format(DateTimeFormatter.RFC_1123_DATE_TIME);
		String relativePath = "/" + bucket + "/" + fileName;
		String stringToSign = "PUT\n\n" + CONTENT_TYPE + "\n"
				+ dateFormat + "\n" + relativePath;
		String signature = Base64.getEncoder()
				.encodeToString(hmacSHA1(stringToSign, secretKey));

		return new ProcessBuilder(
				"curl", "-X", "PUT",
				"-T", file.toString(),
				"-H", "Host: " + bucket + ".s3.amazonaws.com",
				"-H", "Date: " + dateFormat,
				"-H", "Content-Type: " + CONTENT_TYPE,
				"-H", "Authorization: AWS " + accessKey + ":" + signature,
				"http://" + bucket + ".s3.amazonaws.com/" + fileName)
				.start();
	}

	private byte[] hmacSHA1(String data, String key) {
		try {
			Mac mac = Mac.getInstance(ALGORITHM);
			mac.init(new SecretKeySpec(key.getBytes(ENCODING), ALGORITHM));
			return mac.doFinal(data.getBytes(ENCODING));
		} catch (NoSuchAlgorithmException | InvalidKeyException
				| UnsupportedEncodingException e) {
			return new byte[] {};
		}
	}
}

Conclusion

Upload to Amazon S3 with cURL from Java code is a rare case, which could be beneficial in the case where memory and CPU usage by JVM is crucial. Delegating file upload to cURL does not disturb JVM heap and Garbage Collection process.

Read more...