Performance testing in the browser
In the current post, I will give some examples of how performance testing can be done in the browser using different metrics. Puppeteer is used as a tool for browser manipulation because it integrates easily with Lighthouse and DevTools Protocol. I have described all the tools before giving any examples. The code can be found in GitHub sample-performance-testing-in-browser repository.
Why?
Many things can be said on why do we do performance testing and why especially the browser. In How to do proper performance testing post I have outlined idea how to cover the backend. Assuming it is already optimized, and still, customer experience is not sufficient it is time to look at the frontend part. In general, performance testing is done to satisfy customers. It is up to the business to decide whether performance testing will have some ROI or not. In this article, I will give some ideas on how to do performance testing of the frontend part, hence in the browser.Puppeteer
Puppeteer is a tool by Google which allows you to control Chrome or Chromium browsers. It works over DevTools Protocol, which I will describe later. Puppeteer allows you to automate your functional tests. In this regards, it is very similar to Selenium but it offers many more features in terms of control, debugging, and information within the browser. Over the DevTools Protocol, you have programmatically access to all features available in DevTools (the tool that is shown in Chrome when you hit F12). You can check Puppeteer API documentation or check advanced Puppeteer examples such as JS and CSS code coverage, site crawler, Google search features checker.Lighthouse
Lighthouse is again tool by Google which is designed to analyze web apps and pages, making a detailed report about performance, SEO, accessibility, and best practices. The tool can be used inside Chrome's DevTools, standalone from CLI (command line interface), or programmatically from Puppeteer project. Google had developed user-centric performance metrics which Lighthouse uses. Here is a Lighthouse report example run on my blog.PerformanceTimings API
W3C have Navigation Timing recommendation which is supported by major browsers. The interesting part is the PerformanceTiming interface, where various timings are exposed.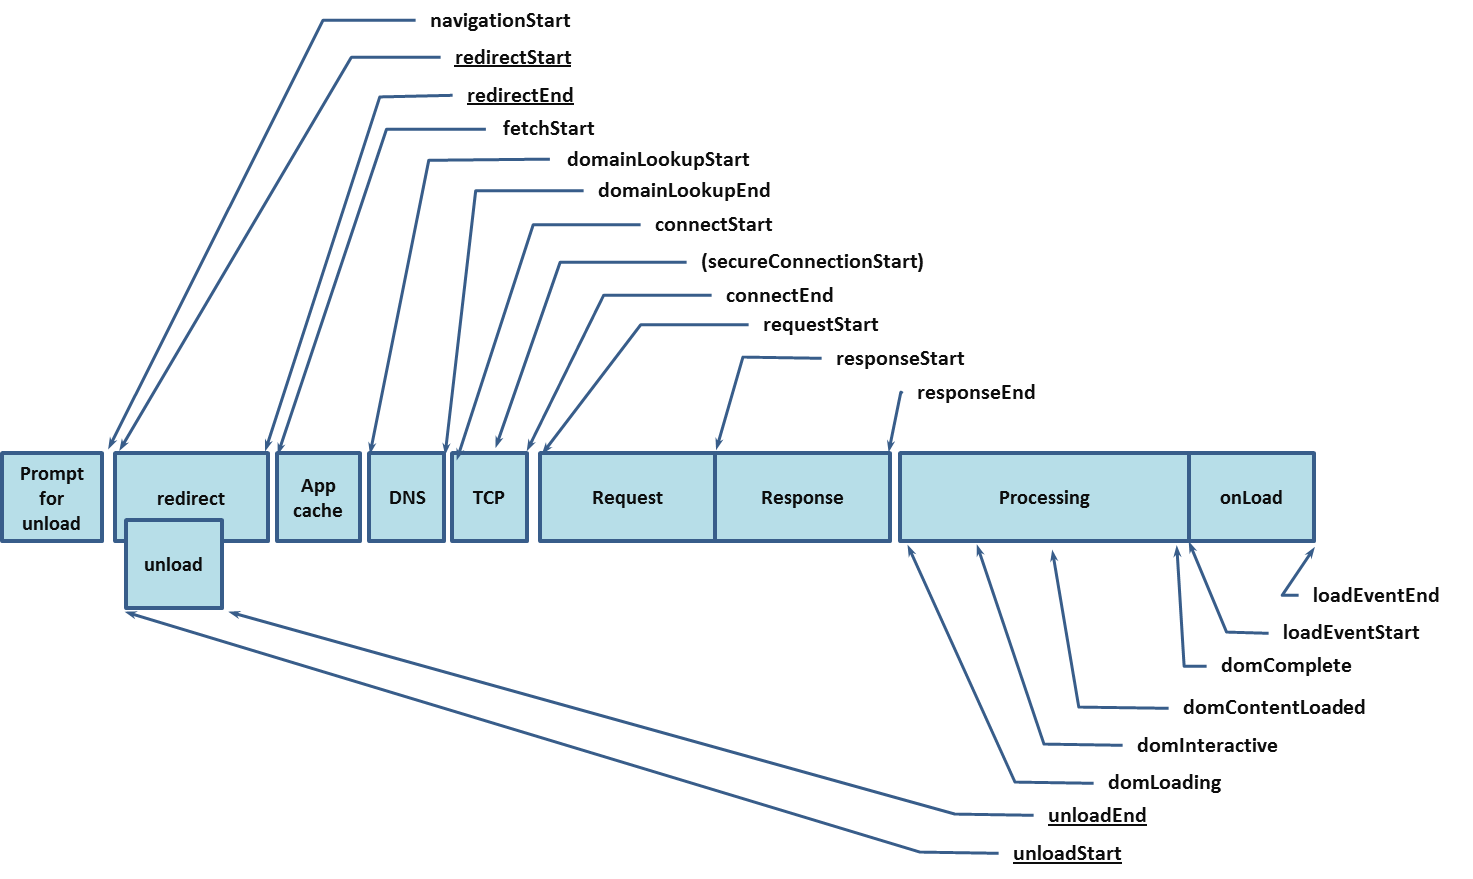
DevTools Protocol
DevTools Protocol comes by Google and is a way to communicate programmatically with DevTools within Chrome and Chromium, hence you can instrument, inspect, debug, and profile those browsers.Examples
Now comes the fun part. I have prepared several examples. All the code is in GitHub sample-performance-testing-in-browser repository.- Puppeteer and Lighthouse - Puppeteer is used to login and then Lighthouse checks pages for logged in user.
- Puppeteer and PerformanceTiming API - Puppeteer navigates the site and gathers PerformanceTiming metrics from the browser.
- Lighthouse and PerformanceTiming API - comparison between both metrics in Lighthouse and NavigationTiming.
- Puppeteer and DevTools Protocol - simulate low bandwidth network conditions with DevTools Protocol.
Gather single PerformanceTiming metric
async function gatherPerformanceTimingMetric(page, metricName) {
  const metric = await page.evaluate(metric =>
     window.performance.timing[metric], metricName);
  return metric;
}
I will not go into details about Puppeteer API. I will describe the functions I have used. Function page.evaluate() executes JavaScript in the browser and can return a result if needed. window.performance.timing returns all metrics from the browser and only needed by metricName one is returned by the current function.
Gather all PerformaceTiming metrics
async function gatherPerformanceTimingMetrics(page) {
  // The values returned from evaluate() function should be JSON serializable.
  const rawMetrics = await page.evaluate(() =>
    JSON.stringify(window.performance.timing));
  const metrics = JSON.parse(rawMetrics);
  return metrics;
}
This one is very similar to the previous. Instead of just one metric, all are returned. The tricky part is the call to JSON.stringify(). The values returned from page.evaluate() function should be JSON serializable. With JSON.parse() they are converted to object again.
Extract data from PerformanceTiming metrics
async function processPerformanceTimingMetrics(metrics) {
  return {
    dnsLookup: metrics.domainLookupEnd - metrics.domainLookupStart,
    tcpConnect: metrics.connectEnd - metrics.connectStart,
    request: metrics.responseStart - metrics.requestStart,
    response: metrics.responseEnd - metrics.responseStart,
    domLoaded: metrics.domComplete - metrics.domLoading,
    domInteractive: metrics.domInteractive - metrics.navigationStart,
    pageLoad: metrics.loadEventEnd - metrics.loadEventStart,
    fullTime: metrics.loadEventEnd - metrics.navigationStart
  }
}
Time data for certain events are compiled from raw metrics. For e.g., if DNS lookup or TCP connection times are slow, then this could be some network specific thing and may not need to be acted. If response time is very high, then this is indicator backend might not be performing well and needs to be further performance tested. See How to do proper performance testing post for more details.
Gather Lighthouse metrics
const lighthouse = require('lighthouse');

async function gatherLighthouseMetrics(page, config) {
  // ws://127.0.0.1:52046/devtools/browser/675a2fad-4ccf-412b-81bb-170fdb2cc39c
  const port = await page.browser().wsEndpoint().split(':')[2].split('/')[0];
  return await lighthouse(page.url(), { port: port }, config).then(results => {
    delete results.artifacts;
    return results;
  });
}
The example above shows how to use Lighthouse programmatically. Lighthouse needs to connect to a browser on a specific port. This port is taken from page.browser().wsEndpoint() which is in format ws://127.0.0.1:52046/devtools/browser/{GUID}. It is good to delete results.artifacts; because they might get very big in size and are not needed. The result is one huge object. I will talk about this is more details. Before using Lighthouse is should be installed in a Node.js project with npm install lighthouse —save-dev.
Puppeteer and Lighthouse
In this example, Puppeteer is used to navigating through the site and authenticate the user, so Lighthouse can be run for a page behind a login. Lighthouse can be run through CLI as well but in this case, you just pass and URL and Lighthouse will check it.const puppeteer = require('puppeteer');
const perfConfig = require('./config.performance.js');
const fs = require('fs');
const resultsDir = 'results';
const { gatherLighthouseMetrics } = require('./helpers');
(async () => {
const browser = await puppeteer.launch({
headless: true,
// slowMo: 250
});
const page = await browser.newPage();
await page.goto('/examples/sample-login/');
await verify(page, 'page_home');
await page.click('a');
await page.waitForSelector('form');
await page.type('input[name="username"]', 'admin');
await page.type('input[name="password"]', 'admin');
await page.click('input[type="submit"]');
await page.waitForSelector('h2');
await verify(page, 'page_loggedin');
await browser.close();
})();
const perfConfig = require('./config.performance.js');
const fs = require('fs');
const resultsDir = 'results';
const { gatherLighthouseMetrics } = require('./helpers');

async function verify(page, pageName) {
  await createDir(resultsDir);
  await page.screenshot({
    path: `./${resultsDir}/${pageName}.png`,
    fullPage: true
  });
  const metrics = await gatherLighthouseMetrics(page, perfConfig);
  fs.writeFileSync(`./${resultsDir}/${pageName}.json`,
    JSON.stringify(metrics, null, 2));
  return metrics;
}
const fs = require('fs');

async function createDir(dirName) {
  if (!fs.existsSync(dirName)) {
    fs.mkdirSync(dirName, '0766');
  }
}
A new browser is launched with puppeteer.launch(), arguments { headless: true, //slowMo: 250 } are put for debugging purposes. If you want to view what is happening then set headless to false and slow the motions with slowMo: 250, where time is in milliseconds. Start a new page with browser.newPage() and navigate to some URL with page.goto(‘URL’). Then verify() function is invoked. It is shown on the second tab and will be described in a while. Next functionality is used to log in the user. With page.click(‘SELECTOR’), where CSS selector is specified, you can click an element on the page. With page.waitForSelector(‘SELECTOR’) Puppeteer should wait for the element with the given CSS selector to be shown. With page.type(‘SELECTOR’, ‘TEXT’) Puppeteer types the TEXT in the element located by given CSS selector. Finally browser.close() closes the browser.
So far only Puppeteer navigation is described. Lighthouse is invoked in verify() function. Results directory is created initially with createDir() function. Then a screenshot is taken on the full page with page.screenshot() function. Lighthouse is called with gatherLighthouseMetrics(page, perfConfig). This function was described above. Basically, it gets the port on which DevTools Protocol is currently running and passes it to lighthouse() function. Another approach could be to start the browser with hardcoded debug port of 9222 with puppeteer.launch({ args: [ ‘—remote-debugging-port=9222’ ] }) and pass nothing to Lighthouse, it will try to connect to this port by default. Function lighthouse() accepts also an optional config parameter. If not specified then all Lighthouse checks are done. In the current example, only performance is important, thus a specific config file is created and used. This is config.performance.js file.
Puppeteer and PerformanceTiming API
In this example, Puppeteer is used to navigating the site and extract PerformanceTiming metrics from the browser.const puppeteer = require('puppeteer');
const { gatherPerformanceTimingMetric,
gatherPerformanceTimingMetrics,
processPerformanceTimingMetrics } = require('./helpers');
(async () => {
const browser = await puppeteer.launch({
headless: true
});
const page = await browser.newPage();
await page.goto('/');
const rawMetrics = await gatherPerformanceTimingMetrics(page);
const metrics = await processPerformanceTimingMetrics(rawMetrics);
console.log(`DNS: ${metrics.dnsLookup}`);
console.log(`TCP: ${metrics.tcpConnect}`);
console.log(`Req: ${metrics.request}`);
console.log(`Res: ${metrics.response}`);
console.log(`DOM load: ${metrics.domLoaded}`);
console.log(`DOM interactive: ${metrics.domInteractive}`);
console.log(`Document load: ${metrics.pageLoad}`);
console.log(`Full load time: ${metrics.fullTime}`);
const loadEventEnd = await gatherPerformanceTimingMetric(page, 'loadEventEnd');
const date = new Date(loadEventEnd);
console.log(`Page load ended on: ${date}`);
await browser.close();
})();
Metrics are extracted with gatherPerformanceTimingMetrics() function described above and then data is collected from the metrics with processPerformanceTimingMetrics(). In the end, there is an example of how to extract one metric such as loadEventEnd and display it as a date object.
Lighthouse and PerformanceTiming API
const puppeteer = require('puppeteer');
const perfConfig = require('./config.performance.js');
const { gatherPerformanceTimingMetrics,
  gatherLighthouseMetrics } = require('./helpers');

(async () => {
  const browser = await puppeteer.launch({
    headless: true
  });
  const page = await browser.newPage();
  const urls = ['/',
    '/examples/sample-login/'];

  for (const url of urls) {
    await page.goto(url);

    const lighthouseMetrics = await gatherLighthouseMetrics(page, perfConfig);
    const firstPaint = parseInt(lighthouseMetrics.audits['first-meaningful-paint']['rawValue'], 10);
    const firstInteractive = parseInt(lighthouseMetrics.audits['first-interactive']['rawValue'], 10);
    const navigationMetrics = await gatherPerformanceTimingMetrics(page);
    const domInteractive = navigationMetrics.domInteractive - navigationMetrics.navigationStart;
    const fullLoad = navigationMetrics.loadEventEnd - navigationMetrics.navigationStart;
    console.log(`FirstPaint: ${firstPaint}, FirstInterractive: ${firstInteractive},
      DOMInteractive: ${domInteractive}, FullLoad: ${fullLoad}`);
  }

  await browser.close();
})();
This example shows a comparison between Lighthouse metrics and PerformanceTiming API metrics. If you run the example and compare all the timings you will notice how much slower the site looks according to Lighthouse. This is because it uses 3G (1.6Mbit/s download speed) settings by default.
Puppeteer and DevTools Protocol
const puppeteer = require('puppeteer');
const throughputKBs = process.env.throughput || 200;

(async () => {
  const browser = await puppeteer.launch({
    executablePath:
      'C:\\Program Files (x86)\\Google\\Chrome\\Application\\chrome.exe',
    headless: false
  });
  const page = await browser.newPage();
  const client = await page.target().createCDPSession();

  await client.send('Network.emulateNetworkConditions', {
    offline: false,
    latency: 200,
    downloadThroughput: throughputKBs * 1024,
    uploadThroughput: throughputKBs * 1024
  });

  const start = (new Date()).getTime();
  await client.send('Page.navigate', {
    'url': ''
  });
  await page.waitForNavigation({
    timeout: 240000,
    waitUntil: 'load'
  });
  const end = (new Date()).getTime();
  const totalTimeSeconds = (end - start) / 1000;

  console.log(`Page loaded for ${totalTimeSeconds} seconds
    when connection is ${throughputKBs}kbit/s`);

  await browser.close();
})();
In the current example, network conditions with restricted bandwidth are emulated in order to test page load time and perception. With executablePath Puppeteer launches an instance of Chrome browser. The path given in the example is for Windows machine. Then a client is made to communicate with DevTools Protocol with page.target().createCDPSession(). Configurations are send to browser with client.send(‘Network.emulateNetworkConditions’, { }). Then URL is opened into the page with client.send(‘Page.navigate’, { URL}). The script can be run with different values for throughput passed as environment variable. Example waits 240 seconds for the page to fully load with page.waitForNavigation().