Performance, Load, Stress and Soak testing

Last Updated on by

Post summary: Performance, Load, Stress and Soak testing are different aspects of one goal – proving that application will function correctly with a large number of users.

Previously I have written for non-functionally testing the application in conditions of a large number of users in How to do proper performance testing post. There I’m using only one term performance testing. If we have to be precise there are several different types of testing that can be done to achieve the goal of sustaining a large number of users.

Performance testing

Testing the system to find out how fast is the system. Create a benchmark of system response times and stability under particular user load. Response time should be small enough to keep users satisfied.

Load testing

Testing how the system performs when it is loaded with its expected amount of users. The load can be slightly increased to measure if and how performance degrades. Load and performance testing are tied together. System performance depends on the load applied to it. Load testing should prove that in case of expected and peak users load system performs close to benchmarks measured with a small load.

Stress testing

Testing of the system beyond its normal expected amount of users to observe its behavior. Sometimes the system is loaded until its crash. The idea behind this testing is to understand how the system handles errors and data when it is highly loaded, is data preserved correctly, what load can crash the system, what happens when the system crashes.

Soak testing

This is kind of underestimated but it is rather important. Soak testing is to test the system with expected or little more than the expected load for a long amount of time. The idea behind that is system may respond fast during short tests but actually to hide some memory leak which will become obvious after a long amount of time.

Knowledge is power

Knowing the problems helps to prepare for them. Procedures can be prepared and followed to avoid a system crash. In case there is a module identified to be slow but important for business it can be made configurable and can be turned down in case of a higher load. In case users count have reached a critical level that could endanger the system, support can reject some users. In case of memory leaks, support can restart the system at regular intervals in time of a low load to avoid a crash. All those and many more can be done only if we know the system.

Conclusion

There are different techniques to prove that system can handle the number of users expected by business. I like the term performance testing and use it to combine all the types of testing above. It is not that important to know the precise definition of the terms than to know what is good to be done in order to prove system can handle a large number of users or to identify the bottlenecks in case it cannot.

Related Posts

Read more...

Code coverage with JaCoCo offline instrumentation with Maven

Last Updated on by

Post summary: Tutorial how to do code coverage with offline instrumentation with JaCoCo and Maven.

Offline instrumentation

Code coverage of manual or automated tests with JaCoCo post describes how to do code coverage with JaCoCo. This is applicable in many of the cases. Still, there could be a case where the application under test does not support Java agents. In this case, JaCoCo offers offline instrumentation of the code. A once instrumented code can be run and coverage to be measured. This post describes how to do it.

JaCoCo for Maven

JaCoCo Maven plugin is discussed in Automated code coverage of unit tests with JaCoCo and Maven post. In order to get code instrumented “instrument” task should be added to Maven:

<properties>
	<jacoco.skip.instrument>true</jacoco.skip.instrument>
</properties>
<build>
	<plugins>
		<plugin>
			<groupId>org.jacoco</groupId>
			<artifactId>jacoco-maven-plugin</artifactId>
			<version>0.7.4.201502262128</version>
			<executions>
				<execution>
					<id>jacoco-instrument</id>
					<phase>test</phase>
					<goals>
						<goal>instrument</goal>
					</goals>
					<configuration>
						<skip>${jacoco.skip.instrument}</skip>
					</configuration>
				</execution>
			</executions>
		</plugin>
	</plugins>
</build>

In the current example, this task will be executed when mvn test is called. It can be configured to be called on package or install by changing the <phase> element.

Make it configurable

Instrumentation should not be done on every build. You do not want to release instrumented code, first because this is bad practice and second code will not run unless jacocoagent.jar is in the classpath. This is why instrumentation should be disabled by default with jacoco.skip.instrument=true in pom.xml property, which can be overridden when needed with mvn clean test -Djacoco.skip.instrument=false command. Another option is separate pom-offline.xml file and build with it when needed.

Get sample application

Current post uses sample application first introduced in Build a RESTful stub server with Dropwizard post. It can be found in GitHub sample-dropwizard-rest-stub repository. For the current tutorial, it has been downloaded to C:\sample-dropwizard-rest-stub. This application gets packaged to a single JAR file by mvn clean package. If instrumentation gets put in package phase then it is not working, as packaging happens before instrumentation. This is why test phase is the correct for the current example, as package includes test by default.

Instrument the code

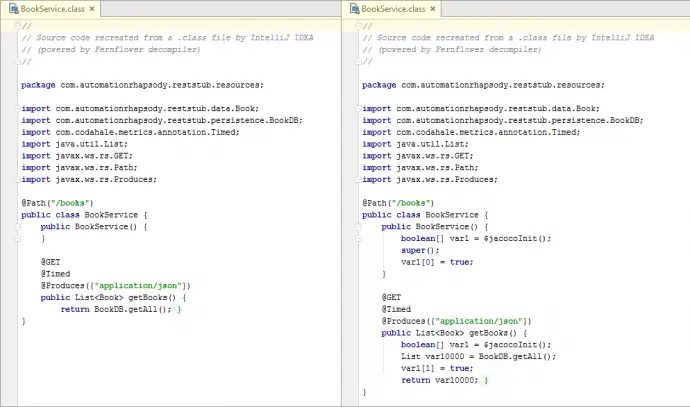
Once the application is downloaded it can be built with instrumentation with mvn clean package -Djacoco.skip.instrument=false command. You can easily check if given class has been instrumented by opening it with some kind of decompiler. The image below shows instrumented class on the right hand side vs non-instrumented in the left hand side.

JaCoCo-offline

Run it with JaCoCo agent in the class path

If not instrumented sample application is started with: java -jar target/sample-dropwizard-rest-stub-1.0-SNAPSHOT.jar server config.yml. In case of instrumented code this command will give exception:

Exception in thread “main” java.lang.NoClassDefFoundError: org/jacoco/agent/rt/internal_773e439/Offline

This is because jacocoagent.jar is not in the classpath.

Adding JaCoCo agent in class path varies from case to case. In this particular tutorial application is a single JAR run by java -jar command. In order to add something in classpath java -cp command should be used. Problem is both -jar and -cp are mutually exclusive. Only way to do it is with the following command:

java -Djacoco-agent.output=tcpserver -cp C:\JaCoCo\jacocoagent.jar;target/sample-dropwizard-rest-stub-1.0-SNAPSHOT.jar com.automationrhapsody.reststub.RestStubApp server config.yml

Where -Djacoco-agent.output=tcpserver is configuration to make JaCoCo agent report on TCP port. More about JaCoCo Offline settings here. C:\JaCoCo\jacocoagent.jar is the location of the JaCoCo agent JAR file. com.automationrhapsody.reststub.RestStubApp is the main method to be run from target/sample-dropwizard-rest-stub-1.0-SNAPSHOT.jar file.

Test

Now when we have the application running is time to run all tests we have both automation and manual. For manual, it is important to be documented scenario which is reproducible on each regression testing, not just some random clicking. The idea is that we want to measure what coverage our tests do.

Import coverage results

In order to import results Eclipse with installed JaCoCo plugin from market place is needed. See Code coverage of manual or automated tests with JaCoCo post for more details how to install the plugin.

Open Eclipse and import C:\sample-dropwizard-rest-stub project as Maven one.

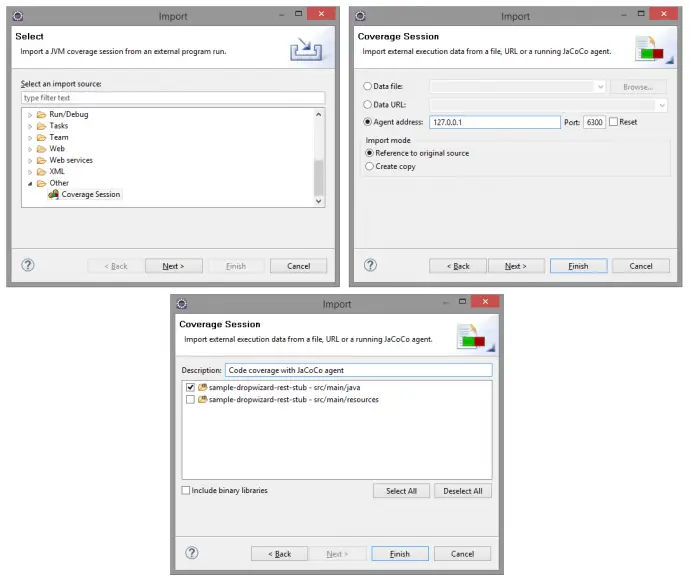
Import the results into Eclipse. This is done from File -> Import -> Coverage Session -> select Agent address radio button but leave defaults -> enter some name and select code under test.

JaCoCo-import

Once imported results can be seen and code gets highlighted.

In case no results are imported delete target\classes folder and rebuild with mvn compile.

Export to HTML and analyze

See Code coverage of manual or automated tests with JaCoCo how to export and analyze.

Conclusion

Although very rare to happen offline instrumentation is a way to measure code coverage with JaCoCo.

Related Posts

Read more...

Automated code coverage of unit tests with JaCoCo and Maven

Last Updated on by

Post summary: Tutorial how to setup code coverage with JaCoCo on unit tests to be done on each Maven build.

Code coverage

There are two main streamlines in code coverage. One is running code coverage on each build measuring unit tests coverage. Once configured this needs no manual intervention. Depending on the tools there is even an option to fail the build if code coverage doesn’t reach the desired threshold. Current post is designated to this aspect. Other is running code coverage on automated or even manual functional tests scenarios. Latter is described in Code coverage of manual or automated tests with JaCoCo post.

Unit tests code coverage

The theory described in What about code coverage post is applicable for unit tests code coverage, but the real benefit of unit tests code coverage is:

  • Unit tests code coverage can be automated on every build
  • The build can be configured to fail if a specific threshold is not met

JaCoCo for Maven

There is JaCoCo plugin that is used with Maven builds. More details and what goals can be accomplished with it can be seen in JaCoCo Maven plugin page. The very minimum to make it work is to setup prepare-agent and report goals. Report goal is good to be called during test Maven task. This is done with test instruction. You can define it on other tasks, like install or package, however, code coverage is done for tests. XML block to be added to pom.xml file is:

<plugin>
	<groupId>org.jacoco</groupId>
	<artifactId>jacoco-maven-plugin</artifactId>
	<version>0.7.4.201502262128</version>
	<executions>
		<execution>
			<id>jacoco-initialize</id>
			<goals>
				<goal>prepare-agent</goal>
			</goals>
		</execution>
		<execution>
			<id>jacoco-report</id>
			<phase>test</phase>
			<goals>
				<goal>report</goal>
			</goals>
		</execution>
	</executions>
</plugin>

Once this is configured it can be run with mvn clean test command. Once successfully build JaCoCo report can be found in /target/site/jacoco/index.html file. A similar report can be found in HTML JaCoCo report.

Add coverage thresholds

Just adding unit tests code coverage report is good but can be rather improved. A good practice is to add code coverage thresholds. If predefined code coverage percentage is not reached build will fail. This practice could have a negative effect on putting unit tests just for the sake of code coverage, but then again it is up to the development team to keep the good quality. Adding thresholds is done with check Maven task:

<execution>
	<id>jacoco-check</id>
	<phase>test</phase>
	<goals>
		<goal>check</goal>
	</goals>
	<configuration>
		<rules>
			<rule implementation="org.jacoco.maven.RuleConfiguration">
				<element>BUNDLE</element>
				<limits>
					<limit implementation="org.jacoco.report.check.Limit">
						<counter>INSTRUCTION</counter>
						<value>COVEREDRATIO</value>
						<minimum>0.60</minimum>
					</limit>
				</limits>
			</rule>
		</rules>
	</configuration>
</execution>

check task should be added along with prepare-agent. report is not mandatory but could also be added in order to inspect where code coverage is not enough. Note that implementation attribute is mandatory only for Maven 2. If Maven 3 is used then attributes can be removed.

JaCoCo check rules

In order check task to work is should be added at least one goal element as shown above. The rule is defined for a particular scope. Available scopes are: BUNDLE, PACKAGE, CLASS, SOURCEFILE or METHOD. More details can be found in JaCoCo check Maven task documentation. In current example rule is for BUNDLE, which means whole code under analysis. PACKAGE is the far I would go. Even with it, there could be unpleasant surprises like a utility package or POJO (data object without business logic inside) packages where objects do not have essential business logic but the PACKAGE rule will still require given code coverage for this package. This means you will have to write unit tests just to satisfy the coverage demand.

JaCoCo check limits

Although not mandatory each rule is good to have at least one limit element as shown above.

Available limit counters are: INSTRUCTION, LINE, BRANCH, COMPLEXITY, METHOD, CLASS. Those are the values measured in the report. Some of them are JaCoCo specific other are accordance with code coverage general theory. See more details on counters in JaCoCo counters page. Check sample report at HTML JaCoCo report to see how counters are displayed.

Available limit values are: TOTALCOUNT, COVEREDCOUNT, MISSEDCOUNT, COVEREDRATIO, MISSEDRATIO. Those are the magnitude values for measuring. COUNT values are bounding with current implementation and cannot be referred to some industry standards. This is why RATIO values are much more suitable.

Actual measuring value is set in minimum or maximum elements. Minimum is generally used with COVERED values, maximum with MISSED values. Note that in case of RATIO this should be a double value less than 1, e.g. 0.60 in the example above means 60%.

With given counters and values there could be lots of combinations. The very minimum is to use INSTRUCTION with COVEREDRATIO as shown in the example above. Still, if you want to be really precise several limits with different counters can be used. Below is an example of Maven 3 where defining that every class should have been covered in unit tests:

<limit>
	<counter>CLASS</counter>
	<value>MISSEDCOUNT</value>
	<maximum>0</maximum>
</limit>

Configurations are good practice

Hard-coding is never a good practice anywhere. The example above has a hard-coded value of 60% instruction code coverage, otherwise build will fail. This is not a proper way to do it. The proper way is to define a property and then use it. Properties element is defined as a root level:

<properties>
	<jacoco.percentage.instruction>0.60</jacoco.percentage.instruction>
</properties>

...

<limit>
	<counter>INSTRUCTION</counter>
	<value>COVEREDRATIO</value>
	<minimum>${jacoco.percentage.instruction}</minimum>
</limit>

The benefit of a property is that it can be easily overridden at runtime, just specify the new value as a system property: mvn clean test -Djacoco.percentage.instruction=0.20. In this way, there could be a general value of 0.60 in pom.xml, but until this is not reached it can be overridden with 0.20.

Experiment with JaCoCo checks

Sample application to experiment with is the one introduced in Build a RESTful stub server with Dropwizard post. It can be found in GitHub sample-dropwizard-rest-stub repository. It has a very low amount of code in it and just one unit test with very low code coverage. This gives good opportunities to try different combinations of counters and values to see how exactly JaCoCo works.

Conclusion

Code coverage of unit tests with thresholds is a good practice. This tutorial gives very good introduction how to implement and use them, so apply and use them.

Related Posts

Read more...

Code coverage of manual or automated tests with JaCoCo

Last Updated on by

Post summary: Tutorial how to do code coverage on automated or even manual functional tests with JaCoCo.

Code coverage is a way to check what part of the code your tests are exercising. JaCoCo is a free code coverage library for Java.

Code coverage

There are two main streamlines in code coverage. One is running code coverage on each build measuring unit tests coverage. Once configured this needs no manual intervention. Depending on the tools there is even an option to fail the build if code coverage doesn’t reach the desired threshold. This is well described in Automated code coverage of unit tests with Maven and JaCoCo post. Another aspect is running code coverage on automated or even manual functional tests scenarios. This post is dedicated to latter. I have already created What about code coverage post to the theory of this type of code coverage. Current post is about getting it done in practice.

The idea

The idea is pretty simple. The application is started with a code coverage tool is attached to it, then tests are executed and results are gathered. This is it. Having stated it that way it doesn’t sound that bizarre to run code coverage on manual tests. Running it makes sense if only tests are well documented and repeatable scenarios that are usually run on regression testing.

JaCoCo Java agent

Java agent is powerful mechanism providing the ability to instrument and change classes at runtime. Java agent library is passed as a JVM parameter when running given application with -javaagent:{path_to_jar}. JaCoCo tool is implemented as Java agent. More details for Java agents can be found at java.lang.instrument package.

In case application under test does not support plugin agents to JVM then coverage can be measured with offline instrumentation described in Code coverage with JaCoCo offline instrumentation with Maven post.

Restrictions

Some restrictions that have to be taken into consideration:

  • JaCoCo plugin is only for Eclipse IDE, hence it should be used in order to get the report
  • Imported execution data must be based on the exact same class files that are also used within the Eclipse IDE, hence application should be run in Eclipse, it is not possible to build it and run it separately as class files will differ
  • Eclipse is not capable of shutting down the JVM, it directly kills it, hence the only way to get results is to start JaCoCo agent in tcpserver output mode
  • JaCoCo agent version 0.7.4 and Eclipse EclEmma plugin 2.3.2 are used, those are compatible, 0.7.5 introduces change in data format

Install Eclipse plugin

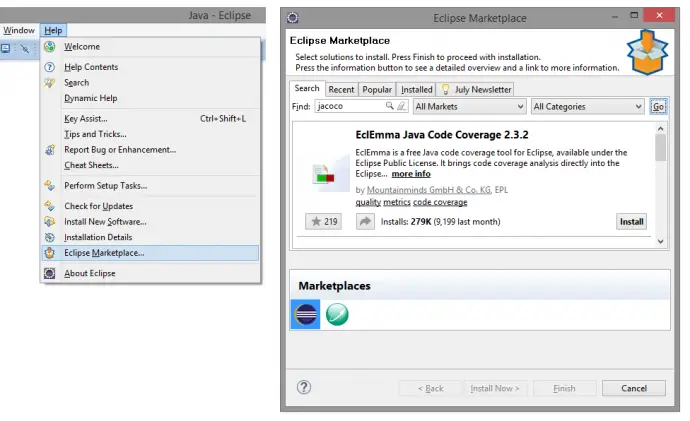
Having stated the restriction it is time to start. Installation is done through Eclipse -> Help -> Eclipse Marketplace… -> search for “jacoco” -> Install -> restart Eclipse.

JaCoCo-install

Run the application

As stated in restrictions in order code coverage to work application should be started in Eclipse. I will use sample application I have introduced in Build a RESTful stub server with Dropwizard post. It can be found in GitHub sample-dropwizard-rest-stub repository. For this tutorial, it is checked out to: C:\sample-dropwizard-rest-stub.

Download JaCoCo 0.7.4 agent jar. For this tutorial it is saved to C:\JaCoCo

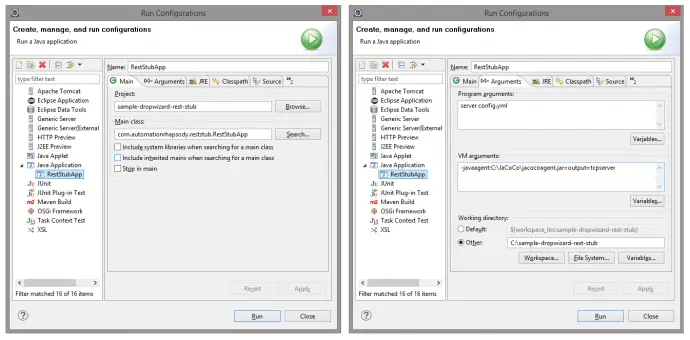
Project have to imported to Eclipse from File -> Import -> Existing Maven projects. Once imported Run configuration have to be done from Run -> Run Configurations… -> double click Java Application. This opens new window to define configuration. Properties are stated below:

  • Name (Main tab): RestStubApp (could be whatever name)
  • Project (Main tab): sample-dropwizard-rest-stub
  • Main class (Main tab): com.automationrhapsody.reststub.RestStubApp
  • Program arguments (Arguments tab): server config.yml
  • VM arguments (Arguments tab): -javaagent:C:\JaCoCo\jacocoagent.jar=output=tcpserver (started in “tcpserver” output mode)
  • Working directory -> Other (Arguments tab): C:\sample-dropwizard-rest-stub

JaCoCo-run

Once the configuration is created then run it.

Apart from the given sample application, it should be possible to run every application in Eclipse. This assumption is made on the fact that developers do need to debug their application, so they will have a way to run it. The important part is to include -javaagent: part in VM arguments section

Test

Now when we have the application running is time to run all tests we have both automation and manual. For manual, it is important to be documented scenario which is reproducible in each regression testing, not just some random clicking. The idea is that we want to measure what coverage our tests do.

Import coverage results

After all tests have passed it is time to import the results into Eclipse. This is done from File -> Import -> Coverage Session -> select Agent address radio button but leave defaults -> enter some name and select code under test.

JaCoCo-import

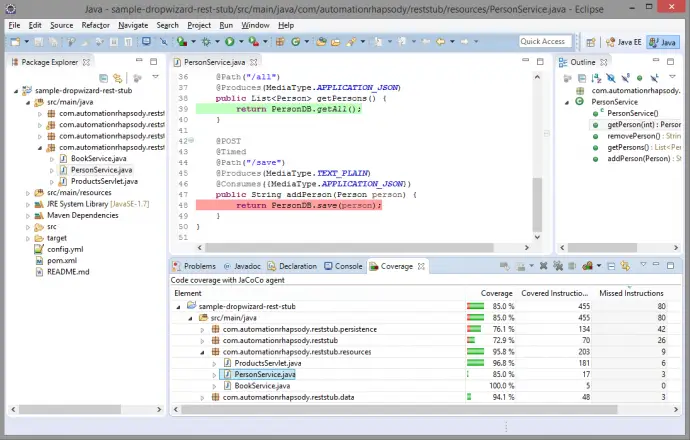
Once imported results can be seen and code gets highlighted.

JaCoCo-results

Export to HTML

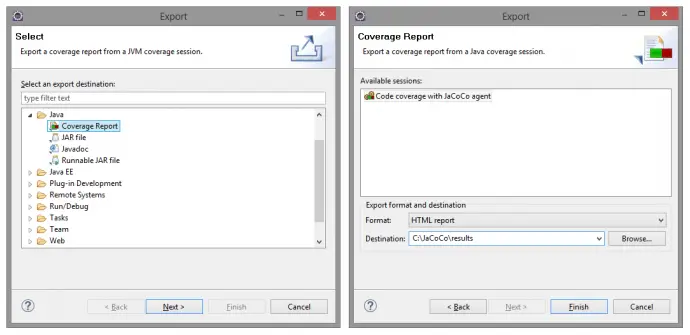
Now result can be exported. There are several options: HTML, zipped HTML, XML, CSV or JaCoCo execution data file. Export is done from: File -> Export -> Coverage Report -> select session and location.

JaCoCo-export

Analyse

Here comes the hard part. The code could be quite complex and not that easy to understand. In the current tutorial, code is pretty simple. Inspecting HTML JaCoCo report it can be easily noticed that addPerson() method has not been called. This leads to a conclusion that one test has been missed – to invoke all persons endpoint. Another finding is that ProductServlet hasn’t been tested with empty product id.

Conclusion

It is pretty easy to measure the code coverage. Whether to do it is another discussion held in What about code coverage post. If there is a time it might be beneficial. But do not make code coverage an important KPI as this could lead to aimless test with only one purpose – higher percentage. Code coverage should be done in order to optimize tests and search for gaps.

Related Posts

Read more...

JPS alternative for Dropwizard – Servlet with Apache Velocity template engine

Last Updated on by

Post summary: How to create a web application with Dropwizard with Servlet and Apache Velocity template engine since JSP is not supported.

JSP

JSP (Java Server Pages) is used to create web applications. It easy to separate presentation from business logic. JSP defines a page template with static content and tags inside which are evaluated in business logic and replaced in a template.

Dropwizard

Dropwizard is Java framework for building a RESTful web server in very short time. It has incorporated proven libraries like Jetty, Jersey, Jackson and many more to reliably do the job in shortest possible time. They have very good getting started tutorial how to make a project from scratch. Dropwizard doesn’t have support for JPS. This is because its purpose is to be REST server, not a web application server.

Dropwizard servlet support

JSP support is not in the scope of Dropwizard as it is designed for microservices not for Web application server see more in Any JSP support going on? thread. Dropwizard has servlet support though. Internally JSP is compiled to the servlet so it is alternative to use some template engine within a servlet.

Dropwizard views

Dropwizard provides so-called Views which actually uses FreeMarker or Mustache template engines. See more about views in Dropwizard Views page. This is Dropwizard’s build in JSP alternative. If you want to go that way then the rest of this post is not really helpful to you.

Apache Velocity

Apache Velocity is a template engine. HTML code is defined as a template with dynamic values substituted with special tags, similar to JSP.

Define Velocity template

The template contains HTML code and tags starting with $ sign, in the example below this is $productId. The template is put in project’s “resource” folder.

This is 'Product $productId name' details page.

Initialise Velocity engine

This is done in Servlet’s init() method. It is important to give as a property where Velocity should look for its resources. It is in the class loader.

private Template details;

public void init() throws ServletException {
	Properties props = new Properties();
	props.setProperty("resource.loader", "class");
	props.setProperty("class.resource.loader.class",
		"org.apache.velocity.runtime.resource.loader.ClasspathResourceLoader");
	VelocityEngine engine = new VelocityEngine(props);
	engine.init();
	details = engine.getTemplate("velocity.details.html");
}

Render template

In order to render the template $variable needs to be substituted with valued values in a VelocityContext map. Note that if given value is null then $variable is being outputted directly, so this case should be handled correctly.

public void doGet(HttpServletRequest request,
		HttpServletResponse response) throws ServletException, IOException {
	String productId = request.getParameter("id");
	if (StringUtils.isEmpty(productId)) {
		productId = "";
	}
	VelocityContext context = new VelocityContext();
	context.put("productId", productId);
	StringWriter writer = new StringWriter();
	details.merge(context, writer);
	String result = writer.toString();

	// Output
	response.setContentType("text/html");
	PrintWriter out = response.getWriter();
	out.println(result);
}

Full code

The full example can be found in GitHub sample-dropwizard-rest-stub repository ProductsServlet class.

Conclusion

This is a pretty easy way to create web application of Dropwizard with keeping the presentation code separate from business logic.

Related Posts

Read more...

Send SOAP request over HTTPS without valid certificates

Last Updated on by

Post summary: How to send SOAP request over HTTPS in Java without generating and installing certificates. NB: This MUST not be used for production code!

SOAP (Simple Object Access Protocol) is a protocol used in web services. It allows exchanging of XML data over HTTP or HTTPS.

Send SOAP over HTTP

Sending SOAP message over HTTP is Java is as simple as:

public SOAPMessage sendSoapRequest(String endpointUrl, SOAPMessage request) {
	try {
		// Send HTTP SOAP request and get response
		SOAPConnection soapConnection
				= SOAPConnectionFactory.newInstance().createConnection();
		SOAPMessage response = soapConnection.call(request, endpointUrl);
		// Close connection
		soapConnection.close();
		return response;
	} catch (SOAPException ex) {
		// Do Something
	}
	return null;
}

HTTPS

HTTPS is an HTTP over a security layer (SSL/TLS). This is the essence of secure internet communication. For valid HTTPS connection server needs a valid certificate signed by a certification authority. Establishing an HTTPS connection between client and server is by a procedure called SSL handshake in which client validates server certificate and both set session key which they use to encrypt messages. This level of security makes the code above to fail if executed against HTTPS host:

javax.net.ssl.SSLHandshakeException: java.security.cert.CertificateException: No subject alternative DNS name matching localhost found.

This error appears because the server is running on localhost and there is no valid certificate for localhost. The proper way for handling this is to generate a valid or test SSL certificate with IP or hostname of the machine running the server and install it on it.

Trust all hosts

Generating and installing SSL certificates for test servers is a good idea but is not worth the effort. So in order to overcome this, an HTTPS connection should be opened and it should be instructed to trust any hostname. First is to add dummy implementation of HostnameVerifier interface trusting all hosts:

/**
 * Dummy class implementing HostnameVerifier to trust all host names
 */
private static class TrustAllHosts implements HostnameVerifier {
	public boolean verify(String hostname, SSLSession session) {
		return true;
	}
}

Open HTTPS connection

Opening HTTPS connection is done with Java’s HttpsURLConnection. Instruction to trust all hosts is done with setHostnameVerifier(new TrustAllHosts()) method. The re-factored code is:

public SOAPMessage sendSoapRequest(String endpointUrl, SOAPMessage request) {
	try {
		final boolean isHttps = endpointUrl.toLowerCase().startsWith("https");
		HttpsURLConnection httpsConnection = null;
		// Open HTTPS connection
		if (isHttps) {
			// Open HTTPS connection
			URL url = new URL(endpointUrl);
			httpsConnection = (HttpsURLConnection) url.openConnection();
			// Trust all hosts
			httpsConnection.setHostnameVerifier(new TrustAllHosts());
			// Connect
			httpsConnection.connect();
		}
		// Send HTTP SOAP request and get response
		SOAPConnection soapConnection
				= SOAPConnectionFactory.newInstance().createConnection();
		SOAPMessage response = soapConnection.call(request, endpointUrl);
		// Close connection
		soapConnection.close();
		// Close HTTPS connection
		if (isHttps) {
			httpsConnection.disconnect();
		}
		return response;
	} catch (SOAPException | IOException ex) {
		// Do Something
	}
	return null;
}

Not valid certificate exception

Running code above throws an exception which generally means that server is either missing an SSL certificate or its SSL certificate is not valid, i.e. not signed by a certification authority. Error is:

javax.net.ssl.SSLHandshakeException: sun.security.validator.ValidatorException: PKIX path building failed: sun.security.provider.certpath.SunCertPathBuilderException: unable to find valid certification path to requested target

The proper way to handle this is to add server’s certificate to client’s JVM TrustStore certificates. But since test servers may change and server on which client is running may also change generating of certificates is an overhead. Since we are writing test code it is OK to lower the level of security of SSL.

Trust all certificates

Trusting all certificates is a very bad practice and MUST never be used in production code. This is undermining the whole concept and purpose of SSL certificates. For test code is not that bad to do this sin. A class implementing X509TrustManager interface is needed:

/**
 * Dummy class implementing X509TrustManager to trust all certificates
 */
private static class TrustAllCertificates implements X509TrustManager {
	public void checkClientTrusted(X509Certificate[] certs, String authType) {
	}

	public void checkServerTrusted(X509Certificate[] certs, String authType) {
	}

	public X509Certificate[] getAcceptedIssuers() {
		return null;
	}
}

Create SSL context trusting all certificates

Instructing HttpsURLConnection to trust all certificates is done with following code:

// Create SSL context and trust all certificates
SSLContext sslContext = SSLContext.getInstance("SSL");
TrustManager[] trustAll = new TrustManager[] {new TrustAllCertificates()};
sslContext.init(null, trustAll, new java.security.SecureRandom());
// Set trust all certificates context to HttpsURLConnection
HttpsURLConnection.setDefaultSSLSocketFactory(sslContext.getSocketFactory());

Send SOAP over HTTPS without having valid certificates

The final code is:

/**
 * Sends SOAP request and saves it in a queue.
 *
 * @param request SOAP Message request object
 * @return SOAP Message response object
 */
public SOAPMessage sendSoapRequest(String endpointUrl, SOAPMessage request) {
	try {
		final boolean isHttps = endpointUrl.toLowerCase().startsWith("https");
		HttpsURLConnection httpsConnection = null;
		// Open HTTPS connection
		if (isHttps) {
			// Create SSL context and trust all certificates
			SSLContext sslContext = SSLContext.getInstance("SSL");
			TrustManager[] trustAll
					= new TrustManager[] {new TrustAllCertificates()};
			sslContext.init(null, trustAll, new java.security.SecureRandom());
			// Set trust all certificates context to HttpsURLConnection
			HttpsURLConnection
					.setDefaultSSLSocketFactory(sslContext.getSocketFactory());
			// Open HTTPS connection
			URL url = new URL(endpointUrl);
			httpsConnection = (HttpsURLConnection) url.openConnection();
			// Trust all hosts
			httpsConnection.setHostnameVerifier(new TrustAllHosts());
			// Connect
			httpsConnection.connect();
		}
		// Send HTTP SOAP request and get response
		SOAPConnection soapConnection
				= SOAPConnectionFactory.newInstance().createConnection();
		SOAPMessage response = soapConnection.call(request, endpointUrl);
		// Close connection
		soapConnection.close();
		// Close HTTPS connection
		if (isHttps) {
			httpsConnection.disconnect();
		}
		return response;
	} catch (SOAPException | IOException
			| NoSuchAlgorithmException | KeyManagementException ex) {
		// Do Something
	}
	return null;
}

Conclusion

Although this code is very handy and eases a lot testing of SOAP over HTTPS it MUST never be used for production purpose!

Read more...

REST performance problems with Dropwizard and Jersey JAXB provider

Last Updated on by

Post summary: Dropwizard’s performance highly degrades when using REST with XML caused by Jersey’s Abstract JAXB provider. Solution is to inject your own JAXB provider.

Dropwizard is a Java-based framework for building a RESTful web server in very short time. I have created a short tutorial how to do so in Build a RESTful stub server with Dropwizard post.

Short overview

The current application is a Dropwizard based serving as a hub between several systems. Running on Java 7, it receives REST with XML and sends XML over REST to other services. JAXB is a framework for converting XML document to Java objects and vice versa. In order to do so, JAXB needs to instantiate a context for each and every Java object. Context creation is an expensive operation.

Problem

Jersey’s Abstract JAXB provider has weak references to JAXB contexts by using WeakHashMap. This causes context’s map to be garbage collected very often and new contexts to be added again to that map. Both garbage collection and context creation are expensive operations causing 100% CPU load and very poor performance.

Solution

The solution is to create your own JAXB context provider which keeps context forever. One approach is HashMap with context created on the fly on first access of specific Java object:

import javax.ws.rs.ext.ContextResolver;
import javax.xml.bind.JAXBContext;
import javax.xml.bind.JAXBException;
import java.util.HashMap;
import java.util.Map;

public class CustomJAXBContextProvider implements ContextResolver<JAXBContext> {
	private static final Map<Class, JAXBContext> JAXB_CONTEXT
			= new HashMap<Class, JAXBContext>();

	public JAXBContext getContext(Class<?> type) {
		try {
			JAXBContext context = JAXB_CONTEXT.get(type);
			if (context == null) {
				context = JAXBContext.newInstance(type);
				JAXB_CONTEXT.put(type, context);
			}
			return context;
		} catch (JAXBException e) {
			// Do something
			return null;
		}
	}
}

Another approach is one big context created for all the Java objects from specific packages separated with a colon:

import javax.ws.rs.ext.ContextResolver;
import javax.xml.bind.JAXBContext;
import javax.xml.bind.JAXBException;

public class CustomJAXBContextProvider implements ContextResolver<JAXBContext> {
	private static JAXBContext jaxbContext;

	public JAXBContext getContext(Class<?> type) {
		try {
			if (jaxbContext == null) {
				jaxbContext = JAXBContext
						.newInstance("com.acme.foo:com.acme.bar");
			}
			return jaxbContext;
		} catch (JAXBException e) {
			// Do something
			return null;
		}
	}
}

Both approaches have pros and cons. The first approach has fast startup time, but the first request will be slow. The second approach will have a fast first request, but slow server startup time. Once JAXB context is created in Dropwizard Application class a Jersey client should be created with this context and used for REST requests:

Client client = new JerseyClientBuilder(environment)
		.using(configuration.getJerseyClientConfiguration())
		.withProvider(CustomJAXBContextProvider.class).build(getName());

Conclusion

There is no practical need to garbage collect JAXB context so it should stay as long as application lives. This is why custom JAXB provider is a good solution even there are not actual performance issues.

Related Posts

Read more...

How to do proper performance testing

Last Updated on by

Post summary: Describe what actions are needed in order to make successful performance testing.

Functional testing that system works as per user requirements is a must for every application. But if the application is expected to handle a large number of users then doing a performance testing is also an important task. Performance testing has different aspects like load, stress, soak. More about them can be found in Performance, Load, Stress and Soak testing post. Those are all incorporated into term “performance testing” in the current article. Steps to achieve successful performance testing in short are:

  1. Set proper goals
  2. Choose tools
  3. Try the tools
  4. Implement scenarios
  5. Prepare environments
  6. Run and measure

Why?

Performance testing should not be something we do for fun or because other people do it. Performance testing should be business justified. It is up to the business to decide whether performance testing will have some ROI or not. In this article, I will give a recipe on how to do performance testing.

Setting the goal

This is one of the most important steps before starting any performance initiative. Just making a performance for the sake of making performance is worthless and a waste of effort. Before starting any activity it should be clear how many users are expected, what is the peak load, what users are doing on the site and many more. This information usually is obtained from business and product owners, but it could be obtained by certain statistical data. After having rough numbers then define what answers performance test should give. Questions could be:

  • Can the system handle 100 simultaneous users with response time less than 1 second and no error?
  • Can the system handle 50 requests/second with response time less than 1.5 seconds for 1 hour and no more than 98% errors?
  • Can system work 2 days with 50 simultaneous users with response time less than 2 seconds?
  • How the system behaves with 1000 users? With 5000 users?
  • When will the system crash?
  • What is the slowest module of the system?

Choosing the tools

Choosing the tool must be done after the estimated load has been defined. There are many commercial and non-commercial tools out there. Some can produce huge traffic and cost lots of money, some can produce mediocre traffic and are free. Important criteria for choosing a tool are how many virtual users it can support and can it fulfill performance goal. Another important thing is can QAs be able to work with it and create scenarios. In the current post, I will mention two open source tools JMeter and Gatling.

JMeter

It is a well known and proven tool. It is very easy to work with, no programming skills are needed. No need to spend many words on their benefits, they are many. Problems though are that it has certain limitations on the load it may produce from a single instance. Virtual users are represented as Java thread and JVM is not good at handling too many threads. A good thing is it provides a mechanism for adding more hosts that participate in the run and can produce huge load. Management of those machines is needed. Also, there are services in the cloud that offer running JMeter test plans and you can scale up there.

Gatling

Very powerful tool. Build on top of Akka it enables thousands of virtual users on a single machine. Akka has message-driven architecture and this overrides the JVM limitation of handling many threads. Virtual users are not threads but messages. The disadvantage is that tests are written in Scala, which makes scenarios creation and maintenance more complex.

Try the tools

Do not just rely on marketing data provided on the website of the given tool. An absolute must is to record user scenarios and play them with a significant number of users. Try to make it as realistic as possible. Even if this evaluation cost more time, just spend it, it will save a lot of time and money in the long run. This evaluation will give you confidence that the tool can do the job and can be used by QAs responsible for the performance testing project.

Implement the scenarios

Some of the work should have already been done during the evaluation demo. Scenarios now must be polished to make them match real user experience as much as possible. It is a good idea to be able to implement a mechanism for changing scenarios just by a configuration.

The essence of performance testing

In terms of Web or API (REST, SOAP) performance testing every tool, no matter how fancy it is, in the end, does one and the same, send HTTP requests to the server, collects and measures the response. This is it, not rocket science.

Include static resources or not?

This is an important question in the case of Web performance testing. There is no fixed recipe though. Successful web applications use a content delivery network (CDN) to serve static content such as images, CSS, JavaScripts, media. If CDN is a third party and they provide some service level agreements (SLAs) for response time then static data should be skipped in the performance test. If it is our CDN then it may be a good idea to make separate performance testing project just for CDN itself. This could double the effort but will make each project focused and coherent. If static data is hosted on the same server as dynamic content then it may be a good idea to include images also. It very much depends on the situation. Browsers do have a cache but it is controlled by correct HTTP response header values. In case of incorrect such or too dynamic static content, this can put a significant load on the server.

Virtual users vs. requests/second

Tools for performance testing use virtual users as the main metric. This is a representation of a real-life user. With sleep times between requests, they mimic real user behavior on the application and this gives very close to reality simulation. The metric though is more business orientated. A more technical metric is a requests per second. This is what most traffic monitoring tools report. But converting between those is a tricky task. It really depends on how the application is performing. Will try to illustrate it with some examples. Let us consider 100 users with a sleep time of 1 second between requests. This theoretically should give 100 requests per second load. But if the application is responding more slowly than 1 second then it will produce fewer req/s as each user has to wait for the response and then sent next request. Lest consider 10 users with no sleep time. If the application responds for 100 ms then each user will make 10 req/s this sums to a total of 100 req/s. If the application responds with 1 second then the load will drop to 10 req/s. If the application responds with 2 seconds then the load will drop to 5 req/s. In reality, it takes several attempts to match users count with expected request per second and all those depend on the application’s response time.

Environments

With the start of the project, tests can be run on test servers or local QA/Dev machines. Sometimes problems are caught even at this level. Especially when performance testing is a big event in the company I recommend first do it locally, this could save some embarrassment. Also, this helps polish even better the scenarios. Ones everything is working perfectly locally then we can start with actual performance testing. Environments to be used for performance testing should be production like. The closer they are, the better. Once everything is good at the production-like server the cherry on top will be if tests can be run on production in times of no usage. Beware when running the tests and you try to see at what amount of users system will fail, as your test/production machine could be VM and this may affect other important VMs.

Measure

Each performance testing tool gives some reporting about response times, the total number of requests, request per second, responses with errors. This is good, but do not trust these reports. Performance testing tools like any software have bugs. You should definitely have some server monitoring software or application performance measurement tool installed on the machine under test. Those tools will give you the most adequate information as long as memory usage statistics and even hints where problems may occur.

Conclusion

Performance testing is an important part of an application life-cycle. It should be done correctly to get good results. Once you have optimized the backend and end results are not satisfactory it is time to do some measurements in the frontend as well. I have given some tips in Performance testing in the browser post.

Related Posts

Read more...

Build a RESTful stub server with Dropwizard

Last Updated on by

Post summary: How to make a RESTful server that can be used for stub during testing.

It might happen that you are testing a REST client against a server that is not under your control. It might happen that server is not in your network, the server is not very stable, has sensitive data, changing, and unstable data, etc. In such cases, it might be hard to do proper automation testing. Solution to such situation is a server stub that responds to REST request in a predictable manner. This is tutorial how to do it.

Dropwizard

Dropwizard is Java framework for building a RESTful web server in very yshort time. It has incorporated proven libraries like Jetty, Jersey, Jackson and many more to reliably do the job in shortest possible time. They have very good getting started tutorial how to make a project from scratch. I’ve used it to create a project on my own. Steps are described below.

How to do it

  1. Create Maven project
  2. Add Dropwizard dependency
  3. Build with Maven
  4. Add configuration file
  5. Add configuration class
  6. Add data classes
  7. Add service classes
  8. Add health check
  9. Add Dropwizard application
  10. Build everything into a single JAR file
  11. Run it
  12. Test and enjoy

Create Maven project

Maven is central build repository for JARs. It makes it very easy to manage dependencies between libraries. Before getting started with Maven it should be installed. Once you do this path to Maven bin folder should be added to your Path environment variable (Windows). Once you do this open command prompt and type mvn –version to test if everything is configured correctly. If OK then make the project with the command below. Important in command is groupId this is Java package and artifactId this is project name:

mvn -B archetype:generate \
	-DarchetypeGroupId=org.apache.maven.archetypes \
	-DgroupId=com.automationrhapsody.reststub \
	-DartifactId=sample-dropwizard-rest-stub

The project can be created directly from IntelliJ, but I would recommend to create it with Maven to get acknowledged to it.

Build with Gradle

How to build the same project with Gradle instead of Maven can be found in Build a Dropwizard project with Gradle post.

Add Dropwizard dependency

Run your favorite IDE and import already created Maven project. In this tutorial, I’ll use IntelliJ. From project structure open pom.xml file. If the project was created with Maven there should be <dependencies> section with junit in it. You can remove junit and add the following XML instead.

<dependency>
	<groupId>io.dropwizard</groupId>
	<artifactId>dropwizard-core</artifactId>
	<version>0.8.0</version>
</dependency>

Build with Maven

Since you have created project with Maven you have it configured and know how to use it. Navigate to projects folder and run mvn package command. When run first time it takes a while since all dependencies are being loaded to the local Maven repository.

Once build is done go to IntelliJ and refresh Maven JARs. Right click on project -> Maven (in the bottom) -> Reimport.

Add configuration file

Configurations in Dropwizard are managed with YAML. In short key-value pairs are separated with a colon. Child elements are indented with two spaces from their parent. Repeating items are shown with a dash in front. The configuration file is with *.yml extension. Add config.yml file in the project. Below is sample use of configuration we are about to use in this tutorial. version is our custom property to illustrate working with configurations. server is standard Dropwizard property. With these configurations, we set the application to listen port to 9000 and administration port to 9001. With -type is shown repetitive sequence. In the current situation, it is HTTP, but there may be several protocols provided. port is its child key/value pair.

version: 0.0.1

# Change default server ports
server:
  applicationConnectors:
  - type: http
    port: 9000
  adminConnectors:
  - type: http
    port: 9001

Add configuration class

Once we have configuration file we need a class that will handle it. As I said version is our custom configuration property. In order to handle it, our class should extend Configuration. Define field with getter and setter. Annotate getter and setter with @JsonProperty and you are ready to go. If more properties are needed more fields with getters and setters should be defined in the class.

package com.automationrhapsody.reststub;

import com.fasterxml.jackson.annotation.JsonProperty;
import io.dropwizard.Configuration;
import org.hibernate.validator.constraints.NotEmpty;

public class RestStubConfig extends Configuration {
	@NotEmpty
	private String version;

	@JsonProperty
	public String getVersion() {
		return version;
	}

	@JsonProperty
	public void setVersion(String version) {
		this.version = version;
	}
}

Create data classes

The term in Dropwizard for those POJOs is Representation Class but in general they are objects to exchange data. In our example, we have Person class which has very basic attributes. It has only getters in order to be immutable. Getters are annotated with @JsonProperty  which allows Jackson to serialize and deserialize from JSON. Note that there is empty constructor which is needed for Jackson’s deserialization.

package com.automationrhapsody.reststub.data;

import com.fasterxml.jackson.annotation.JsonProperty;

public class Person {
	private int id;
	private String firstName;
	private String lastName;
	private String email;

	public Person() {
		// Needed by Jackson deserialization
	}

	public Person(int id, String firstName, String lastName, String email) {
		this.id = id;
		this.firstName = firstName;
		this.lastName = lastName;
		this.email = email;
	}

	@JsonProperty
	public int getId() {
		return id;
	}

	@JsonProperty
	public String getFirstName() {
		return firstName;
	}

	@JsonProperty
	public String getLastName() {
		return lastName;
	}

	@JsonProperty
	public String getEmail() {
		return email;
	}
}

If data to be exchanged gets too much data classes will become enormous. One solution to reduce their size is to use Lombok. See how it is done in Get rid of Getters and Setters post.

Create service

The term in Dropwizard is Resource Class but this actually is the RESTful service with its endpoints. @Path provides where the endpoint is. In the current example, I have /person for the whole class and different paths for different operations. The result is that paths are concatenated. @GET and @POST indicate the type of the request. @Timed is put for analytics purposes. @Produces and @Consumes provide the type of data that is being exchanged. @PathParam indicates that id is part of the URL.

package com.automationrhapsody.reststub.resources;

import com.automationrhapsody.reststub.data.Person;
import com.automationrhapsody.reststub.persistence.PersonDB;
import com.codahale.metrics.annotation.Timed;

import javax.ws.rs.*;
import javax.ws.rs.core.MediaType;
import java.util.List;

@Path("/person")
public class PersonService {

	public PersonService() {
	}

	@GET
	@Timed
	@Path("/get/{id}")
	@Produces(MediaType.APPLICATION_JSON)
	public Person getPerson(@PathParam("id") int id) {
		return PersonDB.getById(id);
	}

	@GET
	@Timed
	@Path("/remove")
	@Produces(MediaType.TEXT_PLAIN)
	public String removePerson() {
		PersonDB.remove();
		return "Last person remove. Total count: " + PersonDB.getCount();
	}

	@GET
	@Timed
	@Path("/all")
	@Produces(MediaType.APPLICATION_JSON)
	public List<Person> getPersons() {
		return PersonDB.getAll();
	}

	@POST
	@Timed
	@Path("/save")
	@Produces(MediaType.TEXT_PLAIN)
	@Consumes({MediaType.APPLICATION_JSON})
	public String addPerson(Person person) {
		return PersonDB.save(person);
	}
}

Service operations

Example above is about RESTful service dealing with person data. There are 4 operations exposed on following URLs:

  • /person/get/{id} – by provided person unique “id” it returns JSON with person data
  • /person/remove – removes one person on random basis
  • /person/all – returns JSON with all person data
  • /person/save – receives JSON with the person data and saves it to persons if “id” is unique, if not updating person by its id.

Business logic

It is little overrated to call it business logic but this is how we manage persons. If this was a production application you might have lots of business logic and some DB (SQL or no-SQL). Since this is just a test stub it is enough to have some data structure where to keep persons. In our case, HashMap is selected. There are static methods manipulating data.

package com.automationrhapsody.reststub.persistence;

import com.automationrhapsody.reststub.data.Person;

import java.util.ArrayList;
import java.util.HashMap;
import java.util.List;
import java.util.Map;

public class PersonDB {
	private static Map<Integer, Person> persons = new HashMap<Integer, Person>();

	static {
		persons.put(1, new Person(1, "FN1", "LN1", "email1@email.com"));
		persons.put(2, new Person(2, "FN2", "LN2", "email2@email.com"));
		persons.put(3, new Person(3, "FN3", "LN3", "email3@email.com"));
		persons.put(4, new Person(4, "FN4", "LN4", "email4@email.com"));
	}

	public static Person getById(int id) {
		return persons.get(id);
	}

	public static List<Person> getAll() {
		List<Person> result = new ArrayList<Person>();
		for (Integer key : persons.keySet()) {
			result.add(persons.get(key));
		}
		return result;
	}

	public static int getCount() {
		return persons.size();
	}

	public static void remove() {
		if (!persons.keySet().isEmpty()) {
			persons.remove(persons.keySet().toArray()[0]);
		}
	}

	public static String save(Person person) {
		String result = "";
		if (persons.get(person.getId()) != null) {
			result = "Updated Person with id=" + person.getId();
		} else {
			result = "Added Person with id=" + person.getId();
		}
		persons.put(person.getId(), person);
		return result;
	}
}

Create health check

The health check is a smoke test that can be called from admin panel to give you information about the status of the system. In production systems, you might do things like checking DB connection, checking file system or network, checking important functionality. In the example here just to illustrate the functionality my health check is the count of persons in memory. If it goes to 0 then something is wrong and the system is not healthy. Also to illustrate how properties are used version is passed from configuration file to health check via its constructor.

package com.automationrhapsody.reststub;

import com.automationrhapsody.reststub.persistence.PersonDB;
import com.codahale.metrics.health.HealthCheck;

public class RestStubCheck extends HealthCheck {
	private final String version;

	public RestStubCheck(String version) {
		this.version = version;
	}

	@Override
	protected Result check() throws Exception {
		if (PersonDB.getCount() == 0) {
			return Result.unhealthy("No persons in DB! Version: " +
					this.version);
		}
		return Result.healthy("OK with version: " + this.version +
				". Persons count: " + PersonDB.getCount());
	}
}

Create application

This is the final piece. Once we have all (data, service, health check) then the application is the binding piece that brings them together. This is execution entry point. In main method new application is created and its run() method is called. This is it. In order to actually work service and health check should be registered. This is done in the run method. You create an instance of both service and health check. Configuration is passed in health check’s constructor.

package com.automationrhapsody.reststub;

import com.automationrhapsody.reststub.resources.BookService;
import com.automationrhapsody.reststub.resources.PersonService;
import io.dropwizard.Application;
import io.dropwizard.setup.Environment;

public class RestStubApp extends Application<RestStubConfig> {

	public static void main(String[] args) throws Exception {
		new RestStubApp().run(args);
	}

	@Override
	public void run(RestStubConfig config, Environment env) {
		final PersonService personService = new PersonService();
		env.jersey().register(personService);

		env.healthChecks().register("template", 
			new RestStubCheck(config.getVersion()));
	}
}

Build a single JAR

This was it now all have to be packed into a JAR. The strategy is to build everything into one JAR and just run it. It could not be more simple. Open pom.xml file. Add <build><plugins> … </plugins></build> in the end. Add XML below into this snippet. Only <mainClass> is customizable and should be changed according to your project structure.

<plugin>
	<groupId>org.apache.maven.plugins</groupId>
	<artifactId>maven-shade-plugin</artifactId>
	<version>1.6</version>
	<configuration>
		<createDependencyReducedPom>true</createDependencyReducedPom>
		<filters>
			<filter>
				<artifact>*:*</artifact>
				<excludes>
					<exclude>META-INF/*.SF</exclude>
					<exclude>META-INF/*.DSA</exclude>
					<exclude>META-INF/*.RSA</exclude>
				</excludes>
			</filter>
		</filters>
	</configuration>
	<executions>
		<execution>
			<phase>package</phase>
			<goals>
				<goal>shade</goal>
			</goals>
			<configuration>
				<transformers>
					<transformer implementation="org.apache.maven.plugins.shade.resource.ServicesResourceTransformer"/>
					<transformer implementation="org.apache.maven.plugins.shade.resource.ManifestResourceTransformer">
						<mainClass>com.automationrhapsody.reststub.RestStubApp</mainClass>
					</transformer>
				</transformers>
			</configuration>
		</execution>
	</executions>
</plugin>

Build and run

Once this is done use mvn package to make the JAR. Navigate to target folder in your project and run the JAR. Two arguments are needed in order to run the JAR. First is server which instructs Dropwizard to run as a server. Second is the path to *.yml configuration file.

java -jar sample-dropwizard-rest-stub-1.0-SNAPSHOT.jar server ../config.yml

If everything is fine you should see something like the code below which will mean the server is ready.

GET     /person/all (...)
GET     /person/get/{id} (...)
GET     /person/remove (...)
POST    /person/save (...)

Test and enjoy

Once all this hard work has been done it is time to enjoy our RESTful server. List of all persons can be found at this URL: http://localhost:9000/person/all. You can get a person by id: http://localhost:9000/person/get/1.

Health checks are found in admin panel: http://localhost:9001. Try removing all persons by invoking several times this URL: http://localhost:9000/person/remove

And the hardest part is to save a person. I’m using Postman plugin but you can use any REST client you want. You have to put POST data against http://localhost:9000/person/save URL.

{
	"id": 10,
	"firstName": "FN10",
	"lastName": "LN10",
	"email": "email10@email.com"
}

And most important DO not forget to put Content-Type: application/json in the request header. If you do not put you will get Error 415 Unsupported Media Type error.
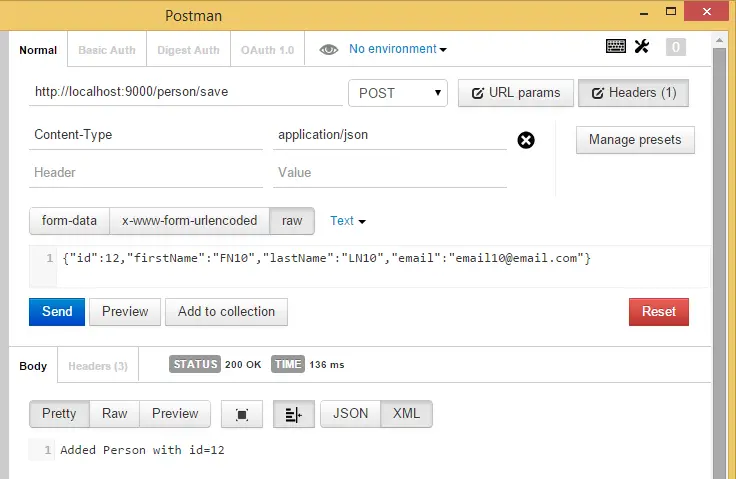
PostmanRequest

The sample application can be found in GitHub sample-dropwizard-rest-stub repository. Postman requests can be downloaded from Dropwizard Postman requests link and directly imported into Postman.

Another way to test the stub is by building a client as described in Create simple REST API client using Jersey post.

Run with Docker

In Run Dropwizard application in Docker with templated configuration using environment variables post, I have described how to make Dropwizard application configuration be changed with environment variables which makes it very easy to build and run inside Docker container.

Conclusion

It could not be easier. If you really need to stub a RESTful server this is the proper way to do it.

Related Posts
Read more...

Get rid of Getters and Setters

Last Updated on by

Post summary: Use Project Lombok to reduce the amount of code you have to write by automating Getters and Setters generation

UPDATE: After having some real usage of project Lombok I would recommend not to use it. There are situations where debugging is not possible, also code navigation through IDE is hard.

C# has Properties, special methods which look like public data members but behind the scenes are special methods. This allows data to be accessed easily and less code to be written.

Inconvenience

Properties behavior in Java is implemented with so-called Getters and Setters which generally are normal methods with a special name. Encapsulation is important OOP principle that requires data fields to be hidden from outside world. Even in test code, it is not good to break this principle. So we need to write lots of Getters and Setters to expose data fields. Even that all IDEs provide a way to generate them automatically worst thing is that class is polluted with lots of methods that are actually insignificant.

Get rid of Getters and Setters

Project Lombok is a solution for having less code in your classes. You do not need to worry about writing Getters and Setters anymore. They are automatically added at compile time. What you need to do is just annotate your class or fields. One option is to directly put a @Data annotation on class level. Another option is to put restrictions on each field if you are too picky.

Code

In some cases, there is some processing of values Getter or Setter. This is not a problem you can implement only this method. If Lombok sees there is Getter or Setter it is ignoring it at compile time. In the example, below correct getIsbn() is being used.

import lombok.Data;

@Data
public class Book {
	private String isbn;
	private String name;
	private String author;

	public Book(String isbn, String name, String author) {
		this.isbn = isbn;
		this.name = name;
		this.author = author;
	}

	public String getIsbn() {
		return "ISBN: " + isbn;
	}
}

Conclusion

Although getters and setters are generated only once the code is more readable without them.

Read more...

FIX messages simulator

Last Updated on by

Post summary: General thoughts how to test FIX messages with a FIX simulator.

FIX stands for Financial Information eXchange and is most probably the most used protocol for exchanging electronic messages in the financial world.

FIX sessions

In order to exchange data systems in financial world use FIX messages. The first important step before exchanging messages is to establish a connection between each other. There are two roles for counterparties

  • Acceptor – acts as a server. Stays and listens for clients that will connect
  • Initiator – acts as a client. It is the active participant in the connection

Once roles are defined fix session should be established between both. They can maintain as many different sessions as they need. A session is uniquely identified by FIX protocol version and IDs of both counterparties.

A session is started by initiator by sending Logon request and receiving Logon Acknowledgement. A session is kept alive by both sides. They send Heartbeat messages to each other. A session is ended by Logout message send from one of the counterparties. The other acknowledges the Logout.

FIX messages

Once all the ceremony of setting a session is done and the session is alive both counterparties can start exchanging FIX messages with data. FIX message in short is a string containing key-value pairs in format <TagNumber>=<Value> separated by SOH (\u0001) character. Each tag has a name and in some cases vast specification what values accept, what each value means, etc. FIXimate is a pretty good online tool which gives information about tags. Each tag is represented by its integer number in the message. Tags are separated in three parts of the message:

  • Header – contains information needed for session identification
  • Body – contains business data
  • Trailer – checksum for message validation

An example where SOH is replaced with |

8=FIX.4.2|9=76|35=A|49=Initiator|56=Acceptor|34=1|52=20150321-15:39:28.762|98=0|108=30|141=Y|10=187|

Testing of FIX message scenarios

Depending on business logic behind actual testing of FIX messages could be a pretty complicated task. Each message alone could have tens of tags with data. Each tag is meaningful and the system can react in a different manner based on its value. Each message could depend on the previous message. The combination and complex business logic could be made through a very difficult testing task.

How to do it

There are numerous FIX simulators available out there. They will work for most of the cases but since FIX communication can be really boutique in some cases external tool is not a good idea. The internal tool is what I suggest and propose a solution in the current post.

Visualise the message

This is maybe the hardest part of everything. How to show messages so they can be easy to comprehend and edit. Obviously editing long string with user-unfriendly data is not the best solution. I admit not the perfect solution but couldn’t think of better than good old-fashioned Excel. In short, each column is a specific tag. Each row is a single fix message and you fill the tag value for this particular fix message. There could be separation rows to make different tests scenarios.

Convert the messages

Once Excel test cases are ready they are exported with a macro to special XML format. XML is then read from FIX simulator and converted to real fix messages.

Send the messages

FIX messages are then sent on the wire. In order to send them, you need fix engine. Very popular is QuickFIX engine. It has Java and .NET version. There are example applications which help for better understanding how to use the engine.

Conclusion

Testing FIX messages based on business rules is definitely a very important task. It also is not the simplest task you might think of as a QA. Still, it is achievable. I would say creating custom solution will initially take some time but in the long run, it will pay off as you will have total control over features you have and need.

Read more...

What about code coverage

Last Updated on by

Post summary: Code coverage is a measurement of what percentage of program source code is being executed by your tests. Code coverage is a nice to have, but in no case make code coverage ultimate goal!

Code coverage is a useful metric to check what part of the code your tests are exercising. Is really depends on the tools to be used for gathering code coverage metrics but in general, they work in similar fashion.

How it works

One approach is to instrument application under test. Instrumentation is to modify original executables by adding metadata so code coverage tool is able to understand which line of code is being executed. Another option is to run the application through code coverage tool. In both ways, once the application is running tests are being executed.

What tests to run

Tests that can be run to measure code coverage can be unit tests, functional automation tests or even manual tests. It doesn’t matter the important part is to see how our tests are impacting application under test.

Results

Once tests are finished code coverage metrics are obtained from code coverage tool. To have detailed information most of the tools take the original source code and generate a visual report with color information which line is executed and which not. There are different levels of coverage, method, line, code block, etc. I personally prefer lines and when speaking further I’ll mean lines of code executed.

Benefits

Code coverage information is equally useful for QA and developers. QA analyze code that has not being executed during tests to identify what tests conditions they are missing and improve their tests. Developers analyze the results to identify and remove dead or unused code.

When to do it

Code coverage of unit tests is good to be done on each build. Those can be scheduled in continuous integration jobs and can be run unattended. Code coverage on automated or manual tests is more like a nice to have activity. We can live with or without it. It is useful for big matured products where there are automation test suites. You can also do them against your tests code in order to optimize it. Removing dead code optimizes the product and makes its maintenance easier. I would say doing it too often should be avoided. Everything depends on context but for me best is once or twice a year.

What does code coverage percentage mean

In one word – nothing. You may have 30% of code coverage but to cover most important user functionality and bug rate to be relatively low and you may have 90% with dummy tests made especially to exercise some code without the idea of actually testing it. I was lucky to work on a project where developers keep the code tidy and clean and my tests easily accomplished 81% just by verifying all user requirements. I may say 80-85% is the maximum you may get.

Pitfalls

I would not recommend putting code coverage as an important measurement or key performance indicator (KPI) in your testing strategy. Doing so and making people try to increase the code coverage will in most cases result in dummy tests made especially this percentage to go up. Code coverage is in most cases insignificant aspect of your testing strategy.

How to do it

Practical tutorials on how to do code coverage with Java, C#, and JavaScript can be found on my blog:

Conclusion

Code coverage is an interesting aspect of testing. It might enhance your tests if done wisely or it can ruin them. Remember tests scenarios should be extracted from user requirements and features. Code coverage data should be used to see if you have some blind spots reading the requirements. It can help developers remove dead or unused code.

Related Posts

Read more...

Advanced WPF automation – memory usage

Last Updated on by

Post summary: Highlight eventual memory issue when using Telerik Testing Framework and TestStack White for desktop automation.

Memory is an important aspect. When you have several test cases it is not a problem. But on large projects with many tests memory turn out to be a serious issue.

Reference

This post is part of Advanced WPF desktop automation with Telerik Testing Framework and TestStack White series. The sample application can be found on GitHub.

Problem

Like every demo on certain technology automating WPF applications looks cool. And also like every technology problems occur when you start to use it on a large scale. Problem with WFP automation with Telerik Testing Framework and TestStack White is the memory. When your tests’ number grows frameworks start to use too much memory. By too much, I mean over 1GB which might not seem a lot but for a single process actually is. Increasing RAM of test machine is an only temporary solution and is not one that can be scaled.

Why so much memory

I have a project with 580 tests and 7300 verification points spread in 50 test classes. I’ve spent lots of hours debugging and profiling with several .NET profiling tools. In the end, all profilers show that a large amount of memory used is in unmanaged objects. So generally there is nothing you can do. It seems like some of the frameworks or both have memory issues and do not free all memory they use.

Solution

The solution is pretty simple to suggest but harder to implement – run each test class in the separate process. I’m using a much more enhanced version of NTestsRunner. It is running each test class in separate windows process. Once the test is finished results are serialized in results directory, the process is exited and all memory and object used for this test are released.

Conclusion

The memory could be a crucial factor in an automation project. Be prepared to have a solution for it. At this point, I’m not planning to put running tests in a separate process in NTestsRunner. If there is demand it is a pretty easy task to do it.

Related Posts

Read more...

Complete guide to email verifications with Automation SMTP Server

Last Updated on by

Post summary: How to do complete email verification with your own Automation SMTP server.

SMTP is protocol initially defined in 1982 and is still used nowadays. In order to automate application which sends out emails, you need SMTP server which reads messages and saves them to disk for further processing. Note that this is only in the case when your application sends emails.

Windows SMTP server

One option is to use SMTP server provided by Windows. Problems here are two. First is that from Vista SMTP server is no more supported. There is SMTP server in Windows Server distributions but the license for them is more expensive. The second problem comes from the configuration of the server. You might have several machines and configurations should be maintained on all of them. It is a feasible option to use Windows SMTP server but the current post is not dedicated to it.

Automation SMTP Server

What I offer in this post is your own Automation SMTP Server. It is located in following GitHub project. The solution is actually a mixture of two open source projects. For the server, I use Antix SMTP Server For Developers, which is really good SMTP server. It is windows application and is more suitable for manual SMTP testing rather than automation. I’ve extracted the SMTP core with some modifications as a console application which saves emails as EML file on disk. For the reading of emails, I use the source code of Easily Retrieve Email Information from .EML Files article with several modifications. What you need to do in order to make successful email verification is download executable from GitHub and follow instructions below. More info for it can be found on its homepage Automation SMTP Server.

Automation SMTP Server usage

In GitHub AutomationSMTPServer repository there is an example that shows how to use Automation SMTP Server. The server should be added as a reference to your automation project. Since it is a reference it gets copied into compiled executables folder.

Delete recent emails

Before doing anything in your tests it is good to delete old emails. Automation SMTP Server is saving mail into a folder named “temp”. This is how it works and cannot be changed.

private string currentDir =
	Directory.GetCurrentDirectory() + Path.DirectorySeparatorChar;
private string mailsDir = currentDir + "temp";

if (Directory.Exists(mailsDir))
{
	Directory.Delete(mailsDir, true);
}

Start Automation SMTP Server

The server is a console application. It receives emails and saves them to disk. If counterparty sends a QUIT message to disconnect server gets restarted to wait for next connection. The server should be started as a process. Port should be provided as arguments. If not provided it can be configured in SMTP Server config file. If not configured there it gives a message and takes 25 for default port.

Process smtpServer = new Process();
smtpServer.StartInfo.FileName = currentDir + "AutomationSMTPServer.exe";
smtpServer.StartInfo.Arguments = "25";
smtpServer.Start();

Send emails

This is the point where your application under test is sending emails which you will later verify.

Read emails

Once emails have been sent out from the application under test you are ready to read and process them.

string[] files = Directory.GetFiles(mailsDir);
List<EMLFile> mails = new List<EMLFile>();

foreach (string file in files)
{
	EMLFile mail = new EMLFile(file);
	mails.Add(mail);
	File.Delete(file);
}

Verify emails

Here you can use EMLFile class which is parsing the EML file and is representing is an object so you can do operations on it. Once you have the mail as an object you can access all its attributes and verify some of them. It all depends on your testing strategy. Another option is to define on expected EML file, read it and compare both actual and expected. EMLFile class has predefined Equals method which is comparing all the attributes of the emails.

bool compare1 = mails[0].Equals(mails[1]);
bool compare2 = mails[0].Equals(mails[2]);
bool compare3 = mails[1].Equals(mails[2]);

Stop Automation SMTP Server

This part is important. If not stopped server will continue to work and will block the port. Its architecture is defined in such manner that only way to stop it is it to terminate console application. In a case where you have started it from C# code as process way to stop it is to kill the process.

smtpServer.Kill();

Conclusion

Proper email verification can be a challenge. In case your application under tests send emails I would say it is crucial to have correct email testing as mail is what customers receive. And in the end, it is all about customers! So give it a try and enjoy this easy way of email verification.

Read more...

Extract and verify text from PDF with C#

Last Updated on by

Post summary: How to extract text from PDF in C#.

PDF verification is pretty rare case in automation testing. Still it could happen.

iTextSharp

iTextSharp is a library that allows you to manipulate PDF files. We need very small of this library. It has build in reader that iterates through pages and returns only text.

using iTextSharp.text.pdf;
using iTextSharp.text.pdf.parser;
using System.Text;

namespace PDFExtractor
{
	public class PDFExtractor
	{
		public static string ExtractTextFromPDF(string pdfFileName)
		{
			StringBuilder result = new StringBuilder();
			// Create a reader for the given PDF file
			using (PdfReader reader = new PdfReader(pdfFileName))
			{
				// Read pages
				for (int page = 1; page <= reader.NumberOfPages; page++)
				{
					SimpleTextExtractionStrategy strategy =
						new SimpleTextExtractionStrategy();
					string pageText =
						PdfTextExtractor.GetTextFromPage(reader, page, strategy);
					result.Append(pageText);
				}
			}
			return result.ToString();
		}
	}
}

Verification

Once extracted text can be verified against expected as described in Text verification post.

Related Posts

Read more...

Text verification

Last Updated on by

Post summary: Verify actual text with expected one by ignoring what is not relevant during compare.

In automation testing, there is no definitive way what text verification is best to be done. One strategy is to check that an expected word or a phrase exists in actual text shown in the application under test. Another strategy is to prepare a large amount of text to verify. Later strategy is expensive in case of effort for preparation and maintenance. The first strategy might not be sufficient to do correct verifications.

In between

What I suggest here is something in between. Not too much but not too less. Problem with a paragraph of text to be verified is it might contain data we do not have control over, e.g. date, time, unique values, etc.

Example

Imagine an e-commerce website. When you place the order there is order confirmation page. You want to verify not only that you are on this page but also that text is correct as per specification. Most likely text will contain data you do not have control over – order number and date. Breaking verification is small chunks is an option. Another option is to manipulate the actual text. The third option is to define the text as expected with special strings that will get ignored during compare.

Actual vs Expected

Actual text could be: “Order 123456 has been successfully placed on 01.01.1970! Thank you for your order. ”
The expected text could be: “Order ~SKIP~ has been successfully placed on ~SKIP~! Thank you for your order. ”
And then you can compare both where ~SKIP~ will be ignored during compare.

Compare code

Code to do the compare shown above is incorporated in NTestsRunner also:

public const string IgnoreDuringCompare = "~SKIP~";

public static bool EqualsWithIgnore(this string value1, string value2)
{
	string regexPattern = "(.*?)";
	// If value is null set it to empty
	value1 = value1 ?? string.Empty;
	value2 = value2 ?? string.Empty;
	string input = string.Empty;
	string pattern = string.Empty;
	// Unify new lines symbols
	value1 = value1.Replace("\r\n", "\n");
	value2 = value2.Replace("\r\n", "\n");
	// If no one conains ignore string then compare directly
	if (!value1.Contains(IgnoreDuringCompare) &&
		!value2.Contains(IgnoreDuringCompare))
	{
		return value1.Equals(value2);
	}
	else if (value1.Contains(IgnoreDuringCompare))
	{
		pattern = Regex.Escape(value1).Replace(IgnoreDuringCompare, regexPattern);
		input = value2;
	}
	else if (value2.Contains(IgnoreDuringCompare))
	{
		pattern = Regex.Escape(value2).Replace(IgnoreDuringCompare, regexPattern);
		input = value1;
	}

	Match match = Regex.Match(input, pattern);
	return match.Success;
}

Use in tests

In your tests you will do something like:

string actual = OrderConfirmationPage.GetConfirmationText();
string expected = "Order " + ExtensionMethods.IgnoreDuringCompare +
	" has been successfully placed on " + ExtensionMethods.IgnoreDuringCompare +
	"! Thank you for your order. ";
Assert.IsTrue(actual.EqualsWithIgnore(expected));

Conclusion

It might take little bit more effort to prepare expected strings but verification will be more accurate and correct rather than just to expect a word or a phrase.

Related Posts

Read more...

Advanced WPF automation – read dependency property

Last Updated on by

Post summary: What is dependency property in .NET and how to read it from Telerik Testing Framework.

In this post, I’ll show an advanced way of getting more details from an object and sophisticate your automation.

Reference

This post is part of Advanced WPF desktop automation with Telerik Testing Framework and TestStack White series. The sample application can be found in GitHub SampleAppPlus repository.

Dependency property

Dependency properties are an easy way to extend available in .NET framework functionality. In SampleAppPlus there is CustomControl defined. Purpose of this control is to store text and visualize this text as image. The text is stored in dependency property.

public partial class CustomControl : UserControl
{
	public static readonly DependencyProperty MessageProperty =
			DependencyProperty.Register("Message",
									typeof(string), typeof(CustomControl),
									new PropertyMetadata(OnChange));

	...

	public string Message
	{
		get { return (string)GetValue(MessageProperty); }
		set { SetValue(MessageProperty, value); }
	}

	...

}

Read dependency property

In order to be able to properly automate something, you have to know the internal structure of the application. Generally, you will try to locate and read the element and it will not work in the ways you are used working with elements. At this point, you have to inspect the source code of application under test and see how it is done internally. Most important if dependency property is used you should know its name. Once you know the name reading is easy.

public class MainWindow : XamlElementContainer
{
	...

	private UserControl CustomControl_Image
	{
		get
		{
			return Get<UserControl>(mainPath + "CustomControl[0]");
		}
	}

	public Verification VerifyCustomImageText(string expected)
	{
		string actual =
			CustomControl_Image.GetAttachedProperty<string>("", "Message");
		return BaseTest.VerifyText(expected, actual);
	}
}

GetAttachedProperty

GetAttachedProperty is a powerful method. Along with reading dependency properties, you can read much more. In some cases, WPF elements are nested in each other or in tooltip windows. In other cases, some object is bound to WPF element. In such situations you can try to access the elements and method will return you FrameworkElement object. From this object, you can again get GetAttachedProperty to access some class specific property. In all cases, you will need access to the application under test code to see how it is working internally.

FrameworkElement tooltip = wpfElement.
	GetAttachedProperty<FrameworkElement>("", "ToolTip");
string value = tooltip.GetAttachedProperty<string>("", "SomeSpecificProperty");

Conclusion

GetAttachedProperty is a powerful method. Once you get stuck with normal processing of elements you can always try it. I would say definitely give it a try.

Related Posts

Read more...

Advanced WPF automation – working with WinForms grid

Last Updated on by

Post summary: Example how to work with WinForms grid with TestStack White.

TestStack White is a really powerful framework. It works on top of Windows UI Automation framework hiding its complexity. If White is not able to locate element you have access to underlying UI Automation and you can do almost anything you need.

Reference

This post is part of Advanced WPF desktop automation with Telerik Testing Framework and TestStack White series. The sample application can be found on GitHub.

MainGrid

For single responsibility separation grid logic is in separate class MainGrid.cs. The constructor takes White.Core.UIItems.WindowItems.Window object. Inside the window, we search for an element with control type ControlType.Table. It is the only one of its kind. If there are more we should narrow down the SearchCriteria.

public class MainGrid
{
	private Table table;
	public MainGrid(Window window)
	{
		SearchCriteria search = SearchCriteria.ByControlType(ControlType.Table);
		table = window.Get<Table>(search);
	}

	public string GetCellText(int index)
	{
		TableCell cell = GetCell(index);
		string value = cell.Value as string;
		return value;
	}

	public void ClickAtRow(int row)
	{
		TableCell cell = GetCell(row);
		Point topLeft = cell.Bounds.TopLeft;
		topLeft.X += 5;
		topLeft.Y += 5;
		Mouse.instance.Click(topLeft);
	}

	private TableCell GetCell(int index)
	{
		TableRows rows = table.Rows;
		TableCells cells = rows[index - 1].Cells;
		return cells[0];
	}
}

Access the grid

MainGrid is property inside MainWindow page object. On access to the property new object is instantiated. This might lead to performance issues if grid search and instantiation is slow. So, in this case, you can use Singleton design pattern. Singleton might lead to issues with old object state which will be hard to debug. It depends what your priorities are.

public class MainWindow : XamlElementContainer
{
	public static string WINDOW_NAME = "MainWindow";
	private Application app;
	private string mainPath =
		"XamlPath=/Border[0]/AdornerDecorator[0]/ContentPresenter[0]/Grid[0]/";
	public MainWindow(VisualFind find, Application application)
		: base(find)
	{
		app = application;
	}

	private MainGrid MainGrid
	{
		get
		{
			return new MainGrid(app.GetWindowByName(WINDOW_NAME));
		}
	}

	public void ClickTableAtRow(int row)
	{
		MainGrid.ClickAtRow(row);
	}

	public Verification VerifyTableCell(int index, string text)
	{
		return BaseTest.VerifyText(text, MainGrid.GetCellText(index));
	}
}

Conclusion

TestStack White is a powerful framework. It will be perfect if you can do the job without it. If you cannot you are lucky it exists.

Related Posts

Read more...

Advanced WPF automation – page objects inheritance

Last Updated on by

Post summary: re-use of page objects code through inheritance.

Inheritance is one of the pillars of object-oriented programming. It is a way to re-use functionality of already existing objects.

Reference

I’ve started a series with details of Advanced WPF desktop automation with Telerik Testing Framework and TestStack White. The sample application can be found in GitHub SampleAppPlus repository.

Abstract class

An abstract class is one that cannot be instantiated. An abstract class may or may not have abstract methods. If one method is marked as abstract then its containing class should also be marked as abstract. We have two similar windows with text box, save and cancel button that is shown on both of them. AddEditText class following Page Objects pattern. It is marked as abstract thought. It has an implementation of all three elements except TextBox_Text.

public abstract class AddEditText : XamlElementContainer
{
	protected string mainPath =
		"XamlPath=/Border[0]/AdornerDecorator[0]/ContentPresenter[0]/Grid[0]/";
	public AddEditText(VisualFind find) : base(find) { }

	protected abstract TextBox TextBox_Text { get; }
	private Button Button_Save
	{
		get
		{
			return Get<Button>(mainPath + "Button[0]");
		}
	}
	private Button Button_Cancel
	{
		get
		{
			return Get<Button>(mainPath + "Button[1]");
		}
	}

	public void EnterText(string text)
	{
		TextBox_Text.Clear();
		TextBox_Text.User.TypeText(text, 50);
	}

	public void ClickSaveButton()
	{
		Button_Save.User.Click();
		Thread.Sleep(500);
	}

	public void ClickCancelButton()
	{
		Button_Cancel.User.Click();
	}
}

Add Text page object

The only thing we have to do in Add Text window is to implement TextBox_Text property. All other functionality has already been implemented in AddEditText class.

public class AddText : AddEditText
{
	public static string WINDOW_NAME = "Add Text";
	public AddText(VisualFind find) : base(find) { }

	protected override TextBox TextBox_Text
	{
		get
		{
			return Get<TextBox>(mainPath + "TextBox[0]");
		}
	}
}

Edit Text page object

In Edit Text page object we have to implement “TextBox_Text” property. Also on this window, there is one more element which needs to be defined.

public class EditText : AddEditText
{
	public static string WINDOW_NAME = "Edit Text";
	public EditText(VisualFind find) : base(find) { }

	private TextBlock TextBlock_CurrentText
	{
		get
		{
			return Get<TextBlock>(mainPath + "TextBlock[0]");
		}
	}

	protected override TextBox TextBox_Text
	{
		get
		{
			return Get<TextBox>(mainPath + "TextBox[1]");
		}
	}

	public Verification VerifyCurrentText(string text)
	{
		return BaseTest.VerifyText(text, TextBlock_CurrentText.Text);
	}
}

Conclusion

Inheritance is a powerful tool. We as automation engineers should use it whenever possible.

Related Posts

Read more...

Advanced WPF desktop automation

Last Updated on by

Post summary: In this series of posts I’ll expand the examples and ideas started in Automation of WPF applications series.

Telerik Testing Framework and TestStack White are powerful tools for desktop automation. You can automate almost everything with a combination of those frameworks. This series of posts will give more details how to automate more complex applications.

Reference

Code samples are located in GitHub SampleAppPlus repository. Telerik Testing Framework requires installation as it copies lots of assemblies in GAC.

SampleAppPlusThere is SampleAppPlus which is actually a dummy application with only one purpose to be used to demonstrate automation principles. With this application, you can upload an image file. Once uploaded image is visualized. The image path is listed in a table. The image path is also visualized as an image in a custom control in the bottom of the main window. The user is able to add more text which is added to the table as long as editing already existing text. Add and edit are reflected on custom image element.

Topics

  • Page objects inheritance of similar windows
  • Working with WinForms grid
  • Windows themes and XamlPath
  • Read dependency property
  • NTestsRunner in action
  • Extension methods
  • Memory usage

Page objects inheritance

It is common to have similar windows in an application. Each window is modeled as page object in automation code. If windows are also similar in terms of internal structure it is efficient to re-use similar part and avoid duplications. Re-use is achieved with inheritance. Given SampleAppPlus application has very similar windows for adding and editing text. Code examples show how to optimize your effort and re-use what is possible to be re-used. More details can be found in Advanced WPF automation – page objects inheritance post.

Working with WinForms grid

As mentioned before Telerik Testing Framework is not very good with WinForms elements. This is the main reason to use TestStack White. It is not very likely to have WinForms elements in WPF application but in order to complete the big picture I’ve added such grid in a SampleAppPlus application. Code examples show how to manage WinForms grid. More details can be found in Advanced WPF automation – working with WinForms grid post.

Windows themes and XamlPath

In given examples elements are located with exact XamlPath find expression. This approach has a serious problem related to Windows themes. For complex user interfaces, XamlPath could be different on a different theme. Windows Classic theme sometimes produces different XamlPath in comparison with standard Windows themes. Yes, it is no more available from Windows 8 but Server editions are working only with Windows Classic theme. So one and the same tests could have differences. I couldn’t find a way to automatically detect which is current theme. The solution is to have different XamlPath for both standard and classic themes. Once you have it you can switch them manually with some configuration or you can try to automate the switch by locating element for which you know is different and save variable based on its location result.

Read dependency property

A dependency property is a way in C# to extend the standard provided functionality. It can happen in a real application that developers use such functionality. Given SampleAppPlus application has a special element with dependency property. Code examples show how to extract property value and use it in your tests. More details can be found in Advanced WPF automation – read dependency property post.

NTestsRunner in action

I’ve introduced NTestsRunner which is a custom way for running functional automated tests. Code samples show how to use it and create good tests that are run only with this tool.

Extension methods

Extension methods are one extremely good feature of .NET framework. I personally like them very much. I assume everyone writing code in C# is aware of them. Still, in code examples show how they can be used.

Memory usage

Memory is not a problem on small projects. But when the number of tests continue to grow it actually becomes a problem. More details can be found in Advanced WPF automation – memory usage post.

Related Posts

Read more...